How to Build a Pro-Grade Workbench with a Built-In Router Table
Discover the ultimate guide to engineering a monolithic workbench with a seamlessly integrated router table. Master joinery, leveling, and dust collection.
Mar 22, 2026 - Written by: Linda Wise
I’ve personally found that the biggest momentum killer in any woodshop is the dreaded “tool shuffle.” You know the dance. You’re jointing an edge at your main bench, but to profile it, you have to drag out a flimsy, standalone router table, set it up on uneven floorboards, and pray it doesn’t vibrate across the room while you’re pushing a heavy slab of oak through the bit.
Years ago, I decided to stop compromising. I engineered a monolithic, pro-grade workbench with a seamlessly integrated router station. The transformation in my workflow was immediate and profound. By combining the massive kinetic absorption of a heavy woodworking bench with the precision of a dedicated router lift, you eliminate chatter entirely. You gain a massive outfeed support system for your routing operations. Most importantly, you reclaim precious shop floor real estate.
This isn’t a weekend slap-together project using two-by-fours and drywall screws. We are going to engineer a heavy-duty, heirloom-quality fixture that will outlast you. Grab your notebook. We’re getting into the weeds of mortise and tenon joinery, coplanar surface leveling, and custom dust collection.
Quick Comparison: Top Picks for Your Router Integration
Before we start cutting lumber, you need to select the hardware that will live inside your bench. Your cutout dimensions rely entirely on the plate and lift you choose. Here are the components I trust in my own shop.
| Product | Rating | Check Price |
|---|---|---|
| Kreg PRS5000 Precision Router Lift | ⭐⭐⭐⭐⭐ | View on Amazon |
| JessEm Mast-R-Fence III | ⭐⭐⭐⭐½ | View on Amazon |
| INCRA MagnaLOCK Router Plate | ⭐⭐⭐⭐⭐ | View on Amazon |
The Physics of a Hybrid Workbench
Why integrate these two distinct tools? The answer boils down to mass.
A standard standalone router table usually weighs between 40 and 80 pounds. When you spin a 3-inch panel-raising bit at 10,000 RPM, that lightweight frame acts like a tuning fork. It amplifies vibration. Vibration causes chatter marks on your workpiece, forcing you to spend hours sanding out mill marks that shouldn’t exist.
Now, imagine dropping that same router into a 400-pound solid maple workbench. The mass of the bench absorbs that kinetic energy. The bit spins with dead-flat stability. You’ll notice that the cuts off a heavy bench are glass-smooth, straight off the cutter.
Furthermore, integrating the router gives you an enormous continuous surface. If you are routing a 6-foot piece of baseboard on a tiny dedicated table, the wood wants to tip off the edge. On a 7-foot workbench, the workpiece remains fully supported from start to finish.
Sourcing the Right Materials
You cannot build a pro-grade bench from wet construction lumber. If you use standard pine 2x4s from a big box store, they will dry out, warp, twist, and throw your meticulously leveled router plate out of alignment within a single change of seasons.
The Top
For the benchtop, you want a dense, closed-grain hardwood. Hard maple is the gold standard, closely followed by ash, white oak, or beech. These woods resist denting when you drop a cast-iron hand plane on them, and they offer enough density to hold heavy hardware securely. If you’re tackling outdoor or heavy-duty utility projects, you might want to look at a highly durable, rugged DIY workbench design, but for a precision hybrid station, hardwood density is non-negotiable.
I recommend an edge-grain lamination, aiming for a final top thickness of at least 2.5 to 3 inches.
The Base
The base needs to be rigid enough to resist racking forces when you are hand-planing or pushing heavy stock. Douglas fir is an acceptable, cost-effective substitute for the base, provided it has been kiln-dried and acclimated to your shop for several weeks. Leg stock should be a minimum of 3.5” x 3.5” (a solid 4x4 or a laminated block).
Step-by-Step Construction Phase
Building this bench requires a methodical approach. Do not rush the base. If the base isn’t square, the top won’t sit flat. If the top isn’t flat, your router operations will be universally flawed.
Engineering a Rock-Solid Base
Forget metal brackets and lag screws. A pro-grade workbench relies on traditional joinery. We use mortise and tenon joints for the connection between the stretchers and the legs.
- Mill Your Stock: Joint one face and one edge of all your leg and stretcher material. Plane them to final thickness.
- Cut the Mortises: Lay out the mortises on your legs. I prefer to use a plunge router with an up-cut spiral bit to hog out the waste, followed by a sharp chisel to square the corners. Aim for a mortise depth of at least 1.5 inches.
- Cut the Tenons: Use a dado stack on your table saw to carefully sneak up on the fit of the tenons. A good tenon should slide into the mortise with firm hand pressure—if you have to beat it in with a sledgehammer, it’s too tight and will split the leg. If it falls in, it’s too loose and will fail over time.
- Drawboring (Optional but Recommended): For absolute permanence, offset drill a hole through the mortise and tenon, and drive a hardwood peg through. This mechanically locks the joint, pulling it tight without relying solely on glue.
Pro Tip: When laying out your base, position the upper stretchers so they do not interfere with the router lift housing or the dust collection box that will eventually hang beneath the table. Leave a clear bay on one end of the bench specifically for the router mechanics.
Crafting the Laminated Top
Gluing up a massive hardwood top is arguably the most stressful twenty minutes in woodworking. You are racing against the open time of the wood glue.
Similar to the process used when constructing a visually striking entryway bench, alternating the grain direction of your boards can help mitigate cupping. However, selecting boards with straight, vertical grain (quartersawn) is the best defense against seasonal movement.
Do not try to glue a 24-inch wide top all at once. Glue it up in three manageable 8-inch sections.
- Apply a generous, even coat of Titebond III (which gives you a slightly longer open time) to the faces.
- Clamp the sections using heavy-duty parallel clamps or ¾-inch pipe clamps spaced every 8 to 10 inches.
- Alternate clamps over and under the slab to equalize pressure and prevent bowing.
- Once the three sections are dry, run them through a thickness planer (if they fit) before gluing the three giant sub-assemblies together.
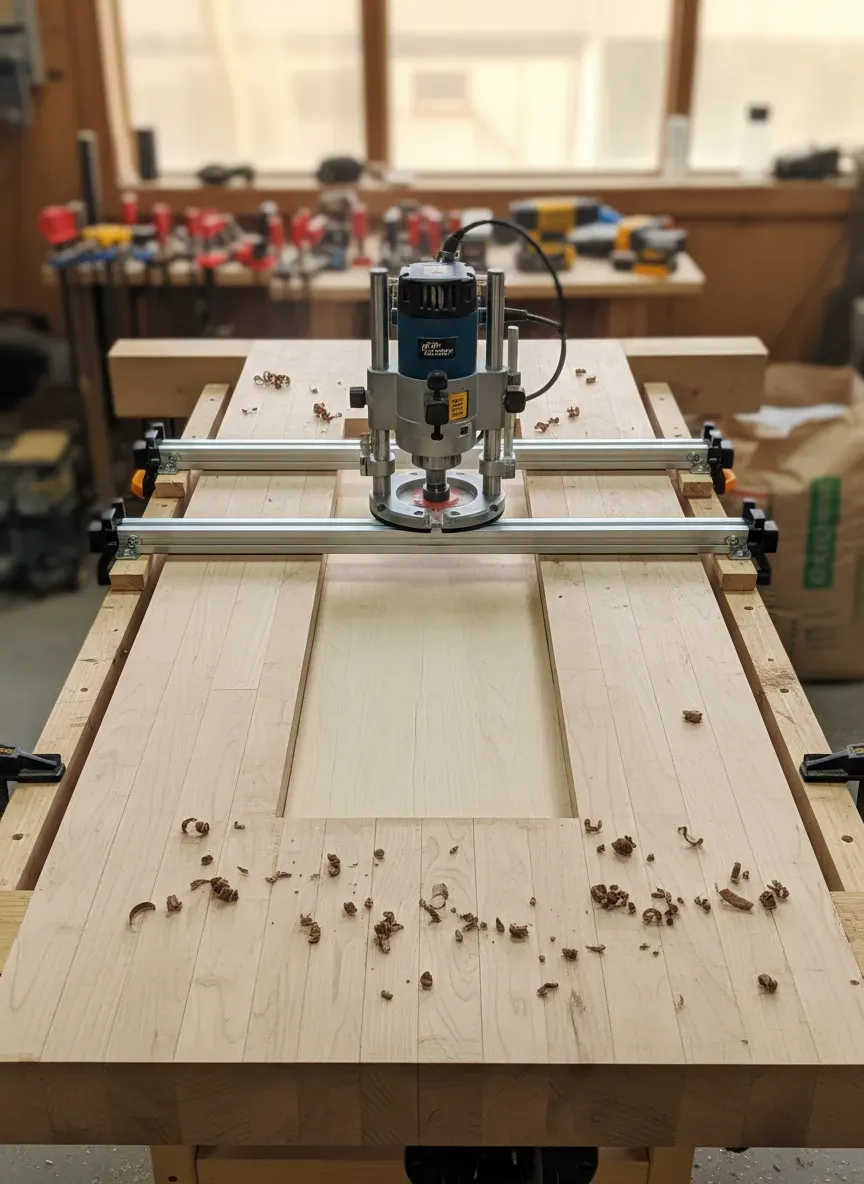
Once the top is glued, it must be flattened. You can use a traditional No. 7 jointer plane if you want a fantastic cardio workout, or you can build a simple router sled. A router sled uses a wide flattening bit to skim the entire surface perfectly parallel to the floor.
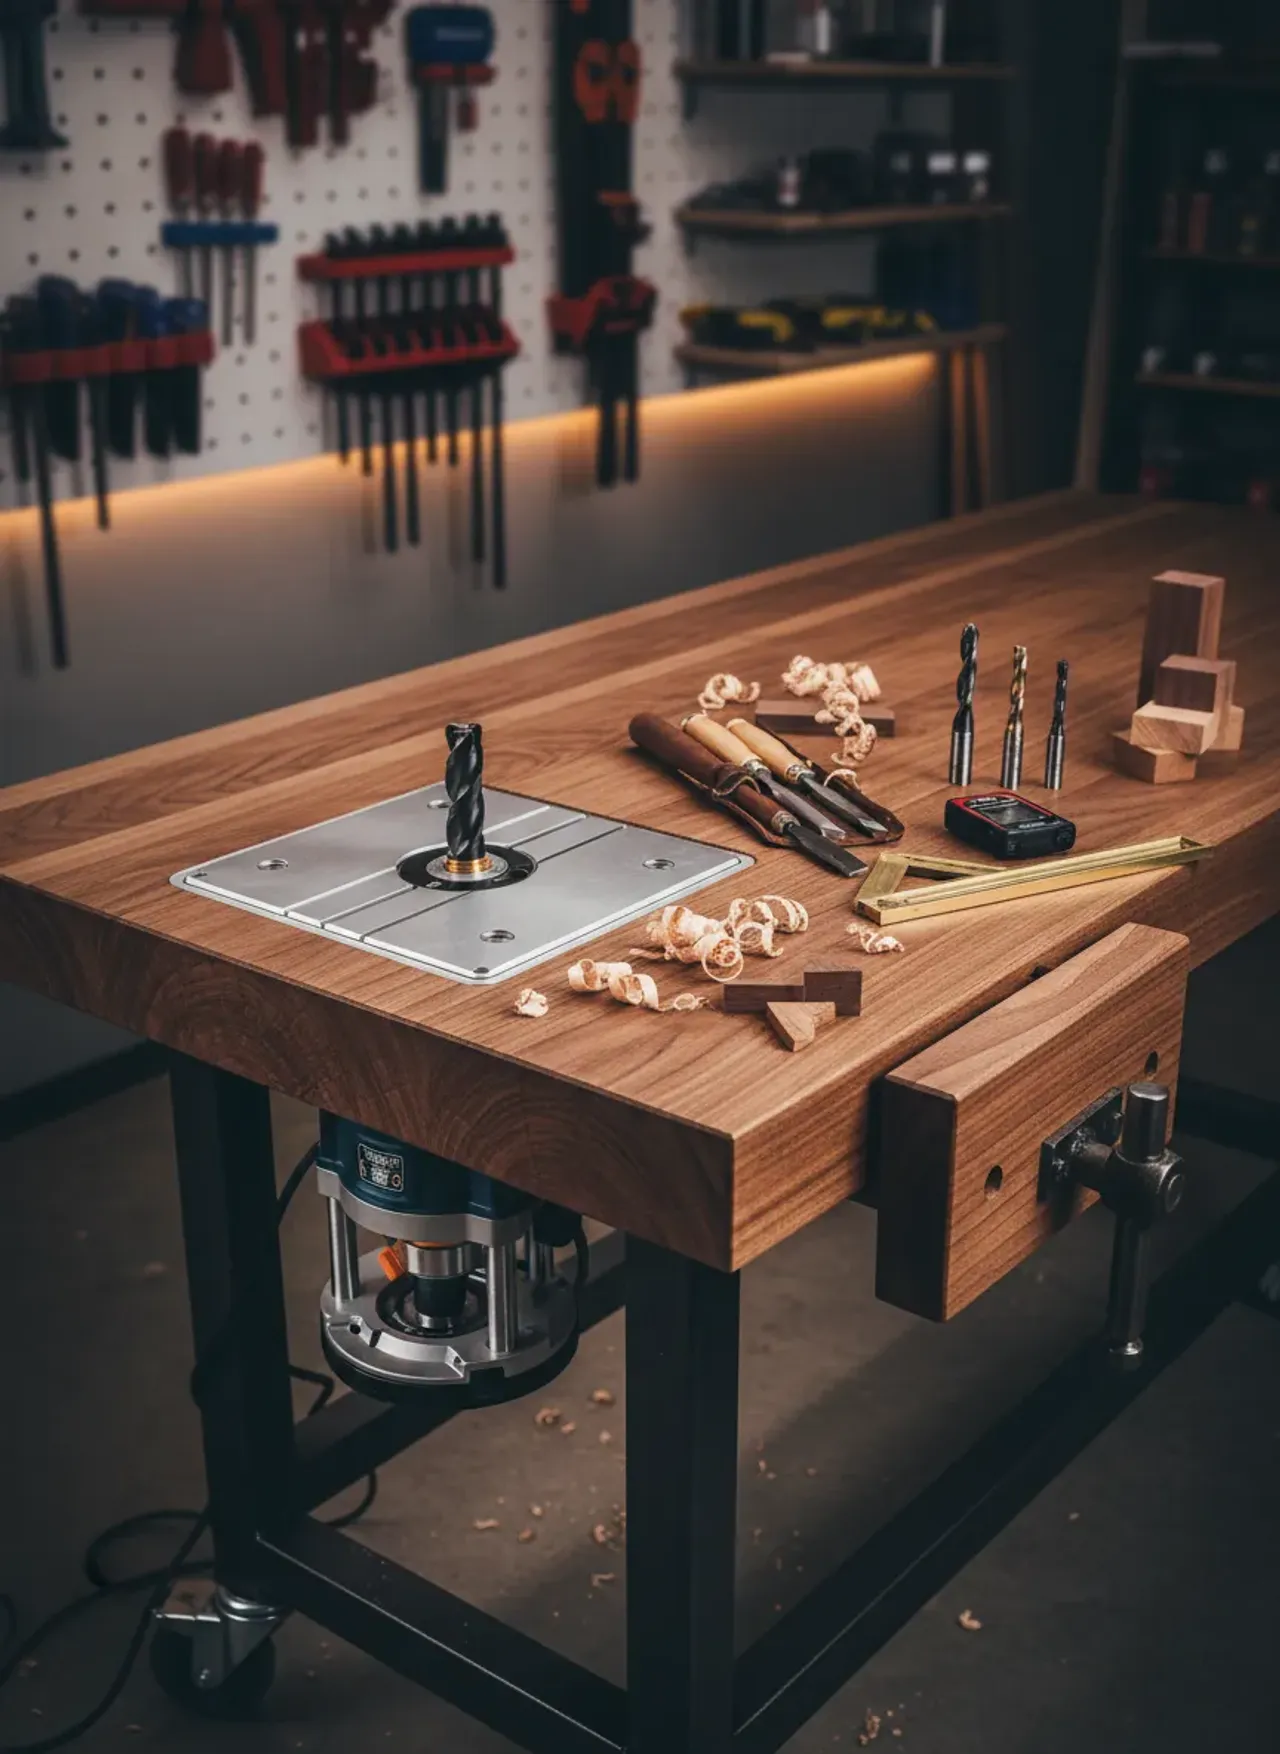
Machining the Router Plate Opening
Here is where precision dictates the success of your entire build. A router plate that sits even a millimeter above or below the surrounding benchtop will catch your workpiece, ruining your profile cut.
You cannot freehand this opening.
Step 1: Make a Template Take your chosen router plate (like the INCRA MagnaLOCK Router Plate) and trace it onto a piece of ½-inch MDF. Carefully cut out the opening using a jigsaw, staying just inside the line. Use files and sandpaper to sneak up on the exact dimensions until the router plate drops into the MDF template with zero slop.
Step 2: Position and Secure Decide where the router will live. I prefer the right-hand side of the bench, about 16 inches from the end. This gives you plenty of infeed and outfeed room without putting the router dead-center where you usually do your assembly work. Secure the MDF template to the benchtop using high-quality double-sided turner’s tape.
Step 3: Rout the Ledge Equip your handheld plunge router with a top-bearing pattern bit. Set the depth to exactly match the thickness of your router plate (usually 3/8” or 1/4”). Rout out the ledge following the inside of your MDF template.
Step 4: Hog Out the Center Once the precision ledge is established, remove the template. Drill a starter hole in the middle of the waste area. Use a jigsaw to cut out the inner rectangle, leaving a sturdy 3/4-inch ledge of hardwood for the plate to rest on.
Pro Tip: No matter how perfectly you set your router depth, the plate will eventually need adjustment due to wood movement. Pre-drill and install threaded inserts into the routed ledge. Thread small grub screws (set screws) into these inserts. By turning the grub screws with an Allen wrench, you can micro-adjust the height of the router plate until it is perfectly coplanar with the benchtop.
Equipping the Router Station
A router lift without a highly functional fence is just a hole in a table.
The Fence System
You have two choices for mounting your fence. You can clamp a custom-made wooden fence to the edges of your workbench, or you can embed T-tracks into the benchtop.
Embedding standard 3/4-inch miter tracks and 5/16-inch T-tracks adds immense versatility. You can use a dado blade or a router to cut channels across the width of the bench. Secure the extruded aluminum tracks with epoxy and countersunk screws. This allows you to slide a premium aftermarket fence, like the JessEm Mast-R-Fence III, back and forth with pinpoint accuracy.
Achieving this level of precision will ultimately help you when crafting heirloom-quality furniture pieces that require tight-fitting joinery, such as sliding dovetails or lock miter joints.
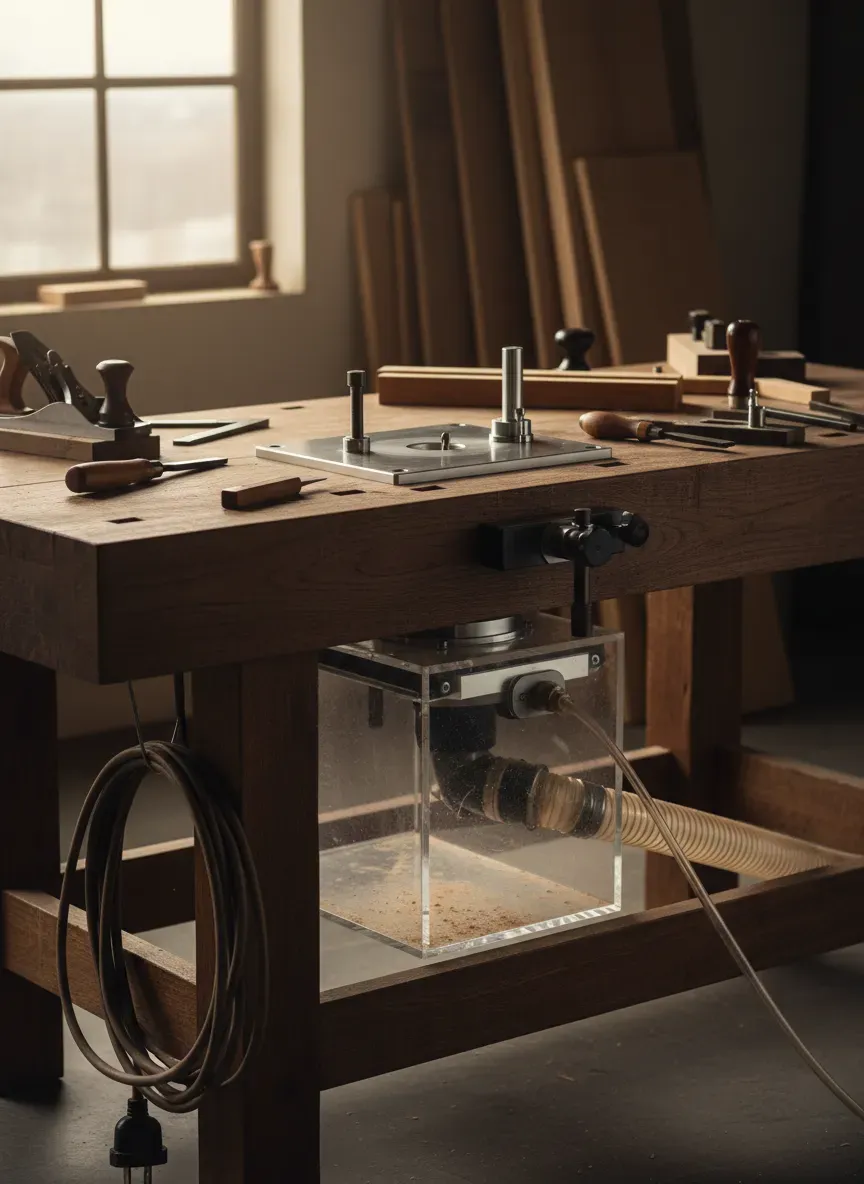
Mastering Dust Collection
Routers are the messiest tools in the shop. They don’t just create dust; they create a blizzard of chips that will coat every surface of your workspace within seconds. A hybrid bench requires a two-stage dust collection strategy.
1. Above-the-Table Extraction: Your fence must have a dust port built into it. Connect a 2.5-inch hose from your shop vac or dust collector directly to the back of the fence. This captures the debris ejected directly by the bit.
2. Below-the-Table Downdraft Box: Build a sealed box out of 3/4-inch plywood that encases the router motor underneath the bench. Add a clear acrylic door on the front so you can access the router for speed changes. Install a 4-inch dust port at the lowest point of this box. As the router pulls air down through the throat plate, the heavy chips fall into the box and are immediately evacuated by your dust collector.
Crucial Note: You must include a fresh-air intake vent on your dust box. If the box is perfectly airtight, the dust collector will choke, and the router motor will overheat due to a lack of airflow. A simple adjustable baffle on the side of the box solves this.
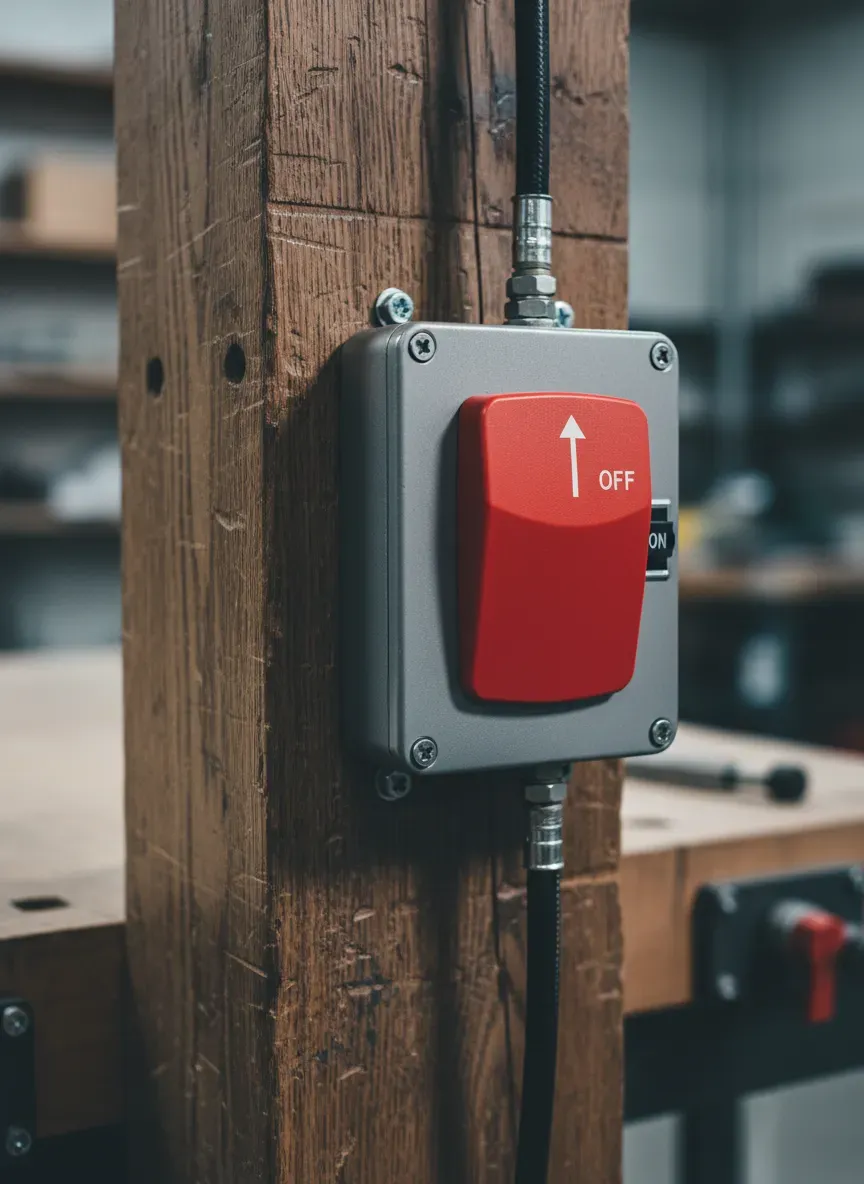
Power and Safety Integration
Fumbling under a heavy workbench to turn off a screaming 3-horsepower router is a massive safety hazard.
You must wire a dedicated paddle safety switch to the exterior of the bench base. Mount it at thigh-height on the front of the bench. If a workpiece binds or splinters, you can instantly kill the power by simply bumping the paddle with your leg, keeping both hands firmly and safely on the wood.
Route a heavy-duty power cord from the safety switch, neatly securing it along the underside of the bench stretchers with cable ties, ensuring it never droops onto the floor where it could be tripped over.
Finishing and Long-Term Maintenance
Woodworkers often debate the best finish for a workbench. Let me save you some time: absolutely do not use polyurethane, varnish, or epoxy.
Film-building finishes crack under the impact of mallets and create a slippery surface. You want your workpiece to grip the bench naturally. Furthermore, when a polyurethane bench inevitably gets damaged, you have to sand the whole thing down to repair it.
Instead, use a penetrating oil finish. A classic mixture of equal parts Boiled Linseed Oil, mineral spirits, and pure tung oil is spectacular. Flood the surface, let it soak in for 20 minutes, and wipe off the excess. Apply three coats over three days.
Once the oil has cured, apply a thin coat of high-quality paste wax and buff it out. The wax prevents wood glue from sticking to the benchtop during your glue-ups. If a drop of Titebond dries on a waxed bench, it chips right off with a fingernail.
Over the years, your bench will accumulate dings, saw kerfs, and chisel marks. These are badges of honor. But when the surface gets too marred, or if seasonal shifts cause the top to pull slightly out of flat, you simply take a hand plane or your router sled, skim a 32nd of an inch off the top, reapply your oil, and you essentially have a brand-new workbench.
Key Takeaways for the Hybrid Build
- Mass is King: Heavy bases and thick tops absorb router vibration, yielding superior cuts.
- Precision Leveling: Use threaded inserts and grub screws to perfectly level your router plate to the benchtop.
- Dual Dust Collection: Address dust both at the fence and via a sealed downdraft box beneath the table.
- Safety First: Always install an exterior paddle switch for instant, hands-free power shutoff.
- Finish Smart: Stick to penetrating oils and waxes; avoid slick, film-building finishes.
The Bottom Line
Building a pro-grade workbench with a built-in router table is a massive undertaking, but it is unequivocally the highest-ROI project you can complete for your shop.
By merging these two critical workstations, you are forced to engage with deep foundational skills: milling heavy stock, executing tight mortise and tenon joinery, managing massive glue-ups, and machining high-tolerance hardware cutouts. The resulting fixture will elevate the quality, safety, and speed of every subsequent piece of furniture you build. It ceases to be just a table; it becomes the monolithic heart of your craft.
Listen, I’ve ruined enough expensive hardwood over the years to know that winging a project like this is a recipe for disaster. If you want to take the guesswork out of your next shop build—or any furniture project you tackle next—I have a secret weapon for you.
You need to check out Ted’s Woodworking. I highly recommend grabbing their complete archive, which gives you access to an astonishing 16,000 meticulously detailed woodworking plans. Whether you are building complex shop fixtures, heirloom cabinetry, or simple weekend projects, having step-by-step blueprints, cut lists, and 3D schematics completely eliminates the frustration of trial and error.
Right now, you can get a massive 75% discount on the entire package. It’s an absolute game-changer for woodworkers of any skill level who want to stop sketching on napkins and start building with confidence.