Building a Workbench with Hand Tools: A Complete Guide to Unplugged Woodworking
Master the art of unplugged woodworking. Discover expert techniques, lumber selection, and joinery methods to build a massive hand-tool workbench from scratch.
Mar 23, 2026 - Written by: Linda Wise
There is a distinct, almost primal satisfaction in silencing the scream of the router and the whine of the table saw. When you transition into the realm of unplugged woodworking, the shop transforms. The blinding cloud of microscopic dust is replaced by the rhythmic swoosh of a sharp hand plane severing wood fibers, leaving behind heavy, curled shavings that smell like damp earth and pine resin.
But to work effectively with hand tools, you need a very specific piece of equipment. Your workbench cannot merely be a table. It must be an immovable fortress. A three-dimensional clamping apparatus that resists lateral shear, downward force, and racking. Building a workbench with hand tools is a rite of passage. It tests your endurance, forces you to master your tools, and leaves you with an heirloom that will outlast you.
I’ve personally found that taking on this project completely off the grid—using only saws, planes, and chisels—fundamentally rewires how you understand wood grain. You will sweat. Your shoulders will ache. You will learn the hard way why a perfectly flat reference face matters. But the reward is a mastery of the craft that machines simply cannot teach.
Quick Comparison: Top Picks for the Unplugged Build
Before we dive into the sawdust, here are the three indispensable hand tools that will see you through this monumental build.
| Product | Rating | Check Price |
|---|---|---|
| Stanley No. 5 Jack Plane | ⭐⭐⭐⭐⭐ | View on Amazon |
| Suizan Japanese Ryoba Pull Saw | ⭐⭐⭐⭐½ | View on Amazon |
| Narex Premium Bench Chisels | ⭐⭐⭐⭐⭐ | View on Amazon |
The Philosophy of the Hand-Tool Bench
A workbench designed for power tools is entirely different from one designed for hand tools. Power tool users need a large, flat assembly surface to support sheet goods and guide rails. Hand tool woodworkers require mass, specific dimensions, and unyielding workholding.
When you push a hand plane across a rough-sawn board, you are transferring immense kinetic energy into the bench. If the bench slides across the floor, or if the frame wracks and twists, your energy is wasted. You’ll quickly realize that a proper hand-tool bench needs to weigh at least 250 to 300 pounds. Gravity is your first clamp.
Key Takeaways for Bench Design
- Mass is non-negotiable: Aim for a top thickness of at least 3.5 to 5 inches.
- Flush front geometry: The front edge of your bench top should sit perfectly flush with the front of the legs. This allows you to clamp wide doors or long boards directly to the legs for edge jointing.
- Narrow is better: A bench deeper than 24 inches is wasted space. You need to be able to reach across it comfortably to grab a tool or secure a holdfast.
Choosing the Right Archetype: Roubo vs. Nicholson
When mapping out your build, you generally choose between two historic archetypes: the French Roubo or the English Nicholson.
The Roubo is characterized by a massive, thick top (often solid slabs) and stout, timber-framed legs joined by heavy mortise and tenon joints. It relies entirely on brute mass to resist movement.
The Nicholson, on the other hand, uses a thinner top (around 2 inches) supported by massive, deep aprons that run the length of the bench. These wide aprons create incredible rigidity and offer a massive vertical clamping surface.
For a hand-tool-only build, the Roubo is often the preferred choice simply because laminating a thick top by hand, while grueling, is straightforward and creates an indestructible anvil for chopping mortises.

Selecting the Right Lumber
You do not need to spend thousands of dollars on Hard Maple or European Beech. In fact, building your first proper bench out of exotic hardwoods is a trap.
I highly recommend Douglas Fir or Southern Yellow Pine (SYP) construction lumber. Construction-grade softwood is cheap, readily available, and surprisingly dense. SYP, in particular, hardens significantly as it ages and dries. It has enough mass to anchor the bench, but it remains forgiving enough that if you accidentally run an edge tool into the bench top, the bench dents rather than your tool shattering.
Pro Tip: Head to your local lumberyard and dig through the 2x10 or 2x12 piles. Look for pith-free boards (avoid the center of the tree) with straight, tight grain. Wider boards generally yield better, clearer wood once you rip away the rounded factory edges.
Managing Moisture Content
Construction lumber is often sold wet (kiln-dried to about 19%). If you build the bench immediately, the wood will shrink, your joints will fail, and your top will warp like a potato chip. Stack and sticker your lumber in your shop for at least three to four months to let it acclimate to your local equilibrium moisture content (EMC).
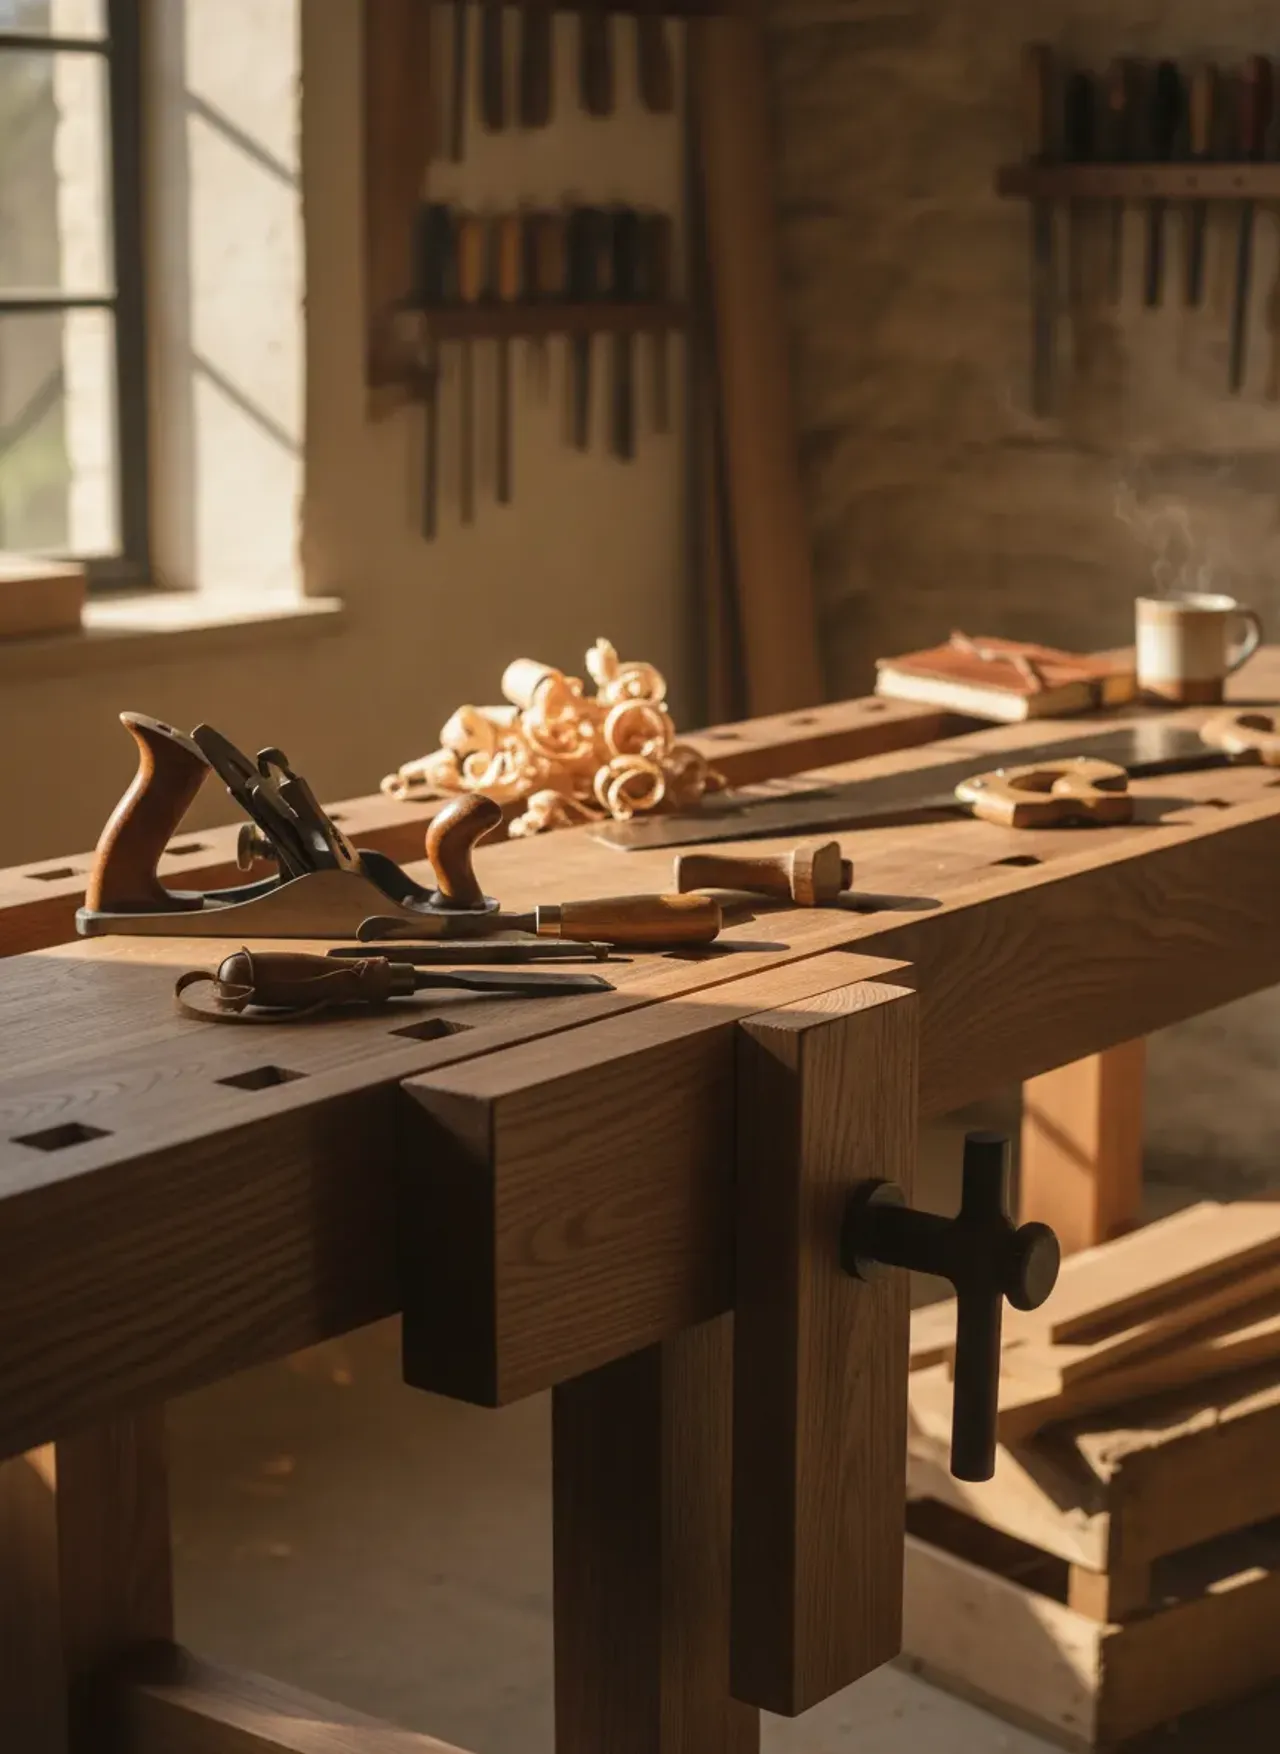
Essential Hand Tools for the Build
Building a bench requires surprisingly few tools, but they must be tuned to perfection.
The Trio of Bench Planes
You will need three distinct planes to mill rough lumber by hand.
- The Scrub Plane (or heavily cambered Jack Plane): This is your roughing tool. The iron is ground to a pronounced curve. You push it diagonally across the grain to hog off material quickly, ignoring tear-out and focusing purely on removing twist and cup.
- The Jointer Plane (No. 7 or No. 8): With a long sole spanning 22 to 24 inches, this tool bridges the valleys and shaves down the high spots left by the scrub plane. It establishes a perfectly flat reference face and a square edge.
- The Smoothing Plane (No. 4): Used at the very end to remove the microscopic tracks left by the jointer plane, leaving a glassy surface ready for finish.
Saws for Ripping and Crosscutting
You are going to be making massive rip cuts. Ripping a 2x12 down the middle by hand over an 8-foot length is a serious cardiovascular workout. You need an aggressive, well-sharpened rip handsaw (typically 5 to 7 points per inch). A heavy back saw or a Japanese Ryoba, like the Suizan Japanese Ryoba Pull Saw, is essential for crosscutting the tenon shoulders with precision.
Measuring, Marking, and Chopping
Throw your pencil away. Pencils leave thick, ambiguous lines. You need a marking gauge with a sharp wheel or pin, and a striking knife. For the joinery, you’ll require heavy bench chisels—the Narex Premium Bench Chisels are exceptional for this—and a heavy wooden mallet to drive them through inches of solid pine.
The Construction Process: A Step-by-Step Approach
Building without electrons means you are the motor. The process is methodical. You cannot force the wood; you have to read the grain and respond accordingly.
Phase 1: Milling the Stock by Hand
Before any glue touches wood, every single board must be flat, straight, and square.
Start by identifying the high spots. Lay a pair of winding sticks across the ends of the board to sight for twist. If the board is twisted, grab your scrub plane. Traverse the grain—planing at a 45-degree angle to the wood fibers. You’ll hear a tearing sound as the cambered iron bites deep. Once the winding sticks sit parallel, switch to the jointer plane.
Plane with the grain until you pull a continuous, full-length, full-width shaving. You now have your Reference Face. Mark it with a traditional pigtail loop.
Next, clamp the board vertically and plane the adjacent edge until it is perfectly 90 degrees to your reference face. Check this constantly with a high-quality try square. You now have your Reference Edge.
From here, use a marking gauge to scribe the final thickness and width, and plane down to those lines. It’s grueling work, but by the tenth board, your plane technique will be flawless.

Phase 2: Gluing Up the Massive Top
Because a Roubo top is typically 4 inches thick, you will need to laminate your milled boards edge-to-edge. Do not attempt to glue up twenty boards at once. The glue will tack up before you get the clamps on, resulting in a disastrous, gap-filled top.
Glue them up in pairs, then glue the pairs into quads, and so on. Use cauls—stout pieces of scrap wood wrapped in packing tape—clamped vertically across the glue lines to keep the boards flush. You want thick, even squeeze-out along the entire joint. Let the glue cure overnight before moving to the next lamination.
Phase 3: Cutting the Joinery
The legs of a hand-tool bench must be joined to the top and the stretchers with massive, unyielding joinery. The gold standard here is the Drawbored Mortise and Tenon.
Drawboring is a mechanical lock that predates cheap modern adhesives. It is the secret to a bench that never wracks.
- Chop the Mortise: Lay out the mortise on the leg. Bore out the bulk of the waste with a brace and auger bit, then use your heavy chisels to pare the walls flat and square.
- Saw the Tenon: Cut the tenon on the stretcher to fit the mortise. It should slide in with moderate hand pressure. If you have to beat it with a sledgehammer, it’s too tight and will split the leg.
- The Drawbore Offset: Assemble the joint dry. Bore a 3/8-inch hole through the leg and the mortise. Remove the tenon. Look through the hole in the leg and mark where the center is on the tenon cheek. Now, shift your drill bit about 1/16th of an inch closer to the shoulder of the tenon and drill the hole through the tenon.
- Drive the Peg: Carve a faceted hardwood peg (oak or hickory). Apply glue to the joint, assemble it, and drive the peg through the offset holes. As the peg forces its way through the misaligned hole in the tenon, it pulls the tenon shoulder violently tight against the leg. No clamps required.
Designing the Workholding: Vises, Dogs, and Holdfasts
A heavy block of wood is useless if you cannot secure your workpiece to it. Workholding is the soul of the bench.
The Leg Vise
For the front vise, nothing beats a traditional wooden leg vise. It consists of a massive wooden chop pivoting against the front left leg. Because there are no guide rods to get in the way, a leg vise offers incredible depth, allowing you to clamp a 12-inch wide board vertically without hitting any steel hardware. To prevent the chop from racking at the bottom, install a crisscross mechanism or a traditional parallel guide with a pin.
The Tail Vise and Dog Holes
To hold boards flat on the bench for face planing, you need a tail vise (or a wagon vise) paired with a row of dog holes.
Bore a line of 3/4-inch holes along the front edge of the bench, spaced about 4 inches apart. A bench dog sits in the vise, and another sits in the bench top. You pinch the board between them. Suddenly, you can plane aggressively without the board moving a millimeter.
The Magic of Holdfasts
Perhaps the most ancient and effective piece of workholding is the forged iron holdfast. It looks like a simple shepherd’s crook. You drop it into a 3/4-inch hole in the top of your bench, tap the top of it with a mallet, and the shaft wedges itself into the thick wooden top, locking down your workpiece with immense pressure. A tap on the back of the shaft releases it instantly.
Pro Tip: Holdfasts require a thick bench top to function. If your bench top is less than 2.5 inches thick, the holdfast won’t have enough surface area in the hole to wedge properly. If your top is thicker than 5 inches, you may need to counterbore the bottom of the holes to allow the holdfast shaft to flex.

Flattening the Top and Finishing
Once the base is assembled and the massive top is lowered onto the tenons, the bench is structurally complete. But the top is not flat. The glue-up process inevitably leaves steps, twists, and high spots.
Flattening the bench top is the final boss of this project.
Grab your winding sticks and your chalk. Map the high spots. Start with the heavily cambered scrub plane, traversing directly across the grain from front to back. You are essentially digging trenches to remove the high ridges left by the glue-up.
Once the worst of it is gone, switch to a No. 7 or No. 8 jointer plane. Work diagonally. From the front-left corner to the back-right, then front-right to back-left. The long sole of the jointer will only cut the peaks, riding right over the valleys. When the plane begins pulling full-width, continuous shavings from every corner of the bench, your top is flat.
A Finish That Makes Sense
Do not use polyurethane, varnish, or lacquer on a workbench. Film finishes create a slick surface. A slippery bench is a dangerous and frustrating bench. You want friction.
Furthermore, film finishes crack and chip when you inevitably drop a mallet or chisel on the top.
Instead, use a penetrating oil finish. A mixture of equal parts Boiled Linseed Oil (BLO), mineral spirits, and beeswax is perfect. The mineral spirits carry the oil deep into the pine, the oil oxidizes and hardens the surface fibers, and the wax provides just enough protection against glue drips. Flood the surface, let it soak for twenty minutes, and wipe off the excess. When the bench gets beat up in a few years, you don’t need to sand through a film finish to fix it. Just plane the top clean and wipe on another coat of oil.
The Bottom Line
The Bottom Line: Building a workbench entirely with hand tools is a masterclass in traditional woodworking. It forces you to hone your sharpening skills, perfect your sawing posture, and read the nuances of grain direction. You aren’t just building a piece of shop furniture; you are building the foundation of your entire craft. The sweat equity invested in hand-planing a massive slab of pine and chopping out drawbored mortises will pay dividends in every single piece of furniture you build moving forward.
Now that you have the ultimate, immovable work surface in your shop, the real journey begins. You’ve got the skills, the sharp tools, and the perfect bench. The next logical step is figuring out what to build on it.
I’ve personally found that the hardest part of any new project isn’t the execution—it’s drafting a reliable, accurate plan. If you want to put that new workbench to the test immediately, you need a vast library of proven blueprints. Here’s the real kicker: you don’t have to design them all yourself. I highly recommend checking out Ted’s Woodworking. You get instant access to over 16,000 meticulously detailed woodworking plans, complete with step-by-step instructions, cut lists, and 3D schematics. Right now, there is a massive 75% discount available. Whether you want to build a classic shaker table, a complex jewelry box, or an outdoor pergola, this collection will keep your new hand-tool workbench covered in fresh shavings for decades to come.