DIY Wall-Mounted Entryway Organizer Projects Under $50
Transform your chaotic entryway with these stylish, budget-friendly DIY wall organizer projects. Step-by-step guides for storage under $50.
Feb 5, 2026 - Written by: linda wise

The entryway is arguably the most hardworking square footage in your home. It serves as the transitional threshold between the outside world and your personal sanctuary. However, without a dedicated system for managing the influx of mail, keys, coats, and bags, this critical area often descends into chaos. Clutter in the entryway sets a frantic tone for the rest of the house, yet custom mudroom built-ins or high-end furniture pieces can cost hundreds, if not thousands, of dollars.
Fortunately, achieving a functional and aesthetically pleasing entryway does not require a renovation budget. With a little creativity, basic tools, and strategic material sourcing, you can construct professional-grade storage solutions for a fraction of the retail price. This guide explores several high-impact DIY wall-mounted organizer projects that you can complete for under $50 each. These projects are designed to maximize vertical space, improve workflow, and add a touch of custom craftsmanship to your home.
The Psychology of Entryway Organization
Before selecting a project, it is essential to understand the “drop zone” psychology. Most clutter accumulates because it lacks a designated home that is easily accessible the moment you walk through the door. If putting keys away requires opening a drawer or walking to another room, they will inevitably end up on the nearest flat surface.
A successful wall-mounted organizer must address three primary categories of items:
- Hanging items: Coats, scarves, dog leashes, and bags.
- Small essentials: Keys, sunglasses, and wallets.
- Paper flow: Incoming mail, bills, and school permission slips.
By consolidating these functions into a single vertical unit, you reclaim floor space and streamline your departure and arrival routines.
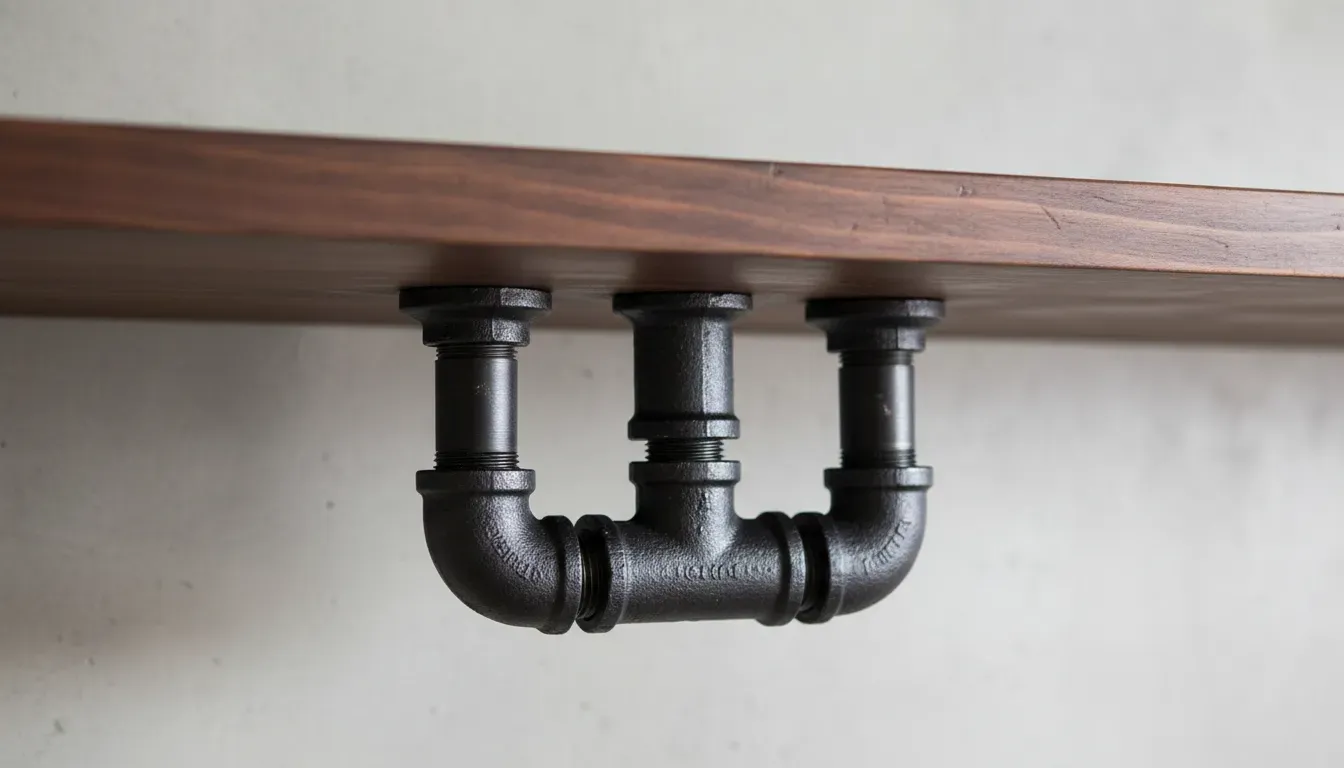
Project 1: The Modern Industrial Pipe and Wood Shelf
Industrial chic remains a popular aesthetic because it blends durability with a clean, minimalist look. This project utilizes galvanized iron piping and standard lumber to create a sturdy shelf with a hanging rod, perfect for coats and umbrellas.
Materials Required
- One 1x8 inch pine board (cut to 24 inches or desired length).
- Two 1/2-inch floor flanges.
- Two 1/2-inch iron caps.
- Two 1/2-inch nipples (6 inches long).
- Wood stain and sealant.
- Wall anchors and screws.
Estimated Cost: $35 - $45
Step-by-Step Construction
1. Prepare the Wood Begin by sanding your pine board. Start with 80-grit sandpaper to remove rough edges and finish with 220-grit for a smooth surface. Apply a wood stain that complements your existing furniture. Dark walnut or espresso stains pair exceptionally well with the dark grey of the iron pipes. Allow the stain to dry completely before applying a coat of polyurethane for protection against moisture and scratches.
For those looking to achieve a specific finish, sourcing the right stain is crucial. You can find excellent options online: Check price for wood stain sampler on Amazon
2. Clean and Paint the Pipes Industrial pipes often come with a greasy residue. Clean them thoroughly with a degreaser or mineral spirits. If you prefer a uniform black look over the galvanized grey, spray paint the flanges, nipples, and caps with a matte black metal paint.
3. Assembly Attach the floor flanges to the underside of the wood shelf. Ensure they are centered and spaced evenly from the edges. Depending on the design, you can mount the flanges to the wall first and rest the shelf on top, or attach the flanges to the wood to act as brackets. For a hanging rod variation, mount the flanges to the bottom of the wood, screw in the nipples, and cap them off. This creates sturdy pegs for hanging bags or coats.
4. Mounting Use a level to mark your placement on the wall. Since this unit may hold heavy coats, it is imperative to screw at least one side into a wall stud. Use heavy-duty toggle bolts for any side not anchored in a stud.
Project 2: The Minimalist Dowel Rail
For those who prefer a Scandi-style or minimalist aesthetic, the wooden dowel rail is an elegant solution. This project relies on the beauty of raw wood and simple geometry. It is incredibly inexpensive but looks high-end.
Materials Required
- One 1x3 inch hardwood board (oak or maple works best).
- One 3/4-inch round wooden dowel.
- Wood glue.
- Mounting hardware (keyhole hangers).
Estimated Cost: $20 - $30
Step-by-Step Construction
1. Layout and Drilling Cut your main board to the desired length, typically between 24 and 36 inches. Mark the center line of the board. Measure and mark points every 4 to 6 inches along the center line where you want your hooks to be.
Using a drill press or a handheld drill with a guide, drill holes at the marked points. To prevent items from sliding off, drill these holes at a slight upward angle (approximately 10 to 15 degrees). The holes should be the exact diameter of your dowel rod for a tight fit. Do not drill all the way through the board; stop about 1/2 inch into the wood.
2. Cut and Set Dowels Cut your round dowel into peg segments. A length of 3 to 4 inches is usually sufficient. Sand the cut ends to remove splinters. Apply a small amount of wood glue into the drilled holes and insert the dowel segments. Wipe away any excess glue immediately.
3. Finishing Once the glue has cured, sand the entire unit. You can leave the wood natural and seal it with a clear wax or oil, or paint it to match your wall color for a monochromatic look.
4. Installation Install keyhole hangers on the back of the board. This allows the unit to sit flush against the wall without visible screws, maintaining the minimalist illusion. This rail is perfect for hanging hats, light jackets, and tote bags. For heavier items, ensure you are using appropriate wall anchors.
Project 3: The Repurposed Picture Frame Command Center
Upcycling is a fantastic way to stay under budget while creating something unique. An old, sturdy picture frame can be transformed into a comprehensive command center for mail and keys.
Materials Required
- Large wooden picture frame (thrifted).
- Sheet metal, cork, or thin plywood for backing.
- Small screw hooks (cup hooks).
- Paint.
- Chicken wire (optional).
Estimated Cost: $15 - $25
Step-by-Step Construction
1. Source and Prep the Frame Look for a frame with a wide, flat profile at a thrift store or garage sale. Remove the glass and existing backing. Lightly sand the frame and paint it a bold color to serve as an accent piece in your entryway.
2. Create the Backing You have several options for the interior of the frame:
- Cork: Glue a sheet of cork roll to a plywood backing to create a bulletin board for reminders.
- Magnetic: Use a sheet of galvanized metal (available at hardware stores) to create a magnetic board.
- Chicken Wire: Staple chicken wire to the back of the frame for a farmhouse look; use clothespins to clip mail to the wires.
3. Add Key Storage Screw small cup hooks into the bottom rail of the frame. If the frame wood is too thin, attach a small strip of wood to the bottom edge to reinforce it before adding hooks.
4. Add a Shelf (Optional) If the frame is sturdy enough, you can attach a small, shallow box or basket to the lower portion of the backing to hold outgoing mail or sunglasses.
This project is highly customizable. You can add a small mirror to one side or use chalkboard paint on the backing to write weekly schedules.
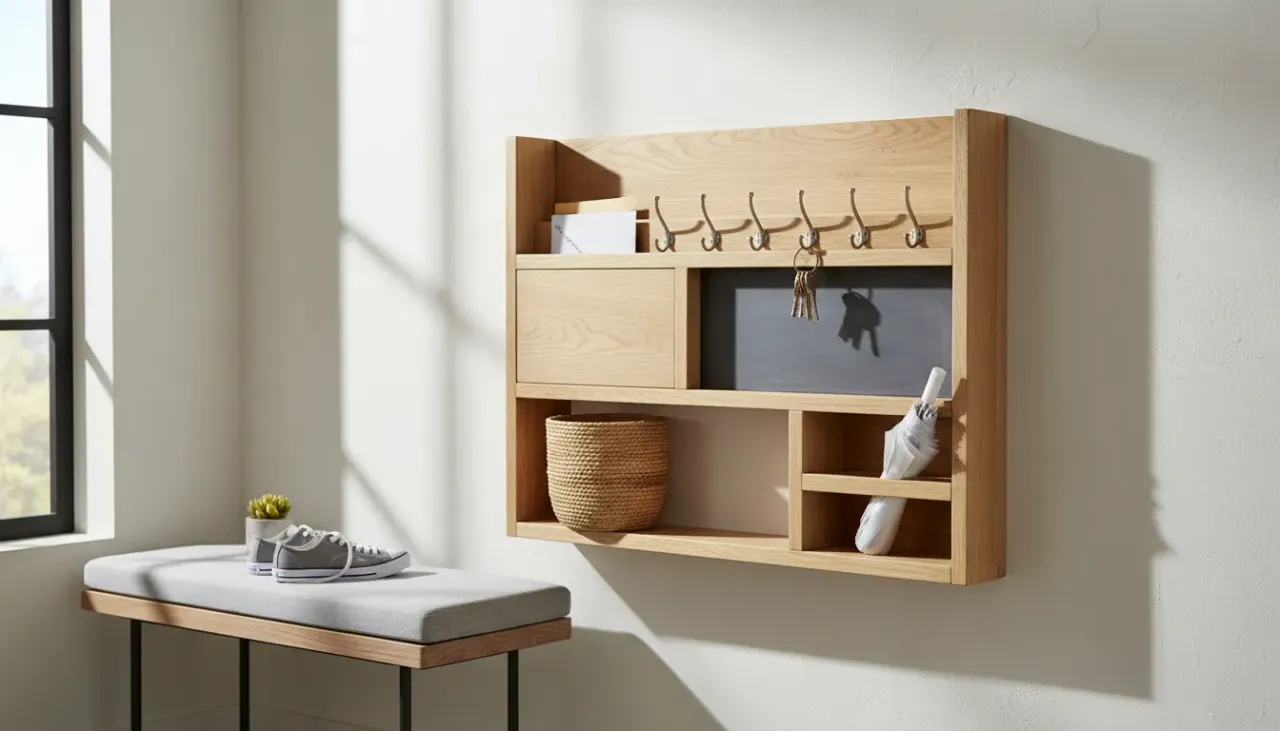
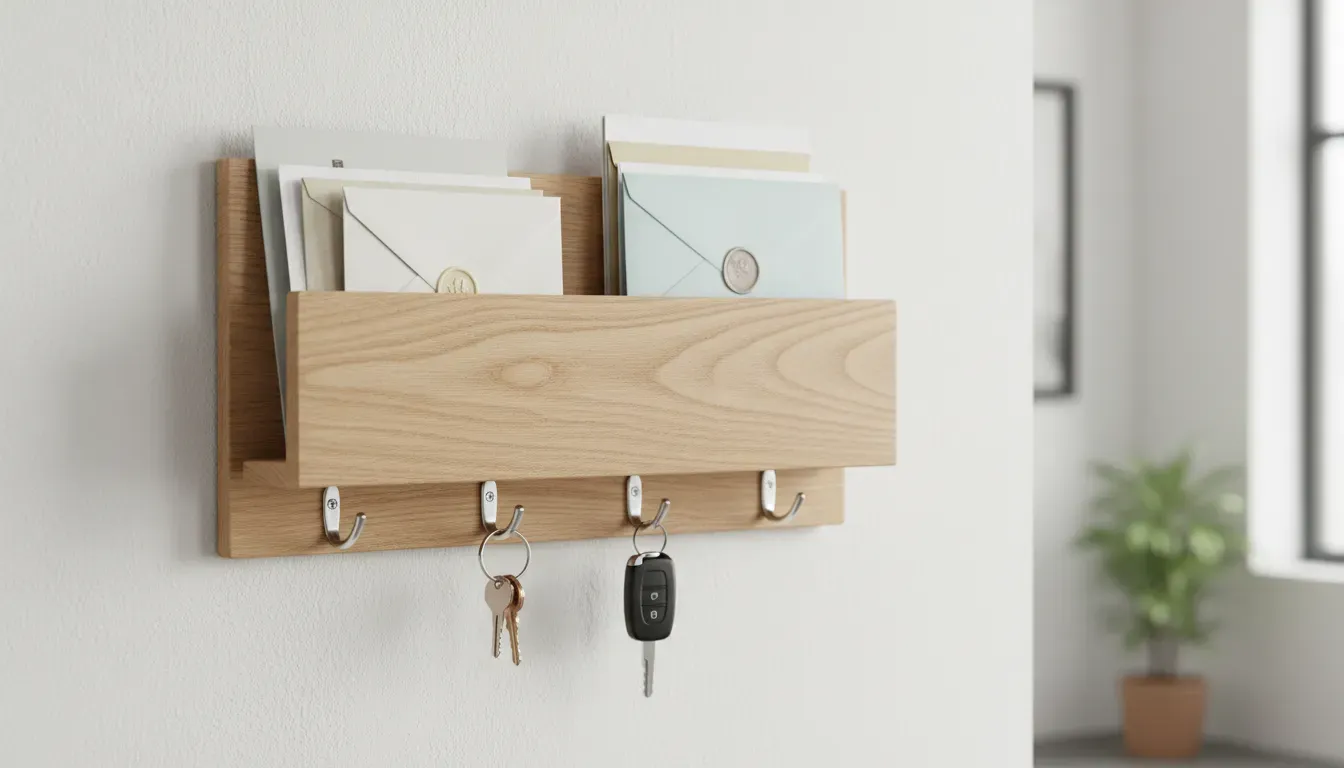
Project 4: The Floating Mail Sorter with Key Hooks
Paper clutter is often the biggest enemy of a tidy entryway. This project focuses on sorting mail immediately upon entry, preventing piles from migrating to the kitchen counter or dining table.
Materials Required
- 1/4-inch plywood (for the front and sides).
- 1x4 inch lumber (for the base and back).
- Wood glue and finish nails.
- Label holders (optional).
- Double hooks.
Estimated Cost: $25 - $35
Step-by-Step Construction
1. Design the Box The goal is to create a shallow box that mounts to the wall. Cut a back piece from the 1x4 lumber (approx. 12 inches long). Cut a bottom piece from the same lumber. Cut two side pieces from the plywood that slope downwards from back to front, allowing easy access to the contents. Cut a front panel from the plywood.
2. Assembly Glue and nail the sides to the back and bottom pieces. Attach the front panel. You now have a bin-like structure. If you need to sort mail by person or by “In/Out,” you can build two smaller units or place a divider in a larger unit.
3. Adding Utility Attach a second piece of lumber extending below the box structure. This extension will serve as the mounting plate for your key hooks.
To ensure you have the right hardware for holding keys and bags securely, consider purchasing a set of durable hooks: Check price for black wall hooks on Amazon
4. Personalization Sand, stain, or paint the unit. Attach metal label holders to the front of the mail bin to designate its purpose. Install the hooks on the lower board. This compact unit handles both mail and keys in a very small footprint, making it ideal for apartments or narrow hallways.
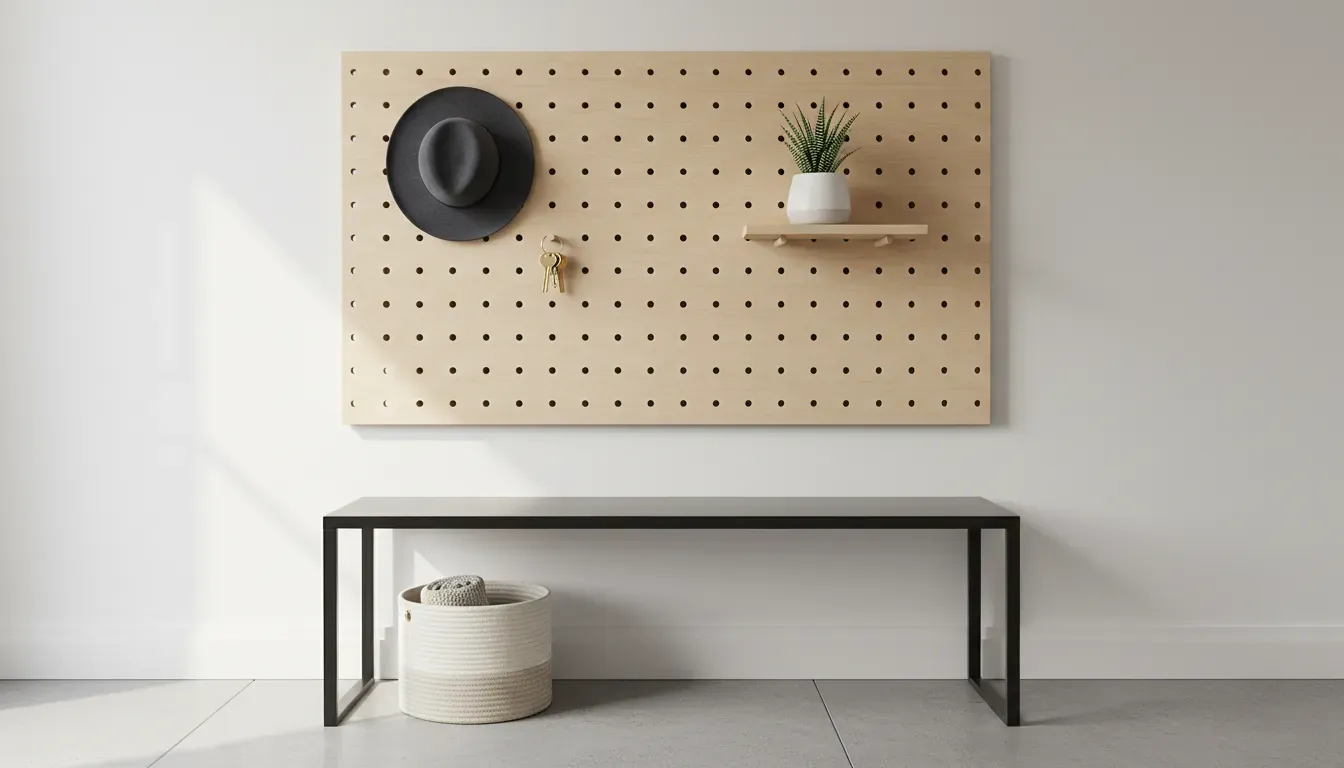
Project 5: The Pegboard Organizer Wall
For maximum versatility, nothing beats a pegboard. While often relegated to the garage, a framed pegboard can look chic and intentional in a home entryway. The true power of this system is its adaptability; you can rearrange shelves, hooks, and baskets as your needs change.
Materials Required
- 2x4 foot pegboard sheet.
- 1x2 inch lumber for framing.
- Mounting spacers or lathe screws.
- Pegboard accessories.
- Paint.
Estimated Cost: $40 - $50
Step-by-Step Construction
1. Cut and Paint Cut the pegboard to your desired size. Paint it a color that contrasts with your wall. A matte black or navy blue pegboard looks sophisticated and modern compared to the standard white or brown.
2. Frame It To elevate the look from “garage storage” to “home decor,” build a simple frame using 1x2 lumber. Miter the corners for a professional finish. Stain the frame a warm wood tone to contrast with the painted pegboard. Attach the frame to the pegboard using construction adhesive and small finish nails.
3. Spacer Installation Pegboards require space behind them for the hooks to function. When mounting to the wall, use 1/2-inch spacers or mount thin furring strips to the wall first, then screw the framed pegboard into those strips.
4. Accessorize This is where the budget can fluctuate. To keep it under $50, repurpose small wire baskets by attaching pegboard hooks to them. You can also create custom shelves by placing a small board across two long straight pegs.
Essential Tools for DIY Success
While the materials for these projects are affordable, having the right tools is essential for a professional finish. You generally do not need a full workshop. A drill, a saw (hand saw or circular saw), a level, and a measuring tape are the core requirements.
One tool that is often overlooked but critical for wall-mounted projects is a reliable stud finder. Hanging storage units that will bear weight requires anchoring into the structural framing of your home. Check price for stud finder on Amazon
Sourcing Materials on a Budget
To strictly adhere to the under $50 budget, you must be strategic about sourcing materials.
- Scrap Wood: Visit the “cull lumber” bin at your local hardware store. These are pieces of wood with minor imperfections sold at a deep discount. Often, the imperfections can be cut away or sanded out.
- Pallets: Shipping pallets are often free. While the wood requires significant sanding, it has a rustic character that works well for farmhouse-style organizers.
- Hardware Salvage: Habitat for Humanity ReStores or similar salvage yards are goldmines for knobs, hooks, and screws that cost pennies compared to big-box retail prices.
Finishing Touches and Styling
The difference between a project that looks “homemade” and one that looks “handcrafted” is usually in the finishing.
- Sanding: Never skip sanding. It opens the pores of the wood for staining and ensures a tactilely pleasing surface.
- Countersinking: When using screws, countersink the heads (drive them slightly below the surface) and fill the hole with wood filler before painting.
- Hardware Consistency: Match your metal finishes. If your door handle is brushed nickel, try to use brushed nickel hooks on your organizer for visual cohesion.
Once your organizer is mounted, style it intentionally. Do not let it become a dumping ground. Add a small potted succulent or a framed photo on the shelf to signal that this is a decor space as well as a storage space. Visit our guide on styling small entryways for more ideas on blending aesthetics with function.
Maintenance and Organization Habits
Building the organizer is only step one. Maintaining the system requires behavioral changes.
- The One-Touch Rule: When you walk in, place your keys and wallet immediately on the organizer. Do not put them on a table to “move later.”
- Weekly Audit: Every Friday, clear out the mail slot. Recycle junk mail and file important documents. If you let the mail slot overflow, the system fails.
- Seasonal Rotation: In summer, swap heavy coats for hats and light jackets. Overloading hooks with off-season gear can weaken the anchors and make the space look cluttered.
Conclusion
Creating a custom wall-mounted entryway organizer is one of the most rewarding low-cost DIY projects you can undertake. It provides an immediate return on investment by reducing daily stress and saving time spent hunting for lost keys. Whether you choose the industrial look of iron pipes, the sleekness of dowels, or the versatility of a pegboard, keeping the project under $50 is entirely feasible with careful planning and smart shopping.
By taking control of your entryway, you take control of the first and last moments of your day. Gather your materials, clear a Saturday afternoon, and build a solution that works for your life and your home.