Essential Safety Tips: Securing Your Hall Tree and Mudroom Lockers to the Wall
Discover critical methods to secure hall trees and mudroom lockers. Protect your home with expert tips on wall anchoring, anti-tip kits, and installation safety.
Jan 28, 2026 - Written by: Content Bot

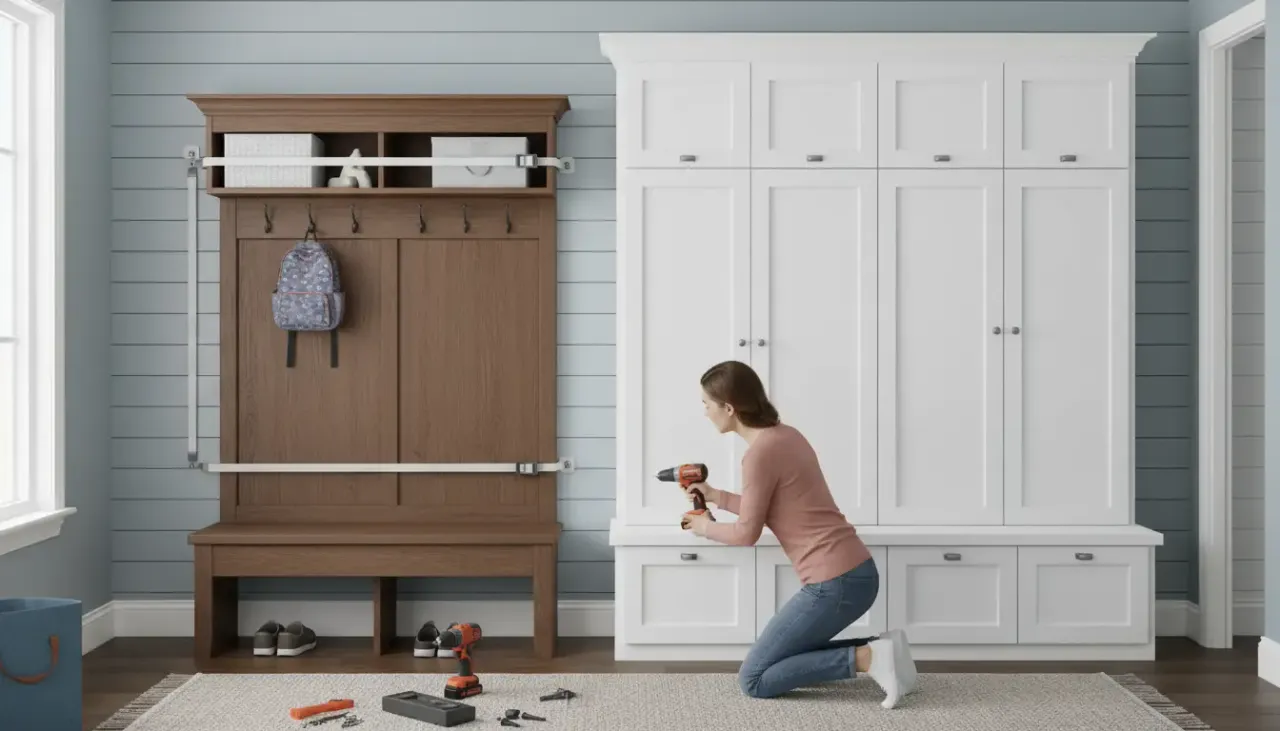
The mudroom is often the unsung hero of the home. It is the transition zone, the drop spot, and the chaos container. We invest time and money into finding the perfect hall tree or installing custom mudroom lockers to organize coats, backpacks, and sports gear. However, amidst the excitement of organizing and decorating, one critical aspect is frequently overlooked: safety.
Large entryway furniture pieces like hall trees and lockers are inherently top-heavy. When you load them with winter coats, hang heavy bags on high hooks, or place storage baskets on the top shelves, the center of gravity shifts dangerously upward. For households with children, pets, or those living in seismic zones, an unsecured hall tree is a significant hazard waiting to happen.
According to the U.S. Consumer Product Safety Commission (CPSC), a child is sent to the emergency room every 60 minutes due to falling furniture or TVs. This is a sobering statistic that highlights why proper installation is not just a recommendation—it is a necessity.
In this comprehensive guide, we will walk you through everything you need to know about wall anchoring hall trees and securing mudroom lockers. We will cover the tools you need, the best anchoring methods for different wall types, and provide a step-by-step tutorial to ensure your entryway is as safe as it is stylish.
The Physics of Tipping: Why Hall Trees are Vulnerable
To understand how to secure your furniture, you must first understand why it tips. Hall trees and lockers are tall, often narrow, and designed to hold weight.
The Lever Effect
When a child climbs on the bench of a hall tree or pulls on an open locker drawer, they are applying a downward force. If that force is applied outside the furniture’s base of support (the footprint on the floor), the unit begins to pivot. Because hall trees are tall, even a small amount of force applied at the top (like an earthquake tremor or a heavy bag swinging) creates significant leverage.
The “Loaded” Risk
An empty hall tree might feel stable. However, once you begin utilizing it for its intended purpose, the dynamics change.
- High Center of Gravity: Winter coats, helmets, and upper-shelf storage bins add weight to the top half of the unit.
- Uneven Loading: If heavy items are hung on the front hooks while the back remains empty, the unit is naturally pulling away from the wall.
- Dynamic Forces: The act of aggressively grabbing a coat or a dog pulling on a leash tied to the leg can introduce sudden lateral forces.
Safety Reality Check: Never assume a piece of furniture is heavy enough to support itself. In fact, heavier furniture causes more severe injuries when it falls.
Essential Tools and Materials for Anchoring
Before you begin drilling holes, you need to gather the right equipment. Using the wrong anchor in drywall can provide a false sense of security, failing the moment actual pressure is applied.
The Must-Have Toolkit
- Power Drill and Drill Bits: Essential for creating pilot holes and driving screws.
- Level: To ensure your furniture is standing straight before you anchor it.
- Tape Measure: For precise placement.
- Pencil: For marking drill points.
- Stud Finder: This is non-negotiable. Anchoring into drywall alone is rarely sufficient for heavy mudroom furniture.
For reliable stud detection, you need a tool that can see deep behind plaster and drywall. We recommend upgrading from magnetic finders to electronic sensors.
Product Recommendation: If you don’t have a reliable way to locate the structural supports in your wall, you cannot ensure safety. A high-quality stud finder is your first line of defense. Check out this Heavy Duty Stud Finder on Amazon
Choosing the Right Anchors
- Furniture Straps: These are flexible straps made of nylon or steel cables. One end attaches to the furniture, the other to the wall stud. They allow for some movement (useful in earthquake zones) but prevent tipping.
- L-Brackets: Rigid metal brackets. These are excellent for a permanent, flush-mount installation where the furniture sits tight against the wall.
- Anti-Tip Kits: Many modern furniture pieces come with these, but the included hardware is often low quality. It is usually safer to buy third-party, high-rated furniture safety brackets.
Identifying Your Wall Type
The method you use to secure mudroom lockers depends entirely on what your wall is made of.
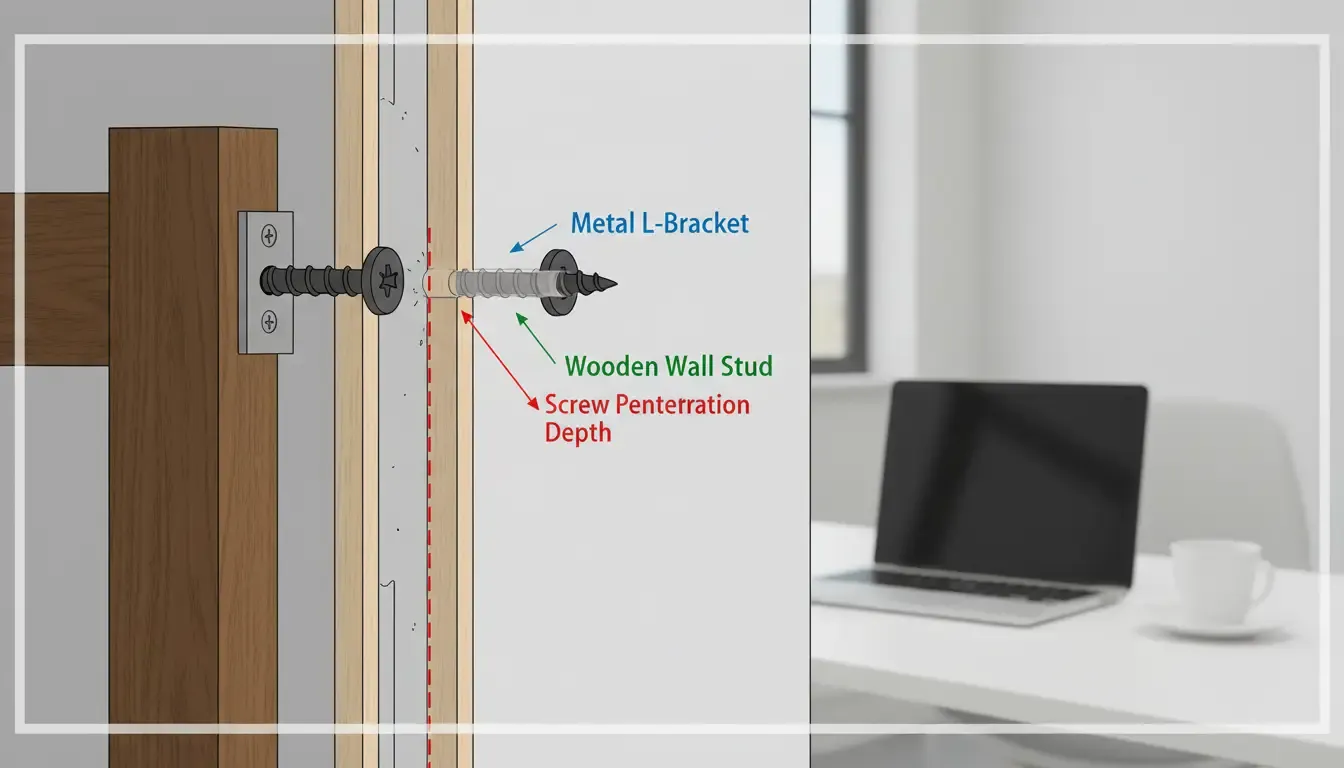
Drywall with Wood Studs
This is the most common scenario. The strongest hold comes from screwing directly into the wooden stud behind the drywall. This provides hundreds of pounds of pull-out resistance.
Drywall (No Stud Available)
Sometimes, the furniture placement just doesn’t align with a stud. In this case, plastic plugs are not enough. You must use high-weight-rated toggle bolts (often called butterfly anchors). These expand behind the drywall to distribute the force over a larger area. However, for a heavy hall tree, we strongly recommend using a bridging method (screwing a piece of wood into two studs and anchoring the furniture to that wood) rather than relying solely on toggle bolts.
Masonry (Brick or Concrete)
If your mudroom is in a basement or a converted garage, you might be dealing with masonry. You will need a hammer drill, masonry bits, and concrete screws or sleeve anchors.
Step-by-Step Guide: Securing Your Hall Tree
Now, let’s get to the work. Follow this process to ensure a secure hold using anti-tip furniture straps or brackets.
Step 1: Position and Level
Place your hall tree exactly where you want it. Use your level to check both the horizontal surface (the bench) and the vertical sides. If you have thick baseboards preventing the unit from sitting flush against the wall, you have two options:
- Cut the baseboard (for built-in looks).
- Use a spacer block or shims to fill the gap behind the unit where the anchor will go.
Step 2: Locate the Studs
Using your stud finder, slide it along the wall behind the unit. Mark the center of the studs with a pencil. Ideally, you want to anchor into two different studs for maximum stability.
Step 3: Attach Brackets to the Furniture
Move the hall tree away from the wall slightly. Identify the solid wood frame of the furniture.
- Warning: Do not attach anchors to the flimsy cardboard backing found on some flat-pack furniture. You must screw into the solid top rail or side panels.
- If using straps, attach one end of the strap to the back or top of the unit according to the manufacturer’s instructions.
Product Recommendation: Standard plastic zip-ties can become brittle over time. For heavy mudroom furniture, steel cables or heavy-duty nylon webbing are superior. Shop for High-Rated Anti-Tip Furniture Straps
Step 4: Attach Brackets to the Wall
Align the wall bracket with your stud marks. Drill a pilot hole into the stud (usually 1/8 inch bit). Drive a 2.5 to 3-inch wood screw through the bracket and into the stud. The screw should penetrate at least 1.5 inches into the actual wood of the stud (accounting for 0.5 inch of drywall).
Step 5: Connect and Tighten
Push the furniture back into place. Connect the furniture bracket to the wall bracket using the strap or connecting pin. Tighten the strap until there is no slack, but do not overtighten to the point where you are lifting the front legs off the floor.
Step 6: The “Shake Test”
Once secured, give the furniture a firm shake. Try to pull the top forward. It should move slightly with the strap tension but should not tip. If the wall anchor pulls out, you missed the stud—start over.
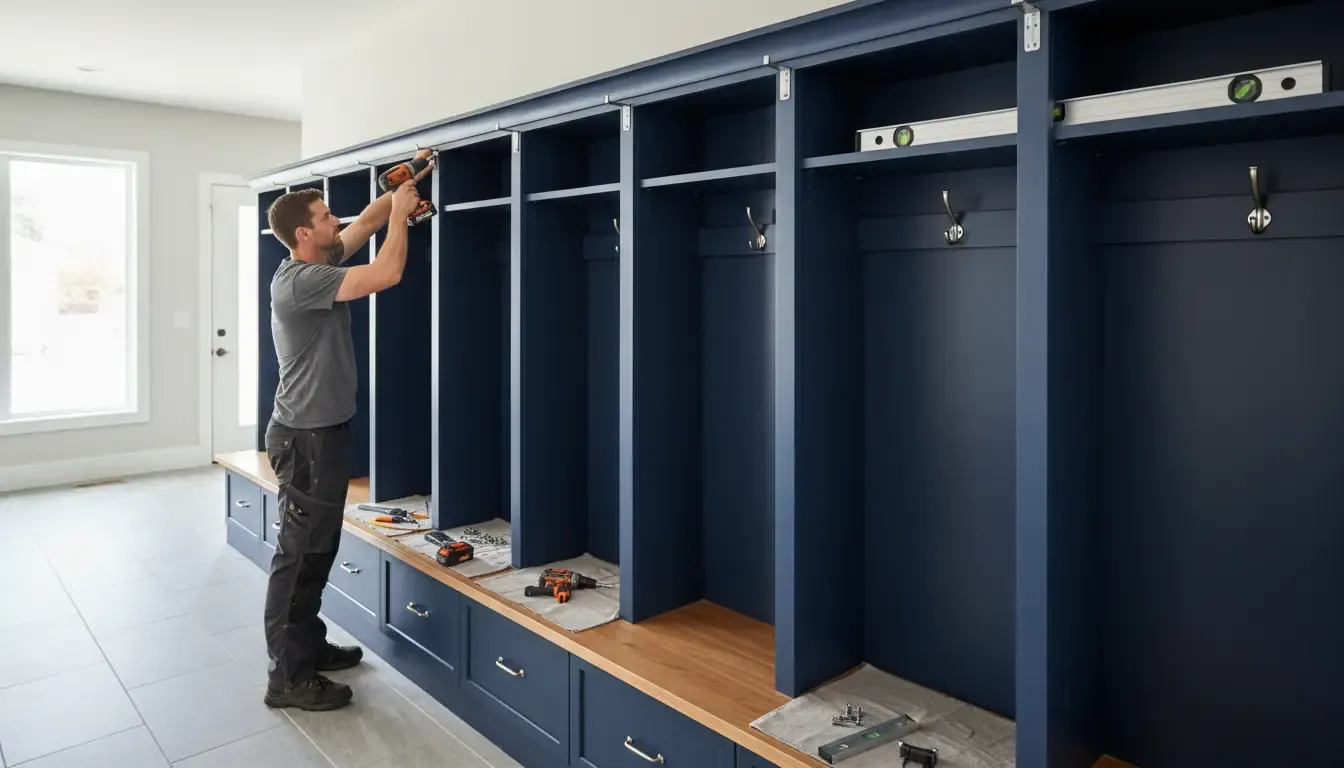
Special Considerations for Mudroom Lockers
Mudroom lockers often come as individual narrow units that are placed side-by-side. This presents a unique challenge and opportunity for stability.
Ganging Lockers Together
If you have multiple locker units, you should “gang” them. This means screwing the units together side-by-side.
- Clamp the sidewalls of two adjacent lockers together so they are perfectly flush.
- Drill through one side into the other (using a bit slightly smaller than your connecting screw).
- Use connecting bolts (sex bolts) or wood screws to bind them.
- Benefit: This creates a wider base of support. A single 12-inch wide locker is very unstable. Four 12-inch lockers screwed together create a 48-inch wide footprint that is much harder to tip.
Securing the “Bank”
Even when ganged together, the entire bank of lockers must be anchored to the wall. Because the unit is now wider, you have a better chance of hitting multiple studs. Aim for at least two anchors for every three locker units.
Earthquake Zones: Specific Requirements
If you live in California, Japan, New Zealand, or other seismically active areas, standard tipping prevention isn’t enough. You need earthquake strapping.
In an earthquake, the vertical motion can jump furniture off the floor, causing L-brackets to disengage if they are open-ended.
- Use Locking Straps: Ensure the mechanism connecting the furniture to the wall locks in place and cannot bounce loose.
- Secure Doors: In a quake, locker doors can fly open, spilling contents and shifting the weight forward instantly. Install positive-catch latches (like push-to-open or magnetic safety locks) that keep doors closed during shaking.
Beyond Anchoring: Loading and Usage Safety
While wall anchoring hall trees is the physical barrier to tipping, how you use the storage is the behavioral barrier.
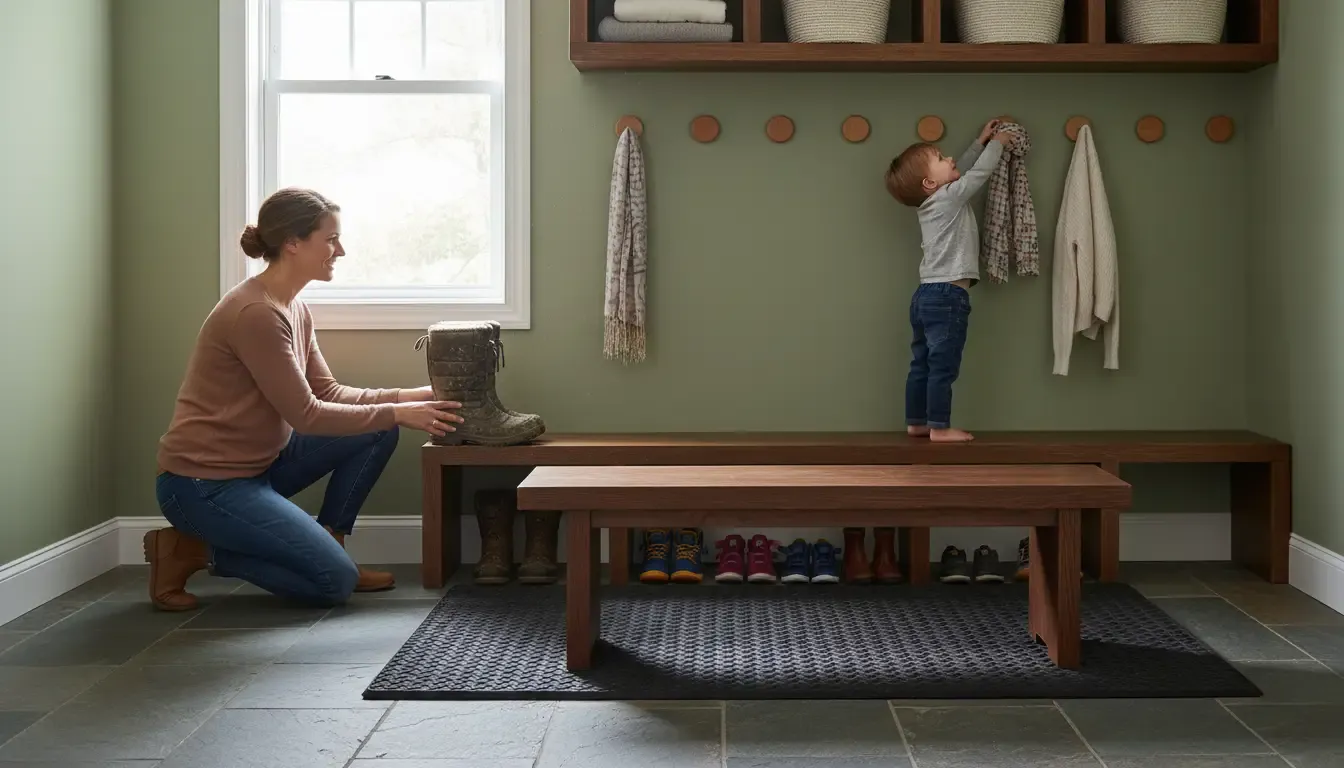
The “Heavy Low” Rule
Always place your heaviest items in the bottom compartments.
- Bottom: Shoes, boots, heavy toolboxes, bags of pet food.
- Middle: Coats, backpacks (on hooks).
- Top: Empty baskets, light seasonal items (scarves, hats), decorative items.
This keeps the center of gravity as low as possible.
Childproofing the Contents
Anchoring prevents the furniture from falling on the child, but it doesn’t prevent the child from accessing dangerous items stored inside.
- If you store cleaning supplies, de-icing salts, or tools in your mudroom lockers, they must be locked away.
- Children often view locker handles as a ladder. Discourage climbing, but assume they will try it anyway (hence the anchoring).
Product Recommendation: To keep curious hands out of lower locker compartments or drawers where you might store heavy or hazardous items, magnetic locks are invisible from the outside but highly effective. Find Child Safety Cabinet Locks Here
Troubleshooting Common Installation Issues
Not every home has perfect walls. Here are solutions to common headaches.
Problem: Thick Baseboards
If you have tall, decorative baseboards, the hall tree stands 1-2 inches away from the wall.
- Solution: Do not slant the bracket. Mount a wooden board (a 1x4 or 2x4) horizontally to the wall studs above the baseboard, at the height of the furniture top. Paint it to match the wall. Anchor the furniture to this board. This “cleat” bridges the gap effectively.
Problem: Uneven Floors
In older homes, floors often slope. If the top of the hall tree leans away from the wall, the anchors will be under constant high tension.
- Solution: Use furniture shims under the front legs of the hall tree to tilt it slightly back toward the wall before you anchor it. This uses gravity to your advantage.
Problem: Metal Studs
In some condos or commercial-style lofts, walls use metal studs instead of wood.
- Solution: Standard wood screws will strip out. You need self-drilling toggle bolts or specific fine-thread screws designed for sheet metal studs.
Aesthetic vs. Safety: Hiding the Hardware
A common objection to furniture safety brackets is that they look ugly. However, with a hall tree, you have the advantage of height.
- Top Mounting: If the hall tree is tall enough (over 6 feet), mount the brackets on the very top roof of the unit. They will be invisible to anyone standing on the ground.
- Inside Mounting: For lockers, you can place the L-bracket inside the top cabinet, screwing through the back panel into the stud. This hides the hardware entirely inside the unit. Note: Ensure the back panel is thick enough or reinforce it with a wood block.
- Paint: Paint the metal brackets the same color as your wall or the furniture to blend them in.
Maintenance: The Set-it-and-Forget-it Myth
Anchoring is not a one-time event. Over time, screws can loosen, straps can degrade, and drywall can compress.
The Annual Checkup
Add “Check Furniture Anchors” to your spring cleaning list.
- Inspect Straps: Look for fraying on nylon straps or rust on steel cables.
- Check Tension: Ensure there isn’t excessive slack.
- Tighten Screws: Give the wall screws a quarter turn to ensure they haven’t backed out due to vibration (from doors slamming or nearby traffic).
Re-Anchoring
If you move the furniture to paint or reorganize, you must re-anchor it immediately. Do not reuse the same holes in the drywall if they have become widened or crumbly. Move the unit a few inches to the left or right to find fresh mounting points, or patch and repair correctly before reinstalling.
Conclusion
Creating a beautiful, organized entryway with a hall tree or mudroom lockers transforms the functionality of your home. It streamlines your morning routine and keeps clutter at bay. But functionality should never come at the cost of safety.
The time investment to secure mudroom lockers and anchor your hall tree is minimal—usually less than 30 minutes. The financial cost is negligible—less than $20 for high-quality hardware. Yet, the peace of mind it provides is priceless. Whether it’s protecting a climbing toddler, a clumsy pet, or your family during a seismic event, proper wall anchoring is the most critical step in your entryway installation.
Don’t wait for a close call to take action. Check your entryway furniture today. If it wiggles, anchor it. Your home should be your sanctuary, and safety is the foundation of that comfort.
Frequently Asked Questions (FAQ)
Q: Can I use Command strips to secure my hall tree? A: Absolutely not. Adhesive strips are designed for lightweight pictures, not heavy furniture. They provide zero protection against tip-over forces. You must use mechanical fasteners (screws/bolts).
Q: My hall tree is extremely heavy; do I really need to anchor it? A: Yes. In fact, heavier furniture is more dangerous. While it takes more force to tip it, once it begins to fall, the momentum is massive and creates a crushing hazard. Gravity affects all objects, regardless of weight.
Q: How many anchors should I use? A: Use at least two anchors for any piece of furniture. For wider banks of lockers, use one anchor for every stud you can align with, or at least one anchor every 3-4 feet.
Q: Does drilling into the wall ruin the resale value of my home? A: No. Small screw holes are easily patched and painted. A safe home is far more valuable, and leaving anchors in place can actually be a selling point for safety-conscious buyers.