how high should coat hooks be
Stop guessing where to drill. An architectural and ergonomic deep-dive into the exact heights for coat hooks in entryways, mudrooms, and closets.
Apr 3, 2026 - Written by: Linda Wise

You stand there, drill in one hand, a beautifully cast iron hook in the other, staring blankly at an empty wall. Your partner says “just put it at eye level,” while your brain is calculating the drop length of your heaviest winter parka.
Drilling into drywall or custom millwork is a commitment. Once that anchor is set, you’re locked in. Placing hardware too low means trench coats will mop your baseboards. Placing it too high transforms your daily routine into a minor athletic event, virtually guaranteeing your kids will just dump their jackets on the nearest chair.
I’ve personally found that hardware placement is where interior design violently collides with human biomechanics. It’s not just about what looks proportionate on the wall; it’s about spatial utility, reachability, and gravity.
Before we dissect the architectural geometry of wall hardware, let’s look at a few pieces of hardware that actually justify putting holes in your walls.
Quick Comparison: Top Picks
| Product | Rating | Check Price |
|---|---|---|
| Heavy Duty Solid Brass Coat Hooks | ⭐⭐⭐⭐⭐ | View on Amazon |
| Rustic Farmhouse Heavy Hook Rail | ⭐⭐⭐⭐½ | View on Amazon |
| Modern Minimalist Swivel Hooks | ⭐⭐⭐⭐⭐ | View on Amazon |
The Standard Rule of Thumb: Ergonomics Meets Architecture
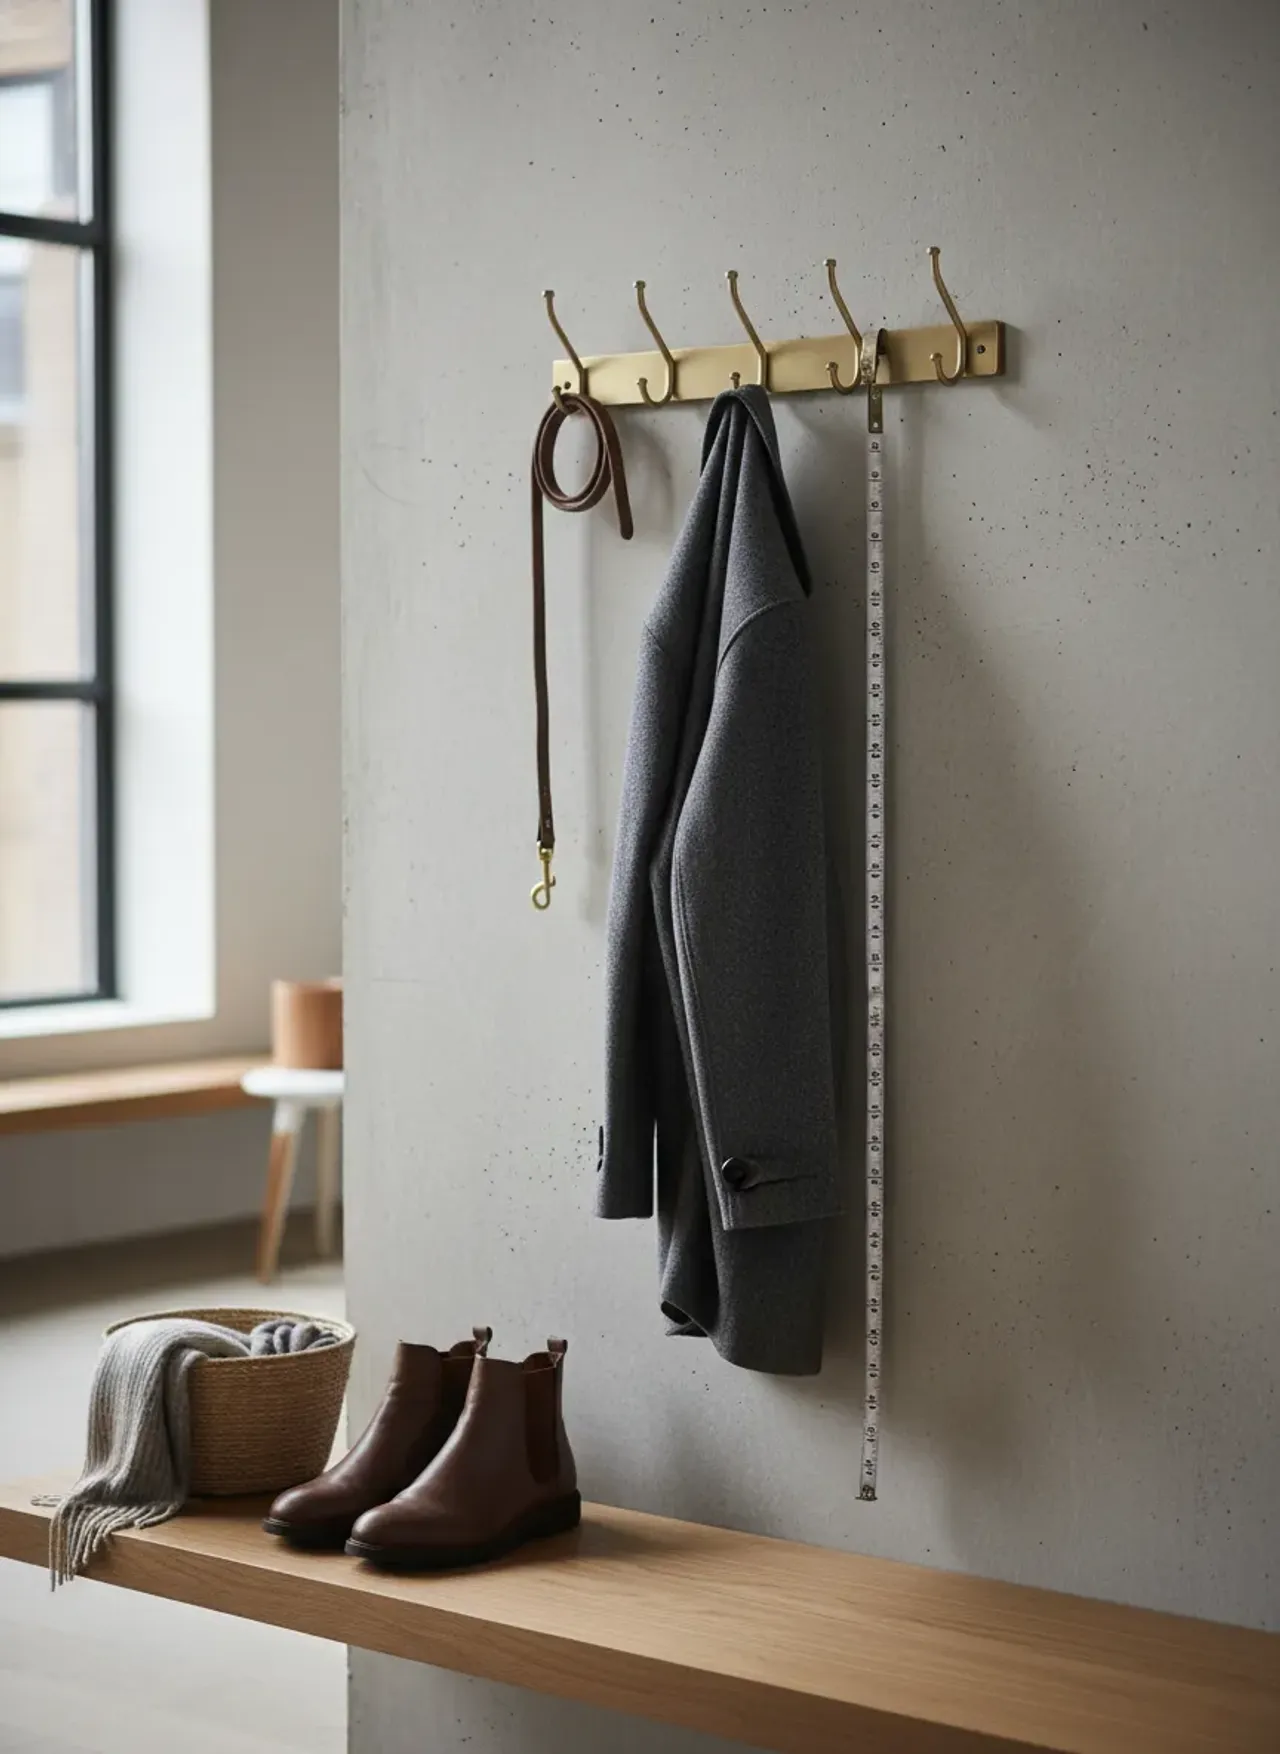
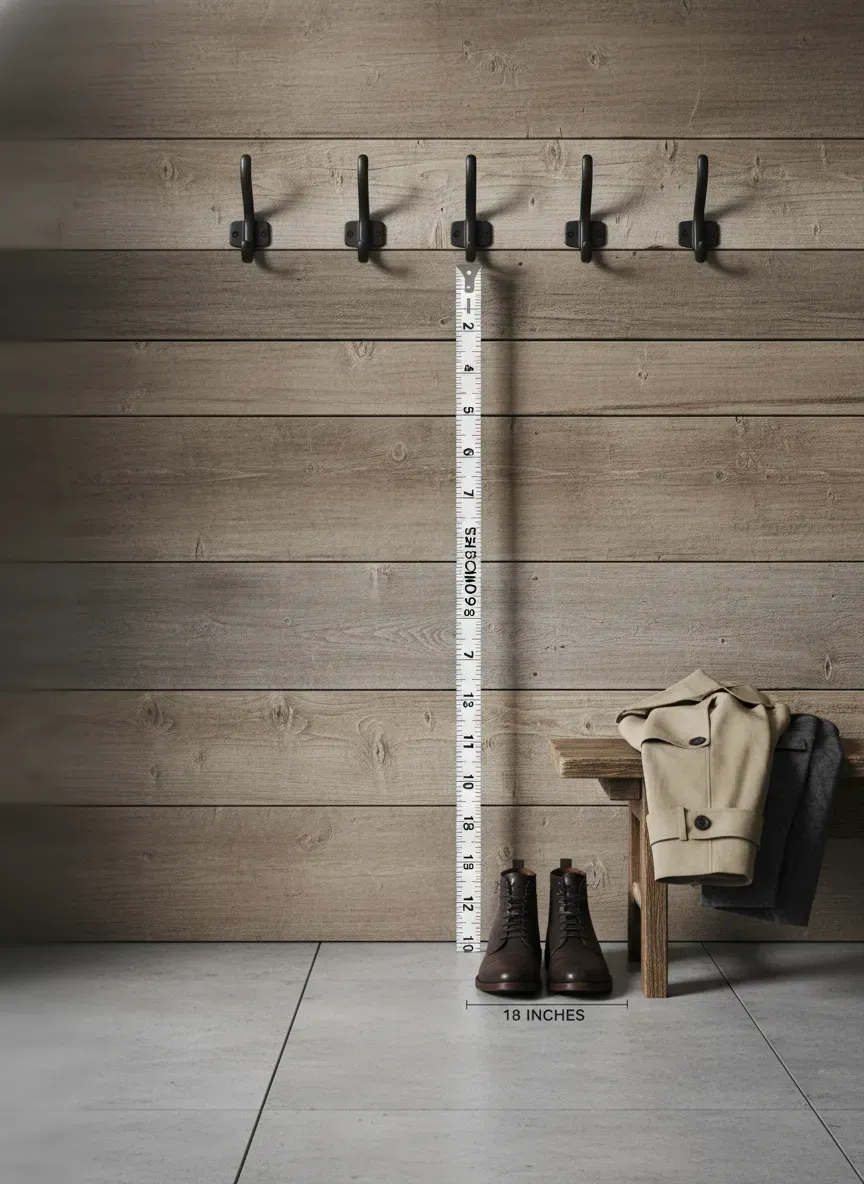
If you are looking for the absolute, industry-standard, foolproof measurement to appease the masses, here it is: 60 inches from the floor.
Five feet dead.
This specific height isn’t arbitrary. It represents the intersection of average adult human shoulder height and the standard drop length of modern outerwear. When you reach for a hook at 60 inches, your arm extends forward at a comfortable 45-to-90-degree angle. You aren’t hyper-extending your rotator cuff, nor are you crouching.
Furthermore, a standard adult winter coat measures roughly 35 to 40 inches from the nape of the neck to the bottom hem. Hanging a 40-inch coat on a 60-inch hook leaves precisely 20 inches of clearance above the floor. This gap is vital. It allows for easy sweeping or vacuuming, accommodates tall baseboards, and leaves ample vertical real estate for boot trays or shoe racks beneath.
The ADA Compliance Factor
If you are designing a commercial space, a public facility, or outfitting a home for aging in place, the 60-inch rule must be modified. The Americans with Disabilities Act (ADA) dictates specific reach ranges to accommodate wheelchair users.
For an unobstructed forward reach, the maximum allowable height is 48 inches from the floor. The minimum is 15 inches. If your entryway serves a multi-generational household or individuals with mobility constraints, dropping a dedicated set of hooks to the 40-to-48-inch range is both a functional necessity and an empathetic design choice.
Variables That Throw the Standard Out the Window
Rules exist to provide a baseline, but residential architecture rarely plays by standard rules. The 60-inch benchmark works flawlessly in a vacuum. In your actual hallway, a dozen different environmental factors will force you to pivot.
Factoring in Ceiling Height and Proportions
Wall hardware visually bisects a space. A horizontal row of hooks acts like a secondary chair rail, drawing the eye across the room.
In a modern home with soaring 10-foot or 12-foot ceilings, a hook rail mounted at 60 inches can suddenly look incredibly diminutive. It feels anchored too close to the floor, leaving a vast, imposing expanse of empty drywall above it. To correct this optical illusion, designers often elevate the hardware to 66 or even 72 inches, bridging the gap visually.
Conversely, in historic homes, basements, or attic conversions with low 7-foot ceilings, a 60-inch hook placement feels claustrophobic. The coats will visually crowd the ceiling line. Dropping the hardware down to 54 inches restores breathing room to the upper third of the wall.
The “Long Coat” Conundrum
Do you live in a notoriously frigid climate? Your outerwear wardrobe likely dictates your hardware placement.
A traditional wool overcoat, a floor-length duster, or a heavy-duty parka often exceeds 45 inches in length. Some hit the 50-inch mark. If you mount a hook at 60 inches and hang a 50-inch coat on it, you have exactly 10 inches of clearance. Throw a bulky pair of winter boots on the floor underneath, and your coat hem is now actively soaking up salt, snow, and mud from your footwear.
If your closet heavily features long outerwear, bump your primary hooks up to 65 or 68 inches.
Children and Accessibility (Drop Zones)
Here’s the real kicker: if children cannot reach a hook, that hook does not exist to them.
Designing a family mudroom requires acknowledging the chaotic reality of kids coming home from school. If the hardware is out of reach, backpacks and jackets will inevitably form a sedimentary layer on your floor.
For children aged 4 to 8, the optimal height is roughly 36 to 42 inches. For pre-teens, 48 to 54 inches works beautifully. This is where staggered designs shine. Installing a primary row of heavy-duty hardware at 60 inches for adults, accompanied by a secondary row at 40 inches for kids, instantly solves the accessibility issue while doubling your storage density.
Before you finalize this layout, you must account for the horizontal spread. A common mistake is packing hardware too tightly. To avoid a tangled mess of zippers and backpack straps, spend a few minutes understanding the ideal spacing between hooks to ensure each garment has adequate breathing room.
Strategic Placement by Room Function
Not all hooks serve the same master. The geographic location of the hardware within your home drastically alters the height requirements.
The Formal Entryway vs. The Utilitarian Mudroom
Your formal front entryway is a space of presentation. When guests arrive, you want symmetry, clean lines, and architectural harmony. Hooks here are typically mounted higher—often integrated into wainscoting or board and batten trim at the 60-to-66-inch mark. The goal is to keep the coats elevated and out of the immediate visual sightline of adjacent living spaces.
The mudroom, however, is an entirely different beast. It is a high-impact, utilitarian trench. You are dealing with wet dog leashes, heavy canvas totes, snow pants, and muddy boots. If you are currently agonizing over how to choose the perfect setup for a small mudroom, vertical optimization is your greatest weapon.
In a mudroom, you rarely want just one row of hardware. A popular configuration is a built-in bench sitting at 18 inches high, a lower row of hooks at 42 inches (for kids and bags), and an upper row at 66 inches for long coats.
Bathroom Towel and Robe Hooks
Throw out the 60-inch rule when you enter the bathroom.
Bath towels and heavy terrycloth robes require massive amounts of airflow to dry properly. If you hang a damp towel on a hook at 60 inches, it may dry eventually. If you bump that hook up to 68 or 70 inches, you take advantage of the ambient heat that naturally rises toward the ceiling, significantly accelerating the drying time.
Furthermore, robes are notoriously long. A plush winter robe can easily drag on the floor if hung on a standard 60-inch hook, especially if the hook has a shallow drop. Aim high in the bathroom, provided it doesn’t interfere with swinging shower doors or medicine cabinets.
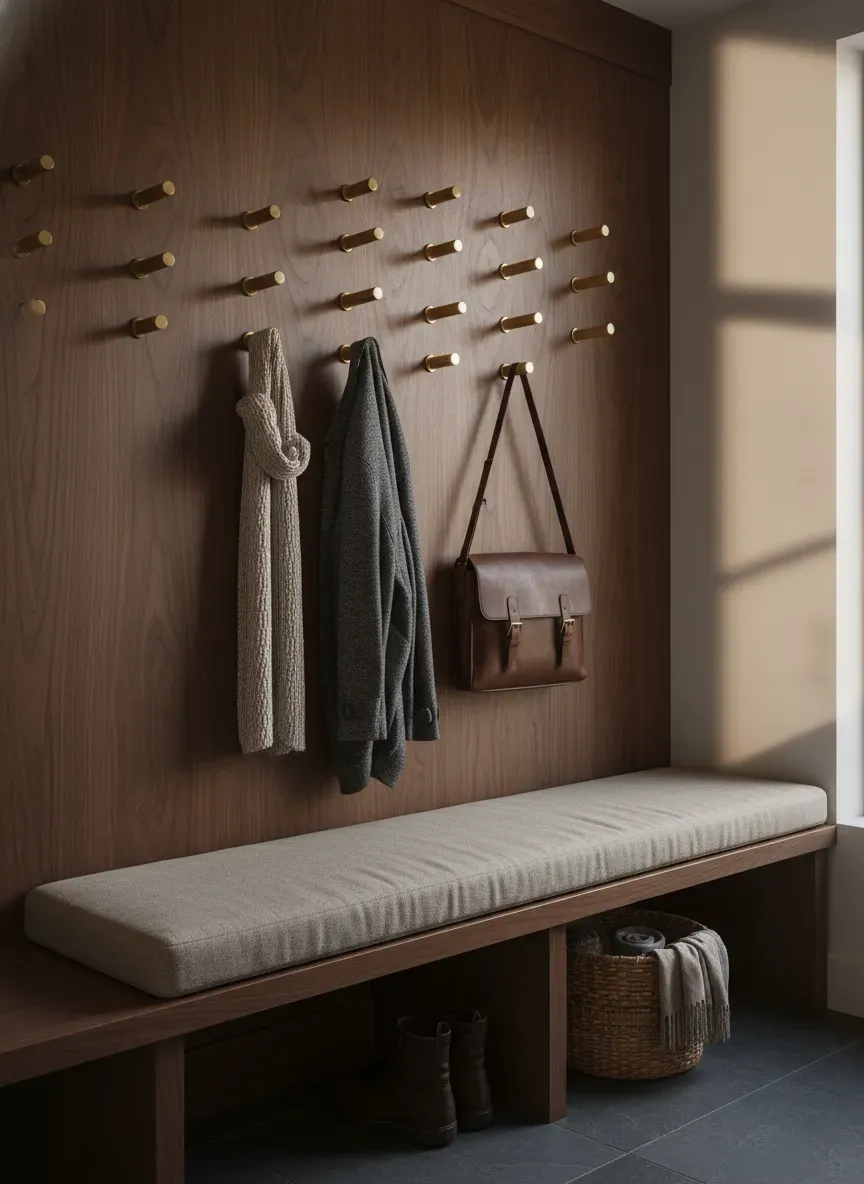
Closets and Hidden Storage
Inside a walk-in closet, hooks are usually relegated to the role of accessory managers—holding belts, ties, scarves, or tomorrow’s outfit.
Because closet walls are typically obscured by hanging clothes, hardware can be placed wherever it fits. However, a brilliant use of dead space is installing hooks on the inside face of the closet door.
If you go this route, be hyper-aware of the door’s core. Solid wood doors can take a hook anywhere. Hollow core doors require you to anchor the hardware either at the extreme top (where the solid wood blocking is) or use specialized hollow-door anchors. Standard heights here are usually 60 to 65 inches, keeping items at eye level for quick grabs during morning routines.
Advanced Hook Architecture: Multi-Tiered Systems
When a single row of hardware won’t cut it, you venture into multi-tiered configurations. This requires precise mathematical planning to avoid overlapping garments.
If you are installing an upper and lower rail, the minimum vertical distance between the two should be 18 inches. Anything less, and the coats on the top row will completely swallow the hooks (and whatever is hanging on them) on the bottom row.
A mathematically sound setup looks like this:
- Upper Rail: 66 inches from the floor.
- Lower Rail: 42 inches from the floor (a 24-inch vertical gap).
- Baseboard/Floor: 42 inches of clearance below the bottom rail.
To maximize density without creating a clustered mess, stagger the individual hooks. If the upper rail has hooks placed every 12 inches, place the lower rail hooks at the 6-inch intermediate marks. This zig-zag pattern allows long coats from the top rail to drape smoothly between the jackets hanging on the bottom rail.
Pro Tip: Never assume your floor is perfectly level or your ceiling is perfectly straight. When mapping out a long horizontal row of hooks, measure up from the floor at both ends, but use a high-quality laser level to draw your actual drilling line. If your house has settled, a mathematically “correct” measurement from the floor might result in a visually slanted hook rail. Trust the level, not the floorboards.
The Mathematics of Anchoring and Substrates
Finding the perfect height is utterly useless if the hardware rips out of the wall the first time you hang a wet wool coat on it. The substrate (the material you are drilling into) dictates everything.
If your ideal aesthetic height lands exactly at 60 inches, but there is no wooden stud behind the drywall at your chosen horizontal spacing, you have a critical decision to make.
- Use Heavy-Duty Anchors: Toggle bolts or snap-toggles can hold upwards of 50 pounds in standard half-inch drywall. For single hooks holding heavy bags, this is the absolute minimum requirement.
- Install a Backer Board: This is the most architecturally sound method. Mount a 1x4 or 1x6 piece of finished lumber horizontally across the wall, anchoring it directly into every stud it crosses. Then, mount your hooks to the backer board. This allows you to place the hooks at any horizontal spacing you desire, completely independent of the stud locations behind the wall.
When integrating hooks into existing millwork, such as board and batten, the height is predetermined by the carpentry. Hooks should be mounted on the horizontal top rail (the batten). If your top rail was installed at 54 inches, that is your hook height. Mounting a hook directly into the drywall an inch above a beautiful piece of custom trim looks like a glaring afterthought.
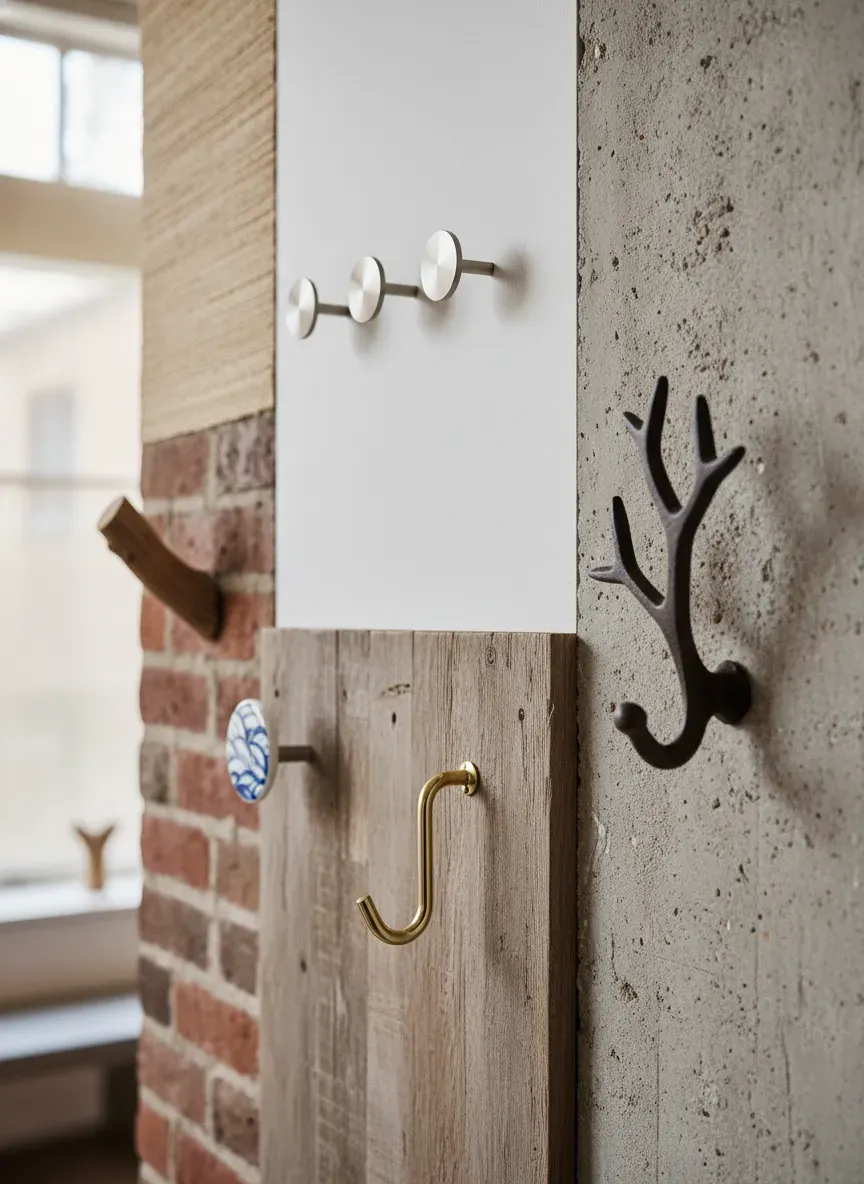
Curated Hardware: My Top 3 Recommendations
The height of the hook matters, but the projection and architecture of the hook itself dictate what you can actually hang on it. Here are three distinct styles that solve different spatial problems.
1. The Heavyweight Champion If you are anchoring into solid wood and need to hold 30-pound winter coats or heavily loaded backpacks, the Heavy Duty Solid Brass Coat Hooks are exceptional. They feature a deep, pronounced upper hook that prevents thick collars from slipping off, and a lower prong for lighter items. Because of their significant vertical profile, you’ll want to mount the center screw right at the 60-inch mark.
2. The High-Traffic Solution For mudrooms or busy family hallways, individual hooks can become tedious to level and space perfectly. The Rustic Farmhouse Heavy Hook Rail provides a pre-measured, highly durable solution. The backer board distributes the weight across a larger surface area, making it ideal for stud-mounting. This is the perfect piece to anchor at 42 inches for a dedicated kids’ drop zone.
3. The Space-Saver In cramped hallways or tight closets where protruding hardware becomes a shoulder-checking hazard, Modern Minimalist Swivel Hooks are a revelation. They fold flat against the wall when not in use. Because they lack a deep curve, they are best suited for garments with hanging loops rather than thick collars. Mount these slightly higher—around 64 inches—to keep them well out of the way of foot traffic.
Common Pitfalls and How to Sidestep Them
Even with perfect measurements, environmental hazards can ruin your installation. Before your drill bit touches the drywall, audit your space for these silent killers.
The Door Swing Arc It is astonishing how often people mount a beautiful row of hooks right behind an entry door. They measure the height perfectly, install the hardware, and then blindly throw the front door open. The doorknob smashes into the coats, or worse, the metal hooks gouge the finish on the door. Always physically swing adjacent doors fully open and mark their boundaries before installing hardware.
Proximity to Heat Sources If you are mounting hardware above a baseboard heater, a radiator, or a forced-air vent, you must calculate the drop length of your longest garment. Hanging a synthetic nylon jacket so it drapes directly over an active radiator is a massive fire hazard. Ensure you have an absolute minimum of 12 inches of clearance between the bottom hem of the longest coat and any active heat source.
Pocket Doors and Plumbing If you are placing hooks on a wall that houses a pocket door, you cannot use heavy-duty wall anchors or long screws. Penetrating the drywall by more than half an inch will inevitably scratch the hidden door or prevent it from sliding entirely. Similarly, walls shared with bathrooms often house plumbing vents or water supply lines exactly where you want to drill. Use a high-quality stud finder with deep-scan and wire-warning capabilities to map the wall’s interior before anchoring.
Key Takeaways for Perfect Placement:
- Default to 60 inches for standard adult outerwear and optimal ergonomics.
- Drop down to 36-42 inches for young children, or 48 inches for ADA compliance.
- Elevate to 66-70 inches in bathrooms for towel airflow, or for floor-length trench coats.
- Always leave at least 18 inches of vertical space between staggered rows.
- Never trust the floor to be level; always use a laser level for horizontal alignment.
- Your substrate dictates your weight capacity. When in doubt, use a backer board anchored directly to the studs.
The Bottom Line Hardware height is not a random guess; it is a calculated response to the specific geometry of your home and the people living in it. By evaluating ceiling height, garment length, and daily traffic patterns, you transform a simple piece of metal into a seamlessly integrated architectural feature. Measure twice, factor in the drop length, and you’ll never have to sweep a muddy jacket off the floor again.
You’ll notice that executing a truly flawless entryway setup—whether it’s installing a custom backer board or building a beautiful built-in bench for your mudroom—requires a bit of foundational woodworking knowledge. If you’re meticulous enough to research the exact ergonomic height of your wall hardware, you probably appreciate the value of custom, hand-crafted solutions rather than settling for flimsy, mass-produced particleboard furniture.
If you want to take your home organization to the next level and build custom mudroom benches, stunning wainscoting, or your own heavy-duty coat racks from scratch, I highly recommend checking out Ted’s Woodworking. It is an absolute goldmine containing over 16,000 step-by-step woodworking plans, ranging from beginner weekend projects to master-level architectural builds. It removes all the guesswork from joinery and dimensions. Right now, you can grab the entire massive collection at a massive 75% discount.