High Style, Low Cost: 7 Budget-Friendly DIY Bench Ideas
Discover 7 budget-friendly DIY bench ideas that look incredibly high-end. Learn expert woodworking techniques, material selection, and finishing secrets.

Mar 21, 2026 - Written by: Linda Wise
I’ve personally found that the furniture market is currently suffering from a bizarre polarization. On one end of the spectrum, you have mass-produced, flimsy particleboard pieces that wobble the second you look at them. On the other, you have boutique, handcrafted hardwood furniture carrying price tags that require a second mortgage. Bridging that massive chasm is the art of strategic, high-impact DIY woodworking.
You don’t need a sprawling shop outfitted with fifty thousand dollars worth of industrial machinery to create something breathtaking. You need ingenuity, a handful of reliable tools, and an understanding of scale, proportion, and finishing. Building a bench is the perfect gateway project. It demands structural integrity because it has to hold human weight, yet its relatively small footprint makes it an approachable weekend endeavor.
I want to share seven distinct DIY bench builds that completely shatter the correlation between budget and aesthetics. These designs look like they were plucked straight from a high-end architectural digest, yet they utilize accessible materials from your local big-box home improvement store or lumber yard.
Before we dig into the blueprints, here is a breakdown of the foundational tools and adhesives I rely on to elevate cheap lumber into heirloom-quality fixtures.
Quick Comparison: Top Picks
| Product | Rating | Check Price |
|---|---|---|
| Kreg Pocket-Hole Jig 320 | ⭐⭐⭐⭐⭐ | View on Amazon |
| Titebond III Ultimate Wood Glue | ⭐⭐⭐⭐⭐ | View on Amazon |
| DEWALT Random Orbit Sander | ⭐⭐⭐⭐½ | View on Amazon |
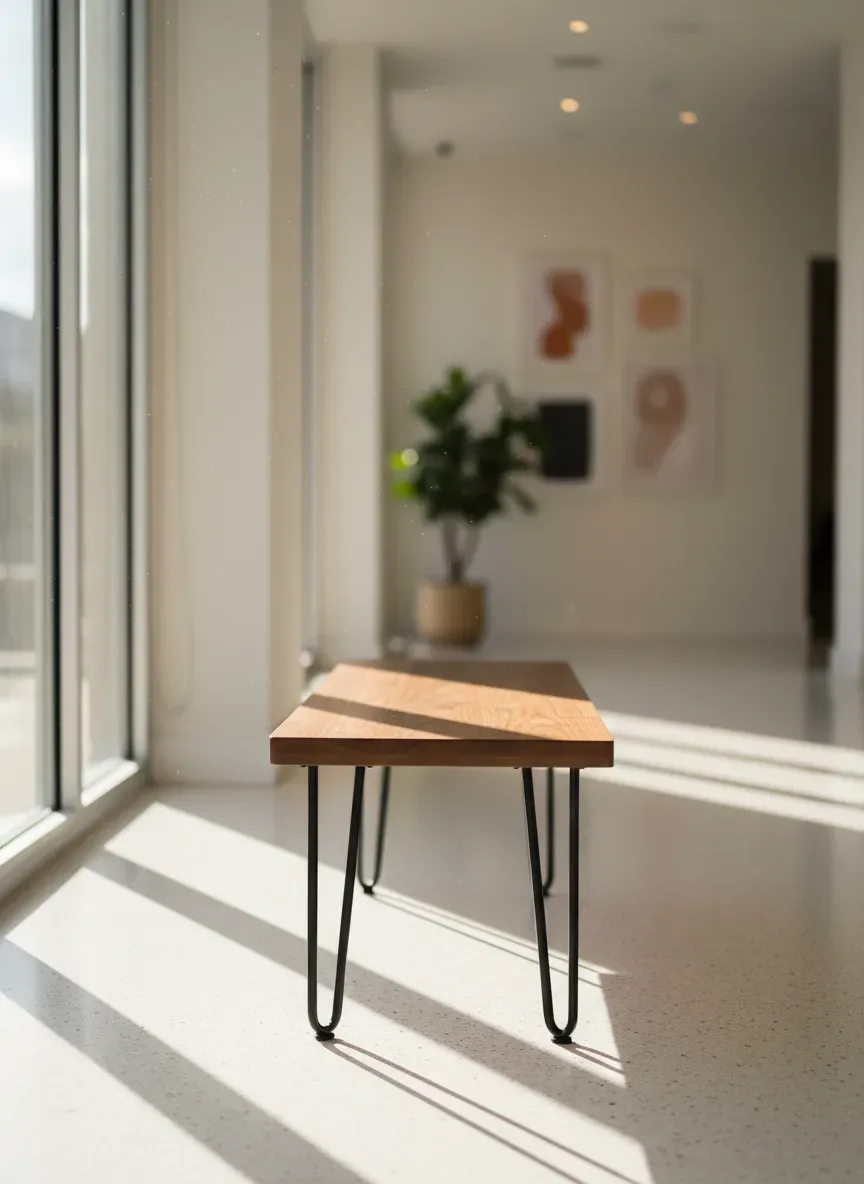
1. The Modern Hairpin Leg Edge-Glued Bench
There is a distinct, kinetic energy to mid-century modern design. It champions negative space and clean geometry. The modern hairpin bench is arguably the highest-ROI project on this list regarding time invested versus the visual payoff.
The Strategy
Instead of dropping serious cash on a solid slab of premium walnut, we rely on standard dimensional pine or Douglas fir. By edge-gluing three 2x6 boards together, you create a substantial, chunky seat. The magic happens in the refinement.
Execution and Nuance
You’ll notice that factory edges on construction lumber are heavily rounded. To achieve that seamless, custom-furniture look, you must rip those rounded edges off using a table saw or a circular saw with a straight-edge guide before gluing them up.
Once your boards have sharp, 90-degree edges, apply a liberal bead of Titebond III Ultimate Wood Glue and clamp them tight.
Pro Tip: Alternate the direction of the end-grain rings (look at the end of the boards; the curved rings should alternate up, down, up). This drastically minimizes the risk of the bench cupping or warping over time as the wood responds to ambient humidity.
After the glue cures, sand the entire assembly meticulously. Start at 80-grit to level the joints, move to 120, and finish at 220. Attach heavy-duty steel hairpin legs to the bottom using threaded inserts rather than standard wood screws. Threaded inserts grip the wood fibers infinitely better, ensuring the legs never tear out when someone inevitably scoots the bench across the floor while sitting on it.
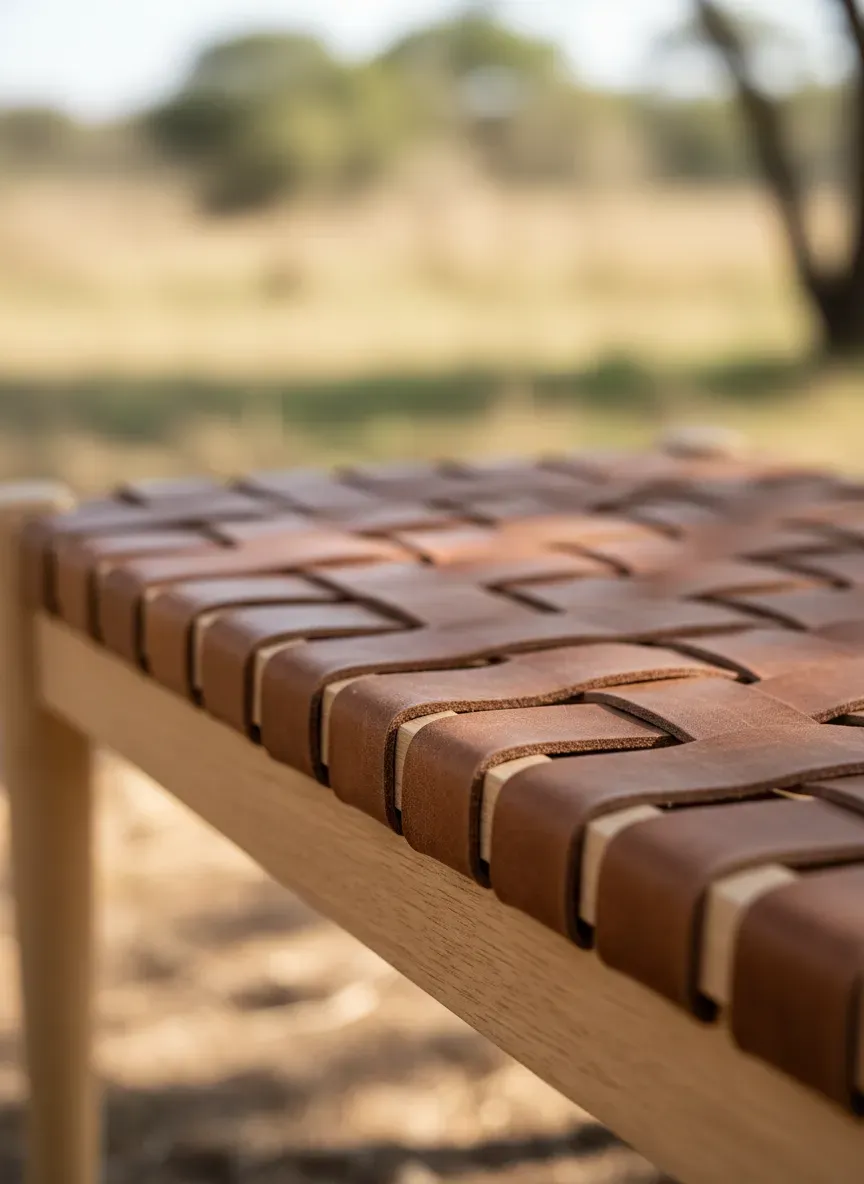
2. The Woven Leather Safari Bench
Texture transforms a room. While flat wood surfaces are beautiful, introducing a tactile element like leather immediately signals luxury. The woven leather safari bench blends minimalist Scandinavian framing with rugged, equestrian-inspired upholstery.
Frame Construction
The base is a simple rectangular frame built from affordable hardwood dowels or square oak balusters found in the stair aisle of your hardware store. Oak is preferable here because the frame needs high tensile strength to combat the inward pulling force of the woven top. Join the corners using simple half-lap joints or hidden dowel pins for a clean, fastener-free aesthetic.
The Weaving Process
You don’t need expensive, full-grain Italian leather hides for this. Search online for “leather strapping rolls” or heavy-duty canvas webbing. You will cut strips to wrap vertically and horizontally across the top frame, creating a tight basket weave.
The secret to a taut weave that doesn’t sag under body weight is securing the straps tightly to the underside of the frame. Use a pneumatic upholstery stapler, pulling the strapping incredibly tight before driving the staple home. The resulting piece looks like a $1,200 boutique showroom item but usually costs less than $75 in materials.
3. The Brutalist Concrete and Cedar Block Bench
Sometimes, you need a piece that commands attention through sheer visual weight. Brutalist design embraces raw, unapologetic materials. If you need a robust seating option for a mudroom, an outdoor patio, or an industrial loft space, the cinder block and cedar bench is an absolute powerhouse.
Sourcing and Assembly
You will need six standard hollow-core cinder blocks and four 4x4 cedar posts. That is the entire material list.
Stack the cinder blocks vertically, three on the left and three on the right, spacing them about four feet apart. The hollow voids in the blocks act as perfectly sized receptacles for the 4x4 cedar posts. Slide the posts through the top holes of the stacked blocks.
Elevating the Aesthetic
To prevent this from looking like a makeshift college dorm setup, you have to treat the materials with respect.
- The Concrete: Paint the cinder blocks matte black or a deep charcoal gray using masonry paint. This instantly elevates them from “construction site debris” to “architectural elements.”
- The Cedar: Sand the cedar posts smooth. Cedar is naturally rot-resistant, but applying a rich, penetrating oil finish like teak oil or pure tung oil will make the grain pop brilliantly and offer a warm contrast against the dark concrete.
4. The Slatted Scandi-Style Bench
Inspired by the iconic mid-century Nelson platform bench, this slatted design is an exercise in rhythm and repetition. It relies entirely on straight cuts and exact spacing, making it a fantastic project for building your precision woodworking skills.
Achieving Perfect Spacing
The seat consists of several narrow wooden slats (1x2 pine or poplar boards work beautifully) running lengthwise, separated by small, equally sized spacer blocks at the ends and in the middle.
Here is the real kicker: Do not try to measure the gaps with a tape measure. You will drive yourself insane, and the cumulative error will result in a crooked bench. Instead, cut a small scrap block of wood to your exact desired gap width (say, 3/4 of an inch). Use this physical spacer block to separate each slat as you glue and nail them together from the underside.
Finishing for Modern Appeal
Slatted benches look best when they boast a sleek, uniform finish. Ebonizing the wood—using a specialized black wood stain or an iron acetate solution (made by dissolving steel wool in vinegar)—gives the bench a striking, sculptural presence. Seal it with a satin polyurethane to protect the color without adding a cheap, plastic-looking gloss.
5. The Upholstered Storage Ottoman Bench
Functionality doesn’t have to compromise style. In entryways, bedrooms, or living rooms, hidden storage is worth its weight in gold. Building an upholstered storage bench allows you to hide winter gear, shoes, or spare blankets while offering comfortable seating.
If you’re tackling a full foyer revamp, you might want to look at comprehensive professional entryway storage setups for inspiration on how this bench fits into the broader ecosystem of a well-designed home.
Building the Carcass
The core of this bench is a simple plywood box. Because it will be entirely covered in fabric, you don’t need expensive cabinet-grade plywood; standard 3/4-inch CDX or sanded pine plywood will suffice. Assemble the box using wood glue and brad nails, ensuring the corners are square.
Attach a sturdy piano hinge to the back edge to support the lid. Piano hinges distribute the weight of the lid across the entire length of the wood, preventing the screws from tearing out over years of opening and closing.
Professional Upholstery Secrets
The difference between a lumpy, amateur DIY cushion and a crisp, professional one comes down to foam density and batting.
- Use high-density polyurethane foam (at least 2 inches thick) for the seat.
- Wrap the foam entirely in Dacron batting before applying your fabric. The batting softens the harsh edges of the foam and fills out the fabric corners, creating a plush, crowned look.
- When stapling your fabric to the underside of the lid, start in the centers of all four sides and work your way toward the corners, pulling the fabric taut with even pressure.
6. The Reclaimed Barnwood Farmhouse Bench
Farmhouse style endures because it evokes warmth, history, and unpretentious comfort. A trestle-style farmhouse bench built from reclaimed wood (or aggressively distressed new wood) anchors a dining room or hallway with substantial gravity.
Masterful Joinery on a Budget
Farmhouse benches endure a lot of lateral stress. If you just screw a top onto four straight legs, it will sway and eventually collapse. You need a trestle base—an A-frame or H-frame structure where the legs are connected by a horizontal stretcher running parallel to the floor.
This is where the Kreg Pocket-Hole Jig 320 pays for itself instantly. Pocket hole joinery allows you to drive screws at an angle, pulling the thick, chunky framing pieces together with incredible force. It hides the fasteners underneath the bench, maintaining the uninterrupted rustic facade.
Distressing Techniques
If authentic reclaimed barnwood is too expensive or hard to find in your area, you can age new pine artificially. Beat the wood with heavy chains, use a wire brush to dig out the soft earlywood grain, and create artificial wormholes using an awl. Apply a dark walnut stain, wipe it off almost immediately, and seal it with a matte wax. The patina will look remarkably authentic, mimicking decades of sun and wear.

7. The Faux-Live Edge Slab Bench
Solid, kiln-dried live edge slabs (wood that retains the natural, undulating exterior contour of the tree) are breathtakingly beautiful. They are also notoriously expensive, often costing hundreds or thousands of dollars for a single slab. You can hack this aesthetic using standard lumber and an angle grinder.
The Shaping Process
Purchase a thick, wide piece of dimensional lumber. A 2x10 or 2x12 piece of Douglas Fir is an excellent canvas. Clamp the board securely to your workbench.
Equip an angle grinder with a heavy-grit flap disc (40 or 60 grit). Carefully run the grinder along the two long edges of the board. You are intentionally removing the straight, factory-milled edge and carving random, organic waves and divots into the wood. Vary the angle and the pressure.
Sanding and Sealing
Once you have carved a convincing faux-live edge, switch to your DEWALT Random Orbit Sander to smooth out the grinder marks.
Douglas fir has a tendency to absorb stain unevenly, leading to a blotchy finish. To counter this, always apply a pre-stain wood conditioner before staining. Finish with a wiping varnish—a blend of oil and polyurethane—to give the wood a rich, hand-rubbed luster that highlights your newly carved “live” edges. Mount the slab on heavy cast-iron or steel A-frame legs to complete the industrial-chic silhouette.
Advanced Theory: Why DIY Furniture Fails (And How to Prevent It)
Creating high-style furniture on a budget isn’t just about slapping wood together and hoping for the best. It requires a fundamental understanding of material science and structural mechanics. Let’s delve into the hidden traps that ruin promising DIY bench projects.
The Tyranny of Wood Movement
Wood is hygroscopic. This means it acts like a dense, fibrous sponge, constantly absorbing and releasing moisture from the surrounding air to reach equilibrium with the environment. As it absorbs humidity, it expands; as the air dries out in the winter, it contracts.
This movement happens primarily across the grain (width), not along the grain (length).
If you rigidly attach a solid wood bench top to a solid wood frame using heavy screws or glue across the width of the board, you have created a cross-grain situation. When summer arrives and the bench top tries to expand, the rigid frame will restrict it. The immense hydraulic pressure of the expanding wood will literally tear the bench apart, resulting in massive, ugly cracks splitting right down the center of your beautiful seat.
The Solution: Always allow for movement. When attaching a solid top to a base, use slotted brackets, figure-eight fasteners, or elongated screw holes. This allows the top to slide microscopically back and forth throughout the seasons without compromising the structural integrity of the piece.
The Capillary Action of End Grain
The ends of a wooden board are fundamentally different from the faces. Think of the structure of wood as a tightly packed bundle of drinking straws. The end grain is the open ends of those straws.
When you apply stain or finish to end grain, capillary action sucks the liquid deep into the wood fibers exponentially faster than the face grain. This results in the ends of your bench turning almost pitch black while the top remains a lighter shade.
The Solution: You must restrict the absorption rate of the end grain. You can achieve this by sanding the end grain to a much higher grit than the rest of the board (if you sand the top to 220, sand the ends to 400). Alternatively, wipe a highly diluted coat of shellac or wood glue onto the end grain before staining to partially seal the pores.
Sanding Disasters: The Pigtail Effect
Nothing ruins the illusion of high-end furniture faster than swirling, pigtail-shaped scratch marks visible under the stain. These occur when woodworkers press down too hard on a random orbit sander, or move the sander across the wood too quickly.
The Solution: Let the weight of the tool do the work. Your hand should merely guide the sander, not force it down. Move the sander at an agonizingly slow pace—about one inch per second. Always progress sequentially through the grits (80, 120, 150, 180, 220). Skipping a grit means the subsequent sandpaper is too fine to remove the deep scratches left by the previous one.
Key Takeaways
- Dimensional Lumber Needs Refining: Never use factory edges if you want a custom look. Rip the rounded corners off before gluing.
- Joinery Matters: Utilize pocket holes, half-laps, and proper wood glue to ensure the bench can actually withstand human weight.
- Respect Wood Movement: Never rigidly fasten wide, solid wood tops to restrictive bases. Use figure-eight fasteners or slotted holes to prevent cracking.
- Texture Elevates Design: Incorporating leather, concrete, or carefully carved faux-live edges immediately adds monetary perceived value to cheap materials.
- Finishing is 50% of the Project: Take your time sanding, seal your end grain, and always use pre-stain conditioner on softwoods like pine and fir.
The Bottom Line: A beautiful home aesthetic is not gatekept by your bank account. It is unlocked through patience, a willingness to learn basic structural mechanics, and the application of thoughtful finishing techniques. You can transform fifty dollars worth of raw materials into a stunning, functional centerpiece that commands the entryway of your home.
Here’s the real kicker: if you found these bench ideas inspiring, you are barely scratching the surface of what you can accomplish in your garage or backyard. I highly recommend checking out Ted’s Woodworking. It is an absolute goldmine containing over 16,000 detailed woodworking plans, complete with step-by-step instructions, cut lists, and 3D schematics for every skill level. Right now, they are offering a massive 75% discount, making it the most cost-effective way to rapidly level up your DIY furniture game and fill your home with stunning, custom-built pieces.