Miter Saw Station Secrets: Long Bench Builds for Precision Cuts
Discover the engineering secrets behind building a flawless long-bench miter saw station. Eliminate kerf pinch, master coplanar wings, and cut with absolute precision.
Mar 22, 2026 - Written by: Linda Wise
You know the sound. That terrifying, violent crack when a heavy piece of oak binds against a spinning blade because the tail end of your stock dropped off a flimsy roller stand. It ruins the wood. It shreds your nerves. And if you are relying on a portable, rickety setup for your primary shop cutting, you are actively sabotaging your own craftsmanship.
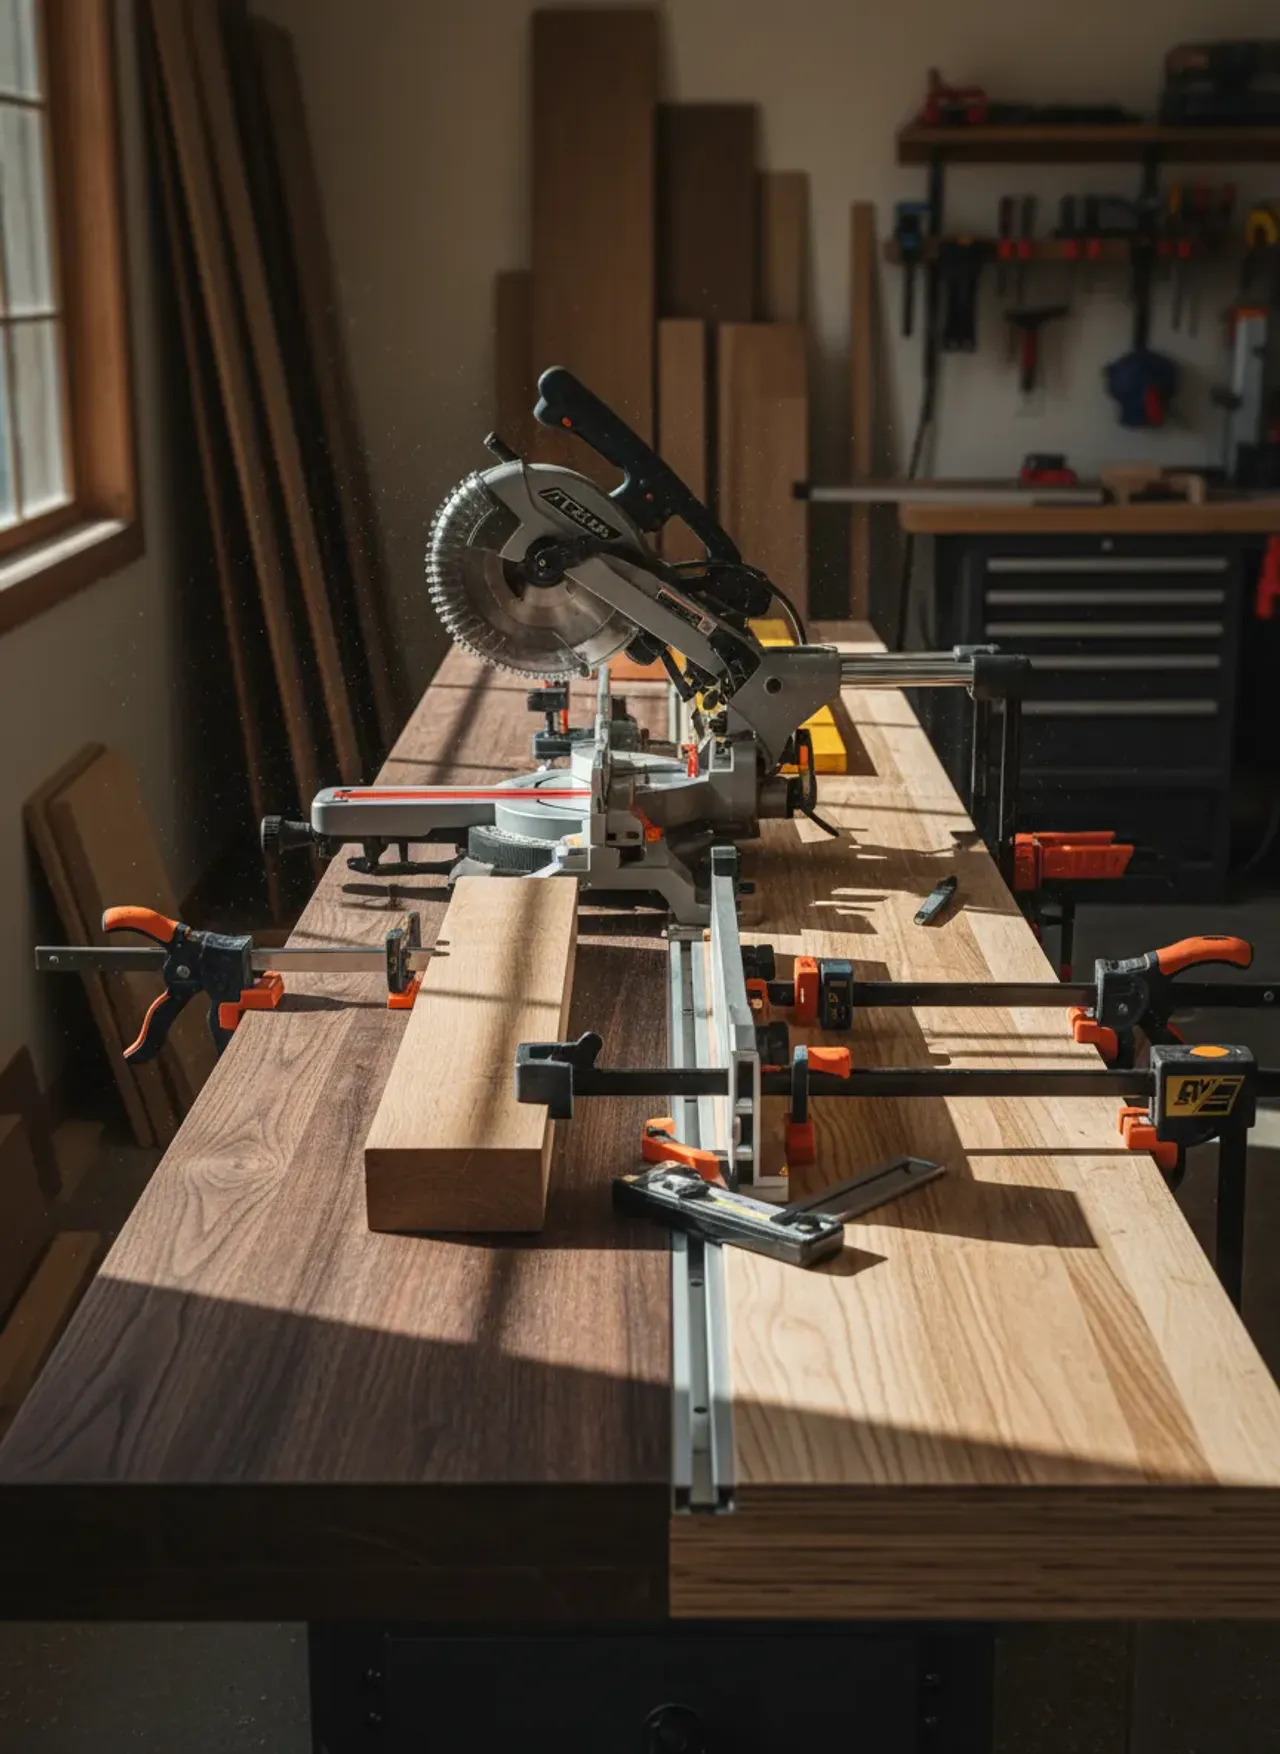
I’ve personally found that the heart of any highly functional workshop isn’t the table saw. It’s the miter saw station. When you transition from balancing eight-footers on your knee to sliding them across a dead-flat, expansive long-bench system, your entire approach to woodworking shifts. You stop fighting the material. You start trusting your measurements.
Building a dedicated, long-bench miter saw station requires precision engineering. We aren’t just slapping plywood across a pair of sawhorses. We are constructing a calibrated instrument designed to support heavy timber, index repeatable lengths to the millimeter, and swallow the catastrophic volume of dust these saws generate.
Before we tear into the blueprints, let’s look at a few critical upgrades that separate a makeshift bench from a professional workstation.
Quick Comparison: Top Picks
| Product | Rating | Check Price |
|---|---|---|
| DEWALT 12-Inch Miter Saw | ⭐⭐⭐⭐⭐ | View on Amazon |
| Kreg Top Trak System | ⭐⭐⭐⭐½ | View on Amazon |
| POWERTEC Heavy Duty Workbench Casters | ⭐⭐⭐⭐⭐ | View on Amazon |
The Physics of Deflection: Why Length Matters
When you crosscut an eight-foot piece of crown molding or a heavy 4x4 dimensional post, gravity is your biggest enemy. Wood is surprisingly flexible over distance. If your miter saw is sitting on a standard 24-inch workbench, the overhanging material sags. This sag creates a micro-arc in the wood right where the blade meets the cut line.
As the blade passes through, the wood flexes inward. This is called kerf pinch. It causes kickback, blade stalling, and burn marks. Even worse, it completely destroys the geometry of your cut. I’ve seen carpenters chase their tails for hours trying to figure out why their 45-degree miters are consistently leaving a 1-degree gap. The saw isn’t out of square; the wood is simply bending during the cut.
A long bench completely nullifies this deflection. By providing continuous, rigid support for at least six to eight feet to the left of the blade (and ideally four to six feet to the right), the stock remains perfectly horizontal. The tension is removed from the cut.
Pro Tip: If your shop space is strictly limited, prioritize the left wing. Most right-handed woodworkers intuitively hold the long end of the stock with their left hand and operate the saw with their right. A sprawling left wing with a continuous fence is non-negotiable for precision millwork.

The Coplanar Imperative: Leveling the Wings
The single most critical secret to a flawless miter saw station isn’t the storage underneath. It’s the relationship between the cast-aluminum deck of your miter saw and the wooden wings flanking it. They must be perfectly coplanar. If your left wing is a sixteenth of an inch higher than the saw deck, your stock will bridge across the gap, causing the same inaccurate cuts as a sagging board.
Here’s the real kicker: Do not recess your miter saw into a dropped pocket.
Many DIY plans show a complicated dropped shelf in the middle of the workbench where the saw sits, theoretically aligning the saw’s deck with the benchtop. This is a nightmare to calibrate. Wood moves. Bench tops settle. If you build a fixed drop-shelf and your saw sits 1/32” too low, you are completely stuck.
Instead, build a single, massive, dead-flat benchtop across the entire length of your wall. Place your miter saw directly on top of it. Then, build elevated wings on the left and right sides to match the height of the saw deck.
Micro-Adjustable Wing Construction
To achieve absolute zero-tolerance alignment, build your left and right wing platforms as independent torsion boxes. You will set these boxes on top of your main benchtop, but you won’t screw them down directly.
Instead, install heavy-duty leveling feet or use a sequence of hardwood shims beneath the wing boxes. Bring your miter saw into position. Lock it down. Take a highly accurate 72-inch extruded aluminum straight edge and lay it across the saw’s cast-iron deck extending over your new wings. Slowly dial in the leveling feet beneath the wings until the straight edge shows zero light passing underneath.
Once perfectly flush, drive structural screws through the wings into the main benchtop to lock them permanently in place. This method guarantees a frictionless glide path for your lumber. If you are looking to construct a durable bench from the ground up, mastering this leveling technique is what separates amateur weekend projects from professional-grade shop fixtures.
Key Takeaways for Deck Alignment:
- Never trust the factory rubber feet on your miter saw; remove them to hard-mount the metal base.
- Use a high-quality aluminum straight edge, not a level, to check coplanarity.
- Check the alignment at the front of the fence and the back of the fence.
- Re-check your zero-clearance alignment every six months, as seasonal humidity will cause your wooden base to shift slightly.
Taming the Top: Material Selection
What should you use for the surface of your wings? You need a material that offers high structural stability, a low coefficient of friction, and resistance to denting when you inevitably drop a heavy drill on it.
Standard BCX plywood is too rough. Softwood will catch the edges of your stock.
MDF (Medium Density Fiberboard) is the shop standard for a reason. It is heavy, dead-flat, and remarkably cheap. However, raw MDF acts like a sponge for moisture and oil. If you use 3/4” MDF for your wing tops, you must seal it. I highly recommend applying two coats of a high-quality wiping varnish, followed by a heavy buffing of paste wax. The wax hardens the surface and creates a slick, friction-free glide that makes maneuvering 100-pound slabs of hardwood feel effortless.
Melamine-coated particleboard is another fantastic option. The slick white surface requires zero finishing and wipes clean easily. The downside? Melamine chips easily at the edges. If you go this route, you must wrap the exposed edges of your wings in a hardwood edge-banding (like a 3/4” strip of maple or oak) to protect it from impact damage.
The T-Track and Stop Block Revolution
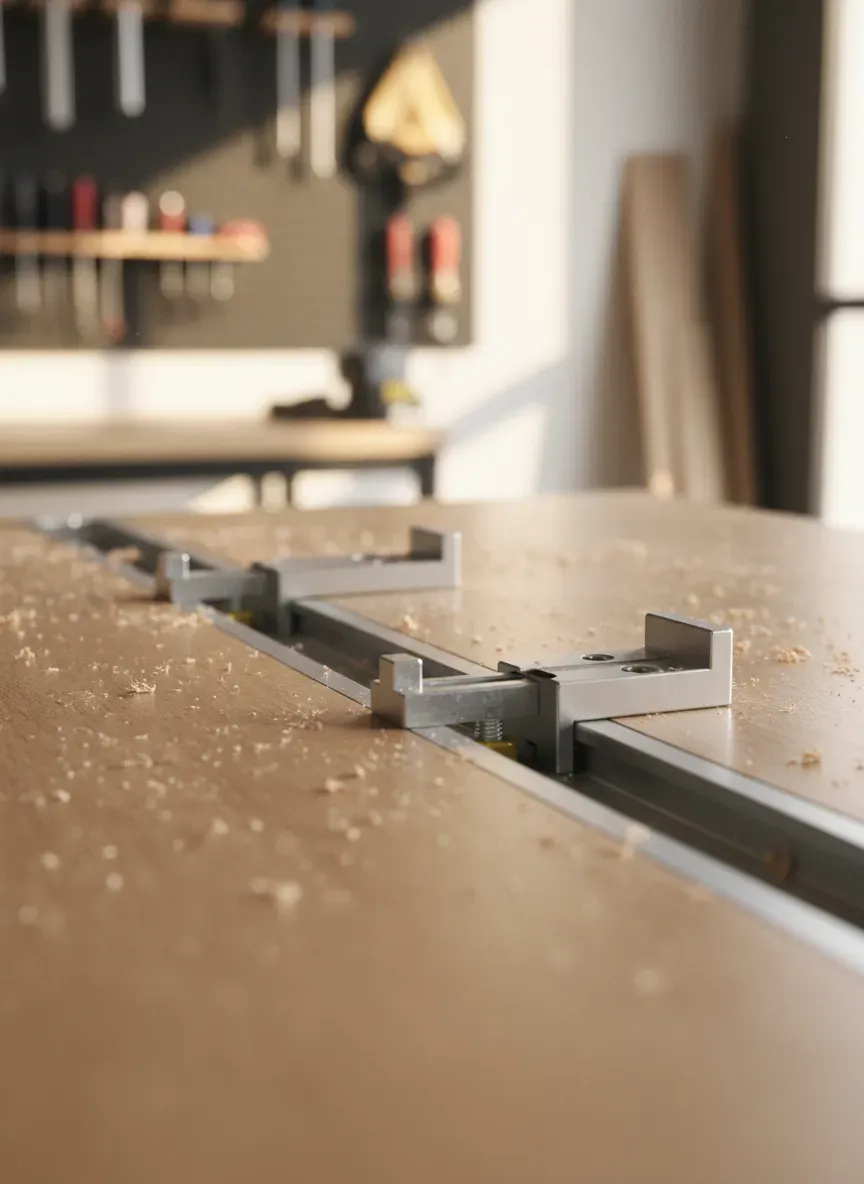
If you are still pulling a tape measure for every single crosscut, you are wasting time and introducing human error into every piece you mill. The defining feature of an elite long bench is the integrated stop block system.
By routing a shallow dado into your bench wings and embedding an anodized aluminum T-track (like the top-tier Kreg Top Trak System), you transform your saw station into an industrial production line.
Setting Up a Continuous Measuring Tape
To achieve absolute repeatability, you will affix a self-adhesive steel measuring tape directly to the T-track. But here is the critical sequence: Do not stick the tape down until the entire bench is built, leveled, and locked into place.
- Slide your flip-stop block onto the T-track.
- Lock the stop block exactly 24 inches away from the saw blade using a highly accurate steel rule.
- Make a test cut on a piece of scrap wood.
- Measure the scrap wood with dial calipers to verify it is exactly 24.00 inches.
- Once verified, peel the backing off your adhesive tape and stick it to the track so the 24-inch mark aligns perfectly with the cursor on your stop block.
This calibration turns your station into a highly engineered rig that can handle the abuse of daily use, much like a heavy-duty garage workstation project. When you need eight table legs exactly 29-1/4” long, you simply slide the block, lock down the brass knurled knob, and rapidly push your stock through. Every single leg will be identical.
Base Cabinetry: Building the Foundation
A long bench spanning twelve to sixteen feet requires immense structural support. You have two distinct paths here: standard 2x4 framing, or modular plywood carcasses.
While 2x4 framing is fast and cheap, it wastes an incredible amount of volume. The space beneath a massive miter saw station is prime real estate. You need drawers. Lots of them.
Building a series of 3/4” plywood cabinets to act as the base of your station provides extreme rigidity and yields massive storage potential. I build my base cabinets at a depth of 24 inches. This accommodates heavy-duty, full-extension drawer slides perfectly. You can dedicate banks of drawers to your routers, sanders, clamps, and specific hardware.
Pro Tip: Keep the base cabinets completely modular. Build them as separate 30-inch-wide boxes and bolt them together. If you ever move shops, you can simply unbolt the cabinets, lift off the top, and transport the entire station in manageable pieces.
When placing your base cabinets, integrate heavy-duty leveling feet into the bottom corners. Garage floors are notoriously sloped toward the door for drainage. A twelve-foot bench can easily drop an inch and a half from left to right. Adjustable steel feet let you dial the entire base into perfect level before you ever start worrying about the saw deck.
The Fence Geometry: Avoiding the Trap
Here is a controversial truth in workshop design: Do not run a continuous wooden fence tightly behind your miter saw.
Many woodworkers try to build a beautiful, single-piece hardwood fence that spans the left wing, dips behind the saw, and continues to the right wing. This is a massive mistake for two reasons.
First, sliding compound miter saws require significant rear clearance for the slide rails and the bevel swing mechanism. A continuous back fence will almost certainly restrict your saw’s ability to bevel 45 degrees to the rear.
Second, the factory cast-aluminum fence on your miter saw is the ultimate reference plane. It is machined to tight tolerances. Your wooden wing fences should not compete with it; they should complement it.
Your wing fences should start an inch or two away from the saw’s factory fence. To align them perfectly, take your 72-inch straight edge, hold it tightly against the saw’s factory fence, and lock it down. Bring your wooden wing fence up behind the straight edge until it makes flush contact, then screw the wooden fence down to the benchtop. This guarantees that your extension fences are perfectly parallel to the saw’s cutting plane.
Conquering the Dust Nightmare
Let’s be brutally honest. Miter saws are the messiest, most obnoxious dust-generators in any workshop. While table saws and planers enclose their blades, a miter saw violently ejects high-velocity sawdust in a massive arc toward the back wall. Attaching a standard shop-vac hose to the tiny one-inch dust port on the saw catches maybe twenty percent of the debris. The rest coats your tools, your lungs, and your floor.
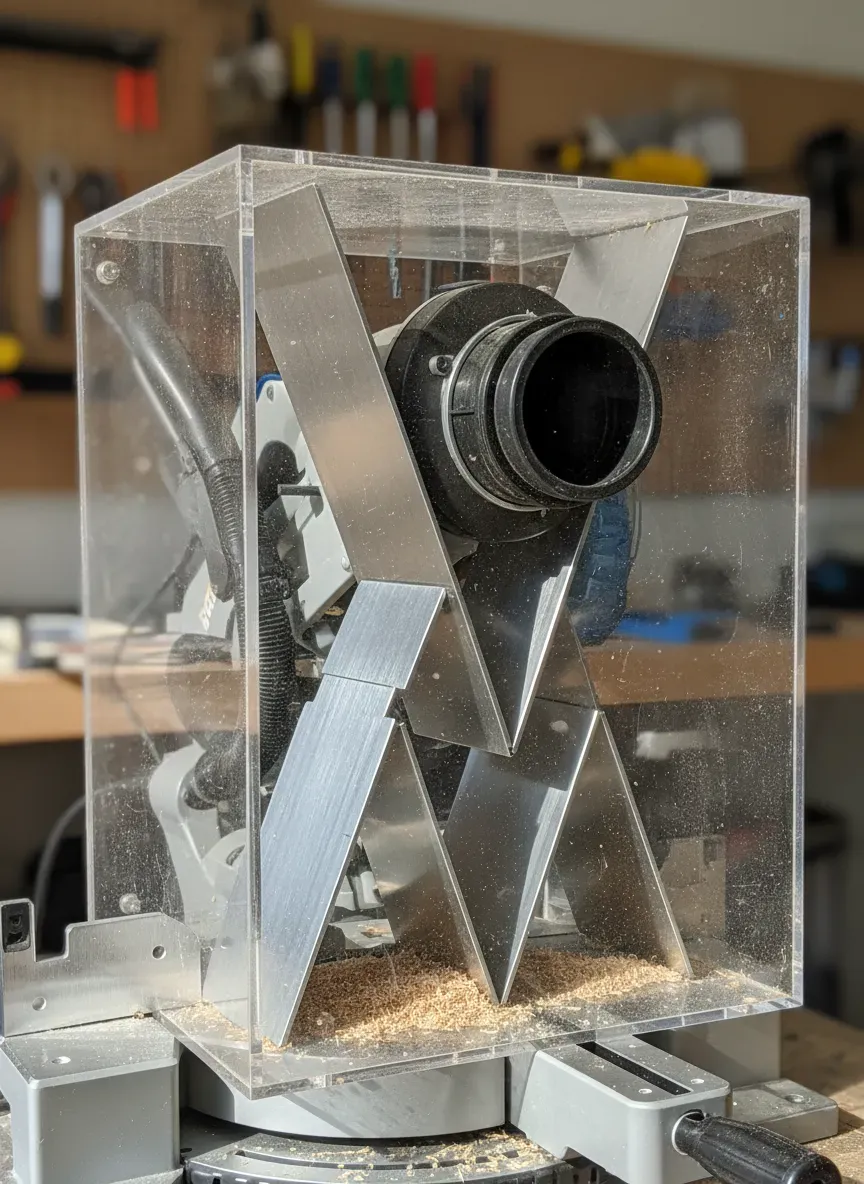
To make your long bench truly functional, you must build a dedicated dust hood enclosure behind the saw.
The Aerodynamics of the Downdraft Hood
Because the saw pivots, you cannot build a tight box. You need a wide, flared hood that catches the lateral spray of dust when making aggressive miter cuts.
I use 1/4” plywood or heavy rubberized canvas to build a funnel-shaped enclosure directly behind the saw’s footprint. The secret to making this hood work is gravity and airflow velocity.
Do not put the vacuum port at the top or middle of the hood. Dust wants to fall. Slope the bottom of your enclosure at a steep 45-degree angle downward, terminating in a 4-inch or 6-inch dust port connected to a high-CFM (Cubic Feet per Minute) dust collector.
If you are restricted to using a standard wet/dry vacuum, you must rely on baffles. Install angled wooden slats inside the hood that force the high-speed air to hit a wall, lose its kinetic energy, and drop down into a collection trough where the shop-vac can suck it away at its own pace.
Mistakes That Will Haunt Your Builds
Even with the best materials, a few critical oversights can ruin a long-bench build. Having audited dozens of shop setups, I consistently see the same three errors.
1. Fastening MDF too tightly: MDF is dimensionally stable in its length and width, but it will swell in thickness if humidity spikes. If you screw an MDF top down to your base cabinets with dozens of rigid screws, it has nowhere to move. It will warp. Use oversized clearance holes in your base structure and attach the top with washer-head screws driven from underneath. This allows the top to float slightly.
2. Ignoring the slide rail clearance: Modern sliding compound miter saws, like the massive 12-inch Bosch or DeWalt sliders, require an enormous footprint. The slide rails push far out the back. If you build your bench only 24 inches deep and slap it against a wall, the saw will hit the drywall before you can push the blade all the way through a 12-inch board. Always measure the maximum depth of your saw at full rear extension, and frame your base cabinets out from the wall accordingly.
3. Failing to account for the power cord: You’ve built a gorgeous, seamless bench. You go to plug the saw in, and realize the cord is trapped underneath an immovable torsion box. Before you lock anything down, drill a generous 2-inch grommet hole directly behind the saw for power and automated vacuum switch cords.
Precision at the saw is the absolute foundation of your shop. It is the very first step toward producing flawless, gallery-level furniture pieces. When your crosscuts are dead square and exactly the length you intended, your joinery becomes tighter. Your glue-ups require less clamping force. Your stress levels plummet.
The Bottom Line: A long-bench miter station is an investment in your own potential. Take the time to calibrate the wings. Spend the money on a premium T-track system. Build the dust hood right the first time. Once you experience the workflow of sliding heavy timber across a frictionless, perfectly coplanar surface and locking it into a zero-tolerance stop block, you will wonder how you ever built anything without it.
Building a world-class miter station is just the beginning of outfitting your ultimate shop. Once your infrastructure is locked in, you need projects that actually put those precision cuts to work. I highly recommend checking out Ted’s Woodworking. It is an absolute goldmine featuring over 16,000 incredibly detailed woodworking plans ranging from shop jigs and cabinets to heirloom furniture. Right now, you can grab the entire archive at a massive 75% discount. It’s the perfect companion to your newly upgraded workspace. Grab your plans and start your next build right here: https://a730c6qdqz1iyu9qn8tewytpf2.hop.clickbank.net.