The Optimal Height Guide: Where to Place Your Entryway Hooks for Maximum Utility
Master the ergonomics of entryway organization. Learn the precise measurements for installing hooks for adults, children, and accessibility to banish clutter.

Feb 5, 2026 - Written by: linda wise

The entryway is the handshake of the home. It is the first space that greets you upon arrival and the last space you interact with before departing. Despite its functional importance, the entryway often succumbs to clutter faster than any other room in the house. Coats pile up on banisters, backpacks form tripping hazards, and keys vanish into the void. The solution is rarely more square footage; rather, it is smarter vertical organization.
Installing entryway hooks seems like a deceptively simple task. However, the difference between a chaotic mudroom and a streamlined drop zone often comes down to inches. Place a hook too high, and it becomes unusable for half the household. Place it too low, and long coats drag on the floor, collecting dust and obstructing shoe storage.
This comprehensive guide will navigate the ergonomics, aesthetics, and technical specifications of hook placement. We will move beyond the general “eye-level” advice to provide specific measurements that maximize utility for every member of the family.
The Standard Rule of Thumb: The 60-Inch Baseline
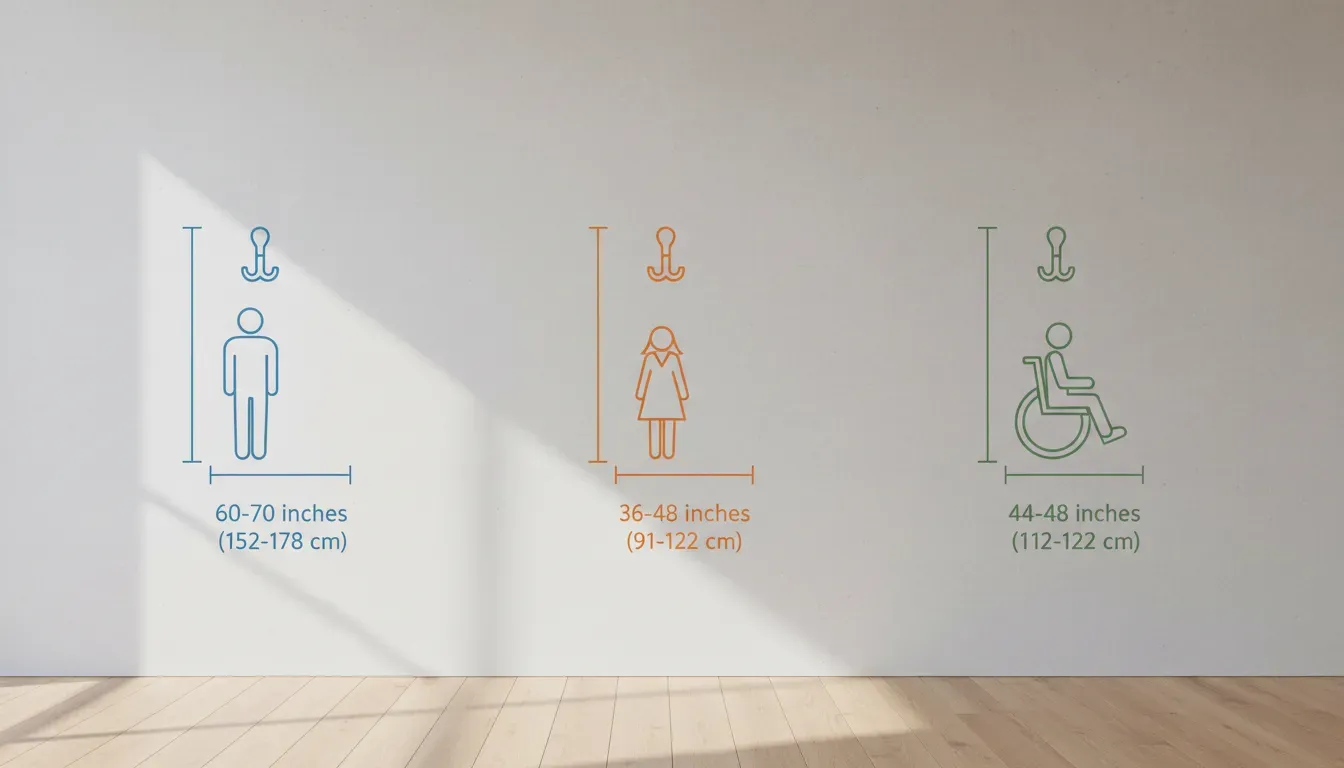
In the world of interior design and carpentry, there is a widely accepted standard for coat hook placement: 60 to 66 inches (152 to 168 cm) from the finished floor.
This height range is not arbitrary. It is calculated based on the average adult height and the average length of outerwear. Placing hooks at roughly five feet off the ground ensures that most adults can reach them comfortably without stretching, while providing enough vertical clearance for trench coats, parkas, and long cardigans to hang freely without touching the floor.
However, strict adherence to the 60-inch rule is often where utility fails. A single row of hooks at this height treats every user and every item as identical. To achieve maximum utility, we must deconstruct this standard and adapt it to specific needs.
Ergonomics and Utility: Who Are You Hanging For?
To create a truly functional entryway, you must design for the users. A “one-height-fits-all” approach inevitably excludes children or individuals with mobility challenges.
The Standard Adult Zone
For a household comprised primarily of adults of average height, the 60 to 66-inch range remains the gold standard.
- For shorter adults: Aim for 60 inches. This allows for an easy reach while maintaining floor clearance.
- For taller households: You can push this to 66 or 68 inches, particularly if you frequently wear full-length winter coats.
- Clearance Check: Ensure there is at least 48 inches of clearance between the hook and any obstacle below it, such as a shoe rack or the floor.
Designing for Children
If you want your children to hang up their own belongings, you must place the storage within their ergonomic reach. Expecting a six-year-old to use a 60-inch hook is a recipe for coats on the floor.
- Toddlers and Preschoolers: Install hooks at 36 to 42 inches from the floor. This empowers them to manage their own jackets and backpacks.
- School-Aged Children: A height of 48 to 54 inches accommodates growing children and heavier school bags.
A strategic approach for families is to install a “growth” system. Utilize a lower rail for children that can eventually be repurposed for handbags, umbrellas, or dog leashes once the children grow tall enough to use the upper hooks.
Accessible Design (ADA Guidelines)
For households that include wheelchair users or individuals with limited range of motion, standard heights are often inaccessible. Universal design principles suggest placing hooks between 36 and 48 inches from the floor.
Within this range, a height of 48 inches is generally optimal for a side reach from a wheelchair, allowing the user to hang a coat without obstruction. Ensure that the approach path to these hooks is at least 36 inches wide to accommodate the wheelchair itself.
The Pet Zone and Accessories
Not everything hanging in an entryway is a coat. Leashes, harnesses, keys, and small umbrellas require less vertical clearance and can be easily lost among bulky outerwear.
- Leashes and Harnesses: 30 to 36 inches. This keeps them separated from human clothing and prevents the hardware from tangling with knitwear.
- Keys and Sunglasses: These should be higher, closer to eye level, usually around 58 to 64 inches, perhaps on a small shelf or distinct rail separate from the fabric items.
The Double-Row Strategy: Maximizing Vertical Space
In compact urban apartments or homes with narrow hallways, horizontal wall space is a luxury. To maximize utility without expanding the footprint, the double-row strategy is essential. This involves installing two distinct rows of hooks.
Vertical Spacing Calculations
When stacking rows, the distance between the two rows is critical. If they are too close, the items on the top row will obscure the bottom row, making the lower hooks difficult to access.
- Top Row: Install at 66 to 70 inches. This is slightly higher than standard to accommodate the row below. This row is best for long coats, seasonal items used less frequently, or items belonging to the tallest family members.
- Bottom Row: Install at 36 to 42 inches. This row serves a dual purpose: it is perfect for children’s coats, or for adults to hang shorter items like purses, scarves, and tote bags.
The Golden Gap: Aim for a minimum of 24 to 30 inches of vertical separation between the actual hooks (not just the mounting plates). This ensures that a jacket hanging on the top hook does not completely drape over the item on the bottom hook.
The Staggered Layout
To prevent bulk buildup, do not align the top and bottom hooks directly vertically. Instead, use a staggered or “diamond” pattern. Place the bottom hook ideally in the horizontal center point between two top hooks. This allows bulky coats on the top row to hang in the gaps of the bottom row, reducing the overall projection of the items into the hallway.
For this application, selecting the right hardware is vital. You need robust hooks that can handle weight without bending.
Shop Heavy Duty Coat Hooks on Amazon
Horizontal Spacing: Preventing the Clutter Cluster
While height determines accessibility, horizontal spacing determines capacity and aesthetics. A common mistake is placing hooks too close together, resulting in a chaotic “clutter cluster” where coats are crushed and difficult to retrieve.
The Mathematics of Bulk
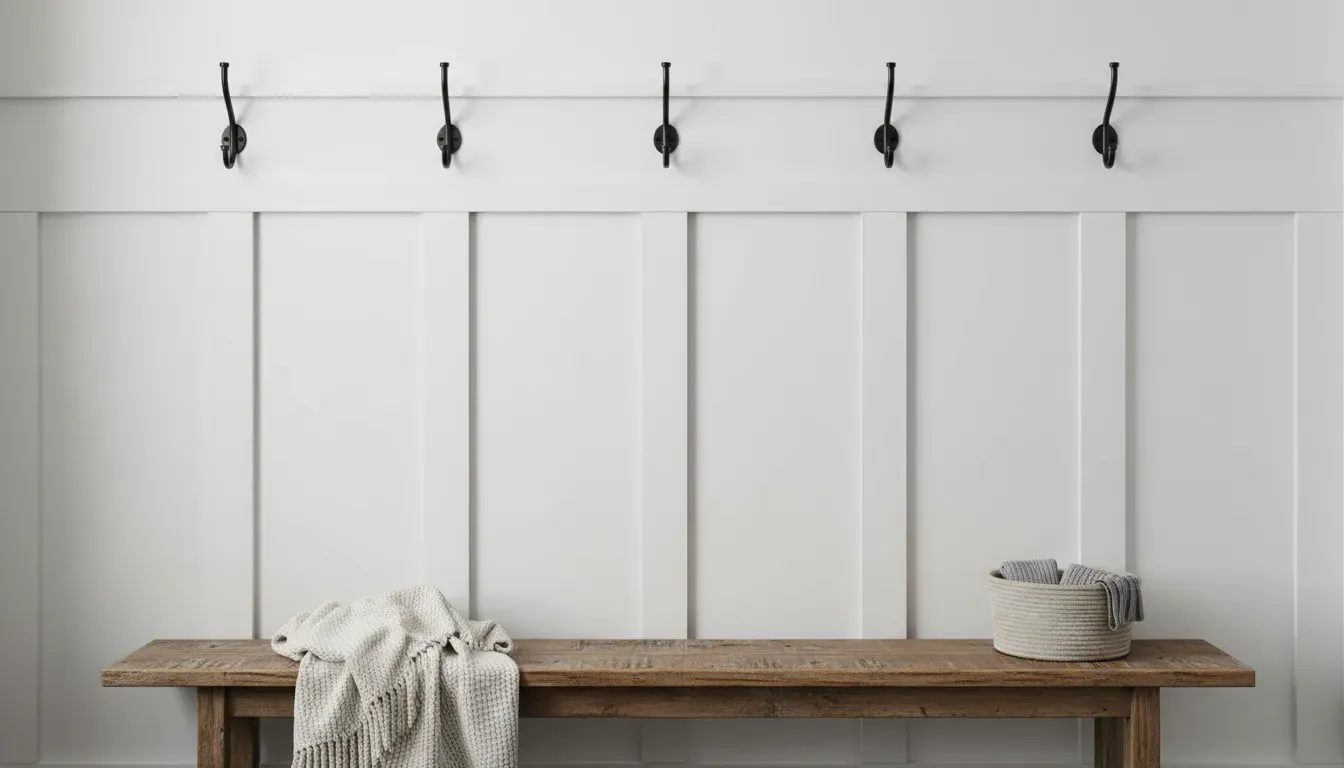
Standard coat racks often space hooks 4 to 6 inches apart. This is insufficient for modern winter gear. A down parka or a heavy wool coat can easily protrude 8 inches from the wall and spread 10 inches wide.
- Minimum Spacing: 8 inches center-to-center. This is adequate for light jackets and sweaters.
- Optimal Spacing: 12 inches center-to-center. This allows for bulky winter coats, large backpacks, and tote bags to hang side-by-side without overlapping. It also allows for airflow, which is crucial if coats are damp from rain or snow.
If you are using a pre-made rack where spacing is fixed, consider buying two smaller racks and mounting them with a gap between them, or utilizing every other hook for bulky items and the intermediate hooks for scarves or hats.
Specialized Scenarios: Benches and Board and Batten
The “open wall” guidelines shift when you introduce architectural elements or furniture into the entryway.
Hooks Over a Bench
Combining a bench with wall hooks creates a highly efficient “mudroom” effect. However, the dynamics of sitting change the height requirements.
If you place hooks at the standard 60 inches above a standard 18-inch bench, long coats will pool on the seat, rendering the bench unusable for sitting. Furthermore, a person leaning back to put on shoes might hit their head on the hardware.
- The Adjustment: Raise the hooks to 66 to 72 inches from the floor.
- Head Clearance: Ensure the bottom of the hook (or the hanging item) is high enough that a seated adult does not lean back into it. This usually requires the hooks to be at least 48 inches above the seat of the bench.
If you are looking to build a cohesive look, integrating a wall-mounted coat rack that complements your bench is a great design choice.
Shop Entryway Coat Rack Wall Mount on Amazon
Board and Batten Integration
Board and batten wainscoting is a popular choice for entryways because it adds durability and style. The top rail of the wainscoting often dictates the hook height.
Typically, board and batten is installed at heights ranging from 60 inches to nearly ceiling height. If your wainscoting cap is at 60 or 64 inches, installing hooks directly onto the top horizontal board is structurally sound and visually pleasing. If you are designing the wainscoting from scratch, plan the horizontal board height specifically based on the user heights discussed earlier.
Installation Guide: Securing Your Storage
The utility of a hook is nullified if it rips out of the drywall the moment you hang a heavy backpack on it. Entryway hooks endure significant dynamic load—the weight of the item plus the force of it being tossed onto the hook.
Finding the Studs
Whenever possible, anchor your hooks into wood studs. Standard studs are spaced 16 inches apart (center-to-center).
- Use a magnetic or electronic stud finder to locate the framing.
- If your desired spacing (e.g., every 12 inches) does not align with the studs, you have two options:
- Mount a Backboard: Secure a 1x4 or 1x6 inch piece of finished lumber into the studs, spanning the length of the wall. Then, mount your hooks into this board at whatever interval you choose. This is the strongest and most flexible method.
- Use Heavy-Duty Toggles: If mounting directly to drywall, avoid plastic plugs. Use strap toggles or toggle bolts rated for at least 50 lbs.
Tools Required
- Tape measure
- Level (essential for aesthetics)
- Pencil (for marking pilot holes)
- Drill and bits
- Stud finder
- Screwdriver
Aesthetic Integration: Making It Look Good
Utility does not require sacrificing beauty. The placement of hooks contributes to the visual rhythm of the room.
Visual Balance
If you are installing a single row of hooks on a designated wall, center the arrangement horizontally. Measure the total wall width, subtract the total width of your hook arrangement, and divide by two to find your starting margin.
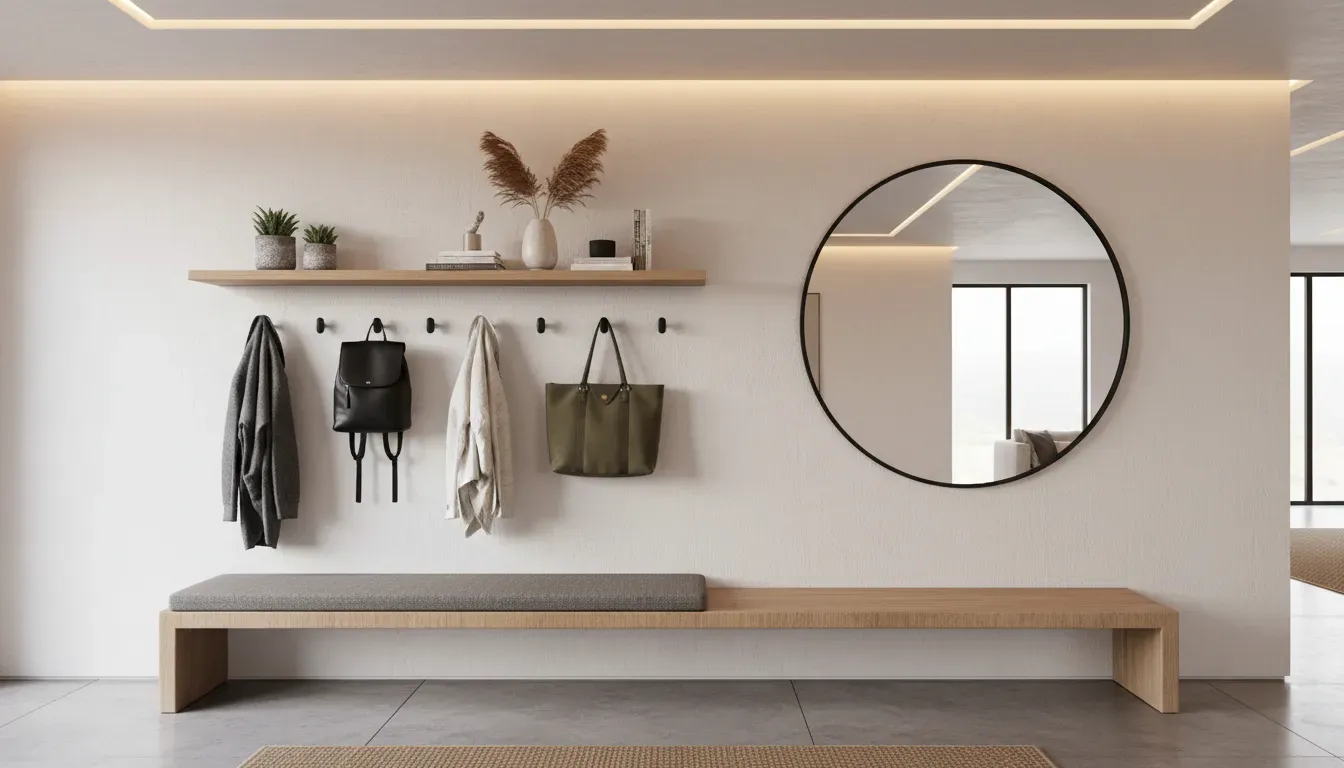
Grouping and Zones
Consider creating “zones” for each family member. In a wider hallway, you might have vertical columns of storage: a basket on the floor for shoes, a low hook for a backpack, and a high hook for a coat. This shoe storage strategy keeps items contained to a specific vertical slice of the wall, preventing the “spread” of clutter.
For a complete drop-zone solution, pairing your hooks with a storage bench creates a furniture-like feel that defines the space.
Shop Entryway Bench with Storage on Amazon
Common Mistakes to Avoid
Even with the best intentions, homeowners often fall into these traps:
- Overcrowding: Buying a rack with 10 hooks for a 24-inch space. It looks efficient in the store but becomes unusable in practice.
- Using Weak Hardware: Decorative hooks made of brittle pot metal often snap under the weight of a wet wool coat or a loaded laptop bag. Always check the weight rating.
- Ignoring Door Swing: Installing hooks behind an entry door without checking the depth. If the door swings open and hits the bulky coats, you will damage the door hinges or the wall. Install a door stop or ensure hooks are placed beyond the swing radius.
- Forgetting the “Drop”: Not accounting for the length of the items. A tote bag on a low hook might drag on the floor. Always measure your longest frequently used item before drilling.
Conclusion
The placement of your entryway hooks is a blend of mathematics, ergonomics, and lifestyle analysis. While the 60-inch standard serves as a reliable baseline, the true “optimal” height is one that accommodates the specific people living in the home.
By incorporating a double-row strategy, respecting the spacing requirements of bulky winter gear, and ensuring secure installation into studs or backboards, you can transform a chaotic dumping ground into a streamlined, functional entryway. Remember that organization is not just about hiding clutter; it is about creating a system that is so intuitive and accessible that maintaining order becomes effortless.
Take the time to measure, plan, and customize your heights. Your entryway—and your sanity—will thank you.