Timeless Mudroom Ideas: Classic Cubby Designs for an Organized Entryway
Discover architectural millwork secrets, spatial planning strategies, and classic cubby designs to transform your chaotic mudroom into a serene, organized entryway.
Apr 1, 2026 - Written by: Linda Wise

Walk through the front door of any bustling household, and the first thing that hits you isn’t the architectural molding or the designer chandelier. It’s the sheer, unadulterated chaos of human transit. Backpacks slung haphazardly across the floor. Mud-caked boots forming a treacherous obstacle course. A mountain of coats threatening to avalanche off a solitary, overtaxed wall hook.
The entryway is the handshake of your home. When that space is disjointed, the psychological friction bleeds into your entire living environment. I’ve personally found that the antidote to this daily madness isn’t just “more storage”—it’s structured storage. Specifically, the classic built-in cubby system.
Timeless mudroom ideas rely heavily on classic cubby designs because they enforce a visual and physical boundary for every family member’s gear. They blend utilitarian grit with architectural grace. You’ll notice that the best entryways don’t feel like commercial locker rooms. They feel like organic extensions of the home’s millwork.
Before we tear into the granular details of joinery, spatial geometry, and aesthetic integration, here is a quick look at the foundational hardware and accessories that elevate a basic build into a bespoke installation.
Quick Comparison: Top Picks
| Product | Rating | Check Price |
|---|---|---|
| Heavy Duty Cast Iron Coat Hooks | ⭐⭐⭐⭐⭐ | View on Amazon |
| Water Hyacinth Woven Storage Baskets | ⭐⭐⭐⭐½ | View on Amazon |
| Vintage Solid Brass Label Holders | ⭐⭐⭐⭐⭐ | View on Amazon |

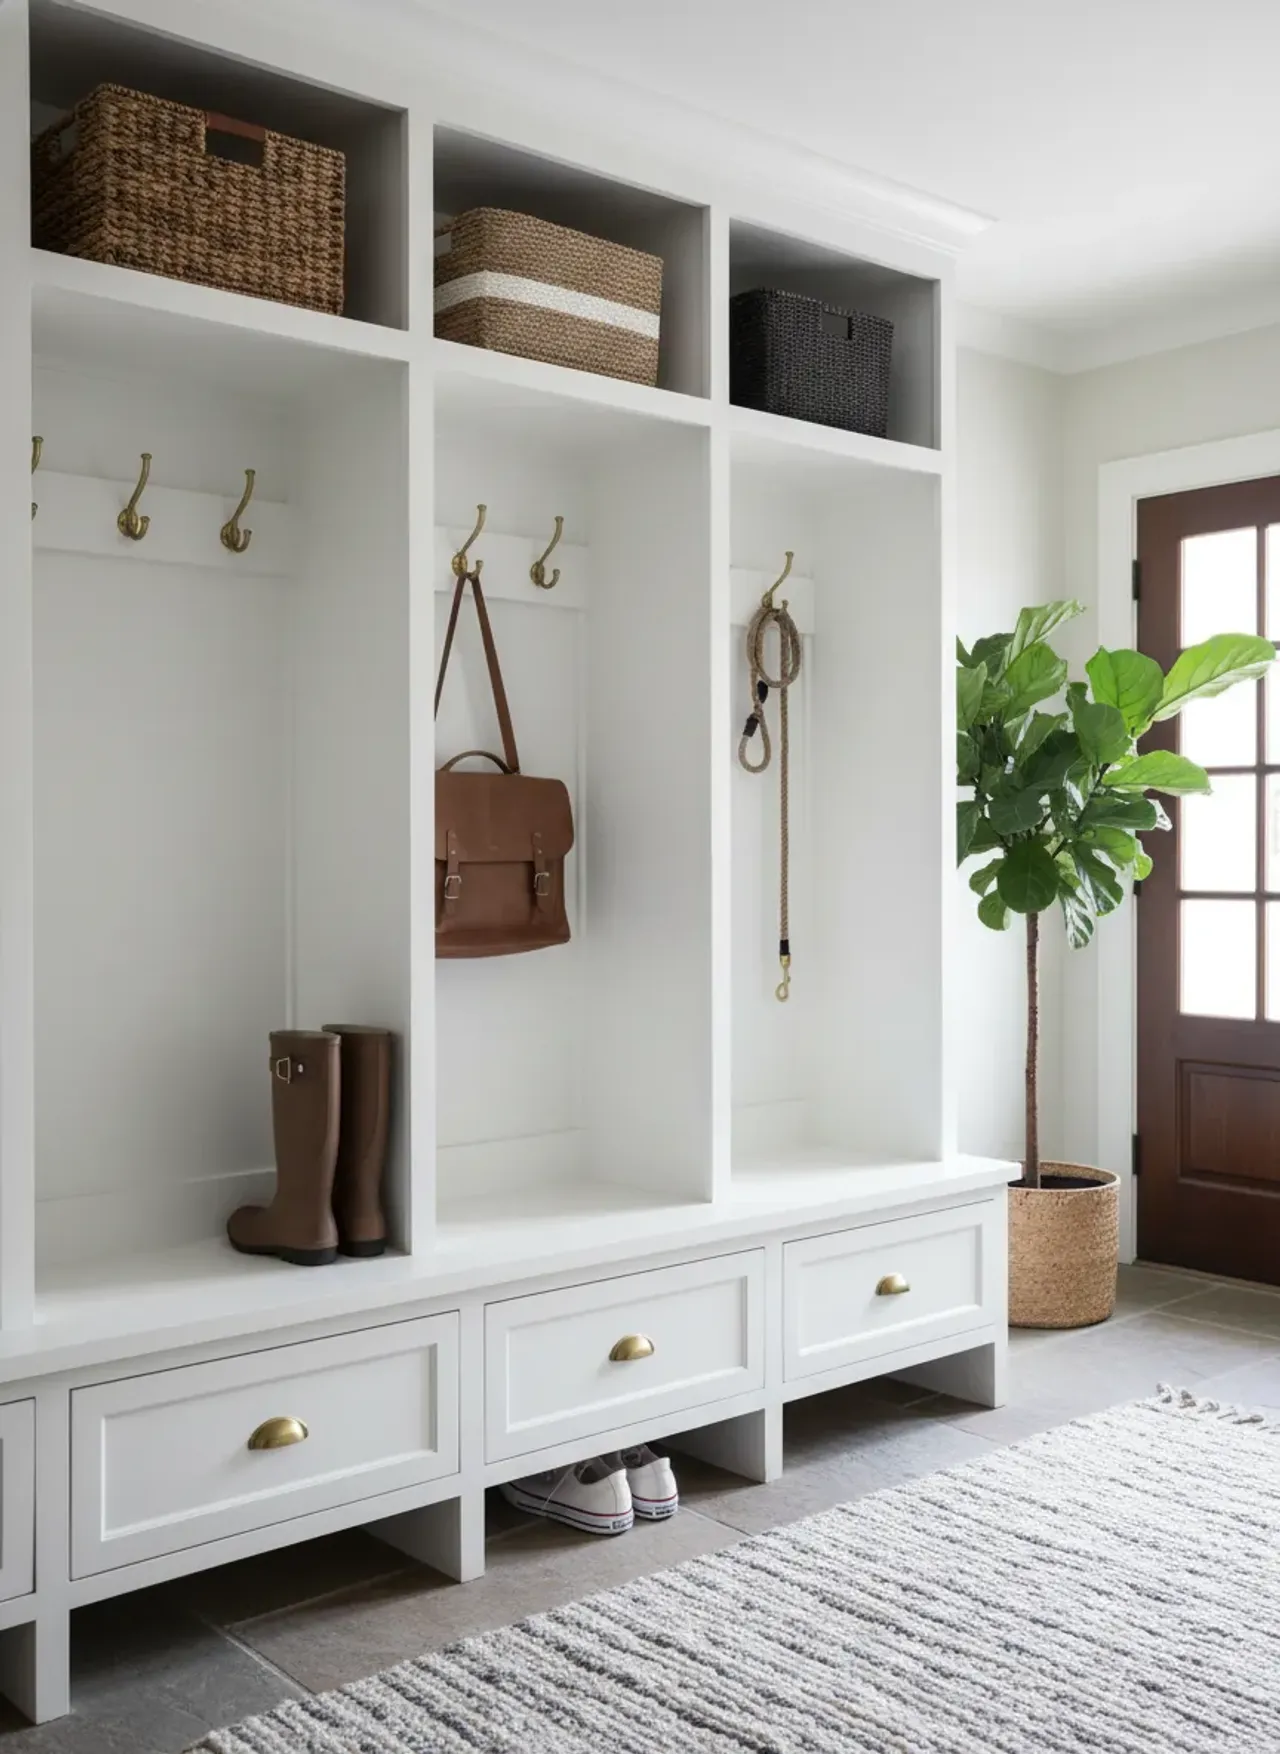
The Anatomy of a Timeless Cubby Design
To build something that lasts—both physically and stylistically—you have to understand its skeletal structure. A classic cubby isn’t merely a box attached to a wall. It is a calculated assembly of specific zones, each engineered for a distinct phase of the arrival and departure routine.
The Foundation: The Boot Bench
The base of your cubby system dictates its overall durability. This is where people drop heavy bags, sit to lace up boots, and occasionally stand to reach the upper cabinets. A flimsy bench makes the entire unit feel remarkably cheap.
I strongly advocate for a bench height of exactly 18 inches from the finished floor. This measurement mirrors standard dining seating, providing optimal ergonomic leverage for adults and children alike. Beneath this bench lies the footwear zone. You essentially have two choices here: open lower cubbies or closed drawers. Open lower cubbies offer frictionless access. If a kid has to open a drawer to put their shoes away, those shoes are staying on the floor.
The Bottom Line: Frictionless design dictates human behavior. Keep the shoe zone open and easily accessible to maintain actual order.
The Vertical Expanse: Lockers and Hook Zones
Above the bench sits the core locker space. This vertical shaft is the workhorse of your mudroom. A timeless design utilizes vertical dividers spaced between 15 and 20 inches apart. Anything narrower, and thick winter coats will bulge awkwardly into the adjacent space. Anything wider, and you lose the psychological benefit of individualized, segmented zones.
This brings up a critical structural detail: the backing. You could just paint the drywall behind the cubbies, but over time, wet coats and metal zippers will obliterate that surface. Installing a beadboard, shiplap, or V-groove paneling as the backing adds immediate architectural rigidity and immense visual texture.
The Crown: Upper Bulk Storage
Capping off the unit are the upper cubbies. These are your seasonal rotation zones. In July, they hold winter hats, thick gloves, and scarves. In January, they house baseball mitts and sunscreen. Because this area is above eye level (typically starting at the 72-inch mark), it’s the perfect staging ground for woven textures. Sliding a set of Water Hyacinth Woven Storage Baskets into these upper slots instantly warms up the hard lines of the cabinetry.
Material Selection: The Skeleton of Longevity
You can execute a flawless design, but if you build it out of subpar materials, it will warp, sag, and chip within a year. Entryways endure wild fluctuations in humidity, temperature, and blunt force trauma.
Plywood vs. MDF: The Great Debate
For the carcass (the main structural boxes) of your cubby system, ¾-inch cabinet-grade plywood is the undisputed champion. Birch or maple veneer plywood provides incredible structural integrity and holds screws with a vicious grip.
Many amateur DIYers gravitate toward Medium Density Fiberboard (MDF) because it’s cheaper and paints beautifully. Here’s the real kicker: MDF behaves like a sponge. The moment a puddle of water from a melting snow boot breaches the paint layer, the MDF will swell, blister, and permanently deform. I only recommend MDF for non-structural, high-and-dry applications, such as the upper decorative crown molding or upper cubby dividers.
Hardwood Face Frames
The exposed front edges of your plywood carcass must be concealed. Applying iron-on edge banding is a common shortcut, but it lacks the durability required for a high-traffic mudroom. Instead, construct a face frame out of solid hardwood. Poplar is an exceptional, cost-effective choice for paint-grade finishes, taking primer and enamel flawlessly. If you plan to stain your cubbies to showcase the wood grain, White Oak or Walnut provides a distinctly bespoke, high-end aesthetic that ages brilliantly.
Pro Tip: When attaching your face frame to the plywood carcass, skip the brad nails. Use pocket hole joinery from the inside of the cabinet, combined with a high-quality wood glue. This creates an indestructible bond that won’t show any visible fastener marks on the front of your millwork.

Navigating Spatial Constraints
Not everyone has the luxury of a sprawling, 200-square-foot dedicated mudroom. Many of us are carving out organization in tight transitional hallways, under staircases, or in a modest slice of the garage.
Mastering the Compact Footprint
When square footage is severely restricted, verticality becomes your greatest asset. You must draw the eye—and the storage—upward to the ceiling. If you are currently optimizing a compact 5x6 mudroom layout, the strategy shifts from wide benches to tall, narrow locker columns.
In these tight quarters, eliminate bulky cabinet doors entirely. Swing clearance consumes valuable floor space. Stick to open cubbies, and rely on unified, monochromatic baskets to hide the visual clutter. Furthermore, consider the depth of your bench. While an 18-inch depth is the gold standard for sitting comfortably, you can easily compress this to 15 inches in a narrow hallway without rendering the bench useless.
The Science of Spacing
One of the most frequent errors I encounter in entryway design is the catastrophic miscalculation of hardware placement. If you mount a row of hooks too closely together, they become functionally obsolete. The coats simply pile on top of one another, tearing loops and pulling the hardware right out of the wood.
If you are determining how far apart entryway hooks should be, the golden rule is a minimum of 8 inches on center, though 10 to 12 inches is vastly superior for bulky winter gear. To maximize utility within a single cubby column, employ a staggered approach: mount a heavy-duty, double-prong hook on the back wall, and flank it with smaller, single-prong hooks on the side interior walls of the cubby, positioned slightly lower.
Key Takeaways for Spatial Planning:
- Bench Depth: 18 inches is ideal; 15 inches is the absolute minimum for tight spaces.
- Cubby Width: Target 15 to 20 inches per individual locker.
- Bench Height: 18 inches from the floor guarantees ergonomic comfort.
- Hook Placement: Keep primary hooks at roughly 60 inches from the floor, staggering secondary hooks lower for children’s access.
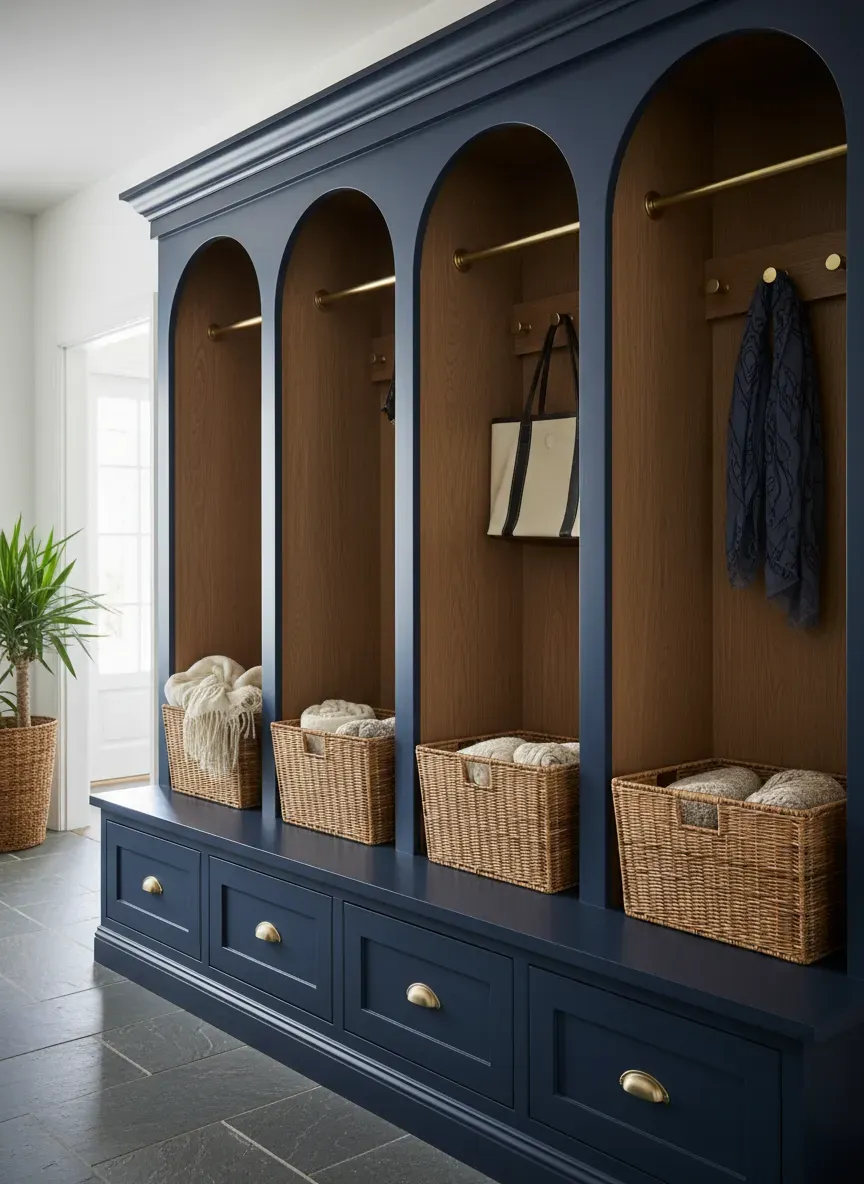
Integrating Aesthetic Finesse
Utility without beauty is just industrial storage. A timeless mudroom cubby system should feel like it was installed the day the house was built, regardless of when it was actually constructed. This seamless integration requires meticulous attention to finishing details.
The Power of Millwork Integration
Freestanding furniture rarely looks high-end in a mudroom context. To achieve that built-in, custom-cabinetry aesthetic, your cubby system must integrate with the room’s existing architecture.
This means removing the room’s baseboards before installation. The cubby unit should sit flush against the bare wall. Once secured, you wrap the room’s baseboard around the bottom of the cubby bench. Similarly, carry the room’s crown molding across the top of the upper cubbies. This anchors the unit into the skeletal framework of the house. It ceases to be a piece of furniture and becomes a permanent architectural feature.
Selecting the Right Finish
Mudrooms take a beating. Flat or matte wall paint will scuff, scratch, and look dilapidated within a month. You need a coating engineered for friction.
Alkyd-based enamels or advanced water-based urethanes (like Benjamin Moore’s Advance or Sherwin-Williams’ Emerald Urethane Trim Enamel) are non-negotiable here. These paints level out beautifully, eliminating brush strokes, and cure to a rock-hard finish that you can aggressively scrub with a wet rag without lifting the pigment.
As for color, timeless doesn’t have to mean sterile white. While a crisp, white beadboard backing paired with natural wood benches is an undeniable classic, deeply saturated tones are incredibly forgiving in mudrooms. A moody slate blue, a rich hunter green, or a warm taupe effortlessly conceals scuffs and dirt while adding an anchor of sophisticated drama to the entryway.
Hardware That Anchors the Look
The hardware you choose acts as the jewelry of the millwork. It dictates the final stylistic direction of the build.
For a truly classic, enduring aesthetic, unlacquered brass is phenomenal. It begins bright but gradually develops a rich, mottled patina from the oils in your hands, aging beautifully alongside the home. If your home skews more farmhouse or craftsman, Heavy Duty Cast Iron Coat Hooks provide an unyielding, utilitarian heft that grounds the space.
Don’t forget the details. Adding Vintage Solid Brass Label Holders to the face of each upper cubby or lower shoe bin creates a delightfully nostalgic, library-esque charm while subtly enforcing ownership of specific zones.
Practical Applications: Zones for Everyone
A stunning piece of millwork fails if it doesn’t intuitively serve the people using it. Customizing the internal zones based on your family’s specific friction points is what transforms a good design into a great one.
The “Drop Zone” Psychology
Human beings are inherently lazy when they transition from the outside world into the comfort of their home. If putting away a backpack requires opening a door, reaching above shoulder height, or navigating a tight space, that backpack is going straight onto the floor.
Design for human nature. Ensure the primary hooks for daily-use bags are low enough that a tired child can loop the strap over them with zero effort.
Accounting for the Elements
If you live in a climate with heavy rain or snow, your lower cubby design must aggressively mitigate moisture. A solid wood bench base will inevitably suffer water damage from dripping snow boots.
A brilliant workaround is to leave the space directly underneath the bench completely open, sliding in custom-fitted, heavy-duty rubber boot trays. Alternatively, if you want a built-in look, install a slatted wood bottom for the shoe cubbies, allowing dirt and water to fall through to a cleanable, waterproof tray hidden below.
The Tech and Mail Micro-Zone
Not everything entering the house is a coat or a boot. Mail, keys, sunglasses, and smartphones need a resting place that doesn’t clutter the kitchen island. Dedicate a narrow, shallow section of your mudroom system specifically as a tech and drop zone. Integrating a hidden electrical outlet inside a small drawer or a specific open cubby allows devices to charge out of sight.
Avoiding the Pitfalls of Mudroom Design
Even seasoned DIYers and interior designers make critical errors when drafting mudroom layouts. Here are the architectural landmines you need to sidestep:
- Ignoring Baseboard Heaters and Vents: Never build a solid box over a functional HVAC register. If you have a floor vent where your cubbies need to go, you must build a toe-kick box that redirects the airflow out the front of the unit, capped with a decorative wooden grate.
- Skimping on Bench Overhang: The seating bench should project at least 1 to 1.5 inches past the vertical dividers and lower shoe cubbies. This creates a comfortable lip for the back of your knees when sitting and gives the unit a distinctly substantial, custom-built look. A flush bench front looks remarkably amateur.
- Inadequate Lighting: Cubbies are deep, and they naturally cast shadows. A dark mudroom is an uninviting one. If you have the electrical access, installing hardwired brass sconces on the vertical dividers between the upper cubbies adds immense warmth and task lighting. Alternatively, battery-operated LED puck lights hidden behind the upper face frames provide brilliant illumination without the need for an electrician.
Crafting Your Own Classic Cubbies
Building a custom mudroom system is entirely within the realm of a dedicated weekend warrior. You don’t need a massive commercial shop to pull this off. Armed with a reliable track saw (or a circular saw with a straight edge), a pocket hole jig, and a drill, you can manufacture high-end millwork right in your garage.
The key to a flawless execution isn’t necessarily having the most expensive tools; it’s having the right blueprints. Guessing dimensions, miscalculating wood movement, or fumbling through improper joinery will result in a wobbly, frustrating mess that devalues your home.
You need precise cut lists. You need step-by-step assembly diagrams that take the guesswork out of the structural engineering.
I’ve personally found a resource that completely shifts the paradigm for DIY woodworkers and home improvement enthusiasts. If you are serious about building a mudroom that looks like it was installed by a master carpenter, you absolutely need to look into Ted’s Woodworking.
This isn’t just a handful of rough sketches. It is a massive, incredibly detailed archive of over 16,000 professional woodworking plans. You get instant access to exact material lists, meticulous schematics, and foolproof instructions that guide you from raw lumber to a stunning, finished masterpiece. Whether you’re building classic entryway cubbies, a custom farmhouse dining table, or outdoor living furniture, this collection is an absolute goldmine.
Here’s the best part: right now, you can bypass the trial-and-error phase entirely and grab this entire lifetime database at a massive 75% discount. Stop staring at that chaotic pile of shoes by your front door and start building the organized, beautiful entryway your home deserves.