The Ultimate Table Saw Workbench: Smart Designs for Small Spaces
Maximize your compact woodshop with our expert guide to building the ultimate table saw workbench. Discover brilliant designs, mobility hacks, and space-saving layouts.
Mar 22, 2026 - Written by: Linda Wise
If you’ve ever tried to rip a full sheet of three-quarter-inch plywood in a space barely large enough to park a compact sedan, you already know the sheer terror of an unsupported offcut. Your heart rate spikes. The wood begins to bow. You’re desperately trying to hold the sheet flush against the fence while simultaneously lunging forward to catch the heavy drop piece before it tears a jagged splinter out of your pristine veneer.
It’s infuriating. I’ve wrecked enough expensive hardwood to know that working in a constrained footprint isn’t just an inconvenience; without the right setup, it’s a genuine safety hazard.
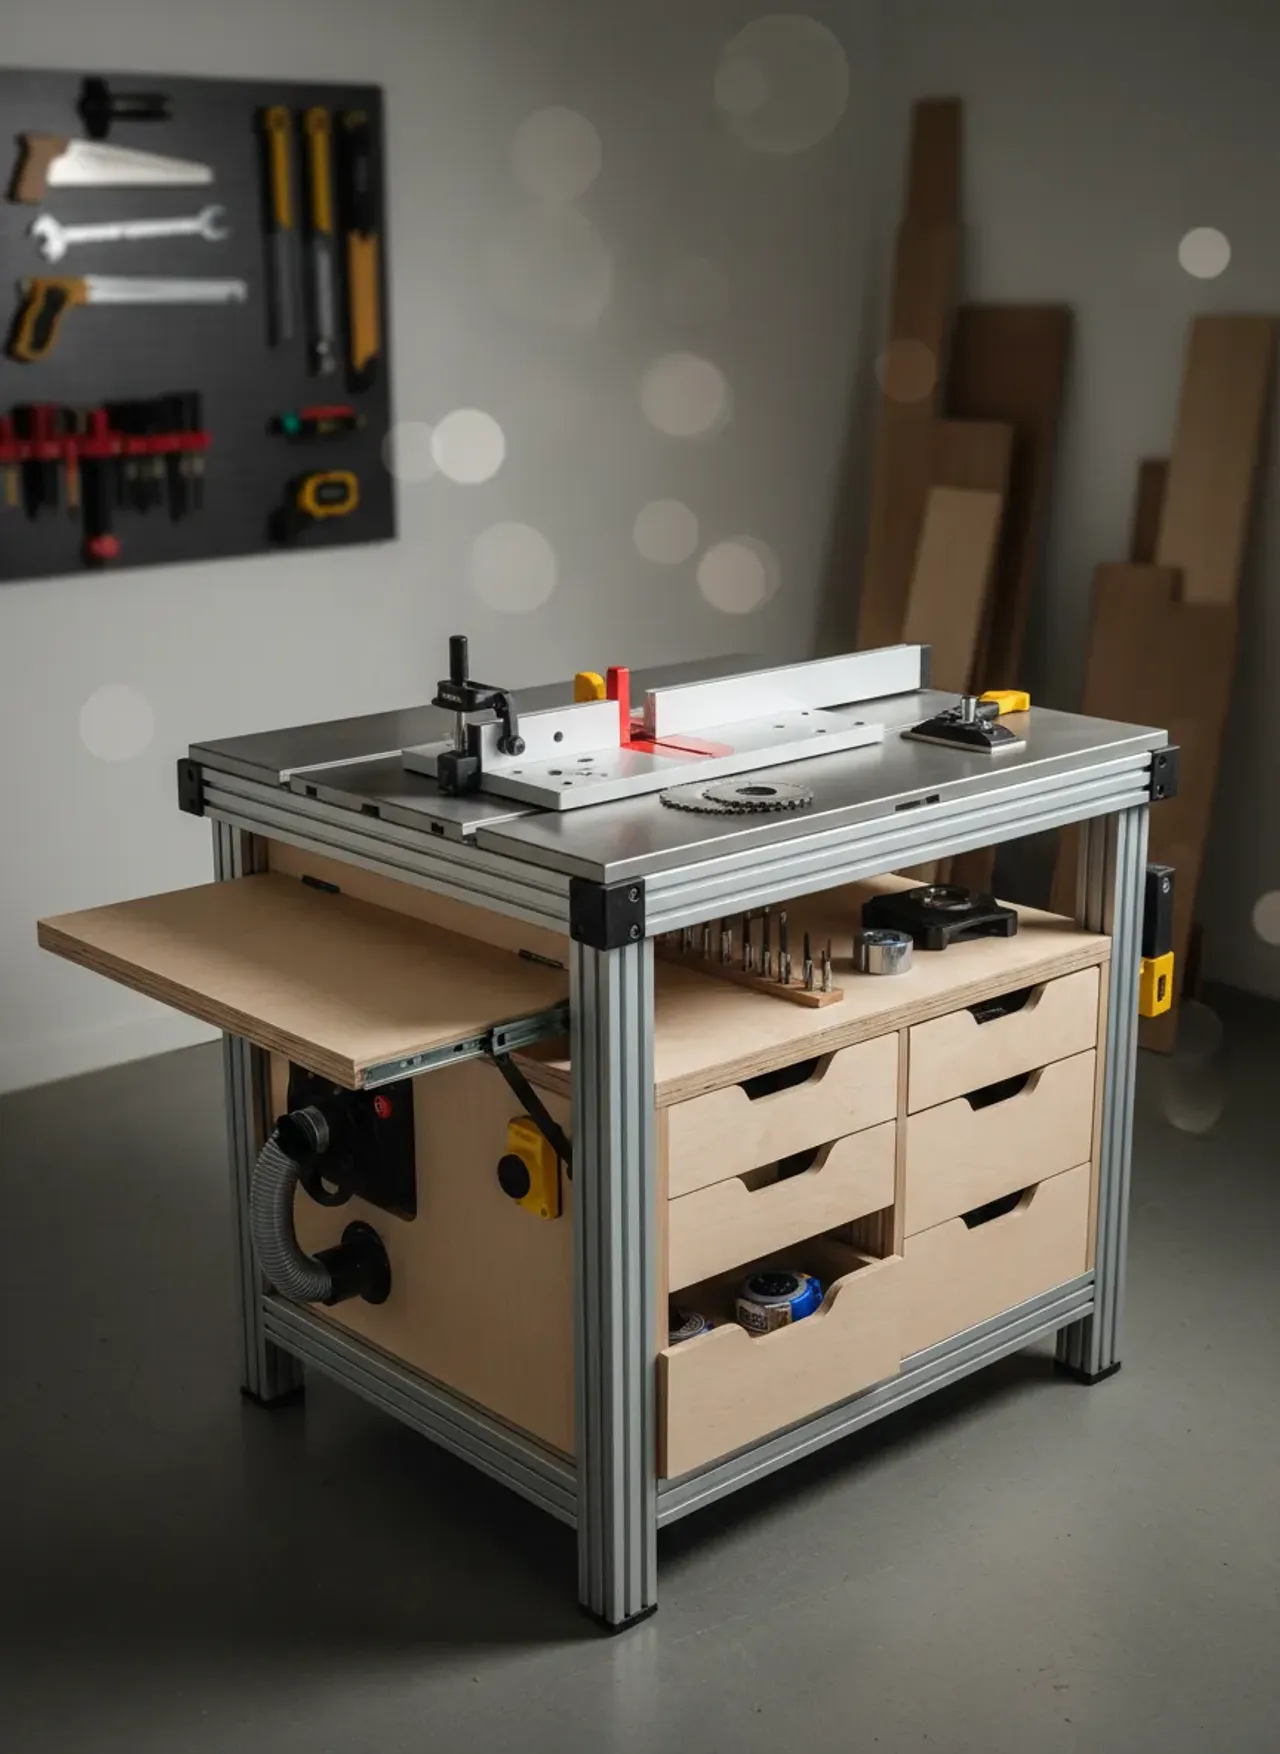
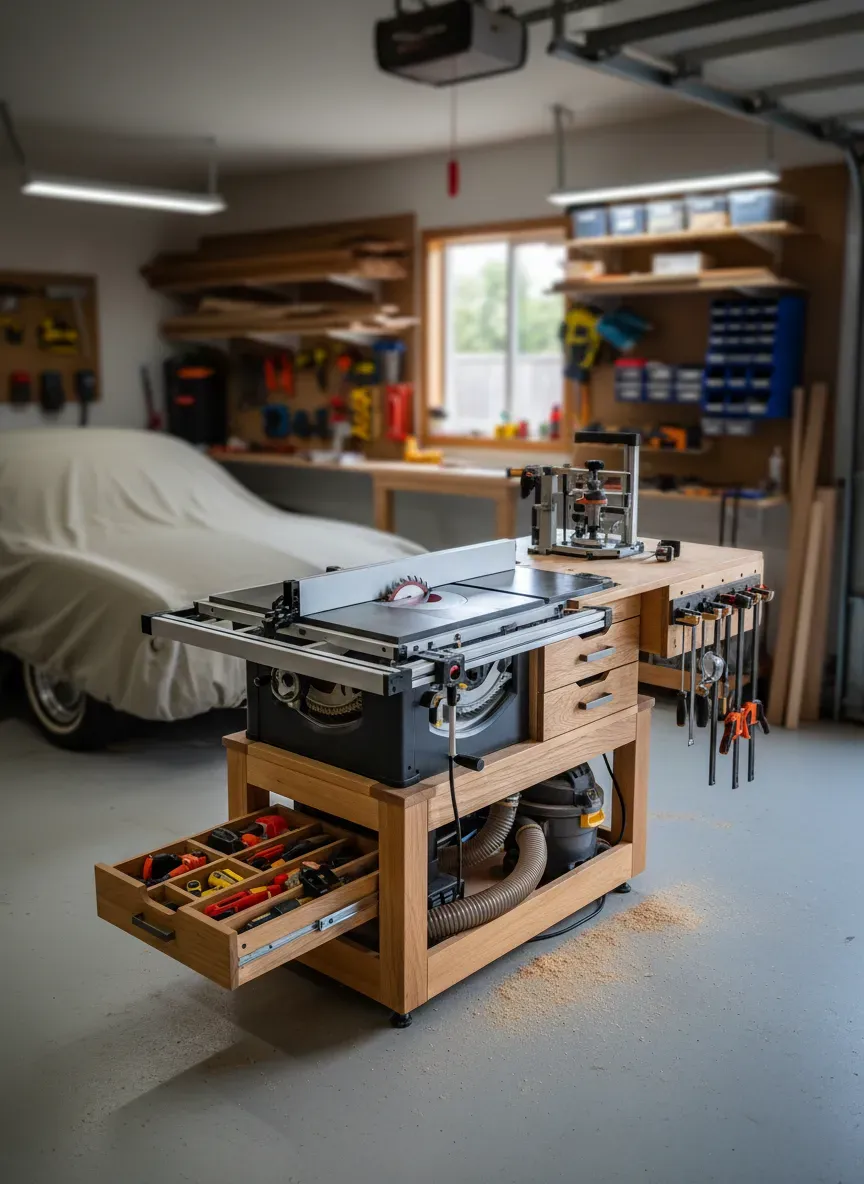
You don’t need a sprawling, three-car garage to do high-level woodworking. You need a centralized, hyper-efficient hub. A well-engineered table saw workbench essentially becomes the beating heart of a small shop, transforming a chaotic room into a streamlined production environment. Forget those flimsy, collapsible job-site stands. We are talking about a monolithic, highly functional workstation that acts as an outfeed table, an assembly bench, a router station, and a storage cabinet all rolled into one.
Before we tear into the blueprinting and chassis mechanics, let’s look at a few off-the-shelf upgrades that can instantly elevate your compact shop setup.
Quick Comparison: Top Picks
| Product | Rating | Check Price |
|---|---|---|
| Kreg Mobile Project Center | ⭐⭐⭐⭐⭐ | View on Amazon |
| Bora Portamate PM-3500 Mobile Base | ⭐⭐⭐⭐½ | View on Amazon |
| Rousseau 2775 Table Saw Stand | ⭐⭐⭐⭐½ | View on Amazon |
The Geometry of Constraint: Why Small Spaces Demand Smarter Benches
The traditional “woodshop triangle”—the theoretical path between the table saw, jointer, and assembly table—completely breaks down when your total square footage resembles a walk-in closet. In these micro-shops, horizontal surfaces are prime real estate. If you dedicate twenty square feet solely to a table saw that you only run for five minutes a day, you are hemorrhaging valuable workspace.
The ultimate compact workbench solves this by forcing your tools to share a footprint. When you drop a job-site or contractor saw into a custom-built chassis, the surface area immediately surrounding the cast-iron (or aluminum) top transforms into usable assembly space.
But there is a catch. The geometry must be flawless. If the outfeed section of your bench is even a sixteenth of an inch higher than your saw’s throat plate, the leading edge of your workpiece will violently jam against the lip. If the bench sits too low, the wood drops as it passes the blade, lifting the rear of the board right into the spinning teeth. Kickback is unforgiving, and a poorly designed bench practically guarantees it.
Decoding the “Outfeed” Conundrum
The primary reason to build a custom table saw workbench is to conquer the outfeed problem. When ripping long stock, the fulcrum point—the exact moment gravity takes over and pulls the board down—happens surprisingly fast.
I’ve personally found that a minimum of 36 inches of continuous outfeed support past the blade is non-negotiable for a small shop. This gives you enough runway to safely push a standard upper cabinet side-panel completely past the riving knife before you have to reach around to retrieve it.
To achieve a dead-flat outfeed surface that won’t sag over time, you need structural integrity. A single sheet of plywood will inevitably bow under its own weight or the weight of your projects. You need to engineer a torsion box. A torsion box is a lightweight grid of interlocking struts sandwiched between two thin skins. It utilizes the same engineering principles as an airplane wing, offering massive rigidity with minimal weight.
Blueprinting Your Ultimate Table Saw Workbench
Building the chassis requires treating the project like a piece of fine furniture, even if it’s constructed out of humble dimensional lumber. The frame takes the brunt of the vibration from the saw’s motor, so sloppy joints will eventually rattle loose.
Skip the standard butt joints held together by brittle drywall screws. Instead, rely on half-lap joints glued and secured with structural screws, or utilize a heavy-duty pocket hole jig. When building the cradle that will actually hold your table saw, precision is paramount. You are effectively replacing the factory stand.
Measure the exact height of your saw from its rubber feet to the top of the miter slots. Your internal shelf must be positioned perfectly so that when the saw rests on it, the saw’s top is perfectly coplanar with the rest of your workbench.
This level of precision is exactly what you apply when learning how to build a stunning entryway bench using minimal space. The same rules of tightly integrated design translate perfectly from interior furniture to shop fixtures.
Material Selection: MDF vs. Plywood vs. Solid Core
Choosing the right material for the top of your bench sparks endless debates in woodworking circles. Let’s cut through the noise.
MDF (Medium Density Fiberboard) is heavy, inexpensive, and incredibly flat. It doesn’t suffer from the internal tension that plagues cheap plywood, meaning it won’t suddenly warp like a potato chip when the humidity changes. However, MDF is a sponge. If you spill a cup of coffee or a bottle of Titebond on an unsealed MDF top, it will swell into an irreparable, lumpy mess.
High-grade Baltic Birch plywood offers superior screw-holding power and is significantly more durable, but it costs a small fortune.
Here’s the real kicker: Melamine-coated particleboard provides a frictionless surface that allows heavy sheet goods to glide effortlessly across the table. It is brilliant for an outfeed surface, but terrible if you want to use the bench for heavy chiseling or assembly work, as the slick surface causes workpieces to slide away from you.
The Case for a Sacrificial Top
My recommendation? Build the core out of two layers of 3/4-inch MDF glued together for sheer mass and vibration dampening. Then, wrap the top in a layer of 1/4-inch tempered hardboard (often called Masonite).
Do not glue the hardboard down. Secure it with countersunk brass screws or double-sided CNC tape. When you inevitably drill through a workpiece or spill a quart of dark walnut stain, you simply back out the screws, toss the ruined hardboard, and drop a brand new $15 sheet in its place. Your bench remains eternally pristine.
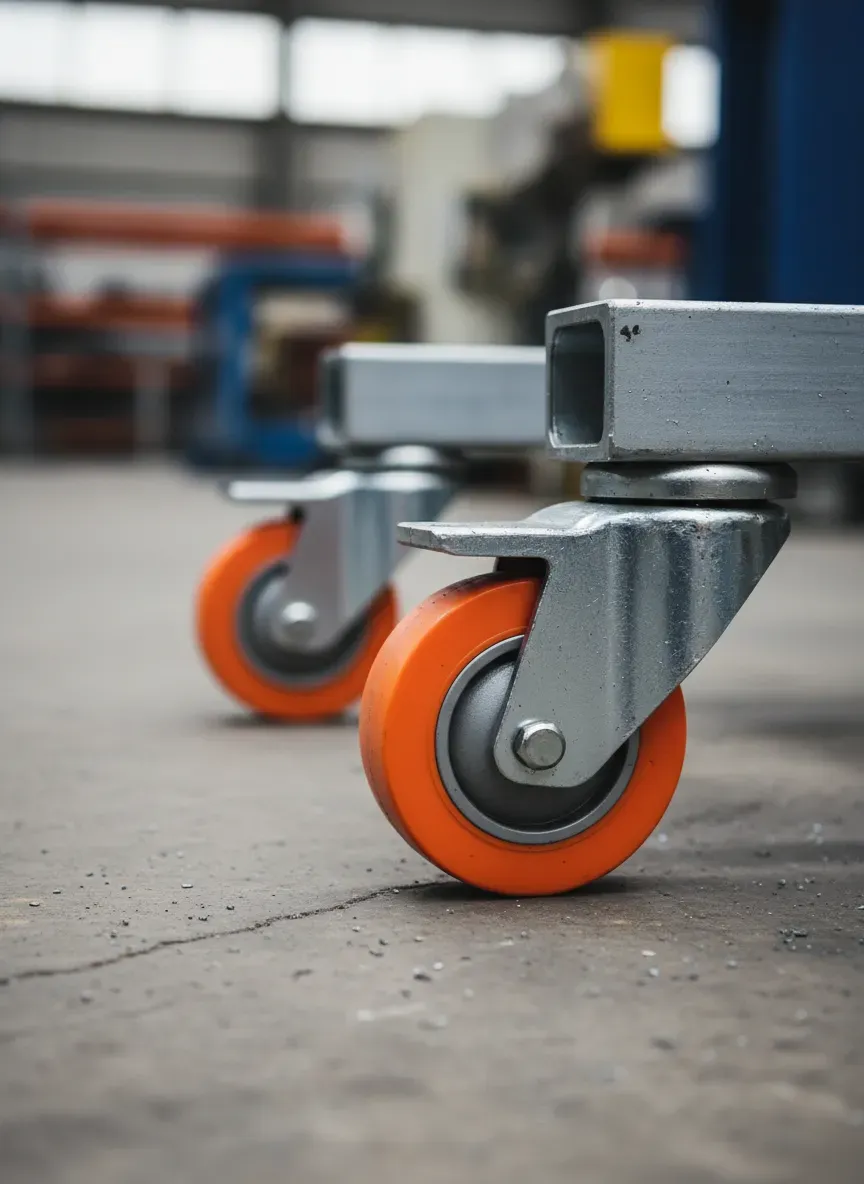
Mobility Mechanics: Casters, Levelers, and Hybrid Systems
A table saw workbench in a small space must be mobile. You will need to pull it away from the wall to handle long rips, and push it back into a corner to free up floor space for assembly. But mobility introduces a critical vulnerability: instability.
A spinning table saw blade generates significant torque. If your bench shifts or wobbles mid-cut, the results can be catastrophic.
You’ll notice that standard locking swivel casters are notoriously flawed for this application. Even when the wheel is locked, the swivel bearing mechanism retains a tiny bit of “play.” Multiply that micro-wobble across a four-foot bench, and your solid workstation suddenly feels like it’s floating on jello.
When you are constructing a built-to-last, rugged DIY storage cabinet, you can get away with standard casters. For a table saw, you cannot compromise.
Retractable vs. Dual-Locking Casters
You need a system that completely disengages the wheels when the saw is in use.
Retractable caster systems mount to the side of the bench legs. By stepping on a steel pedal, you cam-lever the bench up off its wooden legs and onto the polyurethane wheels. When you reach your destination, you flip the pedals up. The bench drops solidly onto its wooden legs, transferring the entire weight directly to the concrete floor.
If you must use permanent casters, invest in heavy-duty, dual-locking mechanisms. These lock both the rotational axis of the wheel and the horizontal swivel bearing simultaneously. Look for wheels made of dense polyurethane rather than hard plastic or steel, as poly absorbs the micro-vibrations of the floor and easily rolls over errant sawdust and zip ties without skidding.
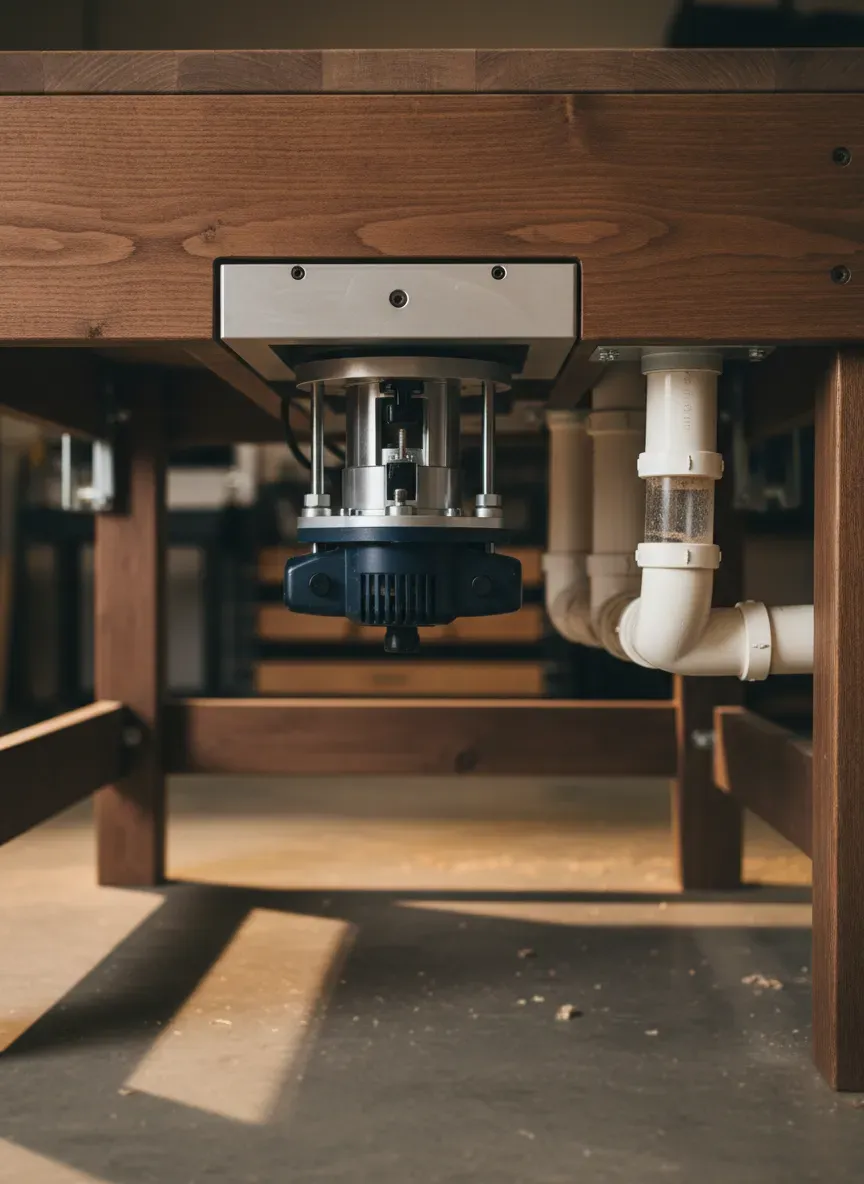
Integrating Dust Collection into the Chassis
Small spaces magnify the dust problem. A standard table saw spits fine particulate matter directly into your breathing zone. Draping a massive four-inch corrugated hose across your shop floor is a tripping hazard just waiting to happen.
Smart bench designs incorporate the dust collection plumbing directly into the internal chassis.
You can route smooth-walled PVC pipe through the internal framing of the bench. Keep the run as short and straight as possible to maintain maximum static pressure. Attach a flexible rubber coupling from the saw’s dust port directly to the internal PVC. Terminate the PVC at the edge of the workbench with a quick-disconnect blast gate.
Now, instead of dragging hoses around the saw, you simply plug your dust collector into the external port on the bench. It creates a sleek, trip-free perimeter.
Pro Tip: Corrugated flexible hose kills your dust collector’s airflow due to internal friction. For every foot of corrugated hose you replace with smooth PVC inside your bench, you dramatically increase the CFM (Cubic Feet per Minute) of dust-pulling power at the blade.
Expandability: Flip-Up Wings and Drop-Down Router Tables
The beauty of a custom bench is its modularity. If you have 24 inches of dead space to the right of your table saw, don’t just leave it as flat MDF. That is prime real estate for a router table.
By routing out a recess and dropping an aluminum router plate directly into the benchtop, you’ve just saved yourself from having to build or store a standalone router table. You can even utilize the table saw’s fence as your router fence by clamping an auxiliary wooden sacrificial fence to it. This kind of multi-tool integration is the secret sauce to crafting excellence and building heirloom-quality furniture pieces without needing a commercial-sized warehouse.
If you occasionally need to cut panels that exceed your bench’s width, consider engineering a flip-up side wing. Using heavy-duty folding shelf brackets, you can attach a 15-inch leaf of melamine to the side or rear of the bench. When you need to break down a sheet of plywood, snap the wing up into place. When you’re done, fold it flat against the chassis.
Engineering a Zero-Play Router Lift Mechanism
If you do integrate a router, the mounting plate must sit perfectly flush with the benchtop. If it sits proud, your wood will catch on the lip. If it sits recessed, your routing depth will be inconsistent across the cut.
Use a pattern bit and a custom MDF template to rout the exact dimensions of your plate into the benchtop. Install micro-adjustment leveling set screws in the corners of the rabbet. This allows you to dial in the height of the aluminum plate to within a thousandth of an inch, ensuring a glass-smooth transition for your workpieces.
Electrical Integration: Eliminating the Cord Clutter
Another hallmark of a premium compact workbench is integrated electrical wiring. Dragging extension cords across a sawdust-covered floor isn’t just annoying; it’s a severe fire hazard.
A truly optimized table saw workbench functions as its own power island. By mounting a heavy-duty, 15-amp or 20-amp power strip (depending on your saw’s requirements) internally, you can plug the table saw, the router, and a shop vacuum directly into the bench itself.
Take it a step further by wiring a magnetic paddle switch to the exterior of the bench. Job-site table saws often have their power switches tucked awkwardly under the front rail. In an emergency, you do not want to be fumbling blindly under the table to shut off the machine.
By wiring the saw to an external, knee-level magnetic paddle switch mounted on the front of your new wooden chassis, you grant yourself instant, hands-free shutoff capabilities. You simply bump the oversized red paddle with your thigh to kill the power. This is an incredible safety upgrade that mimics the functionality of a five-thousand-dollar cabinet saw.
Common Pitfalls in Compact Workbench Design
Even seasoned builders make critical errors when designing these monolithic workstations. Avoid these traps to ensure your build is a success:
- Ignoring Miter Slot Alignment: Your table saw has two miter slots. If your bench’s outfeed table extends tightly behind the saw, you must rout matching grooves into the outfeed surface. If you fail to do this, your miter gauge or crosscut sled will violently crash into the benchtop the second you push it past the blade.
- Forgetting Wood Movement: If you build your chassis out of cheap, wet construction lumber (like framing 2x4s from a big box store), the wood will shrink and twist as it dries in your shop. This shifting can pull your entire bench out of square, tweaking the saw’s trunnions and ruining your alignment. Always let construction lumber acclimate in your shop for a few weeks before milling it, or use high-grade plywood for the structural framing.
- The Overhang Trap: You need a lip around the perimeter of your workbench. If you flush-mount the top directly to the frame, you won’t be able to use standard F-clamps or C-clamps to hold workpieces down. Always leave a minimum of a three-inch overhang on all sides of the benchtop specifically for clamping.
Key Takeaways for the Ultimate Build
- Prioritize Coplanar Surfaces: The saw top and the benchtop must align seamlessly. Use leveling feet under the saw’s base to dial this in.
- Mass is Your Friend: A heavy bench dampens the harsh, high-frequency vibrations of universal table saw motors, resulting in cleaner, chatter-free cuts.
- Design for Extraction: Plumb your dust collection directly into the frame to save floor space and reduce tripping hazards.
- Make it Replaceable: Always use a sacrificial hardboard top. You will damage it eventually; make it easy to swap.
- Lock it Down: Retractable casters are far superior to standard locking wheels for maintaining absolute rigidity during heavy rip cuts.
The Bottom Line: Your Shop, Your Rules
The Bottom Line: A compact woodshop forces you to be deliberate. You can’t rely on sheer square footage to solve your logistical problems. Building a highly engineered, multi-functional table saw workbench is the single most impactful weekend project you can undertake. It shifts your shop from a frustrating, cramped garage into a precision woodworking environment. By centralizing your outfeed, assembly, routing, and dust collection into one monolithic footprint, you unlock the true potential of your small space.
You’ve got the theory, the mechanics, and the blueprinting strategies in your head. But if you are staring at a pile of lumber and wondering exactly where to make the first cut, I highly recommend skipping the frustrating trial-and-error phase.
I’ve personally found that having a precise, step-by-step schematic takes the anxiety out of these massive shop builds. If you want a masterclass in workbench design—along with blueprints for practically everything else you’d ever want to build—you need to check out Ted’s Woodworking.
They offer an incredible archive of over 16,000 highly detailed woodworking plans, including brilliant, space-saving table saw stations tailored specifically for small shops. You get exact cut lists, 3D diagrams, and foolproof instructions that make complex builds feel effortless.
Right now, you can grab the entire collection at a massive 75% discount. Stop guessing your dimensions and start building your ultimate shop today.
Click here to get instant access to Ted’s Woodworking and claim your 75% discount!