How Deep Should Mudroom Lockers Be? 2026 Trends in Stepped-Depth Design
Stop guessing your mudroom dimensions. We break down the ergonomic science of locker depth and the rising 'Stepped-Depth' design trend for 2026.

Feb 26, 2026 - Written by: Linda Wise

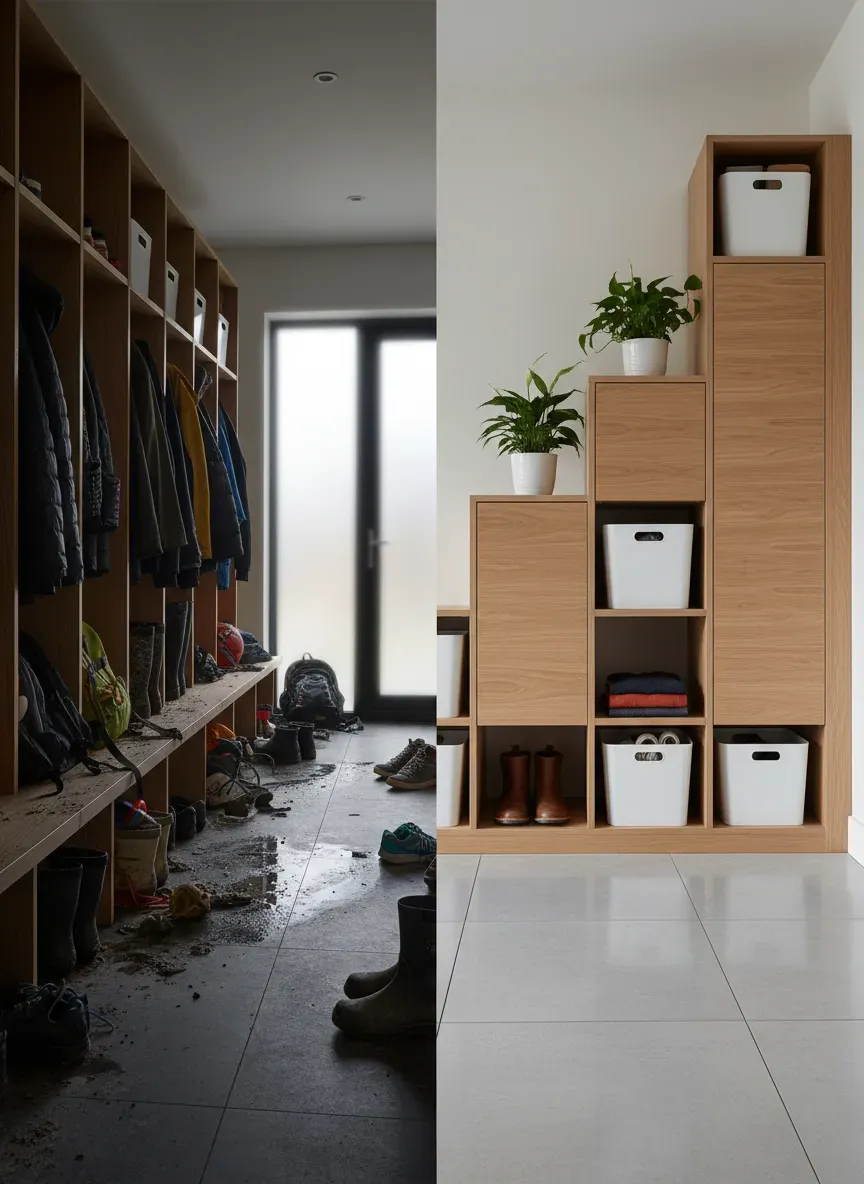
You know that feeling when you walk into a mudroom, laden with groceries and a soaking wet raincoat, only to realize there is literally nowhere to put your body without hitting a cabinet? I call it the “Entryway Squeeze.” It usually happens because someone prioritized maximizing storage volume over human movement, resulting in lockers that encroach aggressively into the walking path.
Conversely, I’ve walked into stunning, high-end homes where the mudroom lockers were so shallow that a standard teenage backpack hung halfway out, forcing the cabinet doors to stay perpetually ajar. It looks cluttered, it feels unfinished, and quite frankly, it’s a design failure.
Determining the perfect depth for mudroom lockers isn’t just about measuring your hallway. It is a balancing act between the “Triangle of Chaos”—coats, shoes, and bags—and the physical limitations of building materials. As we move toward 2026, a specific architectural shift is taking over high-function entryways: Stepped-Depth Design.
This isn’t just about aesthetics; it’s about ergonomic science. If you are planning a build or a remodel, forget standard kitchen cabinet dimensions. They don’t apply here. Let’s tear down the measurements and rebuild them the right way.
The Problem with “Standard” Depth
Here is the kicker that most general contractors won’t mention until it’s too late: standard cabinetry depth is designed for plates and cups, not parkas and hockey bags.
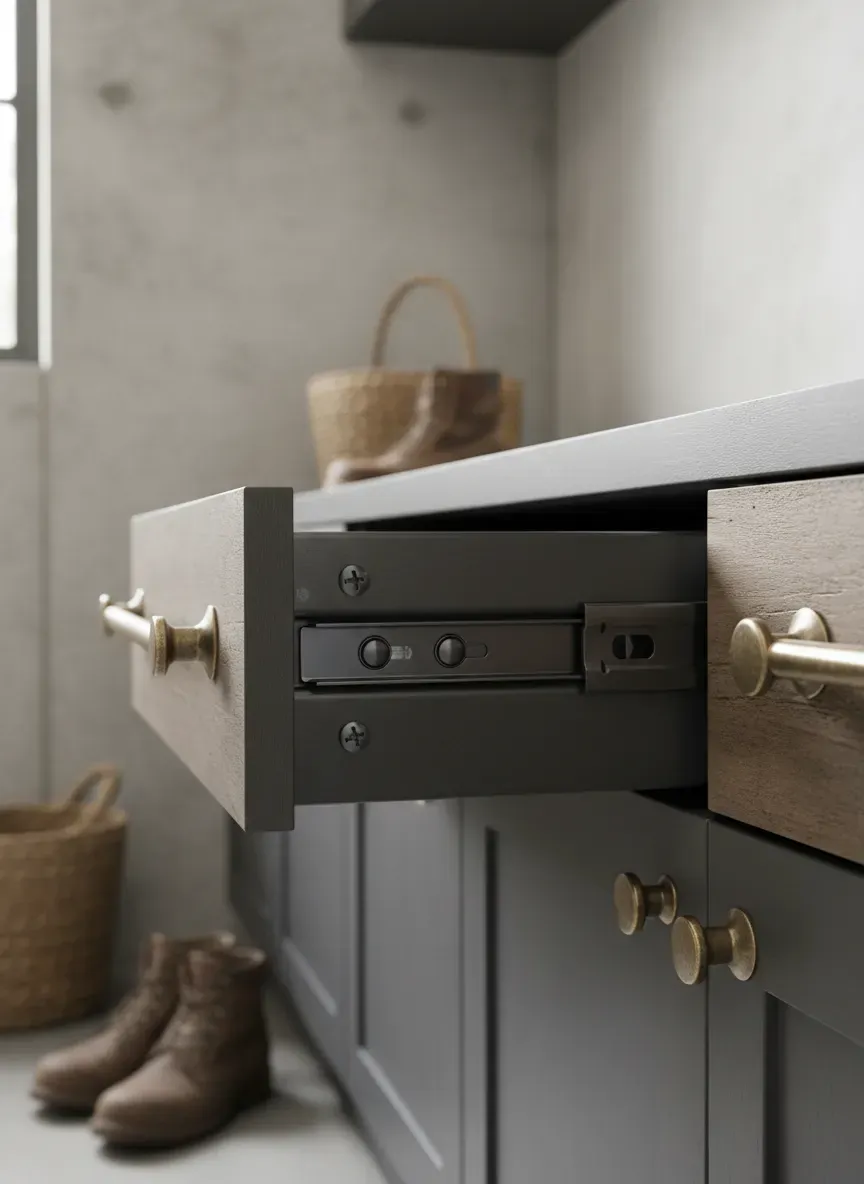
Kitchen uppers are typically 12 inches deep. Kitchen bases are 24 inches. If you apply the 12-inch standard to a mudroom locker, you have failed before you started. A standard adult coat hanger is roughly 17 to 18 inches wide. If you build a 12-inch or even a 15-inch deep locker and plan to use a hanging rod, your cabinet doors will not close. You are forced to angle the hangers (which looks messy) or abandon the rod entirely for hooks.
Pro Tip: If you are determined to use a hanging rod (perpendicular to the back wall), your internal clearance must be at least 22 inches to allow bulky winter coats to hang freely without rubbing against the door.
However, going full 24-inch depth floor-to-ceiling creates a massive visual block. It feels like walking through a tunnel. This is where the nuance of design comes in.

The 2026 Shift: Stepped-Depth Design
The trend dominating the architectural conversations for 2026 builds is “Stepped-Depth” or “Waterfall” cabinetry. Instead of a monolithic block of storage, the unit recedes as it goes higher. This mimics the way humans occupy space—we are wider at the hips and shoulders and narrower at the head.
This approach solves the two biggest complaints I hear: “I don’t have enough room to sit” and “The room feels too small.”
Here is the breakdown of the Stepped-Depth anatomy:
1. The Base (The Bench): 20 to 24 Inches
The foundation of the locker system must be the deepest point. To sit comfortably and tie a shoe, an adult needs roughly 18 inches of thigh support. However, you also need space behind your back for the vertical locker structure.
If your bench is only 18 inches deep and you build a 12-inch upper cabinet sitting on top of it, you only have 6 inches of actual seating depth. That isn’t a bench; that’s a ledge.
The Sweet Spot: I recommend a base depth of 22 to 24 inches. This accommodates slide-out drawers for shoes underneath and ensures that even with a locker tower behind you, you still have a generous 14-16 inches of seating surface.
2. The Mid-Section (The Locker Body): 16 to 18 Inches
This is the critical storage zone. This depth allows for heavy-duty double hooks on the back and side walls. It is deep enough to swallow a fully loaded student backpack (which averages 12-15 inches in depth when stuffed with textbooks) but shallow enough that things don’t get lost in the abyss.
If you go deeper than 18 inches here, you create a “black hole.” Kids will throw things in, and you won’t see them again until spring cleaning.
3. The Upper Storage (The Reach): 14 to 16 Inches
The cabinets above head height should step back again. This reduces the visual weight of the unit, making the ceiling feel higher. It also prevents you from banging your head when you stand up from the bench.
Critical Dimensions: The Coat Hanger Variables
I touched on this earlier, but it warrants a deeper look because it dictates your hardware choices. You have two paths here, and you need to choose one before you order lumber.
Path A: The Rod User
If you want a hanging rod, your lockers must be 24 inches deep (external dimension). This matches the depth of a standard closet. If you try to squeeze this into 20 inches, the sleeves of down jackets will get pinched in the doors.
Path B: The Hook User (Recommended for Mudrooms)
Most families find that rods are too fussy for entryways. Kids don’t use hangers. They use hooks. For a hook-based system, a 16 to 18-inch depth is superior. It keeps coats accessible and prevents layers from piling up too deeply.
If you are going the hook route, don’t buy cheap hardware that snaps under the weight of a wet wool coat. You need architectural-grade hardware. I’ve installed the Brainerd Heavy Duty Coat and Hat Hook in dozens of projects; the projection is perfect for holding a heavy bag and a coat simultaneously without bending.
The “Backpack Bulge” Factor
The biggest variable in 2026 isn’t coats; it’s gear. Lacrosse sticks, violin cases, and the modern academic backpack.
I recently consulted on a home where the lockers were beautifully crafted at 14 inches deep. They looked sleek. But the family had three high schoolers. The backpacks, loaded with laptops and gym gear, protruded three inches past the frame. The cabinet doors were useless, and the hallway became an obstacle course.
The Rule: Measure the widest item you intend to store now, and add 3 inches. If your child plays hockey, that equipment bag is your baseline. If you are avid hikers, your frame packs dictate the depth.
Material Yield: The Hidden Cost of Depth
Here is a perspective from the carpentry side that will save you money. Cabinet plywood typically comes in 4x8 foot sheets.
- 24-inch depth: You can rip a sheet exactly in half (minus the saw blade kerf) and get two perfect strips. Zero waste.
- 23-inch depth: You get one strip, and a 25-inch offcut that is often too narrow for a second cabinet run but too wide to throw away.
- 16-inch depth: You get exactly three strips per sheet. Highly efficient.
When you ask for a custom 20-inch depth, you are paying for the waste. Stick to dimensions that divide evenly into 48 inches (12, 16, 24) to keep material costs down, or be prepared to pay a premium for that specific 19.5-inch custom specification.
The Bottom Line on Measurements
If you are skimming for the numbers, here is the cheat sheet for the Stepped-Depth profile:
- Bench Height: 18 inches
- Bench Depth: 22-24 inches
- Locker Interior Height: 48-60 inches (depending on ceiling)
- Locker Depth: 16-18 inches
- Upper Cabinet Depth: 14-16 inches
For a more granular breakdown of how these numbers interplay with ceiling heights, take a look at our guide on standard depth and height measurements, which covers the vertical spacing in more detail.
Adapting for Narrow Hallways
Not everyone has a dedicated mudroom the size of a garage. Many of us are working with “Mud-Halls”—hallways that double as drop zones.
In a narrow corridor (less than 48 inches wide), a 24-inch deep bench is a mistake. It chokes the flow. In these scenarios, you have to invert the Stepped-Depth design.
The “Slim-Step” Modification:
- Bench: 16 inches (enough to perch, not lounge).
- Uppers: Open shelving only, 10-12 inches deep.
- Hooks: Mounted directly to the back panel, no side walls (separators).
Removing the vertical dividers between lockers saves you 1.5 inches of width per locker and makes the unit feel less claustrophobic. It turns the unit into a communal rack rather than individual cubbies, which physically saves depth because you don’t need the clearance for swinging doors.
Organizing the Deep Abyss
If you commit to the deep lockers (20”+), you encounter the “Dark Corner” issue. The back of the cabinet becomes a graveyard for lost mittens. Lighting becomes mandatory here. I always suggest routing a channel for LED tape light vertically inside the front face frame, pointing backward. It illuminates the depths without shining in your eyes.
Furthermore, upper cabinets that are 16+ inches deep are hard to organize. Things get pushed back. The solution is basket storage. You want a basket that acts as a drawer—pulling out the contents so you don’t have to get a step stool to reach the back.
The texture matters here. You want something breathable so damp hats don’t mildew. I prefer the StorageWorks Hyacinth Storage Baskets because the rigid structure holds up to constant pulling, and the dimensions fit perfectly into standard architectural joinery.
Shoe Storage: The Depth Trap
The area beneath the bench is often the most poorly utilized space in the entire house.
A standard pair of men’s running shoes is about 12-13 inches long. A pair of women’s boots? considerably longer. If your bench is 24 inches deep, and you just leave it as an open cubby, the shoes get kicked to the back. You end up on your hands and knees with a flashlight trying to find the left sneaker.
The Fix: Pull-out trays. If your bench depth exceeds 18 inches, you should treat the space underneath as a drawer, not a shelf. Heavy-duty drawer slides allow you to bring the shoes to you.
For retrofitting existing deep cubbies where you can’t install drawers, you need a specialized insert. The Rev-A-Shelf Pullout Shoe Organizer is the industry standard for a reason. It handles the depth and keeps the mud off the actual carpentry.
Ventilation: The Forgotten Element
We are talking about depth, but depth traps moisture. Deep, closed lockers are petri dishes for mold if you are storing wet gear.
If you are building lockers deeper than 18 inches with doors, you must incorporate ventilation. This can be as simple as leaving a 1-inch gap at the top and bottom of the door or using mesh inserts in the cabinet face.
I’ve seen custom cabinetry ruined in two seasons because wet snow pants were hung in a sealed, 24-inch deep box. The moisture had nowhere to go, warped the plywood, and grew mold on the drywall behind it. If you go deep, let it breathe.
Visualizing the Flow
When you tape out these dimensions on your floor (and please, actually use blue painter’s tape on your floor before you buy anything), pay attention to the swing radius.
If your locker depth is 18 inches, and your door is 18 inches wide, that door swings out into the room. Do you have clearance? A good rule of thumb is that you should be able to walk past the locker with the door fully open without having to turn sideways. If you can’t, either reduce the depth or switch to open cubbies.
The “Show” Mudroom vs. The Real Mudroom
There is a trend I’m seeing in 2026 interior design concepts called “The Hidden Scramble.” This involves a dual-depth system.
The “Show” section (visible from the kitchen) uses shallower, 14-inch depth lockers with solid doors. It looks tidy. Then, around the corner or behind a partition, there is a “Scramble” zone—open hooks, 24-inch deep benches, and industrial matting.
If you have the square footage, stop trying to make one locker bank do everything. Split the depth. Keep the shallow storage for guests and off-season items, and build the deep, rugged storage for daily abuse.
Final Thoughts on Stepped-Depth
The era of the one-size-fits-all, 12-inch deep mudroom unit is over. It simply doesn’t work for modern life.
By embracing the Stepped-Depth design—24” bench, 18” body, 15” upper—you create a piece of joinery that feels custom, respects human ergonomics, and actually holds your stuff.
Don’t let a contractor talk you into standard kitchen dimensions just because it’s easier for them to buy stock cabinets. Fight for those extra inches in the base and the breathing room in the uppers. Your future self, trying to get a muddy snowsuit off a screaming toddler, will thank you for the extra seating space.
Build for the chaos, not the photo shoot.