Standard Depth and Height Measurements for Optimal Entryway Organization Cubbies
Master the math of mudrooms. This expert guide details the precise depth and height measurements needed for functional, stylish entryway cubbies that actually work.
Feb 20, 2026 - Written by: Linda Wise

You know that feeling when you walk through the front door and immediately trip over a sneaker? Or perhaps you’ve experienced the frustration of hanging a heavy winter coat on a hook, only to have the locker door refuse to close because the sleeves are bunched up against the frame.
These aren’t just clutter problems; they are geometry problems.
When we talk about organizing a mudroom or foyer, we often get caught up in the aesthetics—the paint color, the hardware finish, or the wood grain. But as someone who has designed and corrected countless storage disasters, I can tell you that the difference between a sanctuary and a stress-inducer lies entirely in the standard depth and height measurements for optimal entryway organization cubbies. Get the math wrong, and even the most expensive cabinetry becomes useless furniture.
Designing the perfect landing zone requires a blend of ergonomic science, architectural proportion, and a realistic understanding of how much space a size 12 boot actually occupies. Let’s strip away the guesswork and dive into the numbers that make these spaces work.
The Foundation: Why One Size Does Not Fit All
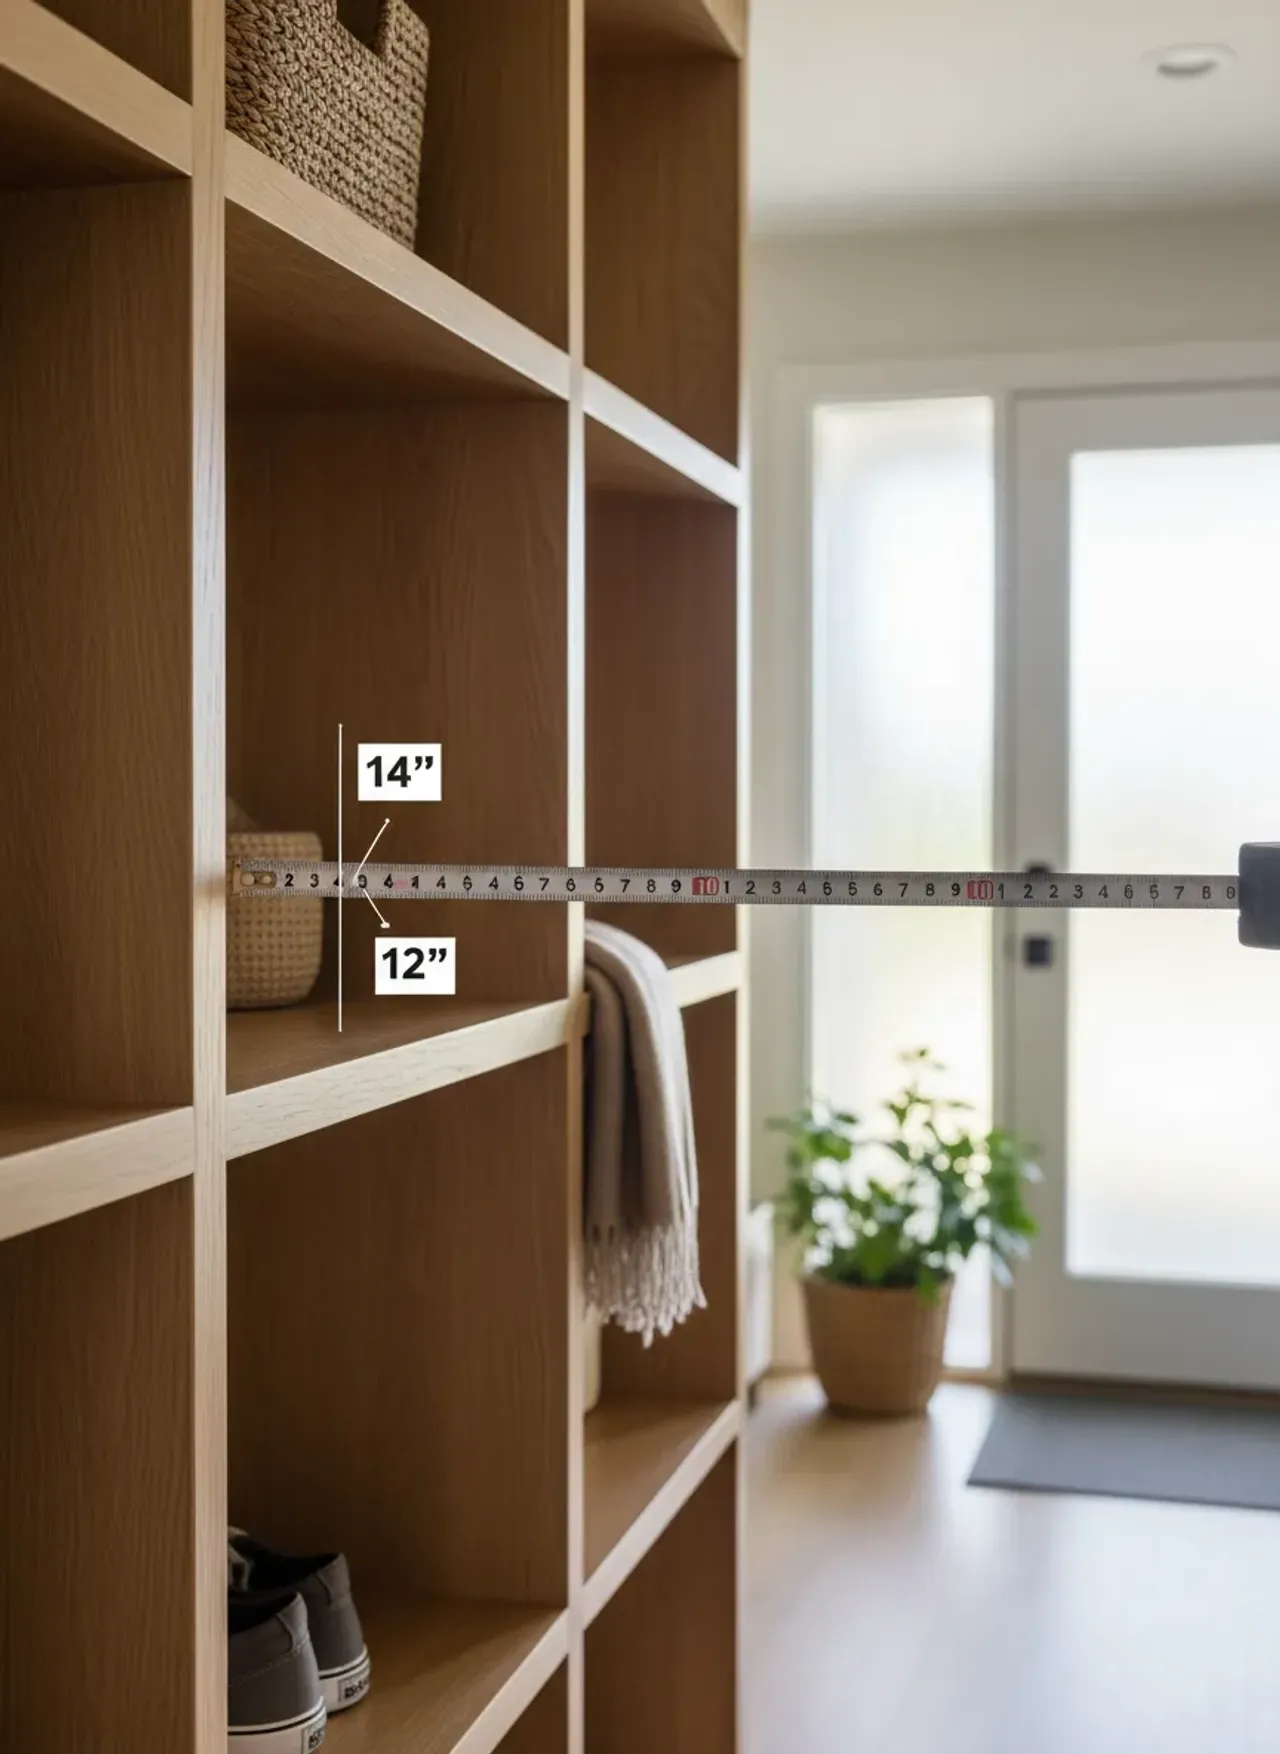
Before we start cutting plywood or ordering units, we have to acknowledge that “standard” is a relative term. In the world of cabinetry, standard upper cabinets are 12 inches deep, and base cabinets are 24 inches deep. However, entryway storage sits in a unique limbo between the two.
If you go with a shallow 12-inch depth for a locker, a standard coat hanger won’t fit perpendicular to the wall. If you go with a massive 24-inch depth, you lose floor space, and the cubbies become dark caverns where mittens go to die.
We need to strike a balance. You want enough depth to conceal the chaos, but enough shallow accessibility to grab your keys and go.
The Golden Rule of Depth
For most residential applications, I’ve found that the “sweet spot” for open locker depth is 15 to 18 inches.
- 15 Inches: This is the minimum for a functional “locker” feel. It allows hooks to hold backpacks without them protruding aggressively into the walkway.
- 18 Inches: This is luxury territory. It accommodates bulky winter parkas, allows for a substantial bench seat, and gives you room for larger baskets.
Pro Tip: If you plan on using coat hangers on a rod rather than hooks, you must have a minimum interior depth of 22 inches, or 24 inches exterior. Anything less, and the hangers will sit at an angle, looking messy and functioning poorly.
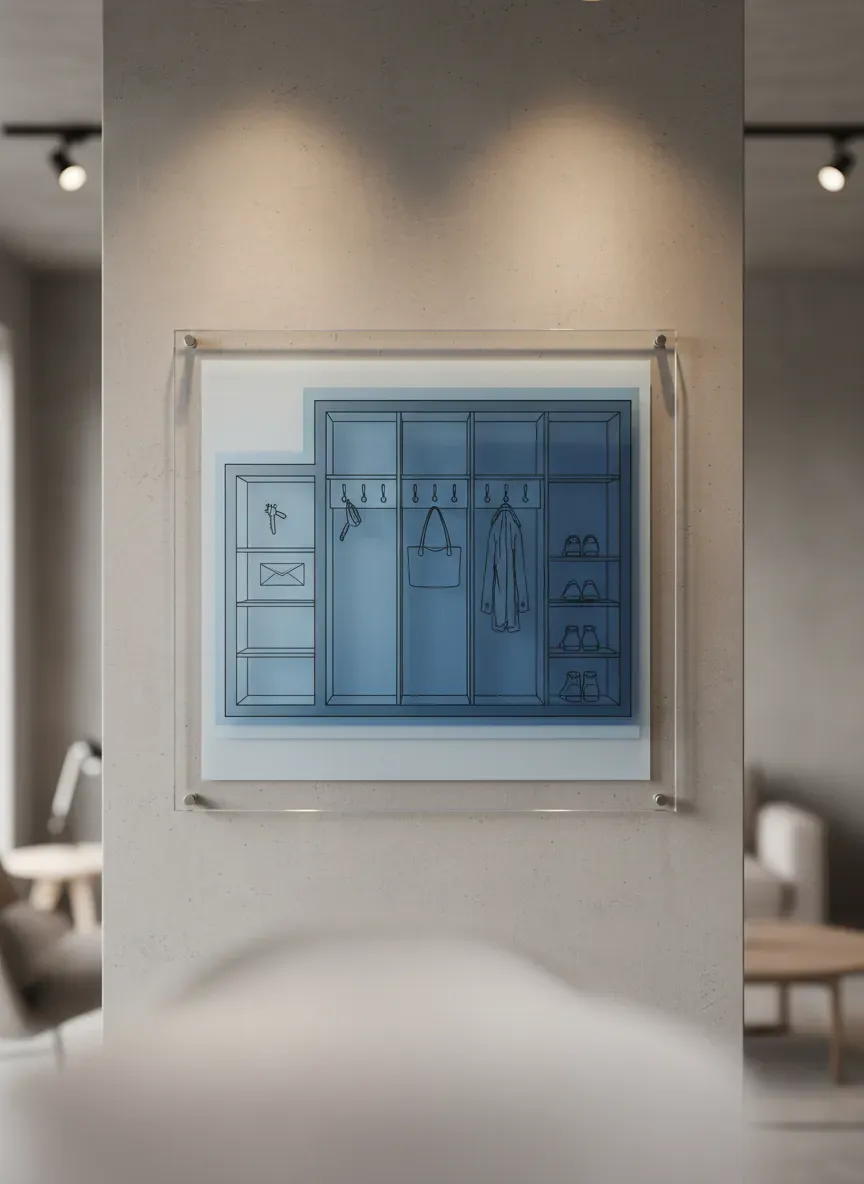
Vertical Velocity: Establishing Height Hierarchies
Vertical space is often squandered in entryways. We tend to focus on eye level and forget the floor and ceiling. To maximize utility, we need to segment the vertical plane into three distinct zones: The Shoe Zone, The Action Zone, and The Overflow Zone.
1. The Shoe Zone (Bottom Tier)
This is where the battle against mud and clutter is won or lost. The height of your bottom cubbies dictates what kind of footwear can live there.
- Standard Sneakers & Low Shoes: These fit comfortably in 6 to 8 inches of clear vertical space.
- Ankle Boots & High-Tops: You need to push this to 10 to 12 inches.
- Tall Winter/Rain Boots: This is where standard plans fail. You need a dedicated section with 16 to 18 inches of clearance.
I highly recommend utilizing adjustable shelving here. Drilled shelf pins allow you to change the configuration as the seasons change—boots in winter, flip-flops in summer. If you want the best experience, I highly recommend checking out the Kreg Shelf Pin Jig for adding versatility to your build.
2. The Action Zone (The Bench & Hooks)
If your design includes a bench, standard chair height rules apply. The top of the seat should sit between 17 and 19 inches off the floor.
Here is the kicker: If you plan to add a thick foam cushion, you need to account for that before you build. A 3-inch cushion on a 19-inch bench creates a 22-inch seat, which is uncomfortably high for putting on shoes. If you are adding a cushion, build your bench box at 15 or 16 inches.
For those who love a retro aesthetic, comparing these dimensions with mid-century entryway benches with storage can give you a great reference point for leg profiles and seat heights that have stood the test of time.
Hook Height: For adults, the primary coat hooks should be placed at 60 to 66 inches from the floor. This prevents long coats from dragging on the bench seat. For children, a secondary row of hooks at 36 to 42 inches empowers them to hang up their own gear.
3. The Overflow Zone (Upper Cubbies)
The space above the hooks is prime real estate for seasonal storage. These upper cubbies are typically hard to reach without a step stool, so size them for bins and baskets.
- Standard Height: 12 to 14 inches. This fits most standard woven baskets.
- Standard Depth: This usually matches the depth of the bench or the locker sides (15-18 inches).
The Width Equation: Shoulder Room for Your Stuff
While depth and height are critical, width determines capacity. A common mistake is making locker bays too narrow.
A standard puffy winter jacket hangs about 22 to 24 inches wide when on a person, but compresses when hung. However, a backpack is rigid.
- Minimum Width: 12 inches per locker bay. This is tight but doable for kids.
- Ideal Width: 15 to 18 inches per person. This allows a backpack and a coat to hang side-by-side without fighting for space.
- Generous Width: 24 inches. This feels like a personal wardrobe.
If you are working with limited horizontal wall space, consider merging zones. Instead of individual stalls, use a continuous bench with a shared hook rail. This effectively accommodates fluctuating volume better than rigid dividers.
Material Thickness and Dimension Loss
When you are sketching out your “standard” measurements, never forget the physical reality of the material.
If you want a cubby opening to be exactly 12 inches wide, and you are using ¾-inch plywood, your center-to-center measurement needs to be 12 ¾ inches. Over a span of four or five cubbies, forgetting to account for material thickness can result in your unit being 3 to 4 inches wider than your wall space.
I’ve seen DIYers build beautiful units in their garage, only to find they are half an inch too wide to fit into the alcove. Always measure your rough opening and subtract at least 1 inch for wiggle room, using scribe molding to cover the gaps later.
For a deeper understanding of how these material constraints affect large-scale units, you might want to read our analysis on hall trees and mudroom lockers, which breaks down the structural differences between freestanding and built-in units.

Integration with Architecture: Baseboards and Outlets
Your entryway doesn’t exist in a vacuum. It likely has baseboards, crown molding, and electrical outlets.
The Baseboard Dilemma
You have two choices here:
- Remove the baseboard: This allows the unit to sit flush against the wall. This is the professional approach.
- Notch the unit: You cut the back bottom corner of your side panels to fit over the existing baseboard.
If you choose to keep the baseboard, your “depth” measurement technically increases because the unit is pushed off the wall by the thickness of the trim (usually ½ to ¾ inch).
Electrical Planning
Modern entryways are charging zones. If you have an outlet on the wall, don’t cover it up. Measure its height and cut an access hole in the back panel of your cubby.
Standard Outlet Height: usually 12 to 16 inches from the floor to the center of the box. This often lands right inside the lower shoe cubby or just below the bench. Plan your horizontal shelves to avoid bisecting the outlet.
The Ergonomics of Reach and Retrieval
Dimensions are ultimately about human movement. We call this anthropometrics.
If your upper cubbies are 18 inches deep and mounted 80 inches high, retrieving a basket from the back of that shelf is nearly impossible for an average-height person without a ladder.
The Fix: If you are building deep upper storage (over 14 inches), mount the shelf slightly lower, or use “pull-down” hardware. Alternatively, use baskets that have handles on the bottom or lower front edge.
Speaking of texture and handling, if you want to soften the look of rigid carpentry, incorporating coastal charm woven entryway benches or similar stylistic elements can break up the boxiness while adhering to these strict measurement standards.
Custom vs. Pre-Fab: When the Math Doesn’t Work
Sometimes, your space just doesn’t align with the standard 15-inch or 18-inch depth. Maybe you have a narrow hallway where you only have 10 inches of depth available.
Can you make a 10-inch deep cubby work? Yes, but you have to change your hardware strategy.
- Hooks: Use side-mounted hooks rather than back-mounted ones.
- Shoes: Store shoes at an angle or vertically using tip-out bins.
- Benches: A 10-inch bench is a shelf, not a seat. Don’t try to sit on it.
If you are forced into this shallow depth, I highly recommend looking at the VASAGLE Industrial Coat Rack. It’s designed specifically for tighter profiles and demonstrates how to maximize verticality when depth is compromised.
The “Cubic Efficiency” of Baskets
Let’s talk about the containers you put inside the cubbies. The cubby dimensions should ideally be dictated by the storage bins you intend to use, not the other way around.
There is nothing more frustrating than building a beautiful array of 11-inch wide cubbies, only to find that the standard basket size at Target or IKEA is 12 inches wide.
The Safe Bet Dimensions for Basket Compatibility:
- Width: 13 inches (fits almost all standard cube bins).
- Height: 13 inches.
- Depth: 15 inches.
If you design around these numbers, you will always be able to find affordable bins to fit your unit.
Specific Dimensions for Kids vs. Adults
If this is a “forever home,” be careful about customizing too heavily for small children. A cubby height of 40 inches is great for a 5-year-old, but useless for a 15-year-old.
The Hybrid Approach: Install adjustable hook rails. Or, use a permanent high rail (60 inches) and a temporary low rail (36 inches) that can be removed later.
School Backpacks: Modern school backpacks are massive. They are deep, heavy, and bulky.
- Required Depth: 10-12 inches minimum when hanging.
- Required Width: 14 inches.
If your cubbies are too shallow, the backpacks will prevent the cabinet doors from closing, or they will intrude into the walking path, creating a tripping hazard.
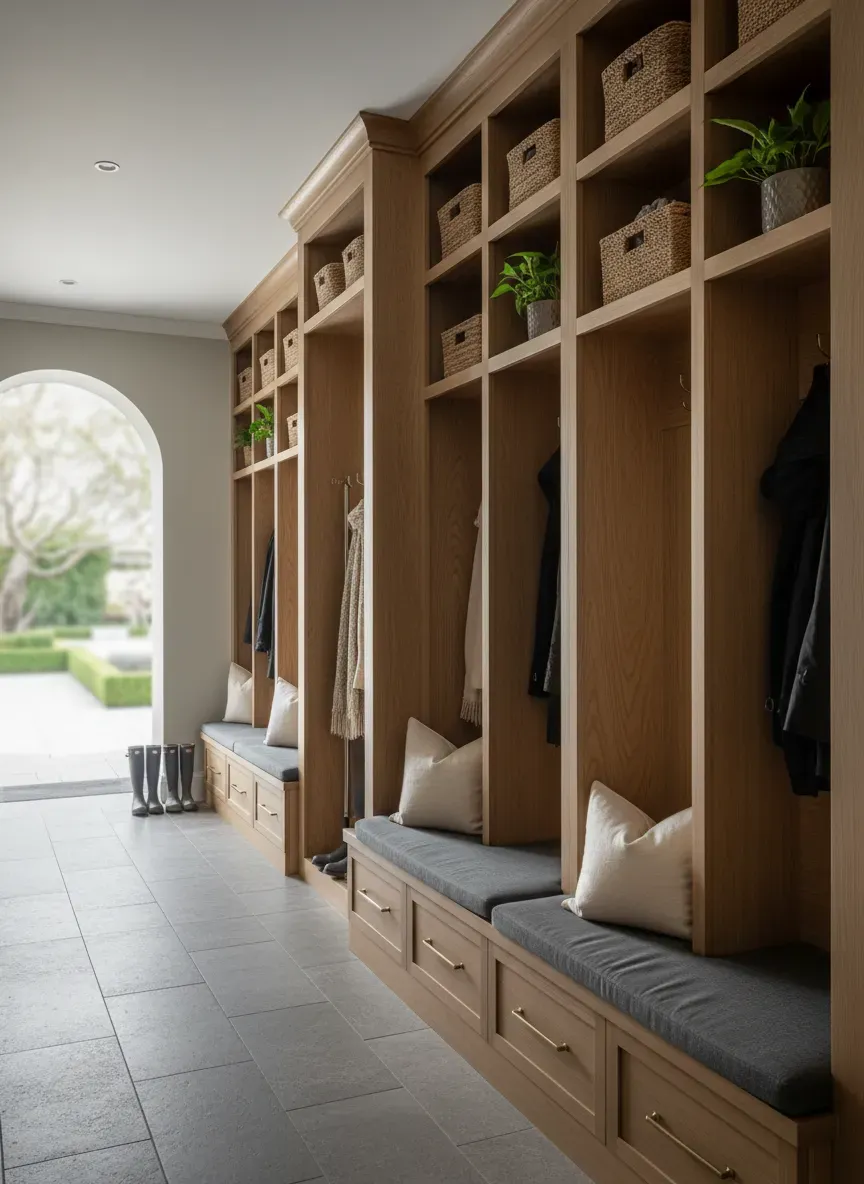
Visual Weight and Proportions
Beyond utility, measurements affect how the unit feels in the room. A unit that goes all the way to the ceiling (usually 8 or 9 feet) looks built-in and expensive. A unit that stops at 7 feet can look like a temporary wardrobe placed in the room.
If you have 9-foot ceilings:
- Lower Section: 18 inches (bench).
- Middle Section: 54 inches (coat area).
- Upper Section: 36 inches (split into two 18-inch shelves or one large cabinet).
- Crown Molding: 4-6 inches.
This utilizes the full height. Leaving a 1-foot gap between the top of the unit and the ceiling creates a “dust bunny farm” that serves no purpose.
For those ready to tackle this construction, my guide on building built-in entryway organization walks through the framing and facing techniques required to achieve these floor-to-ceiling looks.
Troubleshooting Common Measurement Mistakes
I’ve seen many projects go sideways because of simple oversights. Here are the red flags to watch for.
1. The “Door Swing” Conflict
If your entryway cubbies are near the front door or a garage door, measure the swing radius of that door.
- Clearance: You need at least 3 inches of clearance between the open door and the edge of your storage unit.
- Handle Conflict: Ensure the doorknob doesn’t hit the side of your bench.
2. The Vent Cover-Up
HVAC vents are often located on the floor or low on the wall near entryways.
- The Fix: If you build over a vent, you must install a toe-kick duct extension to bring the air flow out to the front of the unit. Do not simply block it; you will cause moisture issues and reduce heating efficiency.
3. Ignoring Light Switches
Standard light switch height is 48 inches. This is right in the middle of your “Action Zone” for coats.
- The Fix: You may need to relocate the switch, or design a “cut-out” niche in the side of the unit to access it.
Key Takeaways: The Cheat Sheet
To keep your project on track, here is the summary of the critical dimensions we’ve discussed:
- Bench Height: 17-19” (standard), 15-16” (if using cushions).
- Bench/Locker Depth: 15” (minimum functional), 18” (ideal), 22-24” (for coat hangers).
- Locker Width: 12” (tight), 15-18” (comfortable), 24” (spacious).
- Hook Height: 60-66” (adults), 36-42” (kids).
- Shoe Cubby Height: 6-8” (sneakers), 12-14” (boots), 18” (tall boots).
- Upper Shelf Depth: 12-14” (for accessibility).
The Bottom Line
When you are planning your entryway, remember that these numbers are guidelines, not laws. However, they are guidelines born from decades of carpentry and ergonomic mistakes. The goal is to create a space that accepts your life as it is—messy boots, wet coats, and heavy bags—without complaining.
Don’t be afraid to tape it out. Before you buy a single board or order a unit, use blue painter’s tape to outline these dimensions on your wall and floor. “Live” with the tape for a few days. Does the 18-inch depth make the hallway feel claustrophobic? Does the 12-inch width feel too narrow for your gym bag?
Real-world testing beats theoretical math every time.
Finally, if you are looking to accessorize your perfectly measured cubbies, reliable hardware is the finishing touch. I’ve had great success with Liberty Hardware Coat and Hat Hooks for their durability and weight capacity.
By respecting these standard depth and height measurements, you aren’t just building a shelf; you are building a morning routine that flows smoother and an evening return that feels a little more welcoming.