How to Properly Mount Entryway Organizers on Plaster or Brick Walls
Master the art of installing heavy entryway storage on difficult surfaces. Learn expert techniques for drilling into plaster and brick without damage.
Feb 5, 2026 - Written by: linda wise

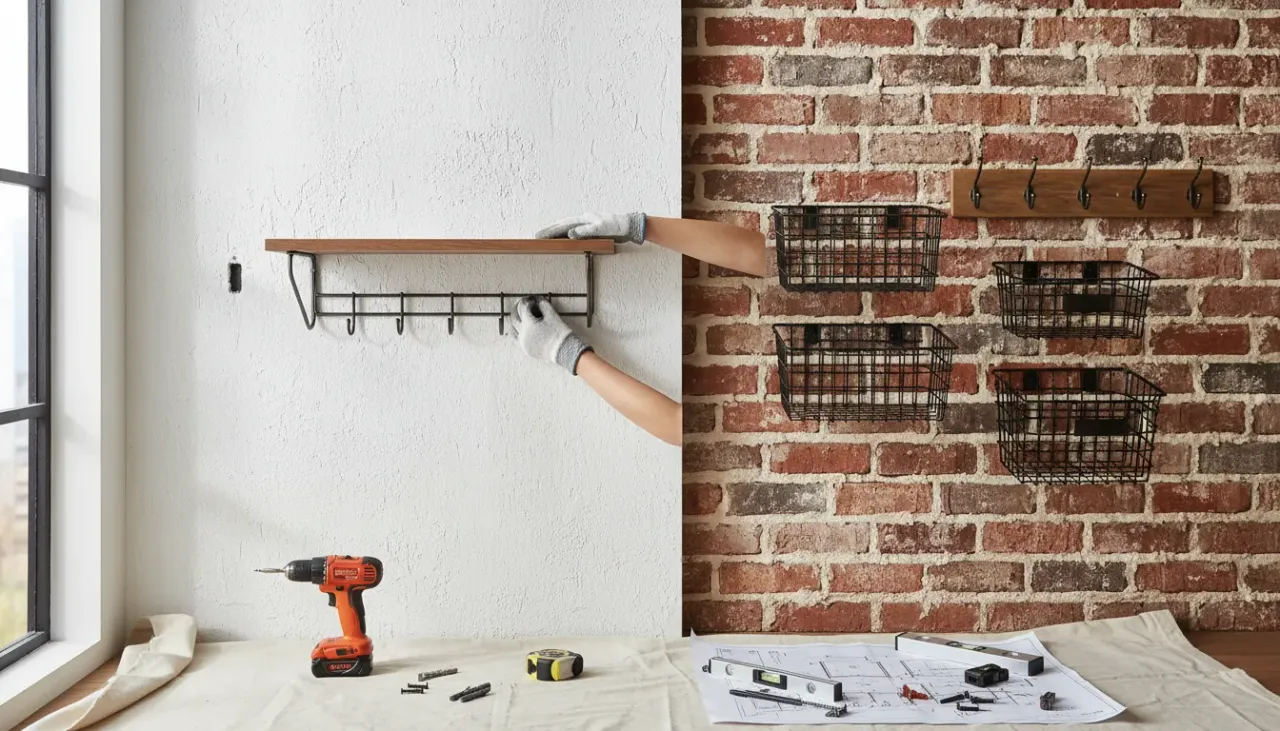
The entryway sets the tone for the entire home. It is the transitional space where the chaos of the outside world is shed, and the comfort of the interior begins. However, achieving a clutter-free foyer often relies on vertical storage solutions. While mounting a shelf or coat rack on standard drywall is a straightforward task involving a stud finder and a few screws, dealing with the architectural character of older homes or industrial lofts presents a significantly different challenge.
Plaster and brick walls are coveted for their aesthetic appeal and historical integrity, yet they are notoriously unforgiving when it comes to installation. A misstep with a drill on horsehair plaster can result in substantial cracking, while improper anchoring in brick can lead to crumbling mortar or, worse, a heavy organizer pulling loose and causing injury.
This guide provides a comprehensive, professional approach to mounting entryway organizers on these difficult substrates. We will move beyond basic DIY advice to explore the structural mechanics of these materials, the precise tools required, and the step-by-step methodology to ensure your installation is as permanent as the walls themselves.
Understanding Your Substrate: Why Plaster and Brick Require Special Care
Before selecting hardware or lifting a drill, it is imperative to understand the material you are working with. Standard drywall anchors will fail in both plaster and brick, often immediately upon bearing weight.
The Anatomy of Plaster Walls
If your home was built before the 1950s, you likely have lath and plaster walls. Unlike a uniform sheet of gypsum board, this system consists of horizontal wood strips (lath) nailed across the wall studs. This lath was then covered with multiple coats of wet plaster, which hardened to form the wall surface.
The “keys”—globs of plaster that squeezed through the gaps in the wood lath—are what hold the wall together. Drilling into this without preparation can vibrate the lath, breaking these keys and causing the plaster to separate from the wood structure. Furthermore, the space behind the plaster is hollow between the studs, meaning standard expansion anchors have nothing to grip.
The Structural Integrity of Brick
Exposed brick offers a stunning industrial or rustic backdrop for entryway decor, but it varies wildly in density and condition.
- Solid Brick: Common in older construction, where the brick is the load-bearing structure.
- Brick Veneer: A single layer of brick built in front of a wood-frame wall.
- The Mortar Variable: The cement paste between bricks (mortar) is generally softer than the brick itself, but it can become brittle over decades.
Mounting heavy storage solutions requires you to decide between drilling into the hard brick face or the softer mortar joints, a decision that affects both the aesthetic outcome and the load-bearing capacity of your organizer.
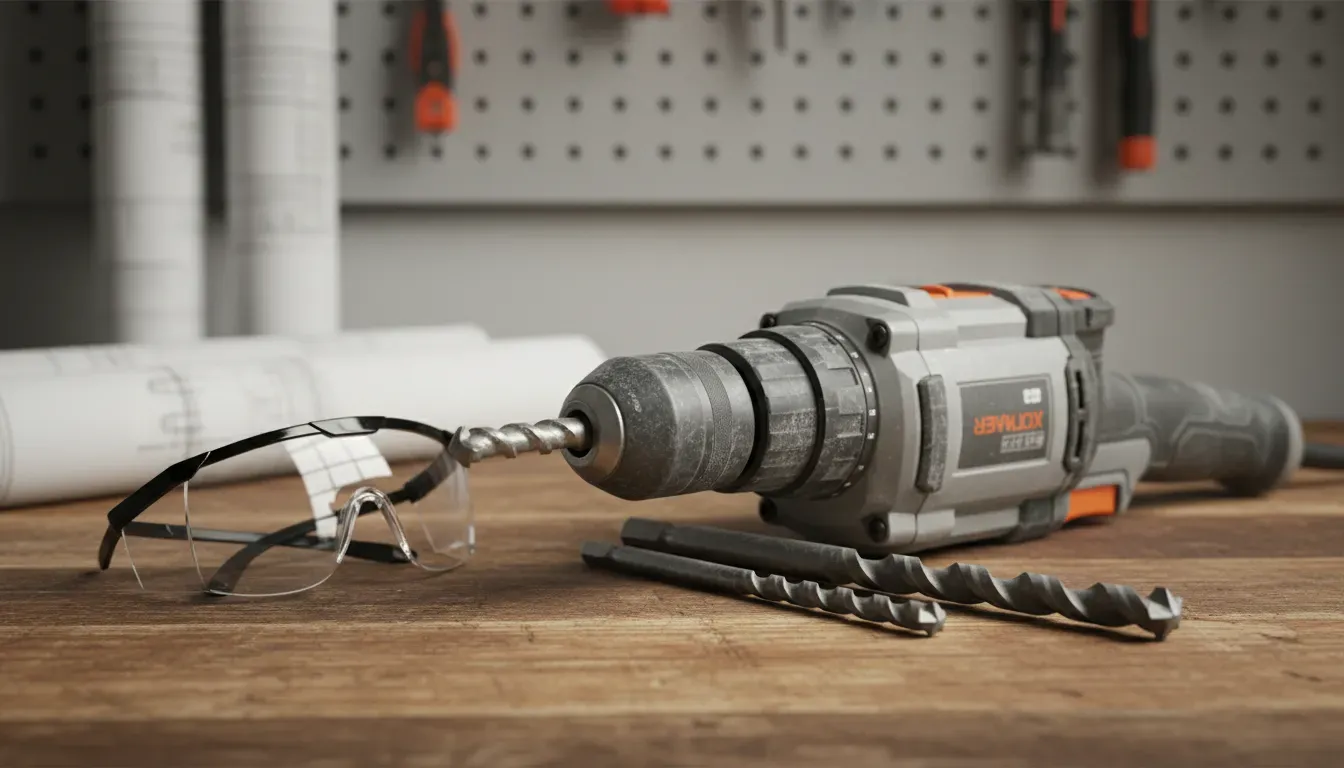
Essential Tools and Safety Equipment
Success in masonry and plaster installation is 80% preparation and tool selection. Using a standard cordless drill with a general-purpose bit is a recipe for frustration and broken drill bits.
The Hammer Drill
For brick, and occasionally for very hard vintage plaster, a standard rotary drill is insufficient. You require a hammer drill. This tool combines rotary motion with a pulsating hammering action that pulverizes hard material as it drills.
- For Plaster: A standard drill is usually preferred to reduce vibration, but if you hit a brick chimney behind the plaster, you will need the hammer function.
- For Brick: The hammer function is non-negotiable for efficient drilling.
If you do not own a robust drill, consider this an investment in your home maintenance toolkit.
Buy on Amazon: Dewalt Hammer Drill Kit
Masonry Bits
You cannot use standard wood or metal twist bits on these surfaces. You need carbide-tipped masonry bits. These are designed to withstand the high heat and abrasion of drilling into concrete, brick, and stone. For plaster, a masonry bit is also recommended as the aggregate in the plaster dulls wood bits instantly.
Safety Gear
Drilling into masonry produces silica dust, which is hazardous to inhale.
- N95 Respirator or Dust Mask: Essential for protecting your lungs.
- Safety Goggles: To protect against flying debris and dust.
- Hearing Protection: Hammer drills used on brick are incredibly loud.
Selecting the Correct Hardware
The most critical variable in this project is the anchor. The weight of winter coats, bags, and the organizer itself creates both “shear” force (downward pull) and “tension” force (pulling away from the wall).
Hardware for Plaster Walls
The gold standard for lath and plaster is the Toggle Bolt.
- How it works: A toggle bolt consists of a machine screw and a spring-loaded wing nut. The wings fold close to pass through the hole and spring open inside the wall cavity, clamping against the backside of the lath.
- Why it works: It spreads the load over a larger area of the lath, rather than relying on the crumbling plaster for grip.
- Alternative: Molly Bolts are also effective, as they expand behind the wall, but toggle bolts generally offer higher weight capacities for heavy entryway organizers.
Buy on Amazon: Heavy Duty Toggle Bolts
Hardware for Brick Walls
For brick, you generally have two robust options: Sleeve Anchors or Concrete Screws (Tapcons).
- Sleeve Anchors: As you tighten the nut, the metal sleeve expands outward, pressing firmly against the inside of the hole in the brick. These are excellent for heavy loads.
- Concrete Screws: These have specialized threads that cut into the masonry. They are excellent for a flush finish but require precise pilot holes.
- Plastic Plugs: While common, standard plastic plugs are often insufficient for heavy coat racks unless they are high-quality, heavy-duty nylon plugs specifically designed for masonry.
Preparing the Location
Before making permanent holes, precise layout is required. Entryway organizers must be level and positioned at a functional height.
- Determine Height: The standard height for coat hooks is 60 to 66 inches from the floor. This accommodates long coats while remaining accessible. If the organizer includes a bench or lower cubbies, adjust accordingly.
- Locate Hidden Hazards: Use a stud finder that detects metal and electricity. In plaster walls, wiring often runs loosely behind the lath. In brick walls, be aware of potential plumbing if the wall is shared with a kitchen or bathroom.
- Create a Template: If your organizer is heavy, holding it up to mark holes is difficult. Tape a large piece of paper to the back of the unit, poke holes through the mounting points, and then tape this paper template to the wall. This ensures perfect spacing.
- Level the Template: Use a 24-inch or 48-inch spirit level. Do not rely on the ceiling or floor lines, as they are rarely perfectly level in older homes.
Comprehensive Guide: Mounting on Plaster Walls
Drilling into plaster requires a gentle touch to preserve the wall’s surface.
Step 1: The Tape Trick
Place a piece of blue painter’s tape over the area where you intend to drill. Mark your “X” on the tape.
- Reasoning: The tape helps bind the top layer of plaster together, significantly reducing the chance of the plaster chipping or spalling as the drill bit enters.
Step 2: Drilling the Pilot Hole
Using a small masonry bit (smaller than your final anchor size), drill a pilot hole.
- Technique: Do not use the hammer setting yet. Use a standard rotary setting with steady, moderate pressure. You will feel the bit penetrate the plaster, then hit the wood lath, and finally punch through into the empty cavity.
- Troubleshooting: If you hit something solid that stops the drill, you may have hit a stud. If this happens, you can switch to a wood screw for that specific hole, which provides the strongest hold possible.
Step 3: Drilling the Anchor Hole
Switch to a bit size that matches the diameter required for your toggle bolt. Drill carefully through the tape and pilot hole. Once through the lath, pull the bit out gently to avoid pulling chunks of plaster with it.
Step 4: Installing the Toggle Bolt
- Thread the machine screw through the mounting hole of your entryway organizer first.
- Spin the toggle wing onto the end of the screw.
- Push the entire assembly toward the wall. Pinch the wings closed and insert them through the hole in the wall.
- Listen for the “click” or snap of the wings opening inside the wall.
- Pull back on the organizer to engage the wings against the lath while tightening the screw.
Crucial Note: Unlike other anchors, you cannot remove the screw from a toggle bolt once installed without the wing falling into the wall cavity. You must mount the fixture as you install the anchor.
Comprehensive Guide: Mounting on Brick Walls
Mounting on brick offers a choice: drilling into the brick face or the mortar joint.
- Brick Face: Stronger, but harder to drill. Difficult to patch invisibly if you move the organizer later.
- Mortar Joint: Easier to drill and easy to patch with a little mortar mix. However, if the mortar is old and sandy, it may not hold a heavy load.
Recommendation: For heavy entryway organizers, drill into the brick face for maximum security. If the organizer is lighter, the mortar joint is acceptable.
Step 1: Mark and Punch
Mark your holes on the brick. Use a center punch or a large nail and a hammer to create a small divot in the brick at your mark.
- Reasoning: Masonry bits tend to “walk” or wander when they first start spinning. The divot keeps the bit centered.
Step 2: Drilling Depth
Measure the length of your anchor and wrap a piece of electrical tape around your drill bit at that specific length (plus 1/4 inch). This acts as a depth stop, preventing you from drilling deeper than necessary.
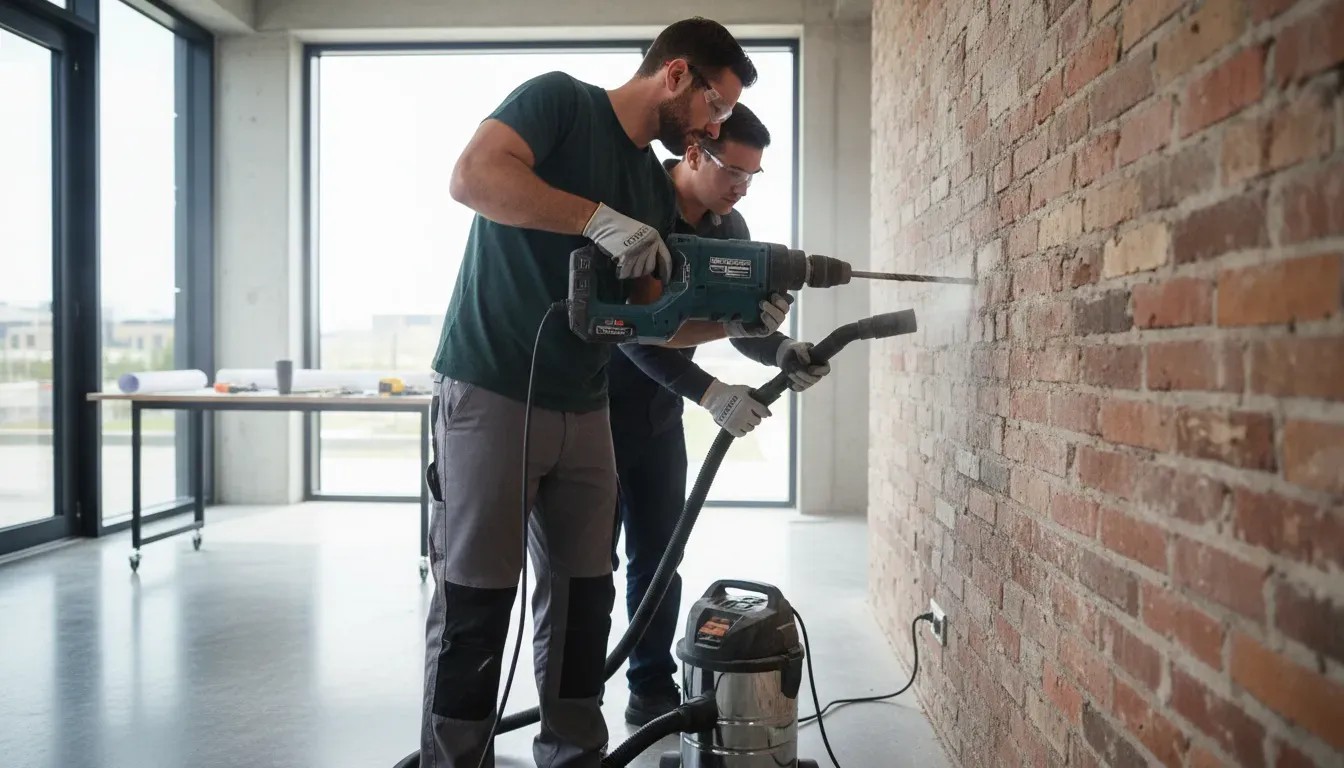
Step 3: The Drilling Process
Set your drill to “Hammer” mode. Apply firm, forward pressure. Let the tool do the work; do not lean your entire body weight into it, or you risk overheating the bit.
- Dust Management: Have an assistant hold a vacuum nozzle directly below the drill site to catch the red brick dust, which stains carpets and porous floors easily.
Step 4: Cleaning the Hole
This is the step most amateurs skip. Once drilled, the hole will be full of concrete dust. If you insert an anchor into a dusty hole, it will grip the dust, not the brick, and will eventually slide out.
- Method: Use a bottle brush or compressed air to thoroughly clean the hole.
Step 5: Inserting the Anchor
Insert your sleeve anchor or masonry plug. Tap it flush with a hammer if necessary.
- Fastening: Align your organizer and drive the screw into the anchor. If using sleeve anchors, tighten the nut with a wrench until it is snug. Do not overtighten, as this can crack the brick.
Troubleshooting Common Issues
Even with expert preparation, older homes can be unpredictable.
The “Crumbling Plaster” Scenario
If you drill a hole and the plaster surrounding it creates a crater larger than your anchor head, the structural integrity is compromised.
- Solution: You need to bridge the gap. Use a larger washer on the screw to span the damaged area, or fill the hole with a hardening putty (like epoxy putty), let it cure, and then re-drill.
The “Soft Brick” Scenario
Some bricks, particularly interior ones in very old buildings (“salmon bricks”), are soft and porous. An expanding anchor might crack the brick entirely.
- Solution: Use a chemical anchor (epoxy). Clean the hole, inject masonry epoxy, insert a threaded rod or screen tube, and let it cure. This bonds the metal to the brick without expansion pressure.
Uneven Walls
Brick and plaster walls are rarely perfectly flat. If you tighten a flat wooden organizer against a wavy wall, the wood may crack or the organizer may pull away.
- Solution: Use shims (small wedges of wood or plastic) behind the organizer at the mounting points to fill gaps. This ensures the organizer is plumb without stressing the material.
Styling and Weight Distribution
Once the hard work of installation is complete, the final phase involves ensuring the longevity of your mount through proper usage and styling.
Weight Management
Even the strongest anchors have limits. A comprehensive home organization strategy involves distributing weight.
- Heavy Items: Place the heaviest coats on the hooks closest to the anchors.
- Balance: Distribute weight evenly across the rack rather than loading one side.
Aesthetic Integration
Since you have drilled into difficult materials, you likely want this fixture to be permanent. Choose an organizer that complements the raw texture of the brick or the smooth elegance of the plaster. Metal and reclaimed wood organizers look exceptional against brick, creating a loft-style aesthetic. For plaster, painted wood or sleek modern metals often provide the best contrast.
Buy on Amazon: Industrial Pipe Entryway Organizer

Conclusion
Mounting an entryway organizer on plaster or brick is a project that intimidates many, often leading to reliance on flimsy freestanding coat racks that clutter the floor. However, by respecting the substrate and utilizing the proper combination of hammer drills, masonry bits, and toggle or sleeve anchors, you can utilize the vertical space in your home securely.
The result is not just a storage solution, but a permanent upgrade to your home’s functionality. Whether you are preserving the historic charm of lath and plaster or accentuating the industrial grit of exposed brick, a properly mounted organizer serves as the anchor for a welcoming and orderly entryway.
Approach the wall with patience, equip yourself with the right hardware, and build a foundation for organization that will last for decades.