Adding Crown Molding and Trim to Elevate Your DIY Entryway Organization Look
Transform your basic DIY hall tree into a bespoke architectural feature. Discover expert carpentry techniques, from coping joints to layering custom trim profiles.

Mar 10, 2026 - Written by: Linda Wise
You step back, dust off your hands, and admire the newly assembled plywood bench and cubbies sitting in your foyer. Structurally, it is sound. Functionally, it does exactly what you need. Visually? It screams “weekend DIY project.” The raw edges, the awkward gap between the top shelf and the ceiling, the abrupt transition where the unit meets your home’s baseboards—these are the telltale signs of amateur construction.
Here is the secret that professional finish carpenters guard closely: the underlying boxes of custom built-ins are often remarkably basic. The magic, the sheer luxury of high-end millwork, is entirely an illusion created by strategic trim. By adding crown molding and trim to elevate your diy entryway organization look, you instantly bridge the aesthetic gap between a functional wooden crate and a permanent, bespoke architectural feature.
I’ve personally found that most DIYers shy away from crown molding because the geometry feels intimidating. Compound angles, out-of-square walls, and shrinking caulk lines are enough to make anyone second-guess their skills. But mastering these details is the single highest-ROI skill you can acquire for interior woodworking. We are going to deconstruct the exact techniques, tools, and materials needed to wrap your entryway storage in flawless, seamless trim.
Quick Comparison: Top Picks
| Product | Rating | Check Price |
|---|---|---|
| Dewalt 12-Inch Dual Bevel Miter Saw | ⭐⭐⭐⭐⭐ | View on Amazon |
| Bostitch Brad Nailer Compressor Combo | ⭐⭐⭐⭐½ | View on Amazon |
| Kreg Crown-Pro Molding Tool | ⭐⭐⭐⭐⭐ | View on Amazon |
The Psychology of Architectural Detail
Before we fire up the compressor, we need to understand exactly what trim accomplishes in a space. Millwork does not just hide gaps. It manipulates the human eye.
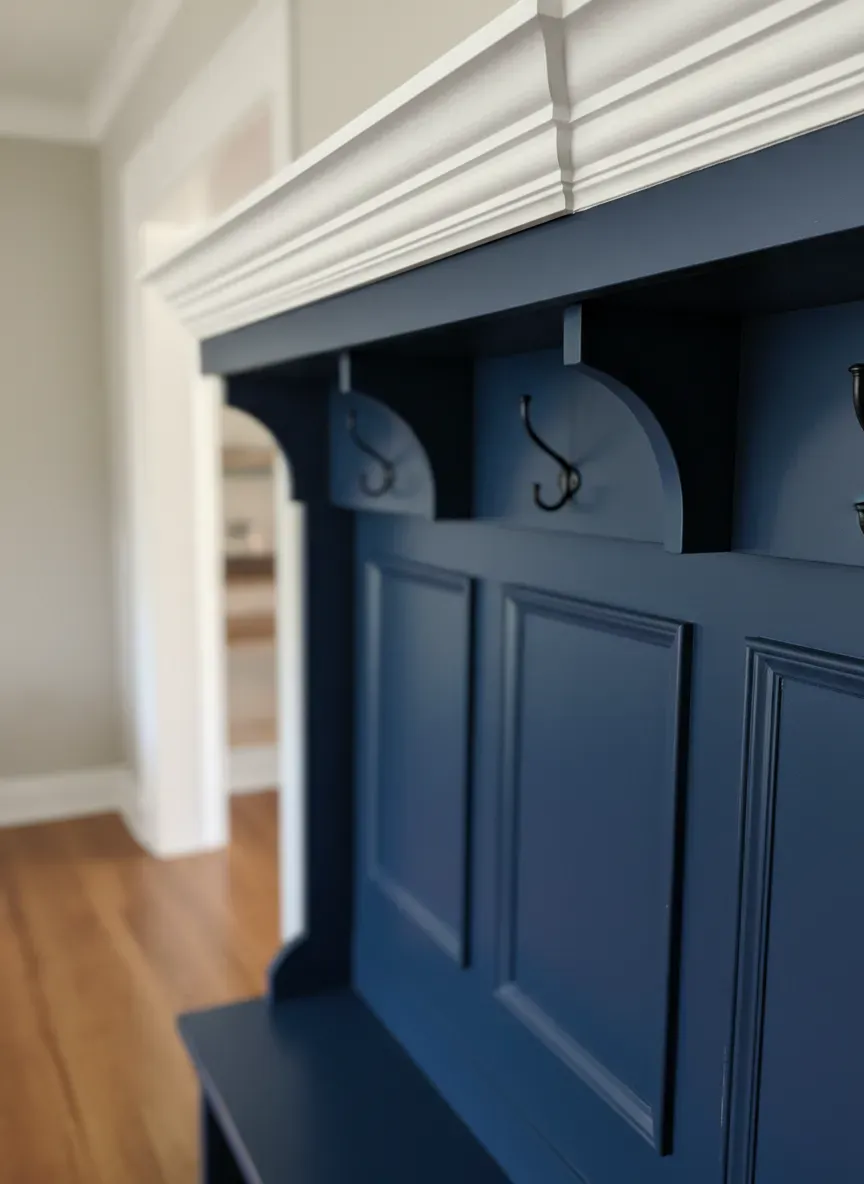
When a guest enters your home, their brain immediately scans for permanence. Freestanding furniture feels transient. Built-ins feel rooted. Trim provides that root system. A hefty baseboard grounds the unit to the floor, telling the eye, this belongs here. A sweeping crown molding draws the gaze upward, making low ceilings feel expansive and tying the unit directly into the architecture of the home.
Visual Weight and the Golden Ratio
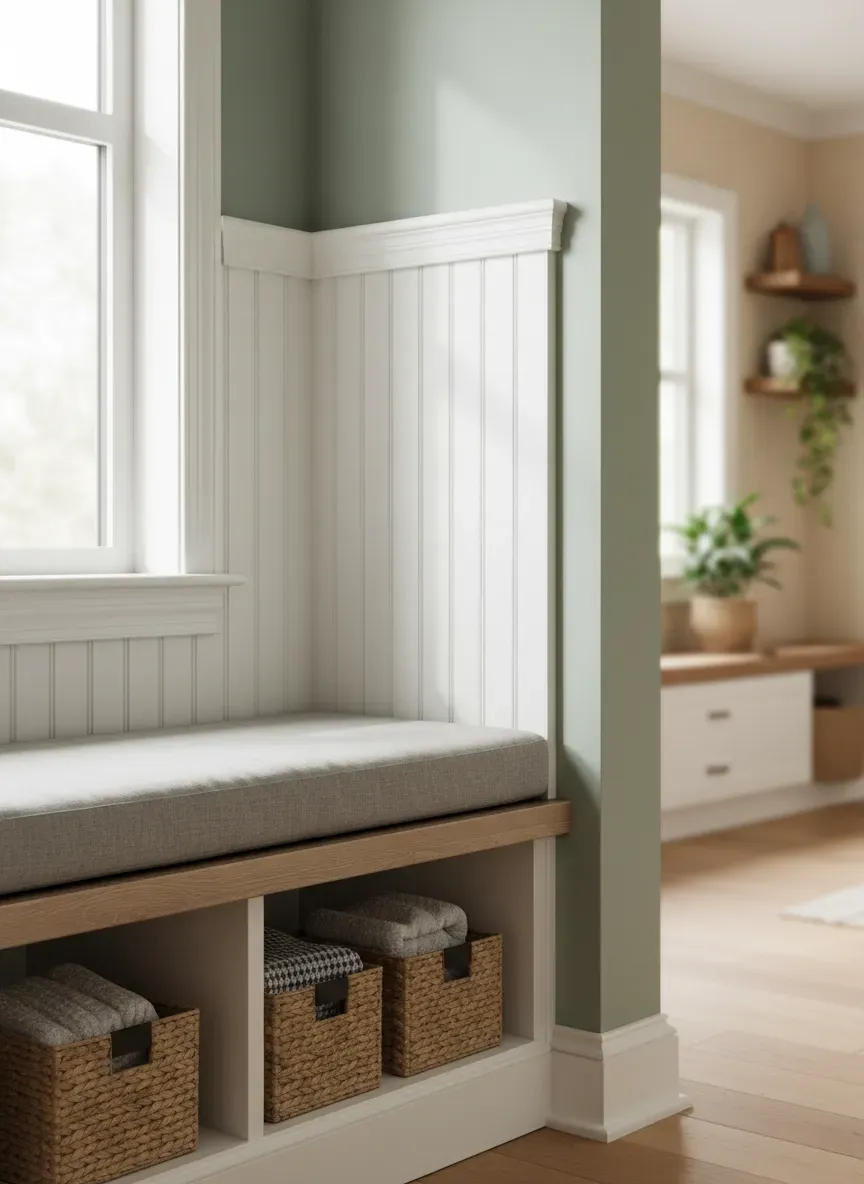
You’ll notice that historical architecture relies heavily on proportions. Slapping a tiny 2-inch colonial crown on a massive 8-foot-tall, deep-set mudroom locker looks disproportionate and cheap. Conversely, putting a heavy 6-inch craftsman header on a delicate, shallow shoe rack will completely overpower the piece.
You need to establish a visual hierarchy. The heaviest visual weight should sit at the bottom (thick baseboards, perhaps a chamfered plinth block). The midsection requires delicate transitions (shelf nosing, subtle face frames). The top requires vertical projection (crown molding that bridges the vertical face of the cabinet to the horizontal plane of the ceiling).
Selecting the Right Millwork for Your Space
You wander into the lumber aisle of a big box store and are immediately confronted with hundreds of profiles. Choosing the right material and shape dictates how the rest of your project will unfold.
Material Matters: MDF vs. Pine vs. Hardwood
Medium Density Fiberboard (MDF): MDF is incredibly affordable and comes pre-primed. It boasts an unnervingly smooth surface that takes paint beautifully. It is also highly flexible, which is a godsend if you are dealing with wavy drywall. Here’s the real kicker: MDF is highly susceptible to moisture and physical impact. If your entryway sees heavy traffic—wet boots, thrown hockey bags, dripping umbrellas—MDF baseboards will swell, crumble, and fail. Use MDF for crown molding (up high, out of harm’s way), but avoid it near the floor.
Finger-Jointed Pine: This is the workhorse of painted trim. It consists of short pieces of pine glued together to create long, straight runs without knots. It holds a crisp edge far better than MDF and takes a brad nail cleanly without mushrooming. It is my go-to recommendation for face frames and baseboards on painted built-ins.
Solid Hardwood (Poplar, Oak, Maple): If you plan to stain your entryway organizer, you must match the wood species of your plywood. Poplar is excellent if you want a premium painted finish because it is harder than pine and resists denting beautifully, though it costs significantly more.
Decoding Crown Molding Profiles
Molding profiles are an architectural vernacular. Mixing them indiscriminately creates visual chaos.
The Traditional Cove and Ogee
Traditional homes thrive on curves. The classic “ogee” profile (an S-shaped curve) combined with deep coves captures light and casts soft, elegant shadows. If your home features arched doorways and raised panel doors, this is your lane.
The Craftsman Flat Approach
Modern, farmhouse, and craftsman homes reject the ornate. They rely on clean lines and sharp right angles. Instead of a sprung crown molding, you might use a flat 1x4 piece of stock, capped with a simple 1x2 overhang, and finished underneath with a tiny piece of cove molding. This built-up, squared-off approach feels substantial without being fussy.
Essential Tools for Precision Carpentry
You cannot fake a tight miter joint. If you attempt this with a dull handsaw and a plastic miter box, you will spend days frustrated, ultimately filling massive gaps with a tube of caulk. Precision demands the right arsenal.
- The Compound Miter Saw: This is non-negotiable. For cutting large crown molding, a 12-inch dual-bevel sliding miter saw is ideal. It allows you to cut thick material without flipping it upside down and backwards (though learning that traditional technique is still highly valuable).
- Brad Nailer (18-Gauge): Hammers and finish nails are a recipe for dented trim. An 18-gauge brad nailer leaves a microscopic hole that requires very little filler, yet provides enough holding power to secure trim to the plywood carcass and wall studs.
- The Coping Saw: A small, inexpensive hand saw with a wire-thin blade. This is the secret weapon of the finish carpenter, allowing you to cut the profile of the trim into the end of a board for perfect inside corners.
- Digital Angle Finder: Your walls are not 90 degrees. I promise you. They might be 88.5 degrees. They might be 92 degrees. A digital angle finder removes the guesswork.
Pro Tip: Invest in a premium, high-tooth-count saw blade (80-100 teeth) specifically designed for fine finish carpentry. The blade that comes stock on most miter saws is meant for framing lumber and will aggressively tear out the delicate edges of your trim.
Step-by-Step Execution: Elevating Your Entryway Built-In
Let’s get into the actual sawdust. You have your hall tree boxes secured to the wall. It is time to dress them up.
Phase 1: The Face Frame
Before any decorative molding goes on, you must cover the raw edges of your plywood. This is the face frame. Using 1x2 or 1x3 finger-jointed pine, measure and cut your vertical stiles first, running them from the floor to the top of the cabinet. Attach them using wood glue and 1.25-inch brad nails. Then, measure the exact distance between the stiles and cut your horizontal rails to fit tightly.
The Bottom Line: Never rely on a tape measure alone for face frames. Hold the actual piece of wood against the opening and mark it with a razor-sharp pencil. This “mark in place” method eliminates fractional math errors.
Phase 2: Baseboards and Grounding
To make your entryway storage look like an integral part of the house, your room’s existing baseboard should wrap seamlessly around the base of the built-in unit.
If your cabinets sit flush on the floor, you’ll run the baseboard directly across the bottom face. When doing this, consider how it interacts with the rest of your entryway elements. Hiding the transition near your ultra-slim, multi-functional shoe storage options demands tight joints, as these lower areas are highly visible when people sit down to untie their laces.
If you are dealing with a tiled or uneven floor, you will likely need to add a shoe molding (a small, curved profile) at the very bottom of the baseboard to hide the undulating gap between the straight wood and the wavy floor.
Phase 3: The Crown Molding Conundrum
This is where grown adults throw tools across the room. Crown molding sits at an angle (usually 38 or 45 degrees, known as the spring angle) between the wall and the ceiling. Because it projects outward, cutting it requires wrapping your mind around compound geometry.
The “Upside Down and Backwards” Method
The most reliable way to cut crown on a standard miter saw is to place it on the saw bed exactly how it will sit on the ceiling, but upside down. The saw table represents the ceiling; the saw fence represents the wall.
- Place the top edge of the crown flat against the saw table.
- Place the bottom edge of the crown flat against the vertical fence.
- Swing your saw blade left or right to 45 degrees to make your cuts.
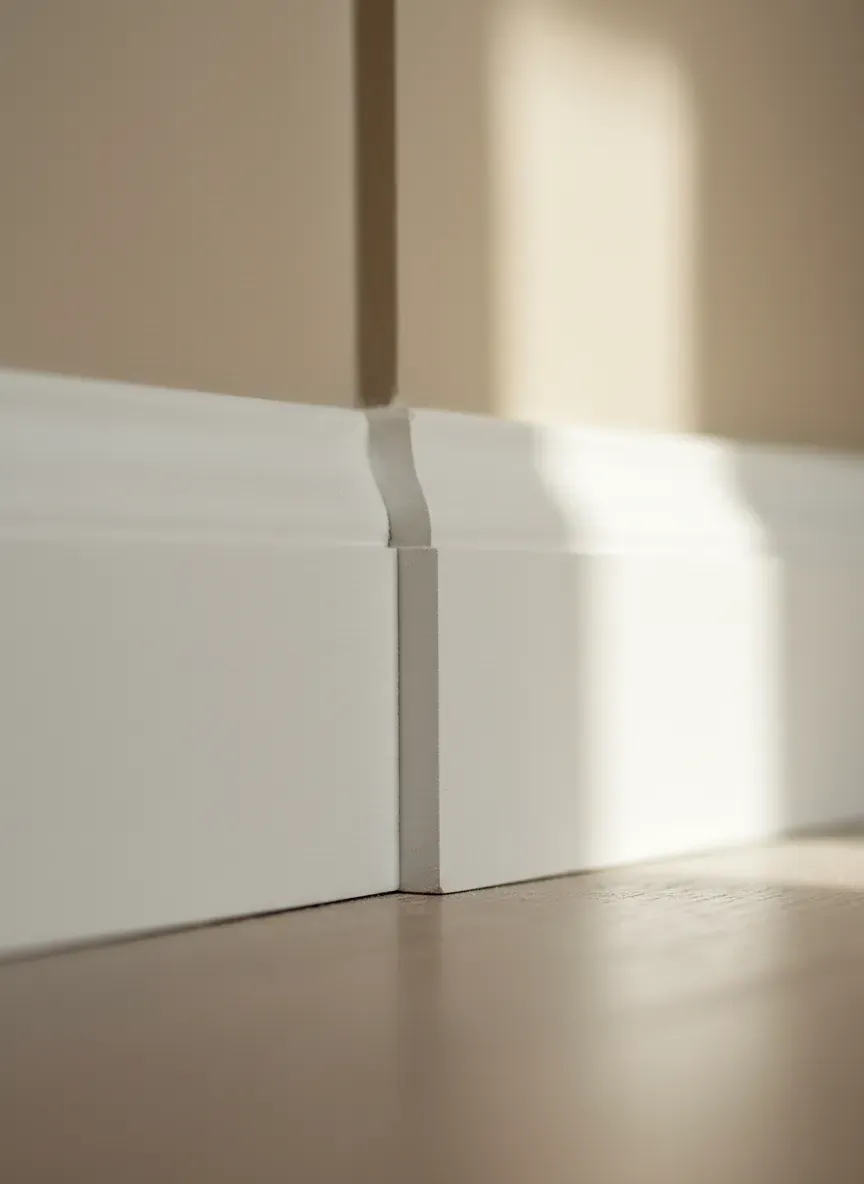
The Coping Joint Reality (Better than Miters)
When two pieces of crown meet at an inside corner (like the corner of a room), an amateur will cut two 45-degree inside miters and push them together.
Here is the problem: wood shrinks and expands with seasonal humidity. Houses settle. When winter arrives and the air dries out, that perfect 45-degree miter will pull apart, exposing a highly visible black crack.
The professional solution is a coped joint.
- Cut the first piece of crown square, running it flush into the corner of the wall.
- Cut the second piece at a 45-degree inside miter. This exposes the exact profile of the molding.
- Using your manual coping saw, back-bevel and cut along that exposed profile line, removing all the “meat” behind the face of the trim.
- When you push this coped piece against the first square piece, it overlaps seamlessly. Because one piece slides over the other, it can expand and contract by an eighth of an inch without ever showing a gap.
Coping a joint? It’s a rite of passage. Don’t let it intimidate you. Practice on three or four scrap pieces before touching your expensive long runs.
Addressing Out-of-Square Walls
If your built-in touches two adjacent walls, you will quickly discover the framing is wonky. This is especially crucial if you are optimizing a tight 5x6 mudroom layout, where every fraction of an inch dictates whether doors open smoothly or smash into baseboards.
When scribing trim to fit an unlevel ceiling or a bowed wall, use a compass. Run the metal point of the compass along the ceiling while the pencil traces that exact undulation onto your trim piece. Belt-sand down to the pencil line, and your rigid trim will perfectly map to the warped architecture of your home.
Seamless Integration: Fluted Casings and Plinth Blocks
Sometimes, you want to scale up the drama of your entryway. If you have tall ceilings or a wide expanse of wall, simple 1x2 face frames won’t carry enough visual weight.
Enter fluted casings and plinth blocks.
Instead of flat wood framing the vertical edges of your lockers, you can use fluted door casing (trim with parallel vertical grooves). To transition this heavy vertical trim gracefully into your baseboard, install a plinth block. A plinth block is a thick, rectangular piece of solid wood that sits at the floor. The baseboard butts into the side of it, and the vertical fluted casing rests on top of it.
Integrating strategic small foyer layout ideas requires playing with these proportions. A plinth block creates a definitive architectural stop, preventing the awkwardness of trying to miter a thick piece of casing into a thin piece of baseboard. It looks intentionally historic and incredibly high-end.
The Paint and Finish Phase: Where Magic Happens
I cannot stress this enough: excellent carpentry can be ruined by terrible finishing, but mediocre carpentry can look flawless with masterful finishing. The difference between a hacked-together weekend job and a custom millwork installation is entirely dependent on what happens after the nails are fired.
Wood Filler vs. Caulk: The Eternal Confusion
Many beginners grab a tube of caulk and smear it into every crack, nail hole, and seam they can find. This is a fatal error.
- Wood Filler (or Spackle) is for flat surfaces. Use it to fill brad nail holes, flush joints on face frames, and any surface that needs to be sanded perfectly flat. Wood filler dries hard. It can be sanded to a glass-like finish. If you use caulk in a nail hole, you cannot sand it. It will leave a rubbery dimple under your paint.
- Caulk is for inside corners and transitions. Use a high-quality, paintable acrylic latex caulk (or elastomeric caulk for high-movement areas) anywhere wood meets wood at an angle, or where wood meets drywall. Caulk bridges gaps and flexes. Do not use 100% silicone caulk; paint will bead right off it.
Sanding and Priming Techniques
Once your filler is dry, you must sand. Start with 120-grit sandpaper to knock down the high spots of the filler, then move to 220-grit for a polished finish. Run your fingertips—not your eyes—over the filled nail holes. If you can feel the transition between the wood and the filler, it will show through the paint.
Vacuum every surface. Wipe it down with a tack cloth.
If you used raw wood or MDF with cut edges, you must prime. MDF edges act like a sponge. If you apply latex paint directly to a routed MDF edge, the moisture in the paint will swell the fibers, creating a fuzzy, hideous texture. Seal cut MDF edges with an oil-based primer or a specialized drywall sealer before applying your topcoat.
Pro Tip: When caulking your seams, keep a damp sponge and a cup of warm water nearby. Run a bead of caulk, dip your index finger in the water, and gently glide it over the bead in one continuous motion. Wipe the excess onto the damp sponge. This yields a flawless, concave seal with zero mess.
Advanced Techniques: Layering Trim for a Bespoke Aesthetic
If you want to completely obliterate any suspicion that your entryway was built from flat-pack furniture or basic plywood, you need to learn how to stack trim.
Stacked (or built-up) molding involves combining three, four, or even five different, smaller profiles to create massive, custom architectural details that cannot be purchased off the shelf.
The Anatomy of a Custom Crown Assembly
Imagine you have a 10-foot ceiling. A standard 4-inch crown molding will look like a tiny ribbon up there. You need an 8-inch or 10-inch profile, but solid crown of that size is exorbitantly expensive and incredibly difficult to cut.
Instead, build it up:
- The Base: Install a wide piece of flat 1x6 stock horizontally against the ceiling, and another vertically against the face of your cabinet. This gives you a massive, solid nailing surface.
- The Drop (Frieze): Install a piece of baseboard upside down against the top of the cabinet face. The decorative edge points downward.
- The Anchor: Install a standard piece of 4-inch crown molding, bridging the gap between the flat ceiling stock and the upside-down baseboard.
- The Finishing Detail: Run a small piece of decorative bead molding or base cap right under the lip of the crown to hide the seam where the crown meets the frieze board.
When the entire assembly is caulked, primed, and painted in a single monochromatic color (perhaps a moody dark green or a stark, brilliant white), it reads to the human eye as one massive, hand-carved piece of timber. This technique alone transforms basic entryways into magazine-worthy spaces.
Key Takeaways for Flawless Execution
- Acclimate your wood: Never bring trim in from a cold garage and immediately nail it to the wall. Let it sit in the climate-controlled entryway for 48 hours to prevent severe shrinking after installation.
- Glue your miters: When joining two pieces of wood at an outside corner, coat the mating surfaces with high-quality wood glue before nailing. Nails hold the wood while the glue dries; the glue provides the actual long-term strength.
- Nail into framing, not just drywall: Your brad nails must penetrate the plywood carcass of your built-in or the actual 2x4 studs in your walls. Two inches of brad nail shot purely into half-inch drywall provides zero structural integrity. Cross-nailing (shooting two nails at opposing angles) can help if you absolutely must secure a small piece without a stud backing.
- Plan your sequence: Always install trim from the bottom up, or the top down, but work logically. Face frames first, baseboards second, crown third, and tiny detail moldings last.
The Final Polish
The architectural weight of a space relies entirely on the finishing touches. A bare plywood box is utilitarian. A fully trimmed out, coped, caulked, and impeccably painted entryway bench is an asset to your home’s equity.
Do not rush the final 10% of the project. The hours spent meticulously cutting angles, filling microscopic brad holes, and feathering out caulk lines might feel tedious in the moment. You will inevitably miscut a piece of expensive molding. You will likely spend a frustrating hour trying to understand a weird spring angle. Embrace the friction. That meticulous attention to detail is exactly what separates a glaring DIY attempt from a breathtaking, custom-built masterpiece. When you run your hand along that perfectly flush, seamless transition between your cabinet and the ceiling, the effort crystallizes into pure architectural elegance.