The 5x6 Mudroom Guide: Making Every Square Inch Count
Transform your cramped 30-square-foot entryway into a high-functioning architectural masterpiece with expert spatial planning, custom millwork strategies, and functional design.

Mar 9, 2026 - Written by: Linda Wise
Thirty square feet. That’s the exact footprint of a standard walk-in closet, a modest powder room, or, if you’re reading this, the dedicated drop zone for your entire household’s chaotic accumulation of footwear, outerwear, and seasonal gear.
I’ve personally found that designing a 5x6 mudroom separates the amateur decorators from the seasoned spatial planners. When you have a massive foyer, you can afford dead zones. You can throw a sprawling bench against a wall, flank it with oversized potted plants, and call it a day. But a 5x6 footprint demands absolute, ruthless efficiency. Every single millimeter must pull double—or triple—duty.
You’ll notice that when people complain about their small entryways, the issue isn’t actually the square footage; it’s the volumetric waste. They think in two dimensions (floor space) instead of three (cubic volume). We are going to completely dismantle how you view this tiny room. By leveraging verticality, optimizing traffic flow, and selecting hyper-functional millwork, we can engineer a 30-square-foot space that behaves like it’s twice its size.
Before we dive into the architectural mechanics of micro-spaces, here is a quick look at the hardware and furnishings that consistently save my narrow-footprint projects.
Quick Comparison: Top Picks
| Product | Rating | Check Price |
|---|---|---|
| Prepac Wide Hall Tree | ⭐⭐⭐⭐½ | View on Amazon |
| Floating Cubby Entryway Bench | ⭐⭐⭐⭐⭐ | View on Amazon |
| Heavy Duty Solid Brass Coat Hooks | ⭐⭐⭐⭐⭐ | View on Amazon |
The Brutal Geometry of 30 Square Feet
To master the 5x6 mudroom, you must first respect its geometry. We are dealing with 30 square feet of floor space. If you have a standard 36-inch entry door that swings inward, the sweep of that door immediately cannibalizes roughly 9 square feet. You are now down to 21 square feet of usable real estate before you’ve even added a single shoe cubby.
Here is the real kicker: egress requires a minimum of 36 inches of clear walking path to meet standard building codes and avoid that suffocating, claustrophobic feel. If your room is 5 feet (60 inches) wide, and you need a 36-inch walkway, you have exactly 24 inches of depth remaining for built-ins.
This mathematical reality dictates every decision moving forward. You cannot fake depth. You cannot wish for a wider walkway. You have to design within the rigid confines of the tape measure.
Configuration A: The Corridor (5’ Wide x 6’ Deep)
If your door is on the 5-foot wall, creating a short, tunnel-like experience, your best strategy is an asymmetrical layout. Dedicate one long 6-foot wall entirely to a flush, floor-to-ceiling storage system. Leave the opposite wall completely bare, save for perhaps a flat mirror or high-gloss wainscoting to bounce light. Attempting to place items on both walls will turn your mudroom into an unnavigable trench.
Configuration B: The Broad Shallow (6’ Wide x 5’ Deep)
If your door is centered on the 6-foot wall, you have a shallow but wide layout. This is actually the gold standard for micro-mudrooms. You can utilize the flanking walls (the 5-foot depths) for dual storage zones. For instance, the left flank becomes the “wet zone” for dripping umbrellas and muddy boots, while the right flank serves as the “dry zone” for backpacks, purses, and mail.
Pro Tip: If your current mudroom door swings inward and destroys your usable space, immediately look into swapping it for an out-swing door, a pocket door, or a heavy-duty sliding barn door on the exterior of the room. Reclaiming that 9-square-foot door sweep is the single most impactful change you can make.
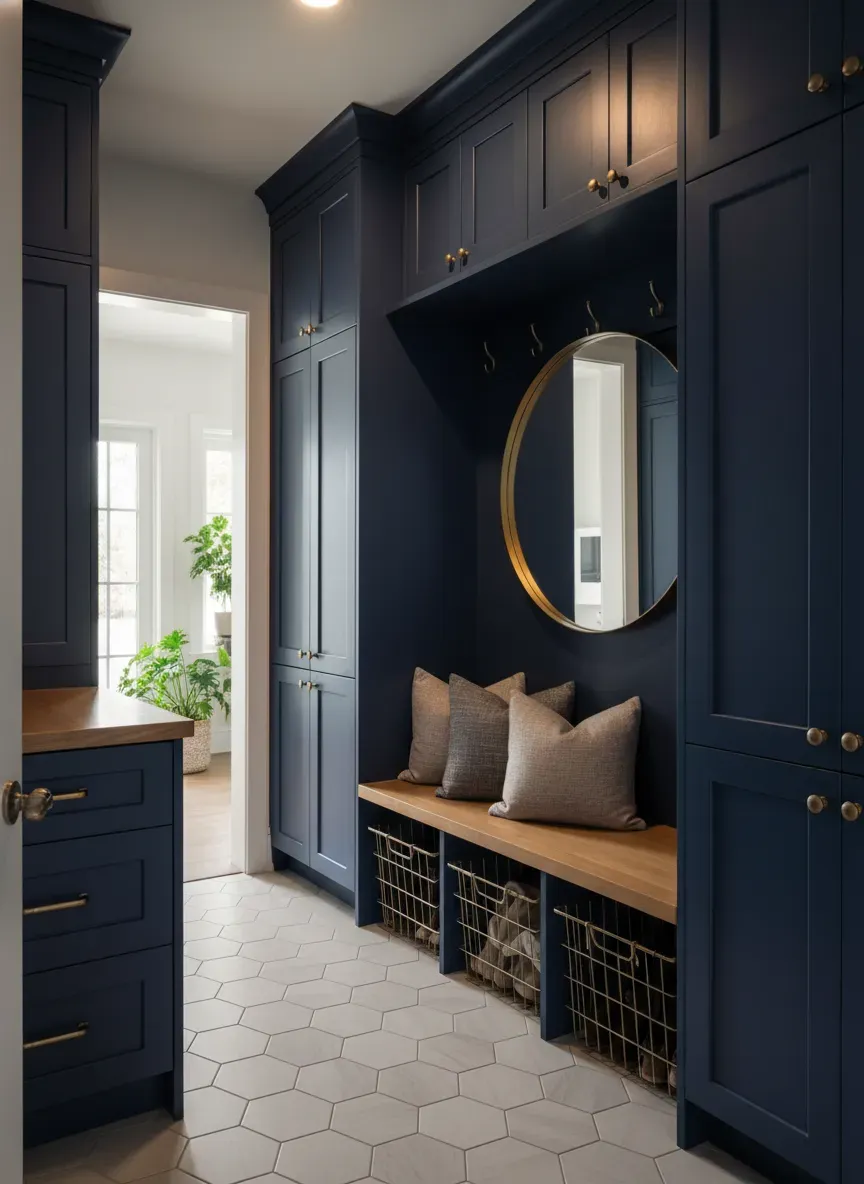
Verticality is Your Best Friend
When lateral space runs dry, look up. Most residential ceilings sit at 96 inches (8 feet) or 108 inches (9 feet). The majority of homeowners completely ignore the top 24 to 36 inches of their walls, leaving a massive void of potential storage.
In a 5x6 mudroom, standard standalone furniture is a liability. You need custom or semi-custom millwork that grazes the ceiling.
Zoning the Vertical Plane
I approach vertical storage in three distinct zones, each serving a specific ergonomic function:
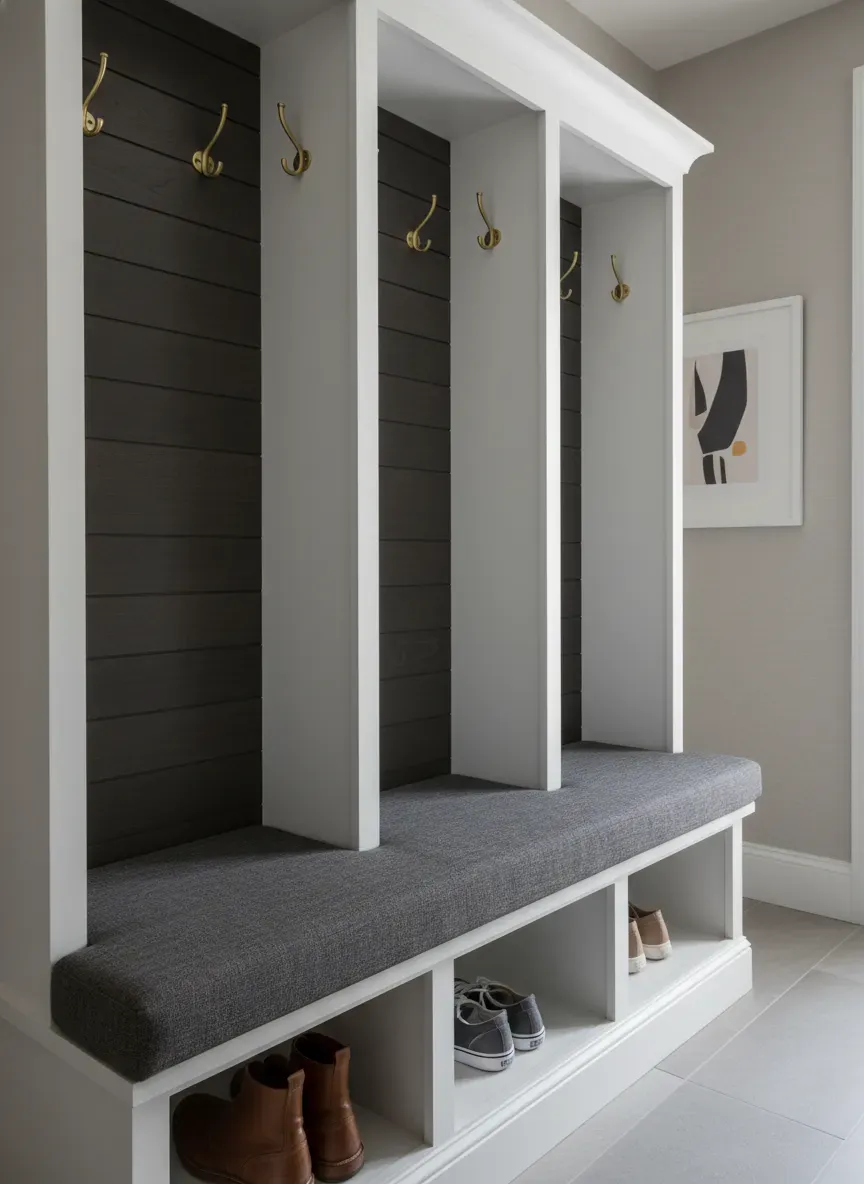
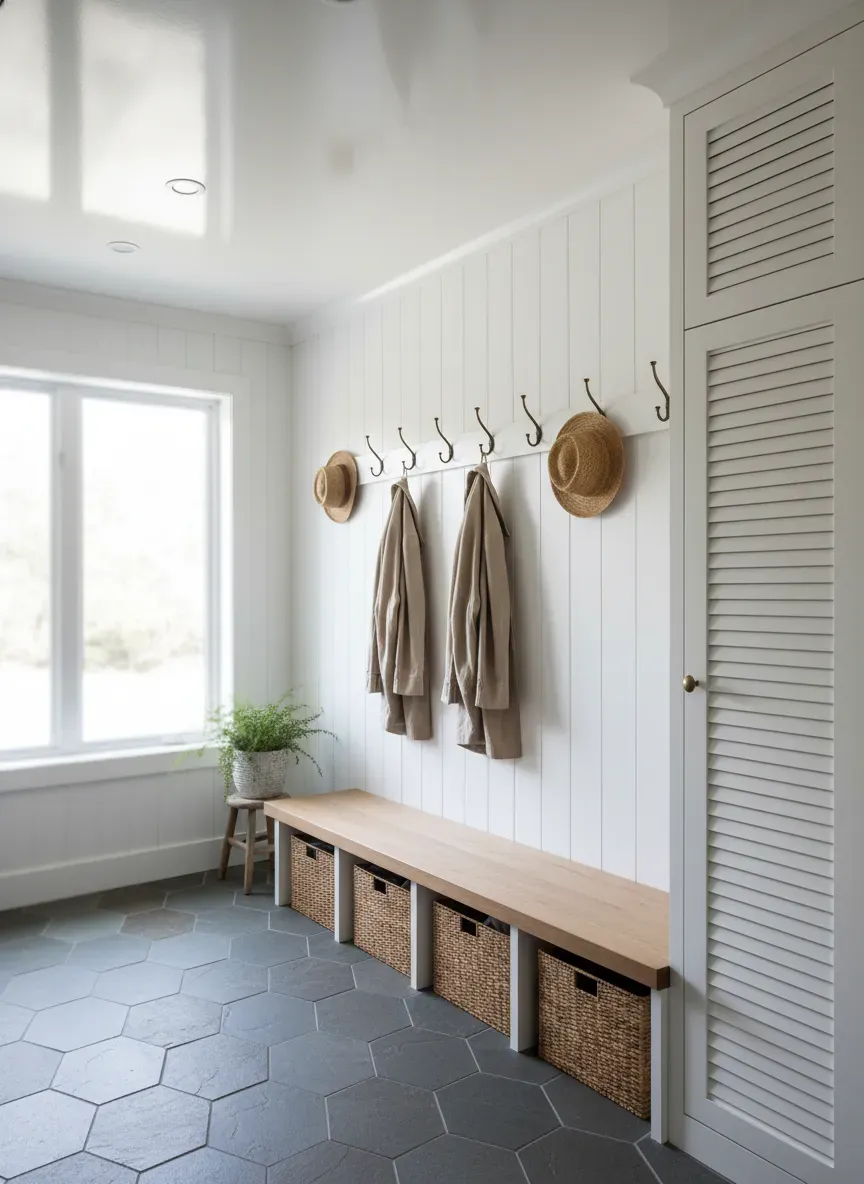
Zone 1: The Floor to Bench (0 - 18 inches) This is your heavy-duty, high-abrasion zone. Wet boots, scattered sneakers, and heavy sporting equipment live here. I highly recommend leaving this space open rather than using closed drawers. Drawers require clearance to pull out, which eats into your precious 36-inch walkway. Open cubbies with heavy-duty wire baskets allow wet shoes to breathe and dry, preventing the dreaded “mudroom funk.”
Zone 2: The Action Area (18 - 65 inches) This is where the magic happens. Seating, coat hooks, and drop zones for keys and wallets belong in this mid-section. Because this area handles bulky winter coats and rigid backpacks, hardware placement is critical. A common mistake is clustering hardware too tightly. When hanging multiple layers of winter gear, getting the ideal hook spacing to keep bulky coats separated is paramount. If you squeeze hooks four inches apart, the coats will bulk outward, pushing into your walking path. Keep them staggered, placing high hooks at 65 inches and low hooks at 45 inches for kids.
Zone 3: Deep Storage (65 - 96+ inches) This upper echelon is reserved for seasonal rotation. Think heavy wool blankets in the summer, or beach towels and sunscreen caddies in the winter. Because you won’t access this daily, this is where you employ cabinet doors. Closing off the uppermost section reduces visual clutter, which is a psychological necessity in a 30-square-foot box.
The Art of the Micro-Bench
You need a place to sit down and tie your shoes, but a traditional bench is a massive floor hog. Let’s dissect how to engineer a bench that works inside a 5x6 parameter without causing bruised shins.
If you are building custom cubbies, pay close attention to your optimal locker depth for winter boots and backpacks so you don’t accidentally encroach on your walking path. A standard bench depth is anywhere from 18 to 20 inches. In our 5x6 scenario with a 24-inch maximum buildable depth, this fits perfectly.
Floating vs. Grounded Benches
I strongly advocate for a heavy-duty floating bench in tight spaces. By anchoring a thick, 2-inch solid wood slab directly into the wall studs via heavy-duty steel brackets, you eliminate the vertical front face of the bench.
Why does this matter?
- Visual Expansion: Seeing the floor material continue seamlessly underneath the bench tricks the human eye into perceiving a larger floor plan.
- Tactical Storage: It allows for the integration of large, oversized rolling bins underneath. You can kick off your boots and simply nudge them backward under the bench, keeping the primary walkway completely clear.
If you prefer a grounded, built-in look with cubbies extending to the floor, you must introduce a toe-kick. A standard 3-inch high by 3-inch deep recess at the base of the bench allows users to stand flush against the unit without stubbing their toes, improving ergonomics immensely. Furthermore, you don’t want a bench that sits too high; sticking to standard seating depth and height measurements guarantees comfort without swallowing floor space. Aim for an 18-inch finished height from the floor to the top of the seat.
Millwork Tactics: Custom vs. Pre-Fab Hacks
When your canvas is only 5 feet by 6 feet, you have to decide how you’re going to source your cabinetry.
The Custom Route
If the budget allows, bespoke millwork is undeniably the superior choice. A local carpenter can scribe the cabinets to fit your exact walls—which are almost certainly not perfectly plumb or square. Custom routing allows you to integrate electrical outlets inside the cabinets (perfect for charging vacuums or power tools) and tailor the cubby sizes to your specific family. Have a hockey player? You need an oversized, ventilated base cubby. Have a family of avid hikers? You need specialized peg systems for trekking poles and hydration packs.
The Pre-Fab Hack
Not everyone wants to drop five figures on custom carpentry for a tiny utility room. You can achieve a high-end built-in look using big-box store carcasses (like IKEA PAX or SEKTION frames) if you know how to trim them out.
The secret to elevating pre-fab furniture lies in the filler pieces and the crown molding. Never leave a 3-inch gap between the top of a pre-fab cabinet and the ceiling. Cut an MDF filler panel, nail it into place, and finish it with crown molding painted to match the cabinet. Do the same for the gaps between the cabinet sides and the walls. It transforms a piece of flat-pack furniture into seamless, architectural millwork.
Pro Tip: When hacking pre-fab cabinets for a mudroom, heavily reinforce the bench area. Flat-pack particleboard is not designed to bear the dynamic weight of two adults sitting simultaneously. Reinforce the bench span with 2x4 framing hidden behind the decorative front fascia.
Material Selection: High-Abrasion Surfaces
A 5x6 mudroom takes more physical abuse per square inch than any other room in the house. Gravel, road salt, mud, dripping rain, and heavy bags are constantly scraping against your finishes. Delicate materials will be destroyed within a single season.
The Floor Foundation
Hardwood floors are beautiful, but they are a liability in a wet zone. Standing water from melting snow will warp wood planks and destroy the finish.
Opt for large-format porcelain tile or natural slate. I specifically recommend large-format (like 12x24 or 24x24 tiles) because fewer grout lines mean less maintenance. Grout is porous and traps dirt; minimizing it keeps the tiny room looking pristine. If you live in a cold climate, placing an electric radiant heat mat beneath the tile is a game-changer. It’s relatively inexpensive for a 30-square-foot room and actively evaporates moisture from wet boots, preventing puddles.
Wall Treatments That Survive
Flat-finish drywall will be scuffed by backpacks and stained by wet coats within weeks.
To combat this, sheath the walls in highly durable materials. Vertical shiplap, beadboard, or board-and-batten paneling constructed from MDF and painted in a high-gloss or satin enamel finish offers incredible resilience. Enamel paint creates a hard, shell-like surface that can be aggressively scrubbed with chemical cleaners without stripping the pigment.
- Key Takeaways for High-Traffic Materials:
- Skip the softwoods: Pine and fir benches will dent. Use oak, maple, or solid walnut for seating surfaces.
- Go dark on the floor, light on the walls: A dark slate hides dirt, while crisp white or pale greige walls bounce light to prevent a cave-like atmosphere.
- Seal everything: Natural stones and wood surfaces must be heavily sealed with commercial-grade polyurethane or penetrating stone sealers.
Lighting and the Psychology of Space
Lighting in micro-spaces is rarely handled correctly. A single, anemic flush-mount dome light in the center of a 5x6 ceiling casts harsh, top-down shadows that make the space feel cramped and gloomy.
Because we are utilizing floor-to-ceiling storage, the upper cabinets often block the central light from reaching the back of the cubbies. This creates dark, unusable recesses.
Layered Illumination
You must layer your lighting, even in a room the size of a closet.
- Ambient Light: Swap the standard dome for a low-profile LED wafer light or a statement semi-flush fixture with multiple exposed bulbs to spread light into the corners.
- Task Lighting: If you have open cubbies or a seating alcove, run a strip of warm-white (2700K - 3000K) LED tape lighting along the underside of the upper shelf. This washes the back wall in light, instantly adding perceived depth to the room.
- Accent Lighting: A pair of hardwired brass sconces flanking a mirror on the non-storage wall acts as functional art, drawing the eye upward and elevating the room’s aesthetic from “utility closet” to “grand entrance.”
The High-Gloss Ceiling Trick
Here is an architectural secret for tiny spaces: paint the ceiling. Not flat white, but a high-gloss, reflective finish. Alternatively, apply a lacquered wallpaper to the ceiling. The reflective surface mirrors the light sources and gives the illusion that the room is extending infinitely upward. It completely obliterates the “lid” effect that makes small rooms feel oppressive.
Managing Seasonal Gear Rotation
Even the most impeccably designed 5x6 mudroom will fail if you treat it as a long-term storage unit. It is a staging area, not an attic.
The golden rule of micro-mudrooms is strict seasonal rotation. In the heat of July, there is absolutely zero reason for a heavy parka or insulated snow boots to be occupying prime real estate in your “Action Area.”
Implement a “One In, One Out” staging system. Dedicate inexpensive, matching opaque bins for the upper “Deep Storage” zone. During the summer, winter gear lives in those bins, completely out of sight. When the weather turns, you pull the bins down, swap the gear, and place the summer hats, sunscreen, and pool towels into the upper bins.
This requires discipline. If an item hasn’t been worn in two weeks, it does not belong in the 5x6 mudroom. It belongs in a bedroom closet or garage storage. Ruthless editing is the final, and most critical, component of spatial economy.
Common Pitfalls and How to Dodge Them
I’ve ripped out and redesigned dozens of failed entryways. Here are the traps homeowners fall into when tackling a 30-square-foot layout:
- Over-Compartmentalizing: Trying to give every single family member their own individual 12-inch wide locker. A 12-inch locker is practically useless for a grown adult wearing a puffy winter coat. Instead of four tiny lockers, build two massive, shared 24-inch wide cubbies. Wide, open expanses function much better than heavily partitioned micro-boxes.
- Ignoring the Drip Zone: Placing a beautiful wood bench directly under wet coat hooks. The water will drip off the coats, pool on the wood, and ruin the finish. Ensure your hooks are positioned so that wet garments drip directly onto the tile floor or into an integrated metal drip tray.
- Choosing Form Over Function with Hardware: Delicate, single-prong aesthetic hooks are useless. You need heavy-duty, double-prong hooks engineered to hold 20+ pounds of canvas and wet wool. Opt for solid brass or cast iron over cheap zinc alloys that will snap under pressure.
The Bottom Line: Designing a 5x6 mudroom is an exercise in strict prioritization and architectural ingenuity. You cannot bend the rules of physics to create more floor space, but by executing a flawless vertical storage strategy, choosing resilient materials, and refusing to compromise on walkway clearances, you can transform a cramped threshold into a highly calibrated machine. Treat those 30 square feet with the precision of custom cabinetry, and your entryway will handle the chaos of daily life without breaking a sweat.