The Ideal Spacing: How Far Apart Should Entryway Hooks Be Mounted?
Stop the entryway clutter. We break down the exact mathematics, ergonomics, and aesthetic rules for spacing your coat hooks perfectly.

Feb 16, 2026 - Written by: Linda Wise

You know the scene. You walk through the front door, heavy winter coat in hand, and reach for a hook, only to be met with a chaotic wall of fabric. The coats are so jammed together that hanging yours up requires a wrestling match with a denim jacket and three scarves. Eventually, gravity wins, and something slides to the floor.
This isn’t just a clutter problem; it’s a geometry problem.
Most homeowners treat hook installation as an afterthought. They eyeball it, drill a few holes, and hope for the best. But if you want an entryway that functions like a well-oiled machine rather than a fabric landfill, you have to get granular with the spacing.
I’ve spent years analyzing storage efficiencies, and I can tell you that the distance between your hooks dictates the lifespan of your drywall, the drying time of your rain gear, and the overall sanity of your morning routine. Let’s dismantle the guesswork and look at the actual math behind the perfect entryway setup.
The Golden Zone: Why Spacing is Critical
Before we pull out the tape measure, we need to understand the physics of a hanging coat. When you drape a jacket over a hook, it doesn’t hang in a straight line; it flares. A heavy wool peacoat or a down puffer requires significantly more lateral “breathing room” than a windbreaker.
If hooks are mounted too close—say, under 6 inches apart—you create what I call the “overlap effect.” This traps moisture between layers of fabric (a nightmare during rainy seasons), makes it impossible to see what is actually on the rack, and increases the mechanical leverage on the hooks, which can eventually rip them out of the drywall if they aren’t anchored in studs.
Pro Tip: “The ‘Squish Factor’ is real. If you have to physically compress an existing coat to hang a new one, your spacing is wrong. Your wall storage should offer retrieval, not excavation.”

The Magic Numbers: Calculating the Distance
There is no single number that works for every household, but there are ranges that separate the amateurs from the pros. The spacing depends entirely on what you are hanging.
The Standard Standard: 8 to 12 Inches
For a general-purpose entryway used by adults and children, 8 to 12 inches center-to-center is the sweet spot.
At 10 inches, you allow enough room for a standard winter jacket to hang without completely obscuring the item next to it. This spacing provides visual breathing room. It stops the entryway from looking like a locker room and gives each item its own dedicated territory.
The “Parka Protocol”: 12 to 15 Inches
If you live in a climate with harsh winters—think Minnesota or Vermont—you are dealing with bulk. Down jackets, ski gear, and heavy wool trenches are volume hogs.
I’ve personally found that pushing the spacing to 15 inches feels luxurious. It ensures that wet coats have 360-degree airflow, speeding up drying times and preventing that musty “wet dog” smell in the foyer. If you have the wall real estate, be generous.
The High-Density Zone: 6 Inches
Can you go closer? Yes, but only for specific items. If you are installing a secondary rail for keys, leashes, light cardigans, or empty tote bags, 6 inches works. However, never use this spacing for your primary coat storage unless you enjoy frustration.
Hardware Dictates the Layout
The hardware you choose isn’t just aesthetic jewelry for your wall; it’s the skeleton of your organization system. The physical footprint of the hook itself changes the spacing equation.
Individual Hooks
These offer the ultimate freedom. You can stagger them, create waves, or stick to a rigid grid. When using chunky, industrial-style hooks, measure from the center of the prong, not the edge of the baseplate.
If you want the best experience, I highly recommend checking out the Liberty Hardware Heavy Duty Coat Hook. The dual-prong design on these allows you to cheat the spacing slightly because you can stack a hat and a coat vertically on the same unit.
Fixed Hook Rails
These are convenient but restrictive. Manufacturers often jam hooks 4 or 5 inches apart to maximize the “feature list” on the packaging.
If you buy a pre-made rail, look for one where the hooks are sparse. Or, do what I do: buy two rails and mount them side-by-side with a calculated gap in the middle to extend the visual rhythm.
The Accordion Rack
Avoid these for heavy loads. The diamond pattern forces items to hang at varying heights, which can look whimsical but often results in the lower coats interfering with the upper ones.
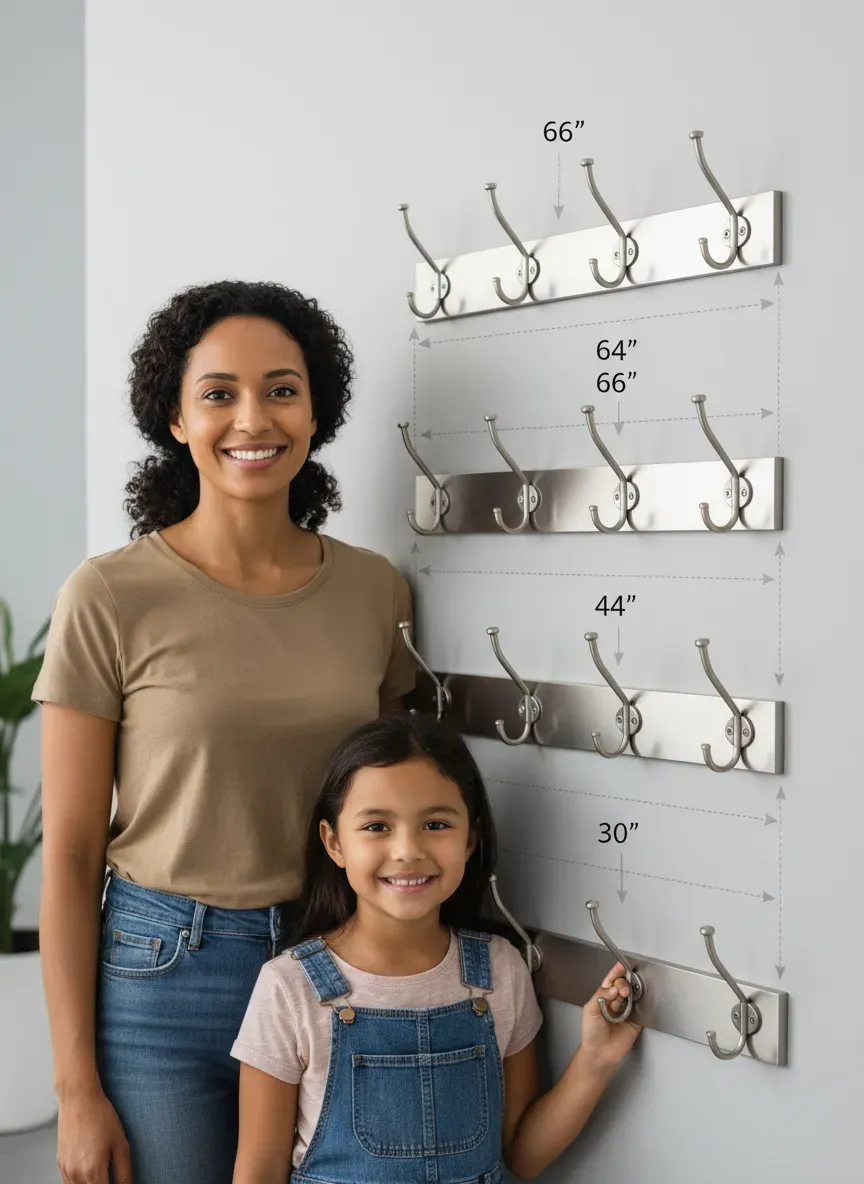
The Vertical Game: It’s Not Just Left-to-Right
We spend so much time worrying about horizontal distance that we forget the vertical axis. The height at which you mount your hooks is just as vital as the gap between them.
The “Knuckle Drag” Test
Standard mounting height is usually around 60 to 66 inches from the floor for adults. However, you need to account for the length of your longest coat.
If you have a bench underneath your hooks, the calculus changes. You need to ensure that the tails of your coats don’t bunch up on the seating surface. This is a common failure point in mudroom design. To get a better grasp on how the seating area interacts with wall storage, it’s worth reading up on integrating bench dimensions with hanging space. If the coat hits the bench, the bench becomes a shelf, not a seat.
The Double Decker Strategy
For families, I love a staggered approach.
- Top Row (Adults): 65 inches high.
- Bottom Row (Kids/Bags): 40-45 inches high.
When doing this, you must offset the hooks. Don’t stack them directly vertically. Place the bottom hook exactly halfway between the vertical lines of the top hooks. This prevents the “bulk sandwich” where the top coat hangs directly over the bottom jacket, rendering the lower hook inaccessible.
Aesthetic Rhythms: The Rule of Odds
Designers use a secret weapon called the “Rule of Odds.” The human eye finds odd numbers (3, 5, 7) more visually pleasing and balanced than even numbers.
If you have a small wall, three hooks spaced 12 inches apart will look significantly more “high-end” than four hooks cramming into the same space at 9 inches apart. It implies intentionality.
Symmetry vs. Asymmetry
While symmetry is safe, asymmetry is functional. Consider grouping hooks by purpose.
- Zone A (Guest/Quick Access): Two hooks near the door frame, spaced widely (14 inches).
- Zone B (Long Term/Family): A denser row further down the hall.
This visual hierarchy tells guests exactly where to hang their things without you having to say a word.
Installation: The “Tape Test” Methodology
Do not drill a single hole until you have done the Tape Test. Put the drill down.
- Gather your hardware.
- Grab a roll of blue painter’s tape.
- Tear off strips representing the vertical and horizontal center of where you think the hooks should go.
- The Live Trial: Actually hang your heaviest coat on a nail or a friend’s finger held against the tape mark. Then, hang a second coat at the next mark.
You will almost immediately realize that your initial guess was too tight. The Tape Test saves drywall. It allows you to visualize the negative space—the empty wall between the coats—which is what actually makes the area look clean.
Key Takeaway: “Your eye judges the space by the empty wall, not the occupied wall. Maximize the negative space to decrease visual clutter.”
The Stud Variable
Ideally, every hook goes into a stud. But studs are usually 16 inches apart (sometimes 24). If you stick strictly to stud spacing, your hooks might be too far apart for a high-capacity family, or oddly placed on the wall.
If you need a specific spacing—say, every 10 inches—you will inevitably hit drywall. In this case, you need a rail. Screw the rail into the studs, and let the rail hold the hooks at your desired intervals. If you demand individual hooks in drywall, use high-capacity toggle bolts, not those cheap plastic plugs that come in the box.
For a sleek, modern look that hides the mounting hardware, I’m a huge fan of the Umbra Flip Wall Mounted Coat Rack. The hooks retract when not in use, which essentially solves the spacing aesthetic issue when the unit is empty.
Specialized Scenarios
The Narrow Hallway
If your entryway is essentially a corridor, protruding hooks are a hazard. You don’t want to snag a shoulder every time you walk by.
Here, spacing isn’t just about the coats; it’s about the traffic flow. You need to verify the depth of the hook plus the bulk of the coat. If your hallway feels tight, you need to understand the relationship between passage width and storage depth. You can find more on this balance in our guide to perfecting hallway sizing constraints.
In these tight spots, space hooks further apart horizontally (15 inches) so the coats lay flatter against the wall rather than bunching outward into the walking path.
The Corner Conundrum
Never mount a hook closer than 8 inches to an interior corner. A coat hung in a corner renders the adjacent wall useless and often prevents nearby doors from opening fully. Give the corner room to breathe.
Materiality and Weight Distribution
The spacing of your hooks also impacts the structural integrity of the mounting surface. If you mount heavy iron hooks every 6 inches on a piece of decorative shiplap or wainscoting, you risk splitting the wood.
Dispersing the weight is key. If you are hanging heavy backpacks (which can easily weigh 20-30 lbs), spacing them 12+ inches apart ensures that the load is distributed across a wider section of the wall or backing board.
For those building a rustic mudroom or a farmhouse entry, you need hardware that matches that aesthetic but provides serious strength. The Franklin Brass Heavy Duty Hook Rail is a solid choice because the backplate distributes the force, meaning precise stud placement for every single hook isn’t as critical.
The Bottom Line
There is a rhythm to a well-designed entryway. It shouldn’t look like a mouth with missing teeth, nor should it look like a overcrowded subway car.
The ideal spacing is 10 to 12 inches for most homes, expanding to 15 inches for cold climates, and condensing to 6 inches only for accessory storage.
Don’t let the standard “rail” dictate your life. If you have the wall space, spread out. Give your coats the dignity of personal space. Your entryway is the handshake of your home—make sure it’s a firm, confident one, not a clumsy fumble.

By taking the time to measure, tape, and adjust, you move from simple storage to architectural intention. And frankly, that’s the difference between a house and a home.
If you are currently renovating and trying to figure out how the hooks fit into the larger puzzle of console tables and shoe racks, take a moment to look at the broader dimensions required for a functional entryway. It puts the hook spacing into the context of the whole room.
So, grab that tape measure. It’s time to drill.