Customizing Your Entryway Racks: Painting, Staining, and Personalizing Wall Units
Transform your mudroom storage from generic to gallery-worthy. A master guide on painting, staining, and hacking entryway racks for maximum style and durability.
Feb 16, 2026 - Written by: Linda Wise

The entryway is the handshake of your home. It’s the first thing guests encounter and the last thing you see before facing the world. Yet, so many of us settle for generic, big-box store coat racks that lack soul. You know the type—flat white MDF or vaguely orange-tinted pine that screams “temporary solution.” But here is the reality: that utilitarian rack holding your raincoats has the potential to be a defining architectural feature.
I’ve spent years tweaking, ruining, and eventually mastering the art of furniture customization, and I can tell you that the difference between a “storage unit” and a “statement piece” usually comes down to a quart of quality finish and a Saturday afternoon. Whether you are looking to refinish a vintage flea market find or upgrade a budget-friendly flat-pack unit, the principles remain the same.
We are going to go deep here. This isn’t just about slapping a coat of blue paint on a hook rail. This is about understanding wood grain, mastering adhesion, and selecting hardware that elevates the tactile experience of walking through your front door.
The Assessment: Know Your Substrate
Before you even look at a color swatch, you have to play detective. The biggest mistake DIYers make is treating all surfaces the same. I’ve seen beautiful paint jobs peel off in sheets like a sunburn because the owner didn’t realize they were painting over a plastic veneer.
Solid Wood vs. Veneer vs. Laminate
If you are working with an older piece, you might be lucky enough to have solid wood. Check the end grain. If the grain lines continue over the edge, it’s solid. If the edge looks like a completely different material or has a “band” applied to it, you are likely dealing with veneer or laminate.
- Solid Wood: The holy grail. You can sand it down, stain it, paint it, or bleach it.
- Wood Veneer: Real wood glued over a cheaper core. You can stain this, but you have to be incredibly gentle. Sand through that thin top layer, and you expose the particle board underneath. Game over.
- Laminate/Melamine: This is plastic printed to look like wood (or just solid color). You cannot stain this. Paint will not stick to it without aggressive chemical priming.
Pro Tip: Not sure if it’s varnish or wax on that old rack? Rub a small spot with a cotton ball soaked in mineral spirits. If the finish dissolves, it’s wax. If it stays put, it’s varnish or poly. You must strip wax completely before applying any new finish, or nothing will cure properly.
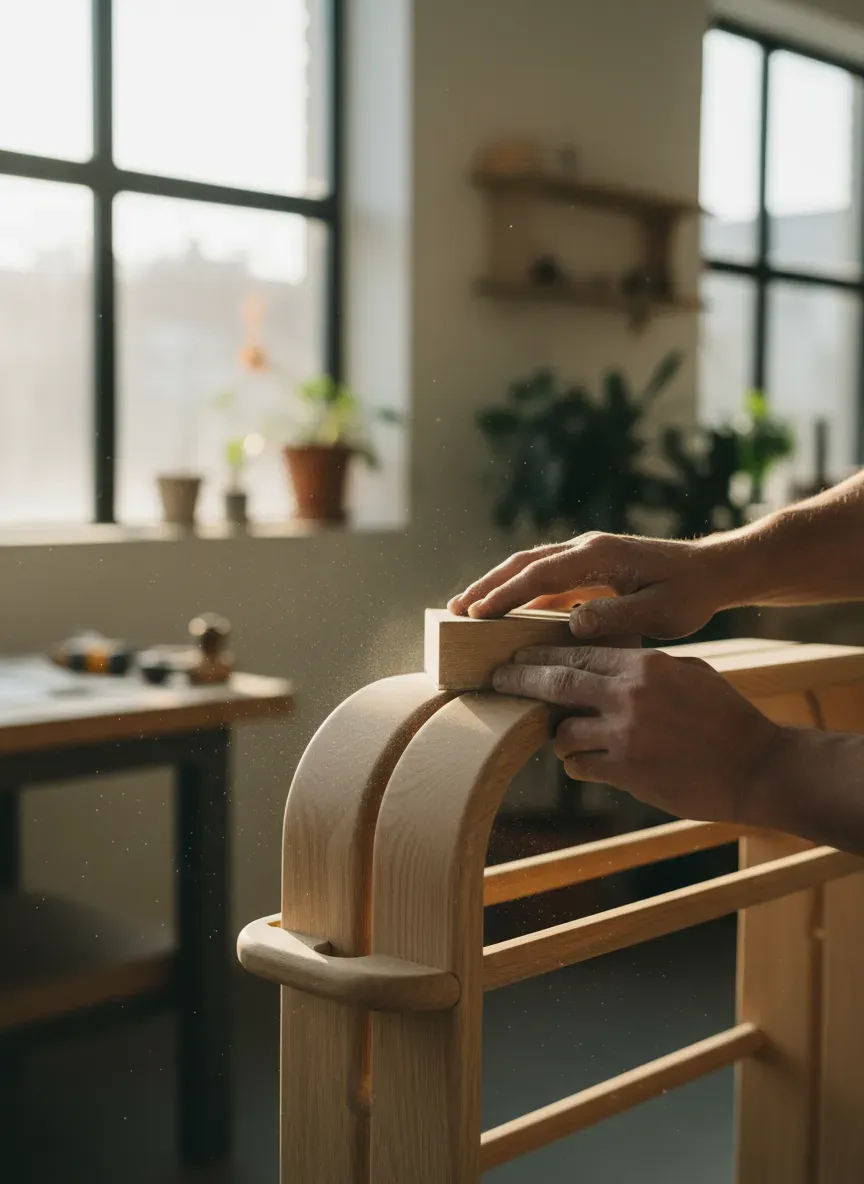
The Prep Phase: Where the Magic Actually Happens
I know, sanding is tedious. It makes a mess. But painting is 80% prep and 20% application. If you skip this, you are wasting your time.
Cleaning and Degreasing
Entryway racks see a lot of traffic. They accumulate oils from hands, grime from jackets, and dust. Even if it looks clean, it isn’t. Wash the entire unit with TSP (Tri-Sodium Phosphate) or a TSP substitute. This cuts through the invisible grease layer that causes “fish-eyes” in your paint finish.
The Sanding Protocol
You aren’t trying to remove all the old finish unless you plan to re-stain. If you are painting, you just need “tooth”—microscopic scratches for the new primer to grab onto.
- For Painting: Scuff sand with 120-grit sandpaper. You just want to dull the shine.
- For Staining: You need to get down to raw wood. Start with 80-grit to strip the old finish, move to 120, and finish with 220. Do not skip steps. If you jump from 80 to 220, the stain will highlight the deep scratches from the 80-grit paper.
If you are dealing with a laminate surface that you want to paint, sanding isn’t enough. You need a bonding primer. I have tried them all, and for slick surfaces, nothing beats Zinsser B-I-N Shellac-Base Primer. It smells potent (wear a respirator), but it sticks to glass, tile, and shiny laminate like it was welded there.
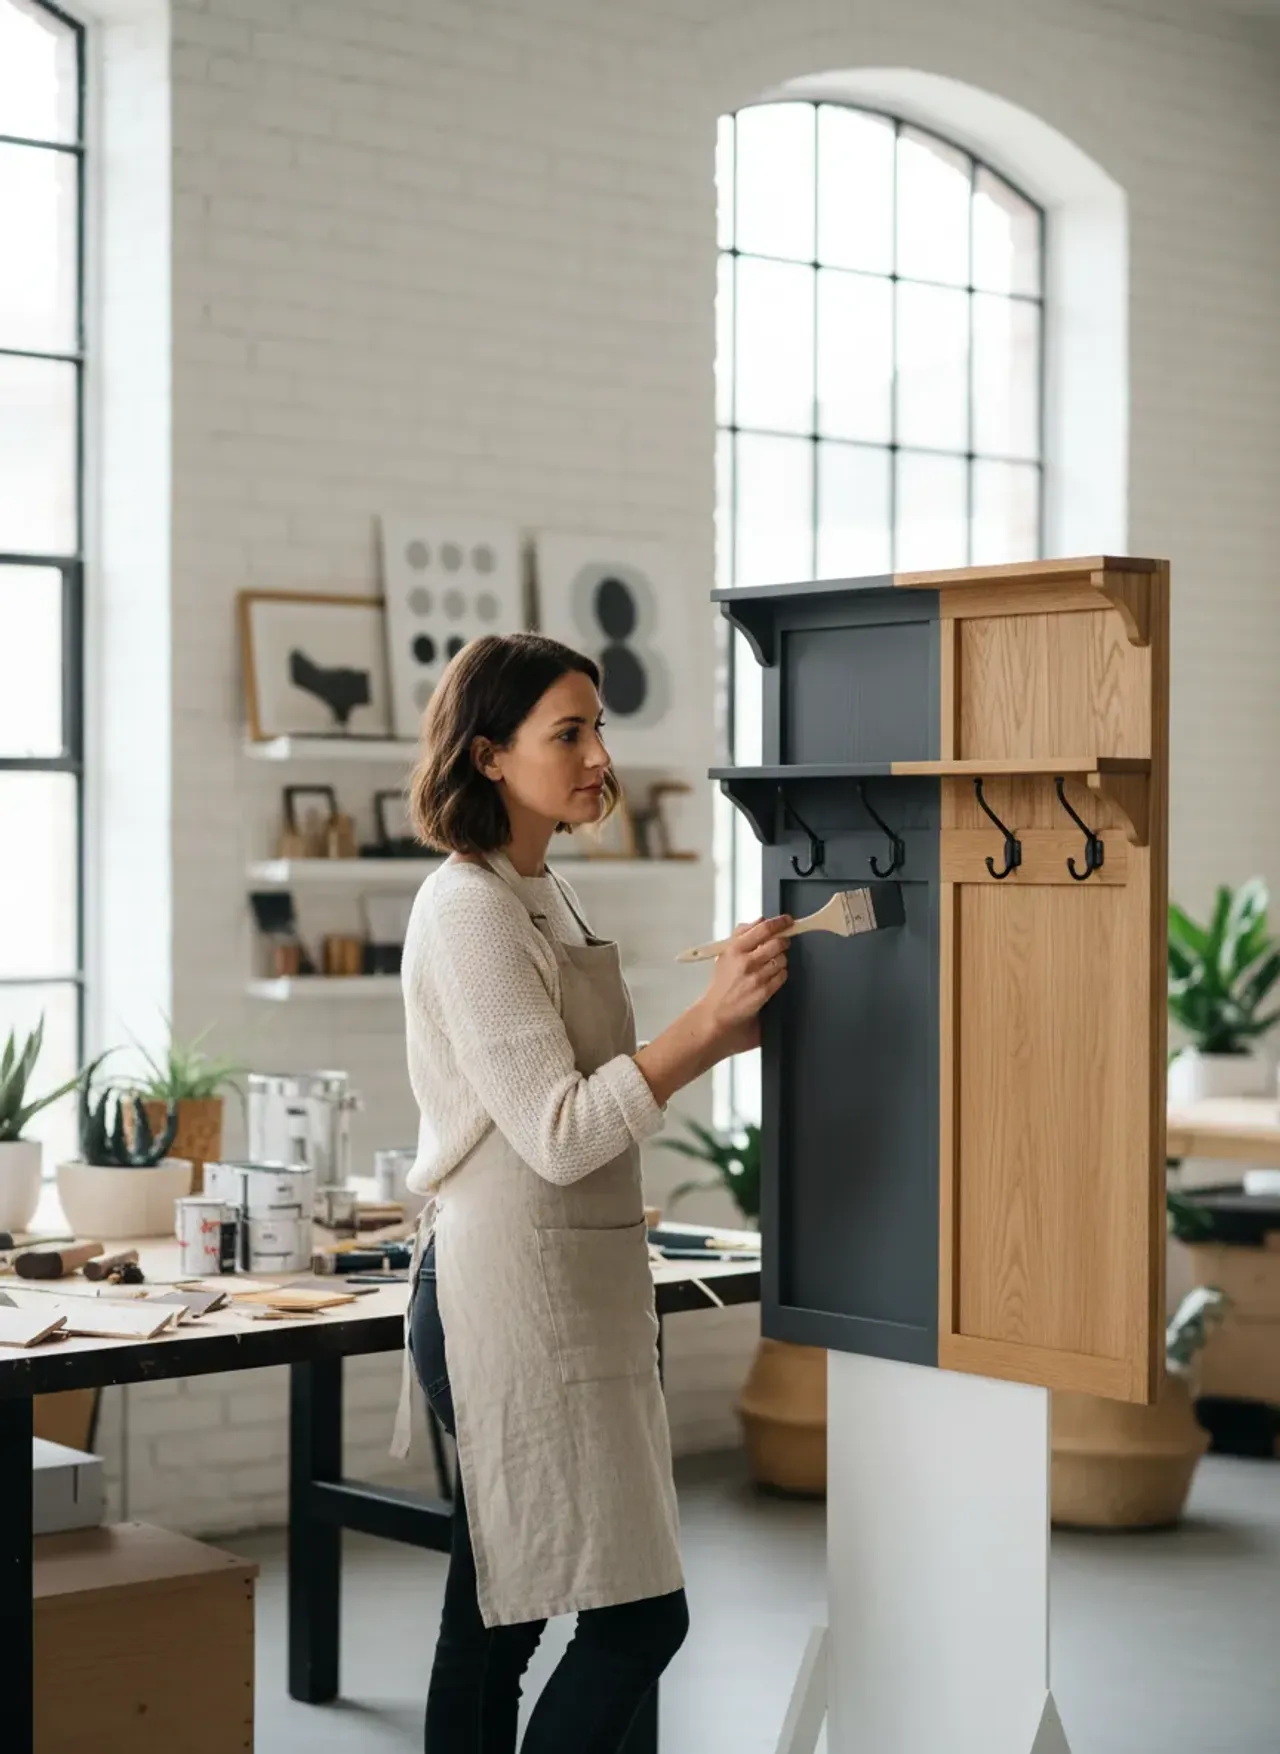
Painting: Techniques for a Factory Finish
When customizing wall units, brush strokes are the enemy. You want the rack to look like it was bought that way, not like a craft project.
Choosing Your Paint
For an entryway, durability is paramount. Wet umbrellas and muddy backpacks are going to assault this furniture.
- Acrylic Latex: Easy cleanup, but can remain “tacky” (blocking) for a long time. If you hang a heavy coat on a latex-painted hook rail too soon, the paint might pull off.
- Alkyd (Oil-based) Enamel: The gold standard for durability. It cures hard as a rock. However, it yellows over time and requires solvents for cleanup.
- Waterborne Alkyd: This is my personal favorite. It behaves like an oil paint (levels out beautifully) but cleans up with soap and water. Brands like Benjamin Moore Advance or Sherwin Williams Emerald Urethane are top-tier here.
The Application
Use a high-quality synthetic brush for water-based paints. Dip the brush only a third of the way in. Apply the paint, and then tip it off—run the brush lightly over the wet surface in one continuous stroke to smooth it out.
If you have a complex rack with cubbies and intricate molding, consider a sprayer. Even a budget HVLP sprayer can give you a glass-smooth finish that a brush simply cannot replicate.
Pro Tip: Elevate your rack on “painter’s pyramids” or simple blocks of wood. This allows you to paint the bottom edges without gluing the rack to your drop cloth.
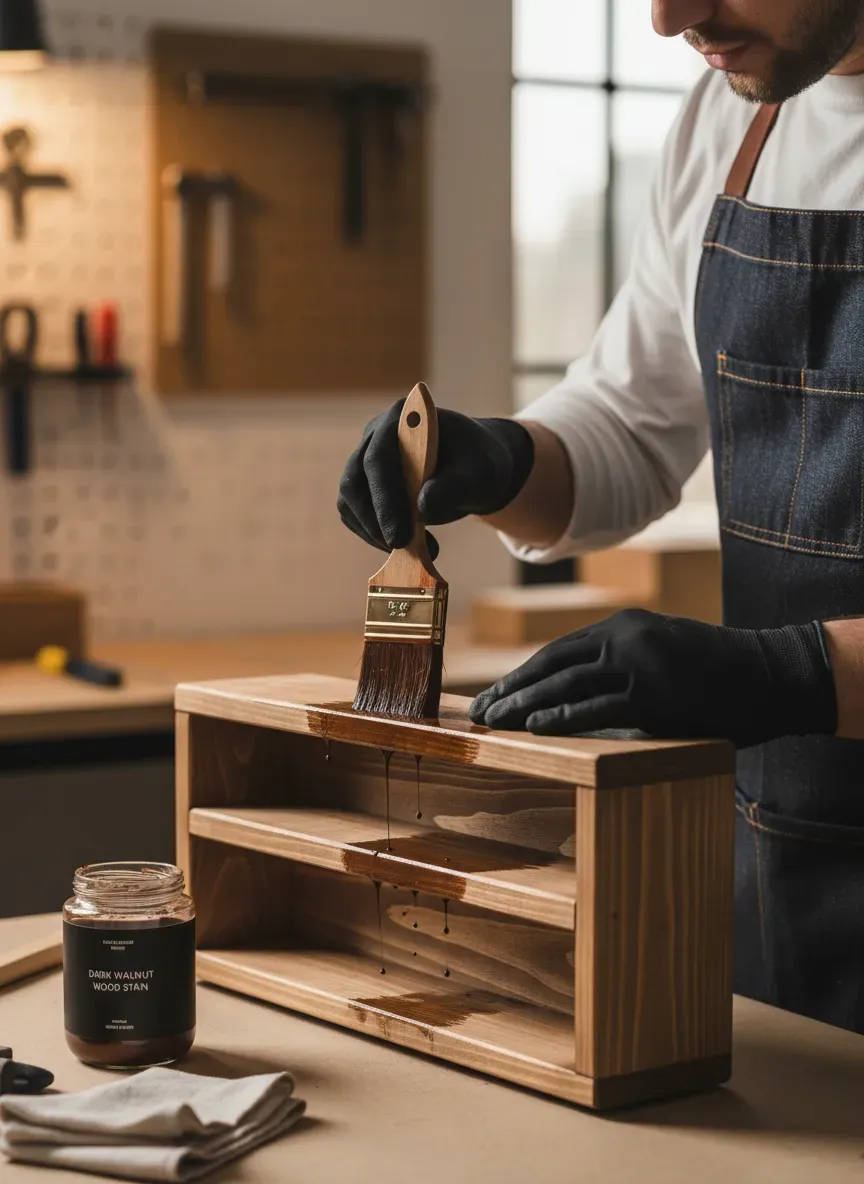
The Art of Staining: enhancing the Grain
Staining is intimidating because it’s unforgiving. You can’t just paint over a mistake. But when done right, a rich walnut or espresso stain adds an element of luxury that paint can’t touch.
The Conditioner Step
If you are working with softwoods like pine (which most affordable entryway racks are), you absolutely must use a pre-stain wood conditioner. Pine absorbs stain unevenly, leading to a blotchy, amateurish look. The conditioner regulates absorption.
Apply the conditioner, let it sit for the specified time, and wipe off the excess. You usually have a window of about two hours to apply your stain after conditioning.
Gel Stain vs. Liquid Stain
For vertical surfaces or intricate wall units, I highly recommend checking out Minwax Gel Stain. Unlike liquid stains that soak in instantly, gel stain sits on the surface longer. This gives you more control and results in a more uniform color, essentially glazing the wood. It’s also fantastic for fiberglass doors or veneer where you can’t sand deeply.
Layering Color
Don’t be afraid to mix stains. I often start with a layer of a reddish tone (like sedona red) and top it with a dark brown (like jacobean) to create a complex, mahogany-like depth. Just ensure the first coat is fully dry before applying the second.
Structural Customization: Beyond the Surface
Color is just one dimension. To truly personalize a rack, you need to look at its bones. This is where we move from “decorator” to “designer.”
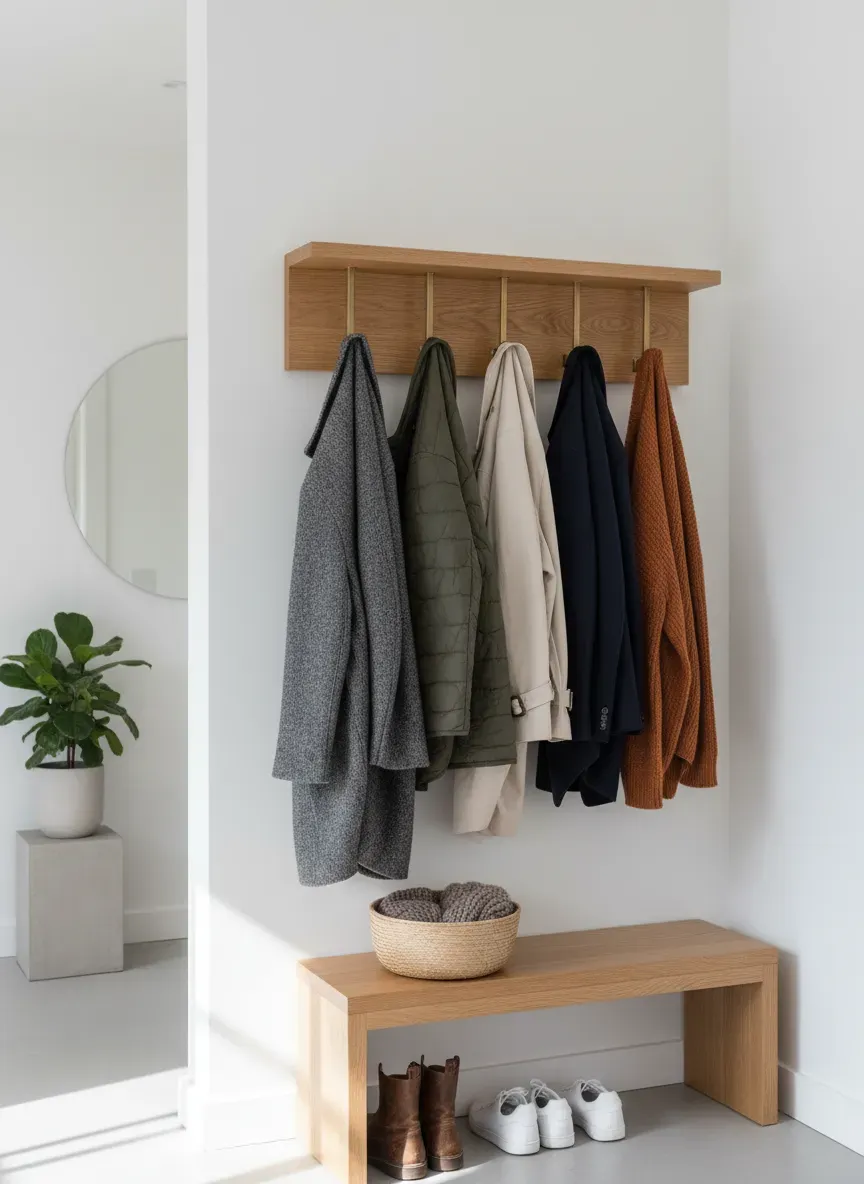
The Hardware Swap
The easiest way to upgrade a rack is to ditch the cheap hooks it came with. Standard builder-grade hooks are often too small or flimsy.
Look for heavy cast-iron double hooks, vintage porcelain knobs, or sleek matte black architectural hooks. The spacing matters too. When positioning your new hooks, consider the ergonomics of entryway benches and storage seating to ensure accessibility for everyone. If the hooks are too high, kids drop their coats on the floor. If they are too low, long coats drag.
Adding Trim and Moulding
A flat plank of wood with hooks is functional, but adding crown molding to the top shelf or beadboard to the back panel transforms it into a built-in feature.
If you have a simple wall-mounted shelf unit, try adding corbels underneath. Not only do they add visual weight and elegance, but they also increase the load-bearing capacity of the shelf.
The Wallpaper Backing Trick
For racks that have cubbies or a back panel, applying wallpaper is a brilliant way to introduce pattern without the commitment of painting the walls. Peel-and-stick wallpaper is perfect for this. Choose a bold botanical print or a subtle geometric texture. It creates a “jewelry box” effect when you open the unit or look past the hanging coats.
Sizing and Placement: The Hidden Customization
We often think of customization as physical changes to the object, but where and how you mount it is part of the custom look. A tiny rack on a massive wall looks cheap.
Before buying gallons of paint, measure your unit and refer to sizing secrets for choosing the perfect entryway layout to understand scale. Sometimes, the best customization is actually combining two identical smaller racks side-by-side to create one massive, impressive unit that spans the wall. This “ganging” technique is a favorite of interior designers to fake a custom built-in look.
Protecting Your Work: The Topcoat
You’ve sanded, primed, painted, and swapped hardware. Do not skip the topcoat. The entryway is a war zone of moisture, grit, and impact.
Polyurethane vs. Polycrylic
- Oil-Based Polyurethane: Amber hue. Extremely durable. Good for dark woods.
- Water-Based Polycrylic: Crystal clear. Dries fast. Best for over white or light paint because it won’t yellow.
For a balance of extreme durability and clarity, I swear by General Finishes High Performance Water Based Topcoat. It sprays beautifully and brushes on without dragging.
Apply at least three coats. Sand lightly with 320-grit paper between coats (except the final one) to knock down any dust nibs. This is how you get that buttery, professional feel.
Wax Finishes
For a more rustic, farmhouse look over chalk paint, furniture wax is traditional. It offers a soft, low-luster sheen. However, be warned: wax offers minimal protection against water and heat. In a wet mudroom, a wax finish will likely need re-application every year.
Advanced Techniques: Distressing and Glazing
If you want your entryway rack to look like it was salvaged from a 19th-century French farmhouse, you need to beat it up a little.
Physical Distressing
Do this before staining or painting. Use a chain, a bag of screws, or an awl to create dents and wormholes. The key is randomness. Focus on the edges and corners where natural wear would occur.
The Wet Distress Method
If you are painting over a dark wood (or a dark base coat), use a wet rag to wipe away paint from the edges just as it starts to dry. This reveals the wood underneath more naturally than sanding the paint off later, which can look scratched and artificial.
Glazing
Glaze is a translucent medium mixed with pigment. You brush it over your painted piece and then wipe most of it off. The glaze settles into the corners, the molding profiles, and those dents you made, highlighting the three-dimensional nature of the rack. It adds instant age and character.
Common Pitfalls to Avoid
I’ve made these mistakes so you don’t have to.
- Rushing the Cure Time: Dry to the touch does not mean cured. Paint can take 30 days to fully cure. If you hang heavy items on it after 24 hours, you risk denting the finish.
- Hardware Misalignment: Measure three times. Use a template. If you are building from scratch, reviewing sizing secrets for choosing the perfect entryway furniture leads is critical to ensure your hardware spacing makes visual sense.
- Overloading the Rack: Customizing a rack often makes it heavier (added trim, heavier wood). Ensure your wall anchors are rated for the new weight plus the weight of your winter gear. Hitting a stud is non-negotiable for large units.
Key Takeaways for Customization Success
- Identify the material first: Don’t paint plastic laminate without a bonding primer.
- Prep is king: Cleaning and sanding determine the longevity of the finish.
- Upgrade the hardware: It’s the highest ROI change you can make.
- Protect the finish: Entryways are high-traffic; use a quality topcoat.
- Scale matters: Ensure the unit fits the wall visually, or combine units for a built-in look.
The Bottom Line
Customizing your entryway rack is one of the most high-impact, low-cost projects you can undertake. It sets the tone for your entire home. By moving beyond the factory finish and injecting your own style—whether that’s a sleek, high-gloss modern look or a weathered, rustic vibe—you create a space that functions perfectly and welcomes you home with personality. Don’t settle for “good enough” at the front door. Grab that sandpaper, pick a bold color, and create something that makes you smile every time you walk in.