Dedicated Mail and Key Drop Zones within Built-In Entryway Organization
Stop losing your keys and drowning in junk mail. Discover architect-approved strategies for designing a flawless built-in entryway drop zone that masters daily chaos.

Mar 10, 2026 - Written by: Linda Wise
I’ve spent over a decade analyzing how people actually move through their homes, and I can tell you exactly where the organizational system breaks down: the first three feet inside the front door. You cross the threshold. You shift your weight. Subconsciously, you immediately seek the nearest horizontal surface to offload your everyday carry.
When that surface is the kitchen island or the dining room table, visual chaos infects the rest of the house.
Building a dedicated mail and key drop zone into your entryway isn’t just about tidiness. It’s about behavioral architecture. By designing a highly specific, seamlessly integrated micro-station for your daily transit items, you eliminate the cognitive load of searching for your keys during the morning rush. Here’s the real kicker: a drop zone only works if it requires absolutely zero extra effort to use. If it takes three steps to open a drawer and place the mail inside, you’ll drop it on the counter instead.
We need to engineer a solution that intercepts your natural dropping trajectory. Before we map out the spatial geometry of custom millwork and paper triage, review a few standout hardware components that can anchor your new setup.
Quick Comparison: Top Picks
| Product | Rating | Check Price |
|---|---|---|
| Yamazaki Home Magnetic Key Organizer | ⭐⭐⭐⭐⭐ | View on Amazon |
| Umbra Estique Wall Organizer | ⭐⭐⭐⭐½ | View on Amazon |
| Kurrajong Farmhouse Wood Mail Holder | ⭐⭐⭐⭐½ | View on Amazon |
The Anatomy of Entryway Friction
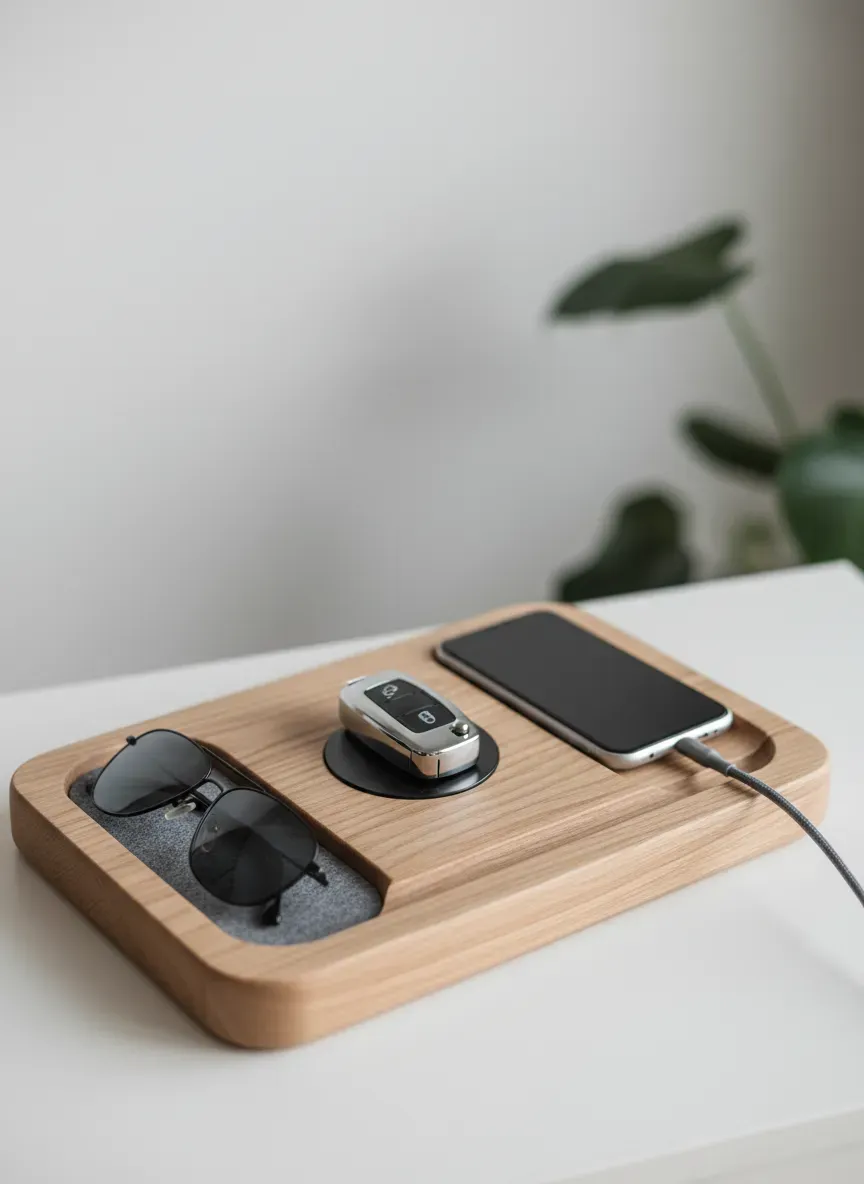
Every home suffers from localized kinetic friction. You enter carrying the mail, your phone, sunglasses, a half-empty coffee thermos, and your car keys. To successfully organize this daily influx of varying objects, a built-in drop zone must respect the different physical profiles of what we carry.
Keys are jagged, heavy, and visually noisy. Mail is flat, slippery, and multiplies rapidly. Sunglasses require scratch-free soft zones.
If you’re dealing with limited square footage, optimizing this initial workflow is critical. Mapping out smart spatial strategies for tight entryways often proves to be step one before you even pick up a tape measure. You need to identify the exact spot where your momentum naturally pauses. Usually, this is just past the swing radius of the front door, adjacent to where you’d instinctively sit to remove a shoe.
Deconstructing the Perfect Built-In Drop Zone
When integrating a drop zone into custom cabinetry or a dedicated mudroom bench setup, you must isolate the “landing pad” from the heavier storage elements like winter coats or muddy boots.
Spatial Geometry & Placement
The ideal height for a drop zone counter or primary shelf lands between 36 and 42 inches from the floor. This matches standard kitchen counter or bar height, allowing you to slide items off your hands without bending your elbows awkwardly.
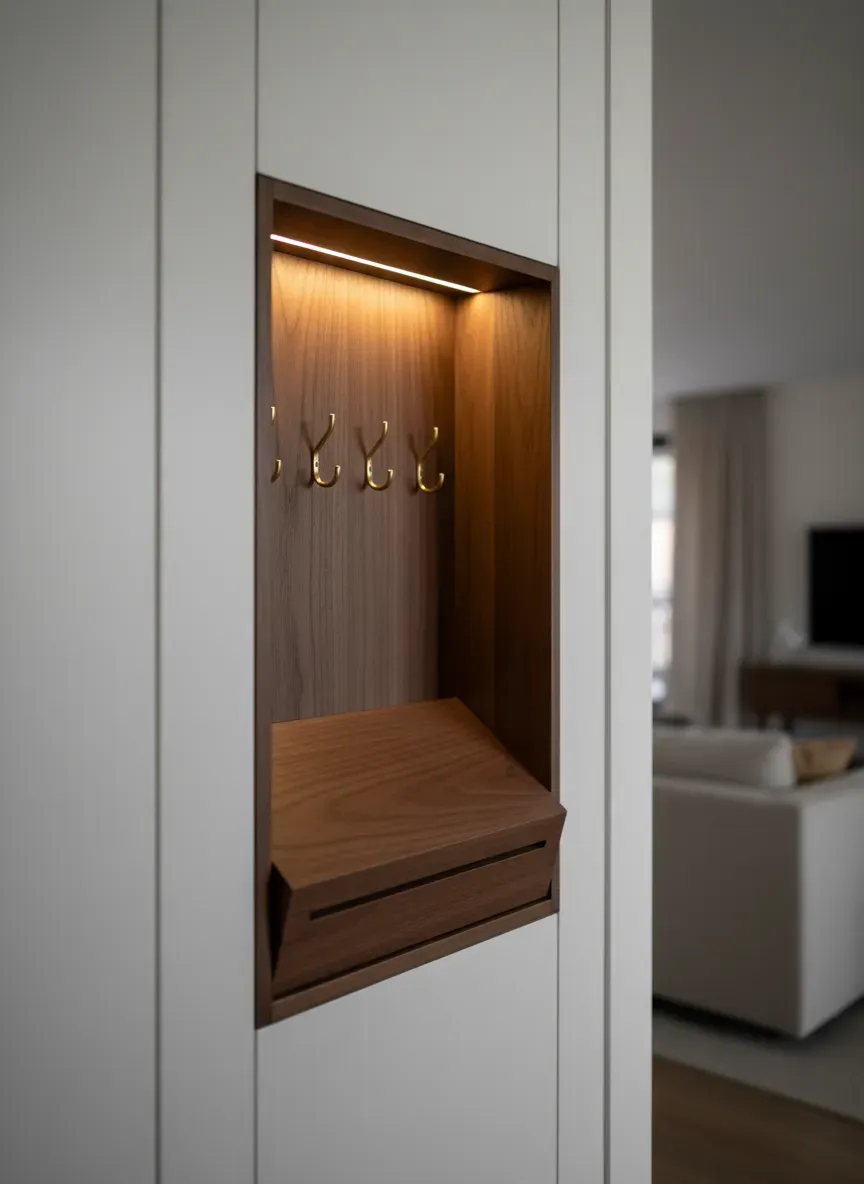
I typically advise framing out a dedicated niche within your larger built-in unit specifically for this purpose. Imagine a tall, floor-to-ceiling wardrobe cabinet. Instead of a solid door running the entire length, you break it up. The bottom handles footwear. The top handles out-of-season gear. The middle is left open as an illuminated, recessed cubby. This open middle zone is your command center.
Material Selection and Tactile Feedback
Never overlook acoustics. Dropping a heavy ring of brass keys onto a bare wooden shelf creates a sharp, jarring noise. Over time, those same keys will gouge the finish of painted MDF or soft woods like pine.
You want a surface that absorbs impact. Consider lining the floor of your built-in niche with a fitted piece of dense, vegetable-tanned leather, heavy-duty felt, or a resilient linoleum pad. Not only does this protect the cabinetry, but it visually defines the exact perimeter of the drop zone. It sends a subconscious psychological cue: this specific rectangle is where the keys belong.
Designing the Mail Sorter System
The paper avalanche is the single greatest threat to a clean foyer. The problem isn’t the mail itself. The problem is a lack of an immediate decision matrix. We bring in envelopes, drop them in a pile, and walk away.
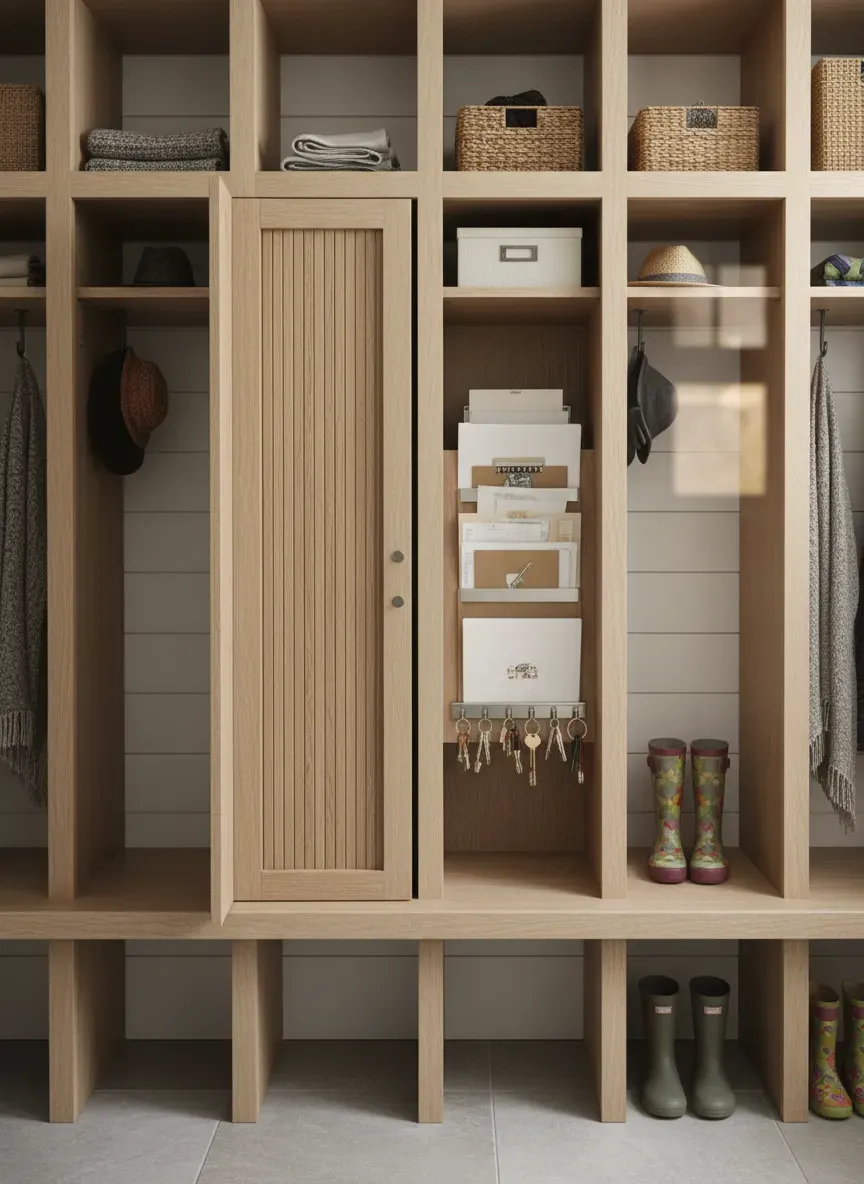
To combat this, your built-in must feature a tiered triage system.
The Triage Approach: Action, File, Shred
A flat tray is a graveyard for correspondence. You need vertical slots. By forcing envelopes to stand upright, you maintain visibility on pending action items and prevent the dreaded stacking effect.
Design your built-in millwork with a minimum of three distinct vertical dividers.
- Action: Bills to pay, invitations to RSVP to, urgent notices.
- File: Important documents that need to be moved to the home office.
- Outgoing: Mail waiting for the postman.
Trash and junk mail should never even touch the drop zone. Integrate a concealed, pull-out recycling bin directly beneath the mail sorter. The workflow becomes seamless: you sort the mail while standing at the built-in, immediately dropping catalogs and flyers into the recycling bin below before they can clutter your counter.
Pro Tip: Design the base of your mail slots with a subtle downward slant—around 5 degrees—tilting toward the back of the cabinet. This slight angle utilizes gravity to prevent glossy magazine covers and slippery envelopes from cascading forward onto the floor.
Concealment Strategies
Some homeowners despise the look of visible paper, no matter how neatly it stands. If that sounds like you, consider a tambour door or a slim, top-hinged opaque glass panel that easily glides down to hide the mail slots. You maintain the functionality of the triage system while preserving a minimalist exterior.
When I drafted a comprehensive blueprint for a 5x6 mudroom space, embedding the mail and key vault behind a mirrored, push-to-open cabinet door completely transformed the room’s visual weight. The clutter vanished, yet it remained instantly accessible.
Key Management: Beyond the Basic Hook
Keys possess an incredibly awkward physical footprint. The modern keychain often features a bulky plastic car fob, gym tags, and house keys. A standard, shallow coat hook won’t cut it.
Hook Spacing and Clearances
If you are mounting hardware directly into your built-in woodwork, you must calculate clearance aggressively. Allow at least 2.5 inches of horizontal spacing between each key hook. If you cluster them too tightly, removing one set of keys will inevitably knock the adjacent set to the floor.
Furthermore, ensure there is at least 6 to 8 inches of vertical clearance below the hook so long lanyards don’t pool onto the counter surface below.
Magnetic Boards vs. Hidden Cabinets
I’ve recently pivoted toward magnetic key management for my clients. It looks cleaner and requires less precision from the user.
By embedding powerful neodymium magnets behind a thin veneer of wood or a solid surface material like Corian, you create a “magic” wall. You simply toss your keys against the wood, and they stick perfectly. No fumbling with loops or hooks in the dark.
For a ready-made solution that mimics this sleek aesthetic, I highly recommend looking at the Yamazaki Home Magnetic Key Organizer. It slaps right onto any steel door or can be mounted inside a cabinet, offering a brilliant hybrid of a tiny mail shelf and strong magnetic key hooks beneath. It’s incredibly low-profile, making it perfect for hyper-modern spaces.
Alternatively, if you prefer the warmth of natural materials, the Kurrajong Farmhouse Wood Mail Holder offers deep pockets for heavy catalogs and sturdy, widely spaced metal hooks that can handle the heaviest set of brass keys without flexing.
Integrating Tech into Your Entryway Command Center
We don’t just drop analog items anymore. We dock massive electronic ecosystems. Phones, smartwatches, wireless earbuds, and even rechargeable flashlights end up dumped by the front door.
If your built-in drop zone lacks power, you’ll end up with a tangled rat’s nest of white lightning cables draped over your pristine millwork.
Charging Stations and Cable Management
During the construction or retrofitting of your entryway built-in, have an electrician run a dedicated 15-amp circuit to the interior of the drop zone niche.
Install receptacles equipped with direct USB-C and USB-A ports to eliminate the need for bulky charging bricks. To take it a step further, integrate a flush-mounted wireless charging pad directly into the countertop of the drop zone. Companies now manufacture inductive chargers designed to be routed into the underside of a wooden shelf. You simply set your phone down on the wood, and it begins charging through the material.
If flush-mounting isn’t in the budget, use a modular tray like the Umbra Estique Wall Organizer. While primarily a mail and key holder, its perforated metal basket is perfect for holding a multi-device charging bank, while the wiring can be cleanly zip-tied behind its frame.
For hardwired setups, utilize brushed metal desk grommets to route cables cleanly down through the shelving into a concealed lower cabinet where the actual power strip lives. Out of sight, perfectly charged.
Micro-Zoning for Multiple Family Members
A communal drop zone quickly degenerates into a turf war. If four people share one generic mail slot and a single hook rail, someone’s keys are getting lost under someone else’s electric bill.
You have to architect individual accountability.
Just as you would allocate individual cubbies for footwear—perhaps utilizing an ultra-slim profile shoe cabinet to preserve precious floor space—you must create dedicated vertical slots for each person’s mail and EDC.
Labeling doesn’t have to look like a preschool cubby. Use subtle visual cues. Assign a specific wood tone, a numbered brass plaque, or distinct hook finishes (matte black for you, brushed nickel for your partner) to designate ownership. When everyone has an assigned, unencroachable 8-inch wide territory within the built-in, the system maintains its integrity.
Advanced Customization Techniques
The difference between a functional built-in and a breathtaking piece of architectural millwork often comes down to lighting and security.
Lighting the Drop Zone
Shadows breed clutter. If your built-in niche is dark, it feels like a cavern, and you’ll treat it like a dumpster.
You need dedicated task lighting. Recess a continuous LED channel into the upper interior lip of the drop zone. Choose a color temperature of around 3000K—it provides a crisp, warm-white light that accurately renders colors (so you can distinguish between the black car fob and the black flashlight) without feeling sterile or clinical.
Pro Tip: Wire this LED strip to a concealed micro-motion sensor. When you reach your hand into the niche to grab your keys at 6:00 AM, the light softly fades on automatically. It’s a small detail that elevates the entire experience of leaving the house.
Security: The Hidden RFID Safe
We drop highly sensitive items at the front door. Passports, wallets, checkbooks, and keyless entry car fobs.
Modern car theft often involves thieves using relay devices from your front porch to amplify the signal of your key fob sitting just inside the door, unlocking your car in the driveway.
To combat this, integrate a small, discreet Faraday cage or RFID-blocking drawer into the millwork. A shallow, felt-lined drawer equipped with a biometric fingerprint latch offers incredible peace of mind. You slide your wallet and keys inside, press your thumb to the sensor, and know your digital and physical assets are secure from both signal hijacking and opportunistic snatch-and-grab burglaries.
Troubleshooting Common Entryway Pitfalls
Even the most impeccably designed systems require fine-tuning. Let’s look at where things usually go wrong after the honeymoon phase of a new built-in wears off.
The Phenomenon of Clutter Creep
You’ll notice that horizontal surfaces act like magnets for unrelated objects. A drop zone designed for mail and keys suddenly becomes home to half-read paperbacks, dog leashes, and returned packages.
Combat clutter creep through strict spatial restriction. Do not make the drop zone counter too deep. A depth of 8 to 10 inches is perfect. It is deep enough to hold a standard envelope (which is roughly 4 to 9 inches long) and a bowl for keys, but too shallow to comfortably balance a cardboard shipping box or a stack of library books.
By physically starving the space of excess real estate, you prevent the accumulation of bulky items.
Misaligned Ergonomics
If you find yourself constantly bumping your elbow against the mail sorter when putting on your coat, the sequence of your built-in is flawed.
The drop zone should always be positioned closest to the door hinge side if possible, or immediately adjacent to the primary walkway. Coat hooks and boot benches require wider physical stances and swinging arm motions. Keep the fine-motor-skill zone (keys and mail) physically separated from the gross-motor-skill zone (coats and boots) by at least 18 inches of buffer space or a vertical partition.
Maintaining the Architecture of Order
A high-functioning built-in drop zone fundamentally alters the rhythm of your home. It creates a physical boundary between the chaos of the outside world and the sanctuary of your interior space.
But a system is only as robust as the habits it supports.
Establish a weekly reset protocol. Every Sunday evening, empty the recycling bin beneath the mail sorter. Move the “Action” documents that have been resolved to the long-term file cabinet. Wipe down the leather landing pad.
When you treat this micro-space with respect, it pays massive dividends in your daily mental clarity. You will never again experience that unique spike of adrenaline that comes from frantically tearing through couch cushions looking for your car keys five minutes after you were supposed to leave.
The Bottom Line Designing a dedicated mail and key drop zone is an exercise in intentionality. It demands an understanding of your personal habits, the physical dimensions of what you carry, and a willingness to commit specific architectural space to solve a universal daily friction point. Keep it shallow, keep it illuminated, and prioritize vertical sorting over horizontal stacking.
Key Takeaways
- Intercept the Trajectory: Place the drop zone exactly where your forward momentum naturally stops upon entering the home.
- Vertical Triage is Mandatory: Never allow mail to lay flat. Use slanted, vertical dividers to categorize actionable mail versus archival documents.
- Protect the Surface: Utilize acoustic and protective padding like leather or heavy felt to prevent keys from damaging your custom millwork.
- Integrate Concealed Power: Hardwire your drop zone with USB-C ports and inductive charging pads to keep device ecosystems organized and visually clean.
- Individualize the Space: Assign specific zones, hooks, or slots to individual family members to prevent cross-clutter and establish accountability.