Diy Entryway Locker Plans: How to Build the Ultimate Mudroom Storage
Transform your chaotic mudroom with these professional-grade DIY entryway locker plans. Step-by-step build instructions, material selection, and expert tips.
Jun 26, 2026 · Linda Wise
5 min readThe daily scramble at the front door is a universal headache. Keys vanish, backpacks form a tripping hazard across the threshold, and shoes pile up in an unorganized mound. If your home lacks a dedicated transition zone, your entryway quickly turns into a cluttered bottleneck.
Building your own custom mudroom lockers is the ultimate remedy for this daily chaos. Standard, store-bought hall trees rarely maximize your unique layout, often leaving awkward gaps or failing to provide enough vertical storage. A custom DIY build allows you to design to the exact inch, matching your home’s architectural style while creating dedicated zones for every member of the household.
Before sawdust starts flying, preparation and having the right tools on hand will make or break your build. Here is a quick look at three essential products that will elevate your construction process and ensure a professional finish.
Quick Comparison: Top Picks
| Product | Rating | Check Price |
|---|---|---|
| Kreg Pocket Hole Jig 720PRO | ⭐⭐⭐⭐⭐ | View on Amazon |
| Franklin Brass Heavy Duty Coat Hooks | ⭐⭐⭐⭐½ | View on Amazon |
| DEWALT 20V MAX Brad Nailer | ⭐⭐⭐⭐⭐ | View on Amazon |
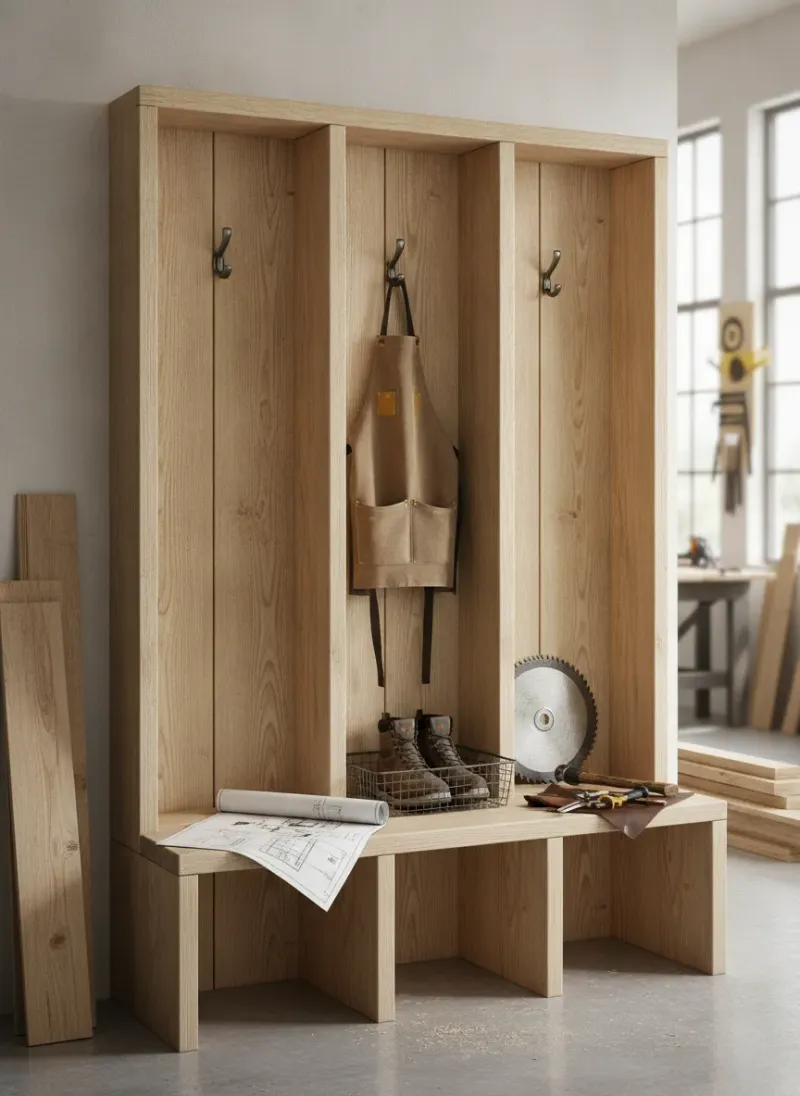
1. Anatomy of an Ergonomic Mudroom Locker System
A truly functional mudroom locker system is not just a collection of tall wooden boxes. It is an exercise in practical ergonomics. If the bench is too high, children cannot climb up to put on their shoes. If the cubbies are too shallow, winter coats will spill forward, preventing closet doors from closing or simply hanging out into the walkway.
+--------------------------------------------------+  --
|                 Upper Cabinets                   |   | 12" - 18"
+--------------------------------------------------+  --
|                                                  |   |
|                                                  |   |
|                 Locker Openings                  |   | 45" - 50"
|                 (Hook Section)                   |   |
|                                                  |   |
|                                                  |   |
+--------------------------------------------------+  --
|                  Bench Top                       |   | 18" Height
+--------------------------------------------------+  --
|                 Lower Shoe Cubbies               |   | 14" - 16"
+--------------------------------------------------+  --
|                    Toe Kick                      |   | 3" - 4"
+--------------------------------------------------+  --
Key Dimensional Benchmarks
When planning your cut list, stick to these industry-standard dimensions for a comfortable, built-in look:
- Overall Height: Typically 84 to 96 inches. Aligning the top cabinet with your room’s door frames or running it all the way to the ceiling with crown molding creates a seamless, built-in aesthetic.
- Bench Height: 18 inches from the finished floor is the sweet spot for comfortable sitting.
- Bench Depth: 15 to 18 inches. Anything shallower feels like a perch; anything deeper eats up precious floor space.
- Locker Depth: 12 to 14 inches for the upper cabinet and hook section. This offset from the bench depth leaves a natural ledge to sit on.
- Locker Width: 12 to 18 inches per bay. If you are building for a family of four, a unit width of around 60 inches is ideal, giving each person roughly 14 inches of dedicated width.
As you plan out your locker dimensions, consider how this built-in will interface with other components of your home’s entrance. For example, modern setups benefit from integrating smart home tech into your entryway, such as smart lighting, charging stations hidden inside individual locker bays, or automated security keypads.
2. Selecting the Right Materials: Plywood vs. MDF
Do not build a mudroom locker out of standard framing lumber. Construction-grade 2x4s and 2x6s are prone to twisting, warping, and shrinking as they acclimate to your home’s climate. Instead, turn to sheet goods for the structural cabinet carcass and premium hardwood or high-grade plywood for the bench top and face frames.
Cabinet-Grade Plywood (The Gold Standard)
I highly recommend using 3/4-inch hardwood plywood (such as Birch, Maple, or Oak) for the main structural panels. Cabinet-grade plywood features alternating layers of wood veneer laminated together, making it incredibly stable, strong, and highly resistant to warping.
- Pros: Holds screws exceptionally well, can be stained or painted, durable in high-moisture environments.
- Cons: More expensive than alternative materials; requires edge banding on exposed edges if you are not installing a solid wood face frame.
Medium-Density Fiberboard / MDF (The Budget Paint-Grade Option)
MDF is a popular choice for budget-conscious builders who plan to paint their entire unit. It has a perfectly smooth surface that takes paint beautifully without any grain texture showing through.
- Pros: Highly cost-effective, perfectly flat, consistent density with no voids or knots.
- Cons: Extremely heavy, dulls saw blades quickly, generates fine, toxic dust when cut, and swells permanently if exposed to standing water (such as melting snow from wet winter boots).
Solid Hardwoods (The Accent & Bench Surfaces)
For the bench top, which will take the brunt of daily abuse from metal zippers, dog claws, and heavy grocery bags, solid hardwood is the undisputed king. White oak, maple, or walnut are excellent options. You can glue up several boards to create a thick, custom butcher-block bench that stands out as a beautiful design contrast against painted cabinet carcasses.
Pro Tip: If your budget is tight, build the main carcass out of paint-grade maple plywood and use solid wood only for the bench top and face frames. This gives you the high-end look of solid wood where it matters most, while keeping material costs manageable.
3. Designing for the Space: Assessing Your Footprint
Before you buy a single sheet of plywood, you must analyze your entryway’s footprint. The layout of your home will largely dictate the configuration of your locker system.
The Mudroom vs. The Hallway
If you have a dedicated mudroom or a wide-open laundry transition zone, you have the luxury of depth. You can build deep lockers with swing-out cabinet doors to hide winter coats completely out of sight.
However, if your project is going into a main corridor or front foyer, you must be careful not to choke off the walkway. If you are dealing with tight clearances, you may want to look into specific solutions for narrow hallways, such as choosing a shallower bench depth (12 to 14 inches) or utilizing open-backed cubbies with wall-mounted hooks to maximize every fraction of an inch.
Baseboards and Electrical Outlets
The two most common obstacles in any entryway project are existing wall trim and electrical wall plates.
- Baseboards: Never build over your baseboards. For a true built-in look, you must carefully pry the existing baseboard and shoe molding off the wall where the locker will sit. Once the cabinet is installed, you can reinstall or wrap the trim around the base of your locker plinth.
- Outlets: If your lockers will cover an electrical outlet, you have two choices: hire an electrician to relocate the box, or cut precise access holes in the back of your plywood panels to pull the outlets forward, mounting them inside the locker cubbies to create integrated charging stations.
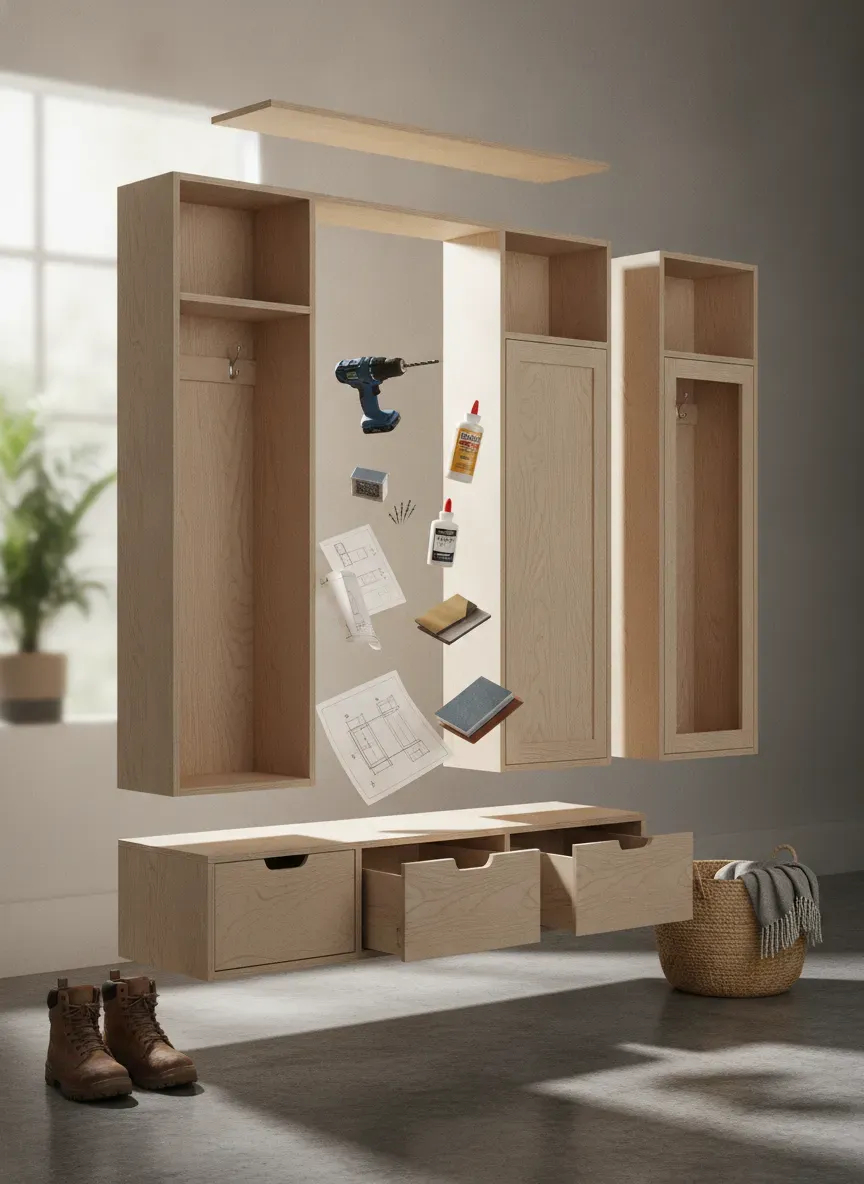
4. Step-by-Step Construction Guide
This step-by-step plan outlines how to construct a classic, three-bay mudroom locker system with lower shoe cubbies, a solid wood bench top, open middle locker bays, and upper cubbies with flip-up cabinet doors.
       [   Upper Cabinet 1   ][   Upper Cabinet 2   ][   Upper Cabinet 3   ]
       ===================================================================
       |                     ||                     ||                     |
       |                     ||                     ||                     |
       |  Locker Bay 1       ||  Locker Bay 2       ||  Locker Bay 3       |
       |  (Hooks on Back)    ||  (Hooks on Back)    ||  (Hooks on Back)    |
       |                     ||                     ||                     |
       |                     ||                     ||                     |
       ===================================================================
       [======================== Solid Wood Bench =========================]
       |  Shoe Cubby  |  Shoe Cubby  |  Shoe Cubby  |  Shoe Cubby  |  Shoe  |
       -------------------------------------------------------------------
       [=========================== Toe Kick ==============================]
Required Tools & Materials
- Table saw or circular saw with a high-tooth-count plywood blade
- Track saw guide (highly recommended for making straight cuts on large sheets)
- Kreg Pocket Hole Jig 720PRO
- DEWALT 20V MAX Brad Nailer
- 1-1/4” pocket hole screws (coarse thread for plywood/MDF)
- 1-1/4” and 2” brad nails
- Premium wood glue
- Wood filler and caulk
- Orbital sander with 120, 150, and 220-grit sandpaper
Step 1: Building the Base Plinth (The Foundation)
A solid, level foundation is critical. If your base is unlevel, your entire cabinet system will twist, throwing off door alignments and causing structural gaps.
Instead of building the bottom storage box directly on the floor, construct a separate base plinth out of utility-grade 2x4s or 3/4-inch plywood strips. Build a simple ladder-frame box that matches the footprint of your lower bench cabinet, minus 3 inches in the front for a toe-kick recess.
  +--------------------------------------------+
  |                   2x4 Frame                |
  |  +--------------------------------------+  |
  |  |                                      |  |
  |  |           Cross Braces               |  |
  |  |   [===]    [===]    [===]    [===]   |  |
  |  |                                      |  |
  |  +--------------------------------------+  |
  |               Toe Kick Recess              |
  +--------------------------------------------+
Position this frame on the floor against the wall studs. Use plastic shims to level the frame perfectly from front to back and side to side. Once level, anchor the plinth securely into the wall studs using 3-inch construction screws.
Step 2: Constructing the Lower Shoe Bench Cabinet
The lower cabinet sits directly on top of the base plinth and serves as both shoe storage and the bench support.
- Cut the bottom panel, top support cleats, and vertical dividers out of 3/4-inch plywood.
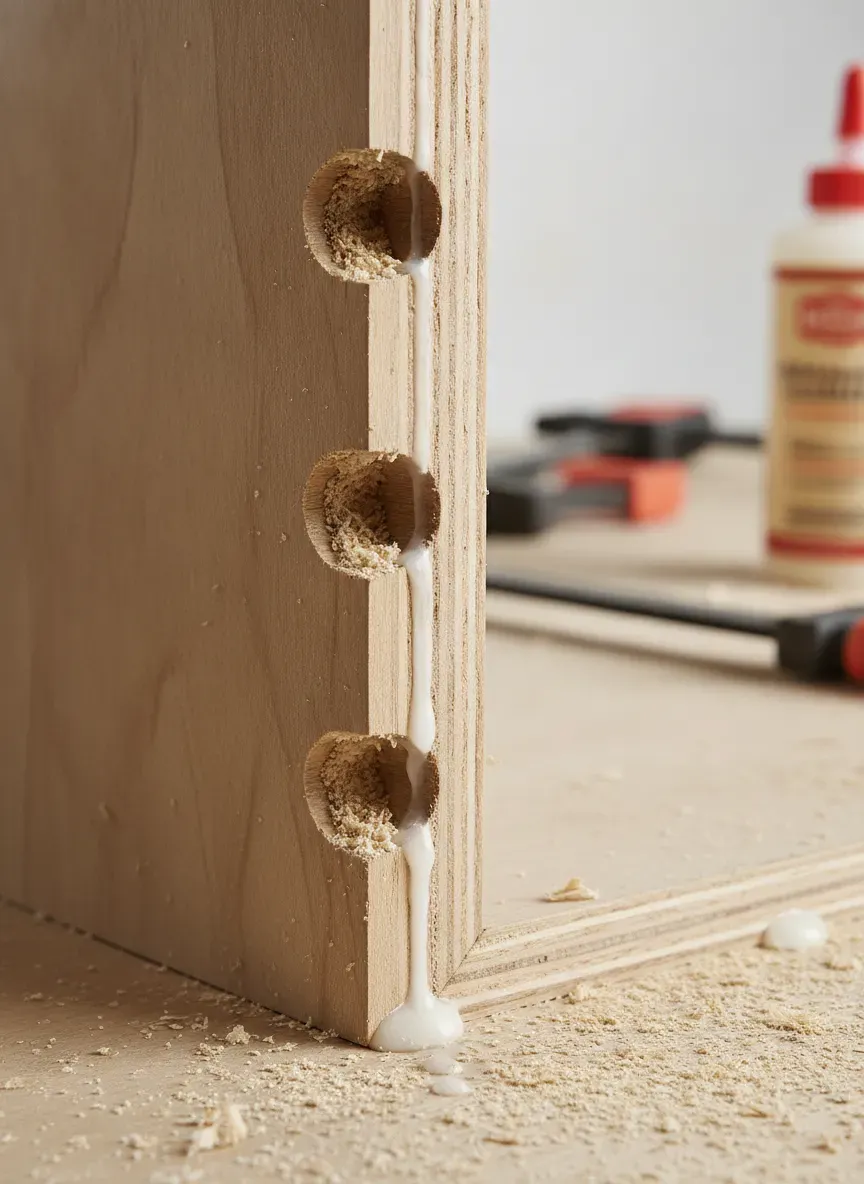
- Drill pocket holes along the top and bottom edge of the vertical dividers.
- Assemble the lower cabinet carcass using high-quality wood glue and 1-1/4 inch pocket hole screws. Ensure that all intersections are square by checking them with a speed square.
- Secure the lower carcass to the base plinth by driving screws from the inside bottom of the cabinet down into the 2x4 frame.
Step 3: Preparing and Installing the Bench Top
Your bench top must be prepped and finished before you install the upper locker towers. This prevents paint from transferring to your stained wood top and makes assembly much easier.
Cut your solid wood or stain-grade plywood bench top so it overhangs the front of your lower cabinet carcass by 3/4 of an inch. If you are using plywood, apply solid hardwood edge banding to the exposed front edge to cover the unsightly plywood layers.
Sand the bench top starting at 120-grit, working your way up to 220-grit. Apply your preferred stain and finish (a durable polyacrylic or hard-wax oil is highly recommended for bench surfaces). Once cured, secure the bench top to the lower cabinet by driving 1-1/4 inch wood screws up from the underside of the lower cabinet carcass, ensuring the screws do not pierce the top surface.
Step 4: Fabricating the Upper Locker Towers
The upper section features individual locker bays and top cubbies.
To keep this project manageable for a single DIYer, build the upper section as a single cohesive unit on the floor, then lift it onto the bench top.
- Cut the outer side panels, top panel, bottom panel, and vertical dividers to size out of 3/4-inch plywood.
- Crucial safety step: When building cabinets, mastering essential DIY furniture building techniques is key. Always pre-drill your pocket holes on the outside of the cabinet carcass if they will be hidden by walls, or on the underside of shelves where they will be out of normal sightlines.
- Apply wood glue to the joints, insert your panels, and clamp them tightly before driving your 1-1/4 inch pocket hole screws. Clamping is non-negotiable here; pocket hole screws have a habit of pulling joints slightly out of alignment if they aren’t clamped solid.
- Cut a 1/4-inch plywood backing panel to fit the entire back of the upper unit. Apply a bead of glue along the back edges of the dividers and nail the backing panel in place using a brad nailer and 1-inch brad nails. This backing panel squares the entire unit and prevents it from racking.
Step 5: Raising and Securing the Upper Units
With a helper, carefully lift the upper locker assembly and set it onto the installed bench top. Push the unit flush against the back wall.
Ensure the upper unit is plumb (perfectly vertical) using a long spirit level. Secure the upper unit by driving 3-inch cabinet screws through the upper back support rail, passing through the 1/4-inch back panel and drywall directly into your wall studs.
Additionally, drive 1-1/4 inch screws from the bottom shelf of the upper cabinet down into the bench top to lock the two assemblies together.
Step 6: Crafting and Installing the Face Frame
A face frame covers the raw plywood edges of your cabinet carcass and ties the separate upper and lower units together, giving the entire assembly a professional, cohesive look.
       +--------------------------------------------+  <- 1x3 Top Rail
       | [ ] Face Frame Stile (Vertical)            |
       |  |                                      |  |
       |  |                                      |  |  <- 1x2 Stiles cover
       |  |                                      |  |     plywood edges
       |  |                                      |  |
       +--+--------------------------------------+--+  <- 1x2 Mid Rail
       |               Bench Top                    |
+--------------------------------------------+- Rip 1x2 solid hardwood lumber (such as poplar for paint-grade or maple for stain-grade) to fit your cabinet face.
- Assemble the face frame on a workbench using pocket hole joinery.
- Apply a thin bead of wood glue to the front edges of the cabinet plywood.
- Align the face frame with the cabinet edges and secure it using a brad nailer with 2-inch brad nails. Sink the nails slightly below the wood surface so they can be filled later.
5. Sanding, Painting, and Professional Finishing
The difference between a “DIY-looking” project and a professional, high-end installation lies entirely in your finishing process.
The Art of Wood Prep
Do not rush to slap paint on your new locker system. First, fill all brad nail holes and any minor joint gaps with a high-quality, non-shrinking wood filler. Once dry, sand all filled areas flush.
Using an orbital sander, sand all plywood surfaces with 150-grit sandpaper, then finish with 220-grit. Wipe down the entire unit with a tack cloth to remove every speck of dust. If you are painting, apply a high-quality primer. MDF and plywood are incredibly thirsty; a dedicated primer seals the wood fibers and prevents your topcoat from soaking in unevenly.
Choosing the Right Paint
Avoid cheap latex wall paints for cabinetry. They remain slightly tacky even when dry, which leads to a phenomenon called “blocking,” where items like books or storage baskets stick to the shelves and peel the paint away.
Instead, invest in a premium acrylic alkyd enamel paint. This paint applies with the ease of water-based formulas but dries to a hard, durable finish that mimics oil-based paint, providing superior resistance to scuffs, moisture, and fingerprints.
Installing Hardware
Once your final coat of paint has cured for at least 48 hours, it is time to install your hardware.
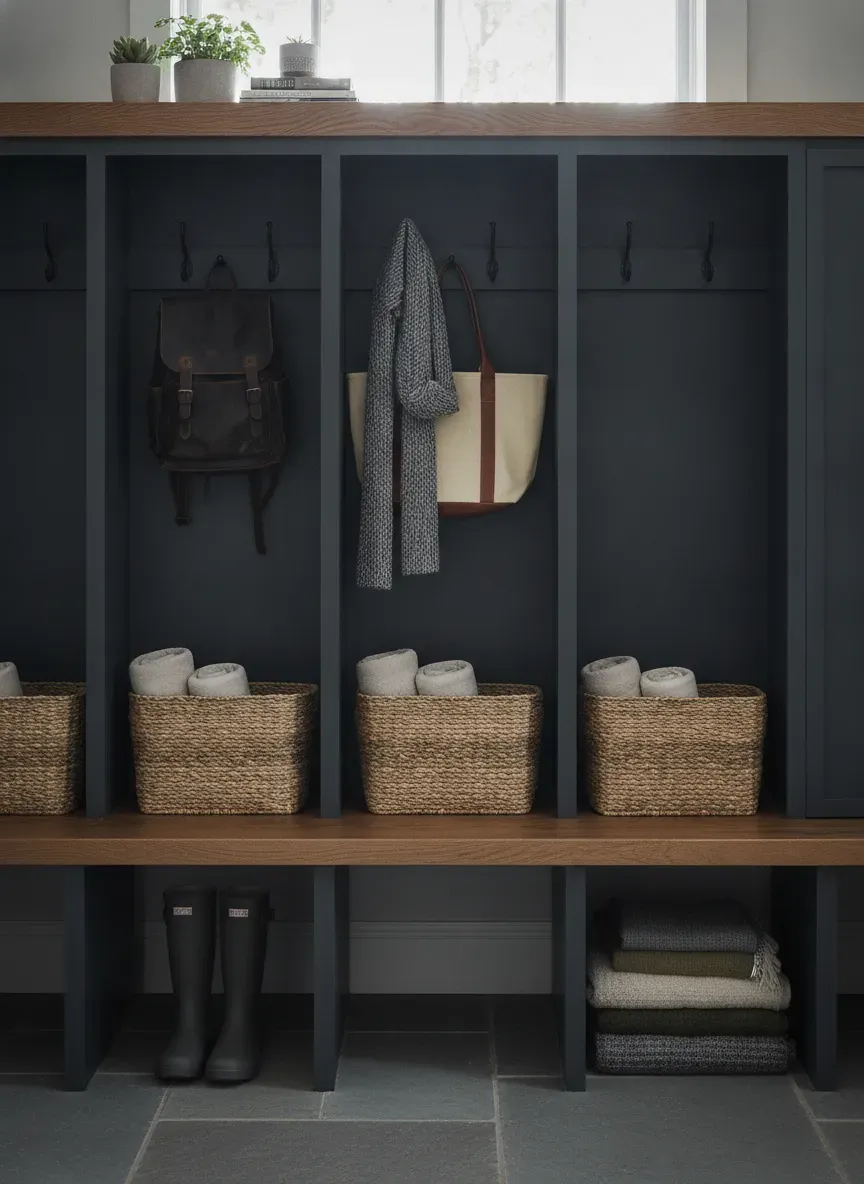
To prevent splitting your freshly painted wood, always pre-drill pilot holes before driving screws for hooks, cabinet knobs, or hinges. When mounting your main hooks, choose a heavy-duty option like Franklin Brass Heavy Duty Coat Hooks. These dual-prong hooks are designed to handle heavy winter coats and backpacks without bending or pulling loose from the backing board.
To ensure your hooks are mounted at a comfortable height for all family members, consider the ideal height for hanging coat hooks. Placing a few lower hooks in one of the bays allows younger children to easily hang up their own gear.
6. Common Pitfalls & Structural Best Practices
Before you make your first cut, keep these structural realities in mind to ensure your project goes smoothly.
The Myth of Straight Walls
Never assume your home’s walls are flat, or that your corners are a perfect 90 degrees. They aren’t. If you build your locker unit to the exact width of your alcove, you will likely get it wedged halfway during installation.
- The Fix: Always design your locker system to be roughly 1/2 to 1 inch narrower than the total space available if building in an alcove. Use filler strips (pieces of face-frame material cut slightly wider than the gap) to bridge the space between the cabinet frame and your out-of-plumb walls. You can scribe these filler strips to match the exact contour of your wall for a perfect, custom fit.
Insufficient Structural Anchoring
A fully loaded mudroom locker system is incredibly heavy. When you add the weight of several family members sitting on the bench and heavy backpacks hanging from the hooks, the forces pulling the unit forward are immense.
- The Fix: Never rely on drywall anchors or toggle bolts. Your upper locker unit must be anchored directly into the wall studs using heavy-duty 3-inch cabinet screws. Use a stud finder to locate the studs before lifting the upper cabinet into place, and mark their locations clearly on your cabinet backing board.
Overlooking Proper Ventilation
Wet boots and soggy rain jackets generate significant moisture. If you build tight, enclosed shoe cubbies without air circulation, you are creating a prime breeding ground for mold, mildew, and unpleasant odors.
- The Fix: Keep shoe cubbies open in the front. If you prefer a cleaner look with doors, select decorative wire-mesh inserts or louvers instead of solid wood panels to allow proper airflow.
Key Takeaways
- Opt for cabinet-grade plywood for the structural carcass to ensure stability, and reserve solid hardwoods for high-traffic surfaces like the bench top.
- Always build a separate base plinth out of 2x4s, leveling it perfectly before installing the main cabinets.
- Use acrylic alkyd enamel paint rather than standard wall paint to prevent sticky shelves and peeling.
- Anchor your locker system directly into wall studs using heavy-duty construction screws to ensure safety.
The Bottom Line: Building your own entryway lockers is an investment of time, patience, and attention to detail. However, the payoff is immense. By customizing your dimensions, choosing durable materials, and executing a professional finish, you will transform a chaotic, cluttered entryway into an organized, beautiful, and highly functional hub that adds genuine value to your home.
Top Picks: Best Entryway Essentials
Editor's shortlist with verified ratings. Prices and availability below — clicking an Amazon link earns us a small commission at no extra cost to you.
| # | Product | Rating | Reviews | Tag | Check Price |
|---|---|---|---|---|---|
| 1 | Vasagle Industrial Entryway Bench | 8,420 | Top Pick | View on Amazon | |
| 2 | Crosley Furniture Seaside Hall Tree | 5,410 | — | View on Amazon | |
| 3 | Seville Classics 12-Pair Shoe Rack | 6,420 | Best Storage | View on Amazon | |
| 4 | Franklin Brass Wall Hooks (5-Pack) | 9,820 | — | View on Amazon | |
| 5 | Simplihome Artisan Solid Wood Bench | 3,127 | Editor's Pick | View on Amazon |
Affiliate disclosure: As an Amazon Associate we earn from qualifying purchases.
Tag: entreyway-20 — change in src/data/topPicks.ts.