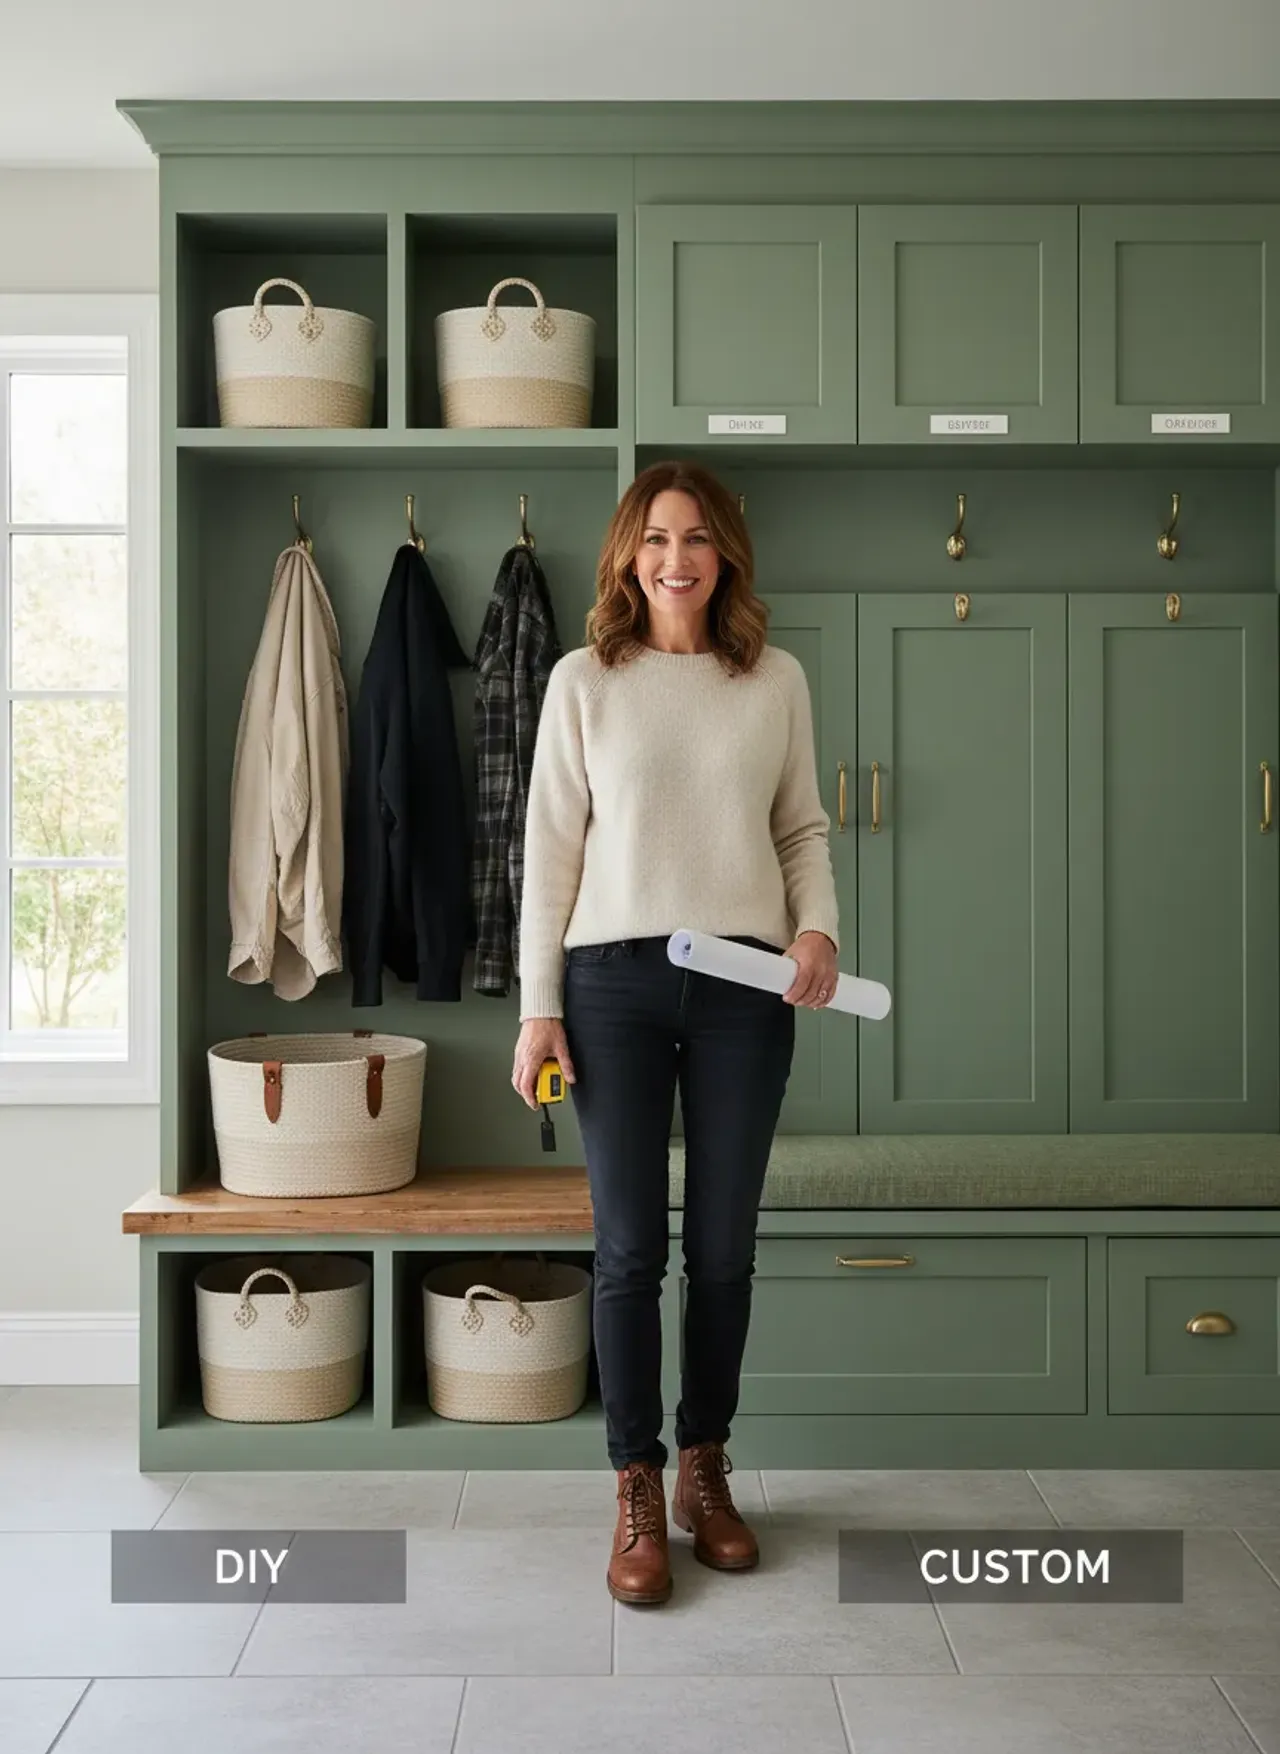
DIY vs. Custom: The Ultimate Guide to Built-In Mudroom Bench and Lockers
Debating between building your own entryway storage or hiring a pro? Discover the exact costs, skill requirements, and hidden pitfalls in this comprehensive guide.
Mar 14, 2026 - Written by: Linda Wise
I’ve personally stood in the exact spot you’re standing right now. You are staring at a chaotic pile of winter coats, discarded boots, half-crushed backpacks, and a rogue umbrella that somehow always ends up exactly where you need to step. You know a built-in mudroom bench and locker system is the silver bullet to this daily logistical nightmare.
The real question keeping you up at night isn’t whether you need this organizational marvel, but how it should come to life. Do you spend your upcoming weekends buried in sawdust, wielding a brad nailer and a pocket-hole jig? Or do you open your wallet, hire a bespoke cabinetmaker, and let the professionals handle the millwork?
This isn’t a simple binary choice. The chasm between a weekend warrior DIY project and a high-end custom installation is vast, fraught with hidden expenses, underestimated timelines, and compromises in material durability. I’ve built my own entryway systems from scratch, and I’ve also managed high-end residential carpentry crews. I’ve seen the spectacular successes and the agonizing, crooked-faced-frame failures.
Before we tear down the drywall, let’s look at a few indispensable components that will elevate your mudroom, whether you build it yourself or write a check.
Quick Comparison: Top Picks
| Product | Rating | Check Price |
|---|---|---|
| Heavy-Duty Rustic Coat Hooks | ⭐⭐⭐⭐⭐ | View on Amazon |
| Kreg Pocket-Hole Jig 720PRO | ⭐⭐⭐⭐½ | View on Amazon |
| INSL-X Cabinet Coat Enamel | ⭐⭐⭐⭐⭐ | View on Amazon |
The Psychology of the Drop Zone
To understand why the construction quality of a mudroom matters, you have to understand its function. The mudroom is the architectural airlock between the wild, unpredictable outside world and the sanctuary of your home. It absorbs the brunt of your family’s kinetic energy.
Kids do not gently hang up their backpacks; they aggressively sling them onto hooks. Winter boots covered in corrosive road salt and melting slush are kicked carelessly against baseboards. The bench itself becomes a staging area for 50-pound bags of dog food, Amazon deliveries, and squirming toddlers.
If you build a flimsy structure, it will fail. A bench top made from cheap, low-density MDF will swell and bubble the second water pools on it. Hooks screwed exclusively into half-inch drywall without blocking will rip out within a week, leaving gaping, jagged craters. You aren’t just building furniture. You are building high-traffic, impact-resistant infrastructure.
This brings us to the core debate: DIY vs. Custom. Let’s dissect the realities of each path.
Going the DIY Route: Sweat Equity and Power Tools
There is a distinct, intoxicating allure to building your own mudroom lockers. You’ve probably seen the highly edited time-lapse videos on Instagram where a homeowner turns a blank wall into a gorgeous, shiplap-backed locker system in what appears to be 45 seconds. The reality requires a bit more nuance.
The Allure of the Weekend Warrior Project
The primary driver for DIY is, undeniably, cost savings. Custom cabinetry is notoriously expensive because you are paying for highly skilled labor, overhead, and insurance. By eliminating labor costs, you can ostensibly cut your budget by 60% to 70%.
You also gain absolute creative autonomy. Want a hidden compartment for your keys? Build it. Want the bench to be precisely 18.5 inches high to accommodate a specific set of vintage woven baskets you found at a flea market? You hold the tape measure.
The Skill Requisites and Hidden Pitfalls
Here is the real kicker: carpentry is an unforgiving discipline. Building a mudroom locker system is essentially building frameless or face-framed cabinetry. You must possess a fundamental understanding of squareness, plumb, and level.
Houses are practically never square. If you simply build a perfectly square box and push it against your entryway wall, you will likely discover a half-inch gap at the top and the baseboard jutting out awkwardly at the bottom.
Pro Tip: Scribing is the most critical skill a DIYer must learn for built-ins. You must use a compass to trace the exact undulations of your wall onto your filler strips, then cut that line with a jigsaw or block plane. This guarantees a seamless, gap-free fit that screams “professional.”
Furthermore, you need to understand material expansion and structural load. If your bench span is wider than 36 inches without a center support, 3/4-inch plywood will bow under the weight of an adult.
Material Science for the Ambitious Amateur
What you buy at the big-box hardware store dictates your success. Do not frame your bench with standard 2x4 “whitewood” studs. Construction lumber has a high moisture content. As it dries inside your climate-controlled home, it will twist, warp, and cup, tearing apart your carefully glued face frames.
Instead, construct your carcasses (the boxes themselves) out of 3/4-inch cabinet-grade plywood—preferably Baltic birch or a high-quality maple veneer core. For the face frames, use dimensionally stable hardwoods like poplar or soft maple, which take paint beautifully and resist denting much better than pine.
Essential Tools You Probably Lack
You cannot build a high-quality mudroom system with just a cordless drill and a circular saw. At a minimum, a successful DIY build requires:
- A High-Quality Table Saw: For ripping plywood down to precise widths.
- A Miter Saw: For cutting face frames and trim to length.
- Pocket-Hole Jig: Like the Kreg Pocket-Hole Jig 720PRO, which is the absolute lifeblood of DIY cabinetry assembly.
- Brad Nailer and Air Compressor (or Battery Powered): For attaching trim, shiplap, and crown molding.
- HVLP Paint Sprayer: Because rolling paint onto cabinetry leaves an amateurish, stippled texture that betrays the DIY nature of the project.
By the time you purchase the tools you lack, the “cheap” DIY project suddenly rivals the cost of hiring a pro.

The Custom Built-In Route: Outsourcing for Perfection
If the thought of ripping full sheets of heavy plywood gives you anxiety, hiring a custom millwork professional is your sanctuary. This is the path of zero friction, assuming you have the budget and know how to vet a contractor.
The Precision of Bespoke Carpentry
When you hire a true professional cabinetmaker (not just a general handyman), you are purchasing mathematical precision. A pro will come to your home, take laser measurements, and identify issues you’d never notice—like an HVAC return vent that needs to be rerouted through the new bench kick toe, or an unlevel subfloor that requires specific shimming.
They will fabricate the locker carcasses in a climate-controlled shop using heavy-duty machinery (like massive sliding panel saws and edge banders) that produces perfectly crisp, tear-out-free edges.
The joinery will be superior. While DIYers rely heavily on pocket screws, professional cabinetmakers utilize domino tenons, dadoes, rabbets, and specialized cabinet hardware that creates invisible, bomb-proof connections.
The True Cost of Professional Work
Let’s address the elephant in the room. A custom-built mudroom system spanning roughly 8 to 10 linear feet will easily cost between $4,000 and $10,000+, depending on your geographic location, the materials chosen (e.g., solid white oak bench tops vs. painted poplar), and the complexity of the finish.
However, you are paying for speed and finality. A professional crew will typically install the pre-built components in your home in a single day, maybe two for the final paint curing. Conversely, a DIY build often stretches over three to four agonizing weekends, leaving your entryway in a state of dusty paralysis.
Resale Value and ROI Considerations
High-end, professionally installed built-ins add tangible equity to a home. Real estate agents love highlighting “custom entryway millwork” in listings. A poorly executed DIY job, complete with visible screw heads, sloppy caulk lines, and peeling paint, acts as a massive deterrent. Buyers will look at a sloppy mudroom and subconsciously wonder, “What else did they fix poorly?”
Crucial Design Considerations (Regardless of Your Path)
Whether you are firing up the table saw yourself or signing a contractor’s estimate, the foundational design principles remain identical. You have to get the math right.
Ergonomics and Dimensioning
Mudrooms fail when they don’t map to human anatomy. A bench that is too high cuts off circulation to the legs; one that is too low forces adults to squat awkwardly. The gold standard for bench seating height is between 17 and 19 inches from the finished floor.
Depth is an equally contentious issue. If you’re wondering how much space you actually need to sit down without your knees knocking the opposite wall, getting the right depth for your mudroom lockers is arguably the most critical dimension you’ll calculate. A bench depth of 18 to 20 inches is usually the sweet spot. Anything shallower feels like a tightrope; anything deeper wastes square footage and makes it hard for kids to reach the back of the cubbies.
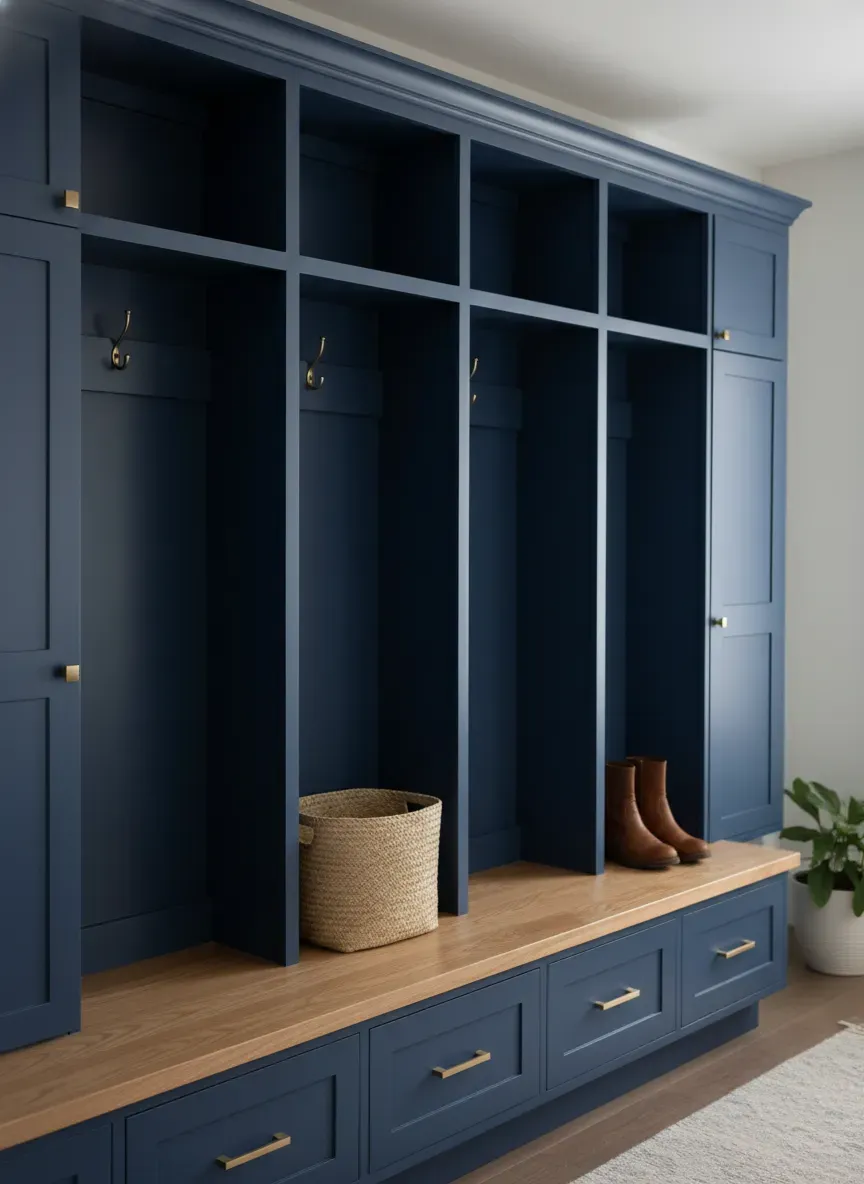
Hook and Cubby Configuration
You don’t want winter coats overlapping into a damp, tangled mess, which is why figuring out the ideal spacing between hooks and cubbies dictates the entire structural rhythm of your build.
Give each locker a minimum width of 15 to 18 inches. If you go narrower, thick winter jackets will bulge out into the adjacent space.
- Upper Cubbies: Perfect for out-of-season gear, hats, and small baskets. Keep these around 12 inches high.
- Lower Cubbies (Shoe Storage): Leave at least 8 to 10 inches of vertical clearance to accommodate high-top sneakers and standard winter boots. If you live in a climate requiring tall rain boots, leave one section completely open to the floor.

The Anatomy of a Flawless Finish
The difference between a built-in that looks like a cheap bookshelf and one that looks native to the home’s architecture lies entirely in the finishing process. This is often where DIYers lose stamina.
Wood Filling and Sanding
Every single nail hole must be filled. Do not use standard drywall spackle; it shrinks and flashes under paint. Use a high-quality wood filler, slightly overfill the hole, and sand it completely flush with 120-grit, followed by 220-grit sandpaper once it dries.
The Art of Caulking
Caulk is the magician of carpentry. It hides the inevitable hairline gaps between your wood components and the drywall. However, you must use a premium paintable acrylic latex caulk. Run a thin bead along every inside corner where wood meets wood or wood meets wall. Keep a damp rag handy to wipe away the excess immediately. A thick, sloppy caulk joint looks amateurish.
Selecting the Right Paint
Standard wall paint will fail on a mudroom bench within days. It lacks the self-leveling properties and hard-curing resins needed for high friction surfaces. You need a urethane alkyd enamel or a specialized cabinet paint.
Pro Tip: Using a product like INSL-X Cabinet Coat Enamel provides a factory-like, durable finish that resists chipping and scuffing from heavy bags and metal zippers. Always apply a high-adhesion bonding primer first, especially if you are painting over raw MDF or wood knots.
Recommended Hardware and Accessories
Hardware acts as the jewelry of your mudroom. It is the tactical touchpoint you interact with daily. Cheap hollow-cast hooks will snap the first time your teenager hangs a backpack loaded with geometry textbooks on them.
Invest in heavy, solid metal hardware. Using Heavy-Duty Rustic Coat Hooks not only elevates the aesthetic but guarantees structural integrity. Ensure you are driving the hook screws through the locker backing and directly into solid wood blocking or a wall stud. Never rely on drywall anchors for mudroom hooks.
Additionally, consider integrating modern conveniences:
- Integrated Outlets: Hide an electrical outlet inside an upper cubby to charge tablets or cordless vacuums.
- LED Strip Lighting: Routing a channel under the bench or the upper cubbies to install motion-activated LED strips adds incredible ambiance and nighttime functionality.
- Ventilated Shoe Drawers: If you opt for drawers instead of open cubbies for shoes, ensure the drawer faces feature slatted venting or cane webbing so damp shoes can breathe.
Making the Final Call: The Decision Matrix
Still paralyzed by indecision? Let’s break it down logically.
Choose the DIY Path If:
- You already own a robust ecosystem of woodworking tools (table saw, miter saw, nailers).
- You have a high tolerance for frustration and the patience to learn complex finishing techniques.
- Your budget is strictly capped under $1,500.
- You view woodworking as a rewarding hobby, not a chore.
Choose the Custom Millwork Path If:
- You want a flawless, factory-grade finish that perfectly matches your home’s historic or modern trim.
- Your entryway features complex geometry (angled ceilings, drastically out-of-plumb walls, intrusive ductwork).
- You place a high premium on your free time and weekends.
- You want an asset that undeniably increases your property’s resale value.
Key Takeaways
- Materials Matter: Avoid construction lumber. Use cabinet-grade plywood and stable hardwoods to prevent warping.
- Proportions are Paramount: Nail your bench depth (18-20 inches) and seat height (17-19 inches) before drawing a single cut line.
- Finish dictates Quality: Invest in specialized cabinet enamel and take the time to meticulously caulk and sand every joint.
- Hardware must be Heavy-Duty: Expect your hooks to hold upwards of 40 pounds. Anchor them accordingly.
The Bottom Line: A built-in mudroom bench and locker system is a high-impact architectural element that will fundamentally change how your household operates. Whether you harness your own sweat equity to build it, or leverage the specialized skill of a custom carpenter, do not compromise on structural integrity. Plan meticulously, measure three times, use premium materials, and you will construct a drop zone that tames the daily chaos for decades to come.