The Essential Rules of Workbench Design: Build It Once, Build It Right
Master the foundational physics, ergonomics, and material science behind constructing a lifetime woodworking workbench. Build it once, build it right.

Mar 24, 2026 - Written by: Linda Wise
You’ve likely experienced the infuriating dance of a flimsy workbench. You lock a piece of oak into a cheap, bolt-on vise, grab your hand plane, take a heavy shaving, and the entire bench scoots three inches across the concrete floor. It rattles. It racks. It bounces your kinetic energy straight back up your arms, leaving you exhausted and your workpiece aggressively mediocre.
I’ve personally found that the vast majority of woodworkers treat their first bench as a disposable learning curve—a hasty assembly of 2x4s and plywood slapped together over a weekend. But here is the uncompromising truth: your workbench is not just a table. It is a three-dimensional clamping surface. It is the most critical tool in your entire shop.
If your bench fights you, every subsequent project will suffer. But if you adhere to the essential rules of workbench design, you create an immovable, highly functional partner that elevates your craftsmanship. We are going to strip away the myths, dive into the brutal physics of woodworking, and outline exactly how to build a generational bench. Build it once. Build it right.
Quick Comparison: Top Picks for Bench Hardware
| Product | Rating | Check Price |
|---|---|---|
| Yost 10-Inch Heavy Duty Woodworking Vise | ⭐⭐⭐⭐⭐ | View on Amazon |
| Kreg Bench Dog Hole Kit and Clamps | ⭐⭐⭐⭐½ | View on Amazon |
| POWERTEC Retractable Workbench Casters | ⭐⭐⭐⭐⭐ | View on Amazon |

The Core Physics of Workbench Design
Before we ever touch a piece of lumber or debate the merits of a tail vise, we must understand the physical demands placed upon a workbench.
Mass Over Everything
A proper workbench requires mass. Heavy, unrelenting, brutal mass. When you strike a chisel with a mallet to chop a mortise, you are transferring kinetic energy. If your bench top is a hollow-core door or a thin sheet of MDF, it acts like a trampoline. The energy disperses into the flex of the wood, bouncing your workpiece and absorbing the force of your blow. You end up working twice as hard to remove half as much material.
Conversely, a bench top made of laminated four-inch-thick solid wood acts as an anvil. It absorbs nothing. The energy from your mallet transfers directly through the chisel edge and into the severing of wood fibers.
You want your bench to weigh a minimum of 250 to 300 pounds. At this weight, friction against the floor overcomes the lateral forces of hand planing, aggressive sawing, and heavy routing.
Rigidity and the War on Racking
Mass prevents the bench from sliding, but rigidity prevents it from swaying. “Racking” is the parallelogram-like shifting of a bench’s base when lateral force is applied. If your bench sways even an eighth of an inch, it is failing you.
Pro Tip: Never rely entirely on modern screws or lag bolts to prevent racking in a workbench base. Over time, the seasonal expansion and contraction of the wood, combined with the vibration of heavy work, will inevitably loosen metal fasteners.
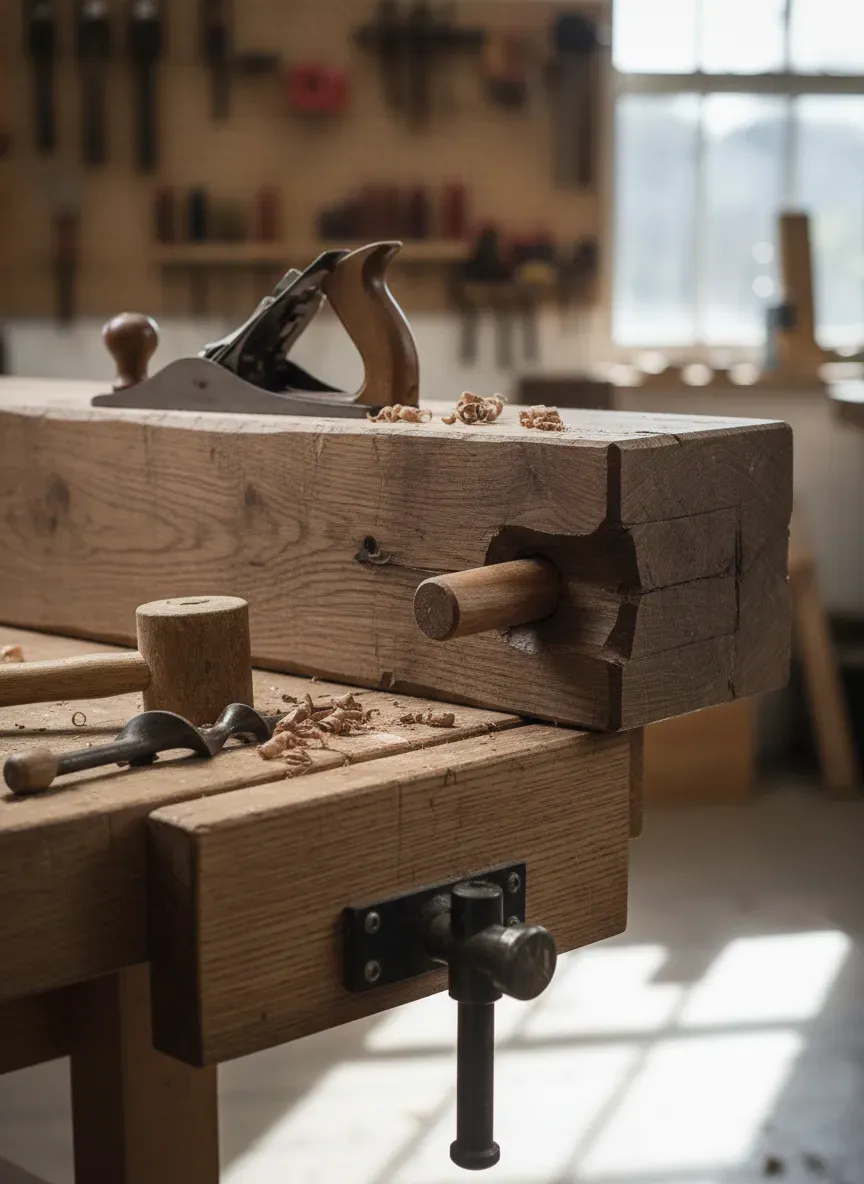
The historical and mathematically superior solution is the drawbored mortise and tenon joint. By driving an offset wooden peg through a massive tenon, you mechanically pull the joint tight. It requires no glue to stay rigid, it will never loosen, and it aggressively resists the shearing forces created by pushing a No. 7 jointer plane across rough lumber.
Sizing Your Bench: Ergonomics That Work
There is no universal “perfect” dimension for a workbench, but there are strict ergonomic boundaries you cross at your own peril.
Height: The Ergonomic Imperative
Bench height is intensely personal and entirely dependent on the type of work you perform. If you are primarily a hand-tool woodworker, using hand planes and hand saws, you need a lower bench. You must be able to lock your elbows and use your body weight—originating from your legs and core—to push the plane. A bench that is too high forces you to push with your triceps, leading to rapid fatigue and shoulder pain. The golden rule for hand-tool benches is the “pinky knuckle rule.” Stand straight with your arms relaxed at your sides; the top of the bench should align precisely with your pinky knuckles.
Power-tool users, however, act more as machine operators and assemblers. If you predominantly use a router, track saw, and random orbital sander, a higher bench (usually around waist height or 34 to 36 inches) will save your lower back from agonizing stooping.
Depth and Width: Reaching Across
Wider is not better. A common novice mistake is building a bench 36 to 40 inches deep, mimicking a kitchen island. This is a disaster.
You must be able to reach comfortably across the bench to grab a tool or support a workpiece without hyperextending your lower back. A depth of 20 to 24 inches is the absolute sweet spot for woodworking. When I map out shop layouts for clients, I often compare bench depth constraints to finding that perfect 12 to 24-inch sweet spot that you would utilize in specialized storage cabinetry. If you go deeper, the back foot of the bench merely becomes a dust-collecting graveyard for displaced tools, half-empty glue bottles, and stray screws.
Material Selection: Debunking the Hardwood Myth
If you browse social media, you might assume it is illegal to build a workbench out of anything other than premium hard maple or exotic European steamed beech. This is pure vanity.
The Top: Hardwood vs. Softwood
Hard maple is fantastic. It is dense, heavy, and pale (which reflects light well). However, it is also brutally expensive and notoriously difficult to flatten by hand.
Here’s the real kicker: softwoods make phenomenal workbenches. Southern Yellow Pine (SYP) or Douglas Fir, when laminated face-to-face in thick slabs, provide immense mass and rigidity for a fraction of the cost.
Furthermore, softwood has a higher coefficient of friction. When you clamp a slick piece of cherry or walnut onto a hard maple bench, the two hard surfaces can slip against each other. When you clamp that same cherry onto a pine bench, the slight give in the softwood micro-compresses, gripping the workpiece like a vice. A bench top is meant to be a sacrificial work surface. It will get gouged by errant chisel strikes and stained by finishing oils. Build it out of dense, affordable construction lumber and spend the savings on premium tools.
The Base: Defying Gravity
The lumber requirements for the base are incredibly simple: it just needs to be stout. Leg blanks should ideally be a minimum of 3.5 by 3.5 inches (the equivalent of a solid 4x4 or laminated 2x4s). The stretchers connecting the legs should be equally beefy to accommodate deep mortises.
If you plan to utilize the empty space underneath your bench for a custom cabinet or drawer stack, you need to flush the front legs with the front edge of your bench top. If you build a cabinet base underneath, you’ll want to calculate the recess carefully, perhaps referencing a mudroom locker depth guide to ensure your knees or shins don’t constantly bash into the drawer pulls while you’re executing a delicate rip cut.
Workholding: The Beating Heart of the Bench
A massive, flat table is just a table. Workholding is what transforms it into a workbench. A bench must hold wood securely in three orientations: faces (for surface planing), edges (for jointing), and ends (for cutting dovetails or tenons).
Face Vises: The Front Lines
The most common workholding device is the face vise, located on the front left of the bench (for right-handed woodworkers).
- The Cast Iron Vise: Quick to install, highly effective, and widely available. Look for quick-release mechanisms that save you from endlessly cranking the handle.
- The Leg Vise: A historical design experiencing a massive modern renaissance. It consists of a massive wooden jaw that pivots against the bench leg. Paired with a modern metal crisscross mechanism to keep the jaw parallel to the leg, a leg vise offers unparalleled clamping depth (often over 8 inches) because there is no central metal screw getting in the way of your workpiece.
Tail Vises and Dog Holes
To hold boards flat on the bench top for surface planing, you need a tail vise (or wagon vise) paired with bench dogs. Bench dogs are simply wooden or metal pegs that drop into holes drilled in the top. The tail vise pushes a dog block toward a stationary dog in the bench top, pinching the board securely between them.
When establishing the layout for these holes, do not overdo it. Novices often drill a grid of holes every two inches, severely weakening the bench top and creating a visually chaotic surface. When determining the layout for your bench dogs, determining the ideal spacing requirements prevents this “Swiss-cheese syndrome.” A single row of dog holes spaced roughly four to six inches apart, parallel to the front edge, is usually all you need to clamp boards of virtually any length.

The Great Debates: Form Follows Function
As you finalize your design, you will encounter several polarizing features in the woodworking community. Let’s dissect them with practical scrutiny.
The Tool Well
Many traditional European benches feature a sunken trough at the back of the bench top called a tool well, designed to hold chisels and planes safely below the work surface. While conceptually appealing, tool wells quickly devolve into dust-filled garbage troughs. They collect wood chips, lost screws, and coffee cups. Worse, they rob you of valuable, coplanar clamping surface. If you are building a modern bench, a perfectly flat, uninterrupted slab is vastly superior.
Flush Front vs. Overhang
Your bench top should be perfectly flush with the front legs of the base. This allows you to clamp wide architectural panels or long boards directly to the front of the legs while the top edge rests securely against the bench top. If your top overhangs the base by several inches, you lose this critical ability to support wide boards vertically.
The Finish: Less is More
Do not apply a film-building finish to your workbench. Polyurethane, lacquer, or epoxy will create a slick, glossy surface. A workbench needs grip, not gloss. Furthermore, film finishes scratch and chip under heavy use, making the bench look atrocious and requiring a massive sanding effort to repair.
Instead, flood the bench top with a simple, penetrating oil mixture—equal parts boiled linseed oil, mineral spirits, and spar varnish. This seals the wood from drastic humidity swings, repels glue drips (which will just pop off with a scraper), and leaves the wood feeling like wood. When it gets battered after three years of heavy use, simply plane the top flat again and wipe on another coat of oil. It takes ten minutes.
Common Pitfalls and How to Sidestep Them
- Key Takeaways for Bench Building:
- Ignoring Coplanarity: The front edge of your bench top, the face of your front legs, and the jaw of your vise must be perfectly coplanar (in the same flat plane). If they are not, clamping long boards to the front of the bench will induce a bow in the wood, making accurate edge jointing impossible.
- Using Wet Lumber: If you buy construction lumber (SYP or Fir) from a big box store, it is likely wet. If you laminate wet wood, your bench top will twist like a potato chip as it dries. Buy the wood, stack it with stickers (spacers) in your shop, and let it acclimatize for at least a month before milling.
- Over-Complicating the Base: Fancy curves and decorative chamfers on the base stretchers add zero functionality and waste valuable shop time. Keep the base brutalist, square, and over-engineered.
The Bottom Line: A workbench is a foundational tool that dictates the accuracy, efficiency, and joy of your time in the shop. By prioritizing massive weight, uncompromising rigidity through traditional joinery, and thoughtful, restrained dimensions, you are constructing an heirloom. It will take time, sweat, and likely a few curse words to maneuver those heavy slabs. But the first time you drop a piece of rough-sawn lumber onto that immovable surface and take a whispered shaving with a sharp hand plane, you will understand exactly why you built it right.
Stop Guessing and Start Building
I’ve wasted years of my life trying to reverse-engineer low-resolution images from woodworking forums, guessing at mortise depths and hardware clearances. It leads to expensive mistakes and wasted lumber. You’ll notice that the difference between an amateur struggling with a wobbly table and a master craftsman working effortlessly on a monolithic bench usually comes down to following a proven, battle-tested blueprint.
Here’s the real kicker: you don’t have to guess or reinvent the wheel. I constantly point my fellow makers—whether they are setting up their first garage shop or outfitting a professional studio—toward Ted’s Woodworking.
It is arguably the most comprehensive repository of blueprints on the internet. With over 16,000 highly detailed woodworking plans—including step-by-step schematics, cut lists, and material breakdowns for stunning, rock-solid workbenches of every historical style—it completely eliminates the guesswork. Right now, you can lock in a massive 75% discount on the entire archive. If you are ready to build the last workbench you will ever need, do yourself a favor and grab this resource.