Hidden Charging Stations: Tech Integration in Built-In Entryway Organization
Discover how to seamlessly integrate hidden charging stations into your entryway millwork. Master wire concealment, thermal management, and smart home tech.

Mar 11, 2026 - Written by: Linda Wise
Walk through the front door of any modern home, and you are immediately confronted by the digital age’s most persistent eyesore: the cable nest. Phones, smartwatches, wireless earbuds, and portable power banks all demand juice the second we cross the threshold. I’ve personally found that the entryway—historically a place designed to welcome and calm—rapidly devolves into a chaotic dumping ground of white lightning cables and bulky wall warts.
Architectural tech integration isn’t just about slapping a power strip inside a drawer. It requires a fundamental rethinking of spatial hierarchy and daily habits. We are engineering a dedicated “drop zone” that conceals our technological tethers while keeping our devices fully charged and ready for deployment. Here is the real kicker: when you integrate power directly into custom millwork, you elevate the entire aesthetic of your home’s first impression.
Quick Comparison: Top Picks
| Product | Rating | Check Price |
|---|---|---|
| Docking Drawer Blade In-Drawer Outlet | ⭐⭐⭐⭐⭐ | View on Amazon |
| Belkin BoostCharge Pro Wireless Pad | ⭐⭐⭐⭐½ | View on Amazon |
| Anker 727 Charging Station (GaNPrime) | ⭐⭐⭐⭐⭐ | View on Amazon |
The Anatomy of a Tech-Integrated Foyer
Understanding the mechanics behind hidden power requires looking past the surface wood. A truly seamless charging station operates invisibly, managing high-voltage alternating current (AC) and converting it to low-voltage direct current (DC) without exposing a single wire.
Form Meets Function: Why Hide the Wires?
Visual clutter heavily influences our cognitive load. You’ll notice that entering a room scattered with tangled cables triggers a subtle stress response. By shifting the charging infrastructure behind closed doors or beneath solid surfaces, we reclaim the visual purity of the mudroom.
I’ve spent years analyzing how families interact with their entry spaces. The instinct is to drop everything exactly 36 inches from the front door. If a charging cable isn’t right there, devices end up dead on the kitchen island. The goal is to intercept this behavior. By embedding power precisely where the natural “drop” occurs, you enforce organization through convenience rather than discipline.
The Psychology of the Drop Zone
Creating a frictionless transition from the outside world to your private sanctuary hinges on intuitive design. When someone unloads their pockets, the sequence is almost always identical: keys, wallet, phone.
By designing a built-in console that anticipates this exact sequence, you eliminate friction. A hidden charging station acts as a psychological anchor. You know exactly where your phone lives, and you know it will be at 100% battery when you leave.
Architectural Considerations for Built-In Power
Retrofitting a standard console table is child’s play compared to hardwiring a custom built-in mudroom unit. You are dealing with residential building codes, structural framing, and thermal dynamics.
Assessing Electrical Loads
One of the biggest mistakes I see in DIY custom cabinetry is overloading a standard 15-amp circuit. If your entryway station is charging three iPads, two iPhones, a laptop, and an e-bike battery simultaneously, you are pulling significant wattage.
You must map out your electrical load before finalizing the cabinet design. High-capacity devices like laptops require USB-C Power Delivery (PD) ports capable of pushing out 65W to 100W individually. Stringing together cheap extension cords inside a wooden box is a guaranteed fire hazard. Hardwiring a dedicated 20-amp circuit specifically for your entryway drop zone provides the overhead necessary for modern, high-draw electronics.
Spatial Planning and Clearances
Cabinetry dimensions dictate exactly what kind of tech you can hide. You cannot squeeze a massive articulating cable arm into a shallow drawer without destroying the track mechanism. This is where understanding spatial relationships becomes critical.
If you are currently designing your space, you need to calculate the exact volume required for your coats, shoes, and tech. I highly recommend reviewing the fundamentals of planning the right mudroom locker dimensions to ensure you leave an adequate chase for electrical conduits. A standard depth might work for winter coats, but adding a false back for an electrical gang box requires an additional three to four inches of clearance.
Practical Applications: Designing Your Concealed Station
Theory only gets us so far. Translating the desire for clean aesthetics into physical woodwork requires specific hardware and clever joinery.
Drawer-Based Charging Systems
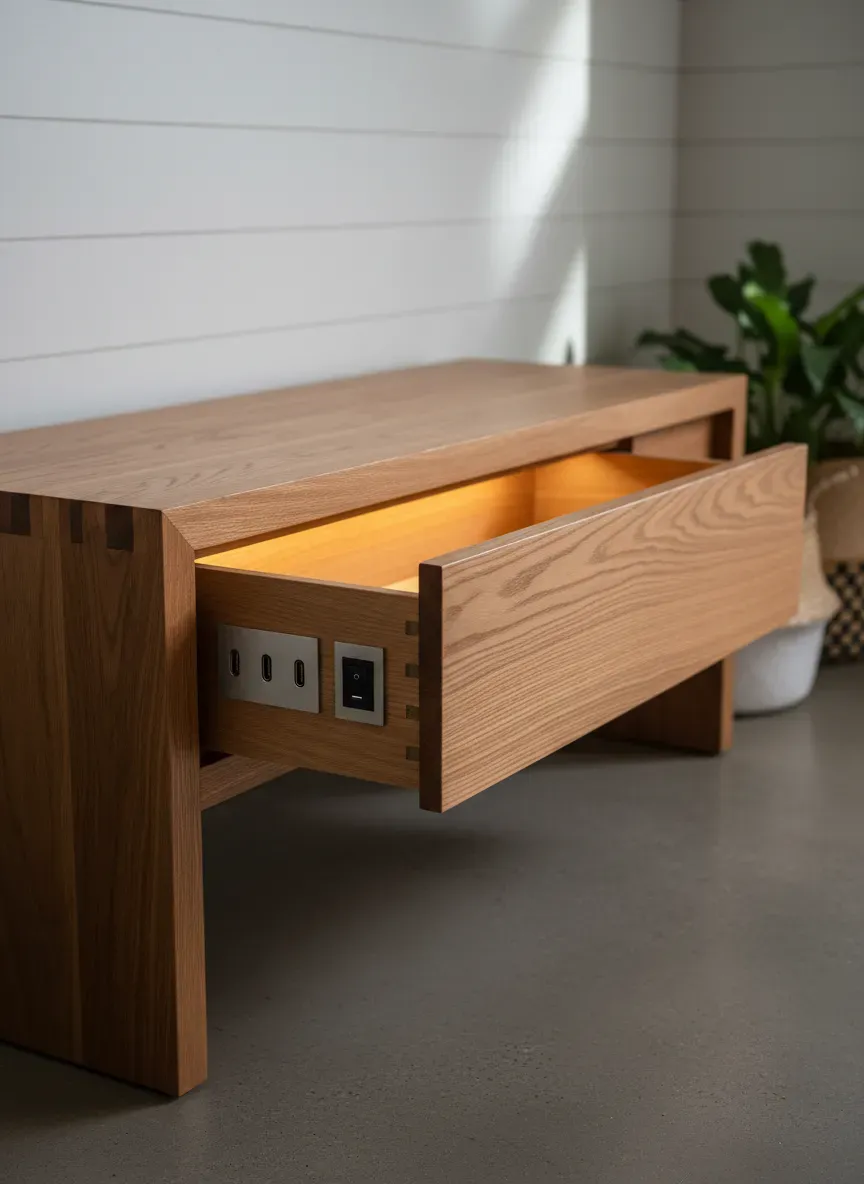
The gold standard for entryway tech integration is the powered drawer. This setup utilizes a mechanical arm that guides the electrical cord as the drawer opens and closes, preventing the wires from binding or snapping.
Brands like Docking Drawer have revolutionized this space by offering UL-listed, interlocking safety mechanisms. Here is why that matters: if you leave a laptop charging inside a closed wooden drawer, heat accumulates rapidly. Premium powered drawers feature an internal thermostat. If the ambient temperature inside the drawer exceeds 120°F (49°C), the outlet automatically cuts power, preventing a thermal runaway event.
When planning a drawer system, position the charging drawer at waist height. Anything lower requires bending down to plug in a phone, which immediately violates the rule of frictionless design.
False Bottoms and Secret Compartments
For those who prefer a static surface, false bottoms offer an elegant alternative. Imagine a beautiful walnut tray resting on your entryway console. Beneath that tray lies a recessed cavity housing a high-output GaN (Gallium Nitride) charging station.
Constructing a false bottom requires precision routing. You create a void approximately two inches deep, drill a discreet passthrough for the main power cable to reach a wall outlet, and then cover the void with a slotted wooden or leather panel. The charging cables poke through the slots exactly where needed.
Pro Tip: Always line the interior of a false-bottom charging cavity with a fire-retardant mat and ensure there are ventilation slots routed into the rear of the cabinetry. Electronics generate passive heat; trapping it degrades battery lifespans significantly.
Integrating Smart Tech with Traditional Millwork
Blending organic materials with cutting-edge silicon creates a stunning juxtaposition. You don’t have to settle for visible plastic ports marring your expensive oak cabinetry.
Wireless Charging Surfaces (Inductive Tech)
Inductive charging (Qi standard) relies on magnetic coils to transfer power over short distances. The magic happens when you completely conceal these coils inside the wood.
By taking a router and carving out a recess from the underside of the cabinet top, you can embed a powerful inductive charger. The trick is to leave exactly 2.5mm to 3mm of wood between the top surface and the charger. Any thicker, and the magnetic field won’t penetrate; any thinner, and the wood becomes fragile and prone to cracking under the weight of heavy keys or bags.
When you place your phone on the seemingly normal wood surface, it instantly begins to charge. To mark the “sweet spot,” I often use a subtle inlay—perhaps a tiny brass ring or a contrasting wood veneer—so users know exactly where to drop their devices.
While you are modernizing your drop zone, it is wise to rethink other archaic elements. Integrating your smart chargers alongside an upgraded system for holding physical keys elevates the entire setup. You can look into integrating a sleek key management system directly above your invisible charging pad to keep the metallic clutter away from the magnetic fields of your inductive chargers.
Cable Management Channels
Even in a wireless world, some devices still require physical tethers. High-end camera batteries or specific power banks simply don’t support Qi charging.
For these, I rely on micro-channels routed directly into the back panel of the cabinetry. Using a 1/4-inch straight bit, you can create a network of grooves that grip nylon-braided cables tightly. The cables run invisibly behind the shelving, emerging only at the exact millimeter they are needed.

Avoiding the “Spaghetti Junction” Pitfall
It takes constant vigilance to prevent a hidden charging station from becoming a dark, terrifying nest of tangled wires hidden from the world.
Future-Proofing Your Ports (USB-C vs. The World)
Technology moves faster than custom cabinetry. If you hardwire standard USB-A ports into your entryway today, your setup will be obsolete within three years. The European Union’s mandate for USB-C, alongside Apple’s complete transition to the standard, means legacy ports are dying rapidly.
When selecting built-in power strips or wall receptacles, prioritize high-wattage USB-C PD (Power Delivery). A 65W USB-C port can charge a modern smartphone to 50% in roughly thirty minutes—perfect for a quick top-up while you are tying your shoes.
Avoid cheap, multi-port hubs from unknown manufacturers. They suffer from terrible power distribution. If you plug two devices into a cheap 40W hub, it doesn’t give them 20W each; it often throttles both down to 10W, turning a quick charge into a multi-hour ordeal. Invest in GaN (Gallium Nitride) chargers. They are physically smaller, run significantly cooler, and manage power distribution intelligently.
Ventilation and Overheating Risks
I cannot stress this enough: wood is an excellent insulator. When you trap heat-generating electronics inside an insulated box, physics takes over.
Thermal throttling is the first symptom. Your phone realizes it is getting too hot and drops the charging speed to a crawl to protect its lithium-ion chemistry. The second symptom is premature battery degradation.
To combat this, utilize convection cooling. Drill intake holes at the lowest point of the hidden compartment and exhaust holes at the highest point. Warm air naturally rises, pulling cool air in from the bottom. For extreme setups—like a family charging four laptops simultaneously in a mudroom locker—I install silent, low-RPM computer fans wired to a simple USB port to force active airflow.
Maximizing Entryway Utility Beyond Phones
The modern entryway handles vastly more than just mobile phones. Our lives are increasingly battery-powered, and the entryway is the perfect logistical hub to manage it all.
Wearables, Tablets, and E-Bikes
Smartwatches require specialized charging pucks, which are notoriously difficult to mount cleanly. The best approach is to utilize 3D-printed docks that secure the proprietary pucks and angle the watch face outward. This turns the charging smartwatch into a miniature entryway clock.
Flashlights, dog walking gear (like LED collars), and portable power banks also need a home. Dedicate a specific, smaller compartment within your hidden setup exclusively for “utility charging.”
As home spaces become more multi-functional, the mudroom often bleeds into other utility areas. If your entryway doubles as a transition zone for an active lifestyle, you might be wrangling charging cords for muscle massagers or digital jump ropes. Properly stowing equipment for a minimalist fitness setup heavily relies on having adjacent, robust power sources that don’t look like a commercial gym’s messy corner.
For heavy-duty items like e-bike batteries or electric scooter packs, you cannot rely on low-voltage USB. You must design a heavy-duty, reinforced lower cubby with a dedicated 120V AC receptacle. These batteries are heavy and require massive power bricks. Keep them low to the ground to prevent strain on your cabinetry and ensure the heavy power bricks rest firmly on a solid shelf, not dangling by their cords.
Step-by-Step Retrofitting Guide for Existing Millwork
Tearing down a perfectly good entryway bench to build a high-tech drop zone from scratch isn’t always feasible. Retrofitting requires a surgical approach to existing millwork.
The Drill-and-Grommet Approach
The simplest way to hide cables in an existing console or locker is utilizing desk grommets.
- Locate the Studs and Wires: Use a high-quality stud finder that detects live AC voltage. You absolutely do not want to drill blindly into a wall cavity housing your home’s main electrical lines.
- Map the Drop: Determine exactly where you want the devices to sit. Mark the spot with painter’s tape.
- Bore the Hole: Use a 1.5-inch or 2-inch hole saw attached to your drill. Run the drill in reverse for the first few seconds to score the wood veneer—this prevents the wood from violently splintering when the teeth bite in.
- Install the Grommet: Press-fit a metal or high-grade silicone grommet into the hole. Avoid cheap plastic; it ruins the premium aesthetic of wood furniture.
- Route the Cable: Drop the cables down through the grommet to a concealed power strip mounted to the underside of the table or hidden in a lower basket.
Hardwiring vs. Plug-in Power Strips
If you want a truly seamless look, you have to lose the visible power strip completely.
Plug-in solutions (where a power strip hidden in a cabinet plugs into a standard wall outlet nearby) are perfectly fine for renters or quick weekend projects. However, the cord traveling from the furniture to the wall will always be visible.
Hardwiring involves pulling a new romex cable from your basement or attic directly into the back of the entryway cabinetry. You install an “old work” electrical box directly into the back panel of the wood, flush-mounting the receptacle. This requires cutting power at the breaker, stripping wires, and ensuring proper grounding. If you are uncomfortable dealing with wire nuts and live voltage, hire an electrician. It takes a professional less than an hour to drop a new line, and it guarantees your home’s insurance remains intact if a surge occurs.

Key Takeaways for Retrofitting:
- Always use painter’s tape over wood before drilling to prevent veneer tear-out.
- Invest in braided nylon cables. They resist the constant friction of being pulled through grommets far better than standard rubber-coated cables.
- Utilize zip-tie anchors with adhesive backs to route cables underneath the furniture, keeping them tight against the wood and out of sight.
- Label your cables at the plug base. When you have six identically black USB-C cables plugged into a hidden hub, you need to know which one powers the iPad and which powers the flashlight.
The Bottom Line on Entryway Tech Integration
The Bottom Line: Hiding your charging infrastructure is a masterclass in spatial efficiency and psychological relief. We tolerate cable clutter because we assume it is the unavoidable tax of living in a connected world. It isn’t. By treating your devices’ power needs as an architectural requirement rather than an afterthought, you fundamentally change how you interact with your home.
Whether you are routing out solid walnut to embed an invisible inductive coil, or simply installing a heavy-duty powered drawer with thermal safety switches, the objective remains the same. You are stripping away the visual noise of the digital age right at the threshold of your sanctuary. You walk in, drop your tech into its dedicated, hidden cradle, and close the drawer. The clutter vanishes, the battery meters climb, and your entryway remains exactly as it was meant to be: calm, organized, and beautifully functional.