High-Gloss Mudroom Finishes: How to Master the Sleek, Modern Look
Discover the professional techniques for achieving a flawless, mirror-like high-gloss finish on your mudroom cabinetry. A deep dive into prep, paint chemistry, and application.
Apr 2, 2026 - Written by: Linda Wise

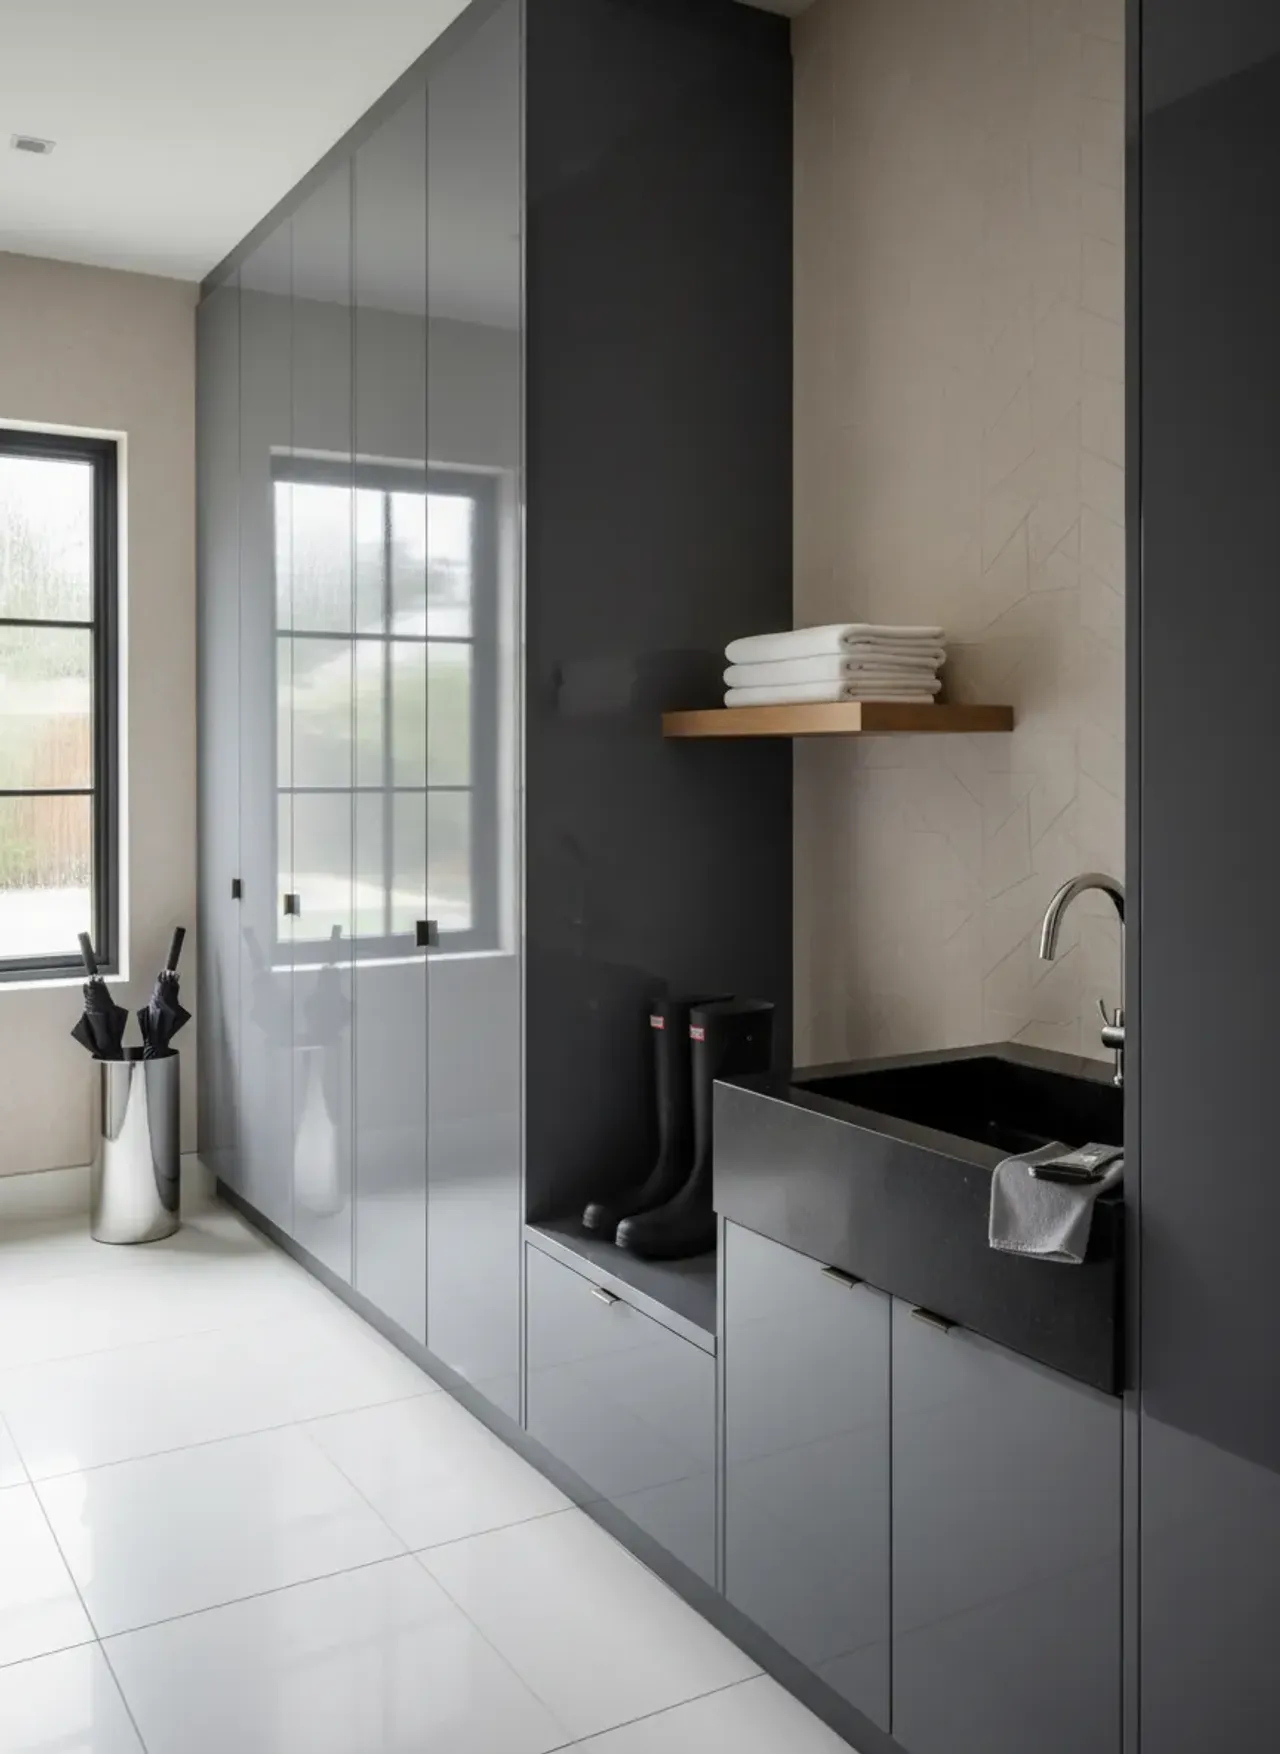
If you’ve ever walked into a high-end European kitchen or a luxury boutique, you’ve likely been captivated by the cabinetry. The surfaces look less like painted wood and more like sheets of colored glass. Achieving that wet, mirror-like aesthetic is the pinnacle of modern interior design. Bringing that specific look into a mudroom—the undisputed workhorse of any residential home—seems almost counterintuitive. Mudrooms endure wet boots, thrown lacrosse sticks, abrasive canvas backpacks, and the daily chaotic scramble of family life.
Yet, I’ve personally found that a high-gloss mudroom finish isn’t just a bold aesthetic flex; it’s a highly functional design choice. A true gloss acts as a hardened, impenetrable shell. It wipes clean with zero friction and bounces ambient light around notoriously dark entryway corners.
But here is the ruthless reality: high-gloss finishes take no prisoners. Matte and eggshell paints are forgiving. They absorb light and hide a multitude of sins—poor sanding, uneven joints, and lazy brush strokes. Gloss does the exact opposite. It amplifies every single microscopic defect on your substrate. To master the sleek, modern look, you must elevate your approach from casual DIYer to meticulous artisan.
Before we strip down the chemistry of paints and the physics of spray atomization, let’s look at the foundational tools you’ll need to pull this off.
Quick Comparison: Top Picks
| Product | Rating | Check Price |
|---|---|---|
| INSL-X Stix Acrylic Waterborne Bonding Primer | ⭐⭐⭐⭐⭐ | View on Amazon |
| Rust-Oleum Specialty High Gloss Enamel | ⭐⭐⭐⭐½ | View on Amazon |
| Fuji Semi-PRO 2 HVLP Spray System | ⭐⭐⭐⭐⭐ | View on Amazon |
The Architecture of Brilliance: Planning for Gloss
You cannot slap a premium gloss paint onto poorly designed cabinetry and expect a luxury result. The reflective nature of a high-gloss finish interacts dynamically with the geometry of your mudroom build.
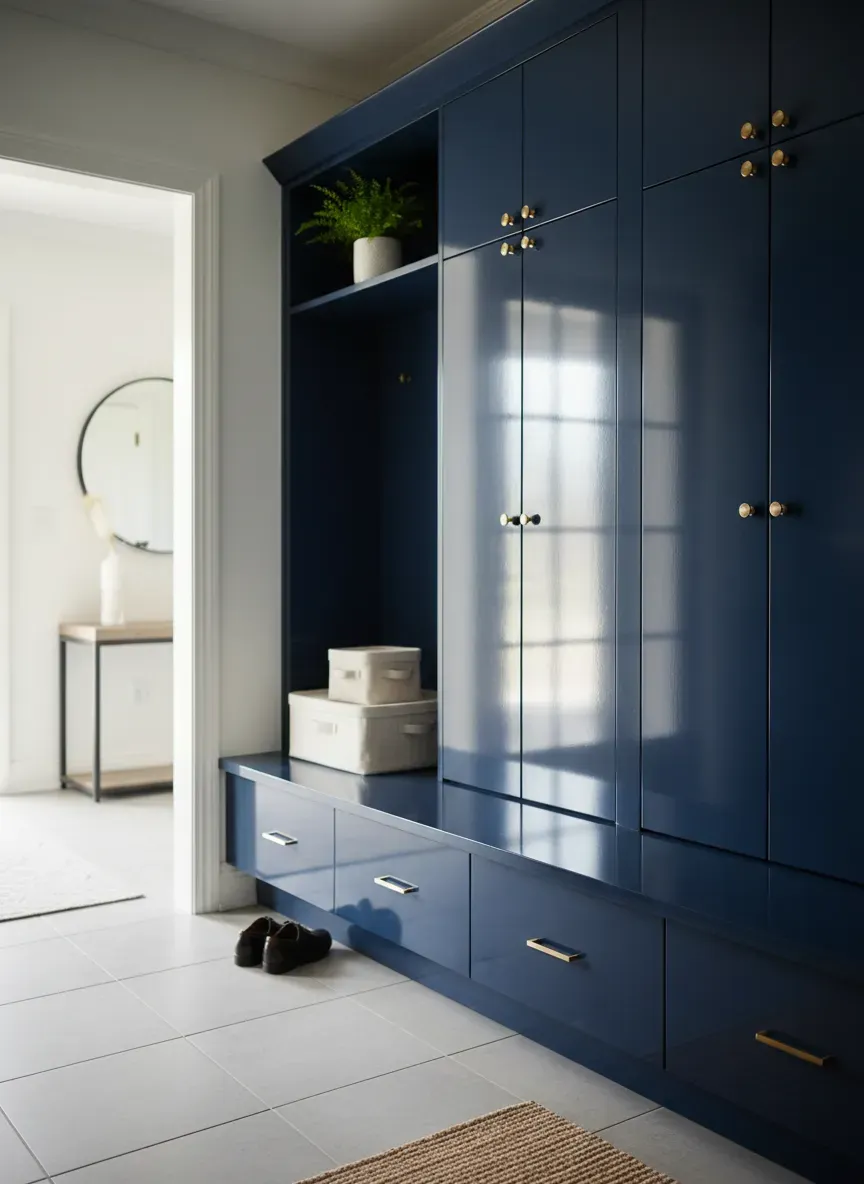
Before you even think about cracking a can of primer, your spatial architecture must be absolutely locked in. Whether you’re configuring vertical storage or calculating the ideal spacing for coat hooks and cubbies, keep in mind that gloss surfaces will catch the reflection of the hardware you install. Matte black or brushed brass hooks will pop magnificently against a high-gloss lacquer, but their placement needs to be mathematically precise, as the reflections will highlight any asymmetrical alignment.
Similarly, a mirror finish reflects light differently depending on the recessed shadows of your structure. This is precisely why determining the correct mudroom locker depth isn’t just a functional decision, but an aesthetic one. Shallower lockers push the glossy back-panels closer to your primary light source, increasing the luminous reflectance value (LRV) of the room. Deeper lockers create dark, moody cavities where the gloss will look incredibly rich and saturated.
Choosing the Right Substrate
Wood grain is the enemy of a modern gloss finish. If you want a traditional, painted-oak look where you can see the grain texture beneath the sheen, that’s a different stylistic avenue. But for the sleek, ultra-modern, glass-like finish we are chasing, the substrate must be perfectly smooth.
MDF (Medium Density Fiberboard) is the absolute gold standard for modern gloss cabinetry. It has zero grain, routes beautifully, and provides a dead-flat surface. If you must use plywood for structural integrity—especially when you are finding the right balance between 12 and 24 inches for seating to accommodate heavy winter boots—opt for a high-grade Birch or Maple veneer. Even then, you will need to apply a grain filler to achieve that unblemished, monolithic look.
The Preparation Phase: Where Gloss Succeeds or Fails
I cannot overstate this: 90% of your labor will be spent before the actual gloss paint ever touches the wood. If you rush the prep, your final coat will look like a wrinkled citrus peel.
Sanding and Filling
Start by filling every brad nail hole, seam, and minor indentation. Standard lightweight spackle will not cut it here; it shrinks and flashes under high-gloss paint. You need a two-part auto body filler (like Bondo) or a specialized hard-drying wood filler.
Once cured, your sanding schedule must be religious.
- Leveling: Start with 120-grit using a random orbital sander to knock down the filler flush with the wood.
- Smoothing: Step up to 150-grit to remove the aggressive scratches left by the 120.
- Polishing: Finish the bare wood with 220-grit.
Run your hand over the surface with your eyes closed. If you can feel a seam, the gloss will show it. You’ll notice that professional finishers often use a “guide coat”—a light misting of contrasting cheap spray paint over the primer—before their final sand. As you sand the primer, the guide coat remains in the microscopic low spots, showing you exactly where the surface isn’t perfectly flat.
The Art of the Primer Coat
High-gloss paints contain heavy resins that need a robust foundation to bite into. A high-build, sandable primer is mandatory.
Spray or roll two coats of a premium bonding primer. Once it dries, you must sand it again. Yes, more sanding. Use a 320-grit foam sanding sponge. The goal here isn’t to remove the primer, but to shear off any raised wood fibers (grain raise) and dust nibs. By the time you are done prepping the primer, the surface should feel as smooth as a piece of printer paper.
Pro Tip: Never use compressed air to blow dust off your prepped pieces right before painting. This just launches microscopic debris into the air, which will inevitably settle onto your wet gloss coat. Use a HEPA vacuum with a brush attachment, followed by a meticulous wipe-down with a tack cloth.

Decrypting Paint Chemistry: Choosing Your Weapon
Not all shiny paints are created equal. Walking down the aisle of a big-box hardware store, you’ll see dozens of cans labeled “High Gloss.” Understanding the chemical makeup inside those cans is the secret to a durable mudroom finish.
Traditional Alkyd (Oil-Based) Enamels
For decades, oil-based enamels were the only way to get a flawless, mirror-like finish. They dry incredibly slowly, which gives the paint ample time to “level out,” meaning brush strokes melt away before the paint solidifies. Once cured, oil enamels are rock-hard and highly resistant to the scuffs and impacts common in a mudroom.
However, they have major drawbacks. They emit massive amounts of VOCs (volatile organic compounds), require harsh solvents like mineral spirits for cleanup, and worst of all, they yellow over time. If you are painting your mudroom a crisp, modern white, an oil-based enamel will turn a dingy ivory within three years, especially in areas devoid of UV light.
Acrylic Waterborne Enamels
Modern chemistry has given us 100% acrylic waterborne enamels. These dry fast, clean up with soap and water, and will never yellow. But that fast drying time is a double-edged sword. Because the water evaporates rapidly, the paint doesn’t have time to level. If you brush or roll standard acrylic high-gloss, you will almost certainly be left with visible brush strokes or roller stipple.
Waterborne Alkyds (The Hybrid Solution)
Here’s the real kicker: the sweet spot for modern cabinetry is the waterborne alkyd. These paints utilize oil molecules suspended in water. You get the easy cleanup and non-yellowing properties of an acrylic, combined with the slow-leveling, hard-curing characteristics of a traditional oil. Products like Benjamin Moore Advance or Sherwin-Williams Emerald Urethane Trim Enamel fall into this category. They are the undeniable champions for high-traffic, high-gloss mudroom applications.
Application Execution: Achieving the Factory Finish
You have your perfectly prepped substrate and your premium waterborne alkyd paint. Now, how do you get it onto the cabinets without ruining the illusion?
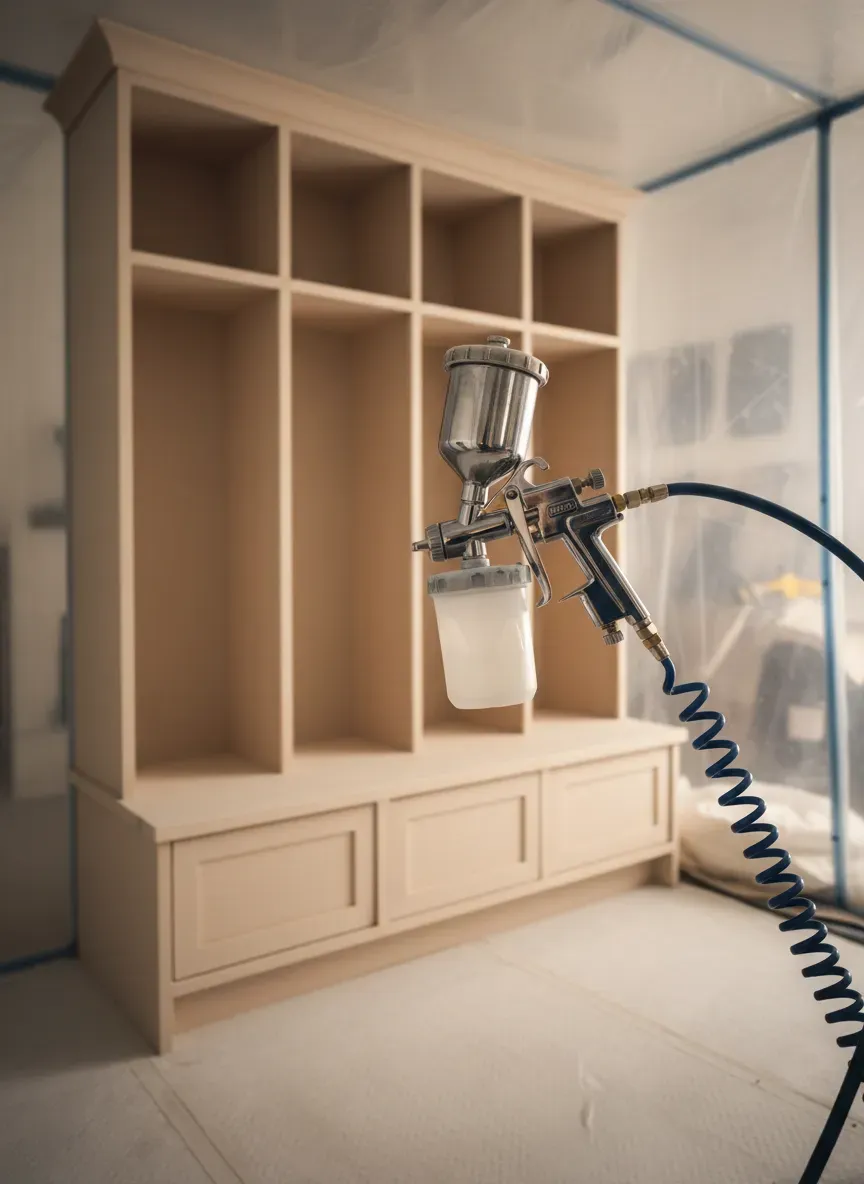
The HVLP Spray System Advantage
If you want a true, modern glass-like finish, you need to spray it. High Volume, Low Pressure (HVLP) systems atomize the paint into a fine mist, laying down a perfectly uniform sheet of color without a single tool ever physically touching the wet surface.
When using an HVLP system with heavy waterborne alkyds, viscosity is everything. The paint straight out of the can is usually too thick to atomize properly, resulting in a textured finish known as “orange peel.” You must thin the paint.
Start by adding 5% to 10% distilled water (never tap water, which contains minerals that can affect the cure) and a high-quality rheology modifier or leveling additive like Floetrol. Use a viscosity cup to measure the flow rate according to your specific spray gun’s manual.
Spray in a grid pattern. Apply a light “tack coat” first, let it flash off for ten minutes, and then follow up with a heavier wet coat. Keep the gun exactly 6 to 8 inches from the surface, moving your entire arm—not just your wrist—to ensure the spray fan stays perfectly perpendicular to the wood.
The “Tip and Roll” Alternative
I completely understand that dropping several hundred dollars on a professional spray rig isn’t feasible for everyone. You can achieve an exceptional high-gloss finish by hand, but it requires a specific technique known as “tipping and laying off.”
Key Takeaways for Hand Application:
- The Roller: Use a high-density, ultra-fine foam roller (flocked foam is best). Apply the paint generously but evenly across a small section of the cabinet.
- The Brush: Immediately follow up with a premium, angled synthetic brush (like an ultra-soft nylon/polyester blend).
- The Technique: Hold the brush at a 45-degree angle and lightly drag the very tips of the bristles across the wet paint in one continuous, fluid motion, moving with the grain of the wood (or vertically if using MDF).
- The Golden Rule: Do not overwork the paint. Lay it down, tip it off, and walk away. If you keep messing with it as it begins to dry, you will tear the surface film and ruin the gloss.
Controlling the Microclimate
Gloss paint is a magnet for airborne debris. A single dog hair or speck of sawdust landing on a wet high-gloss panel will stick out like a billboard.
If you are painting doors and drawer fronts, remove them and paint them in a controlled environment. Build a makeshift spray booth in your garage using plastic drop cloths. Before painting, lightly mist the floor with a spray bottle of water; this prevents you from kicking up dust as you walk around the pieces.
Temperature and humidity play a massive role in cross-linking (the chemical process of the paint curing). If your mudroom is too cold (below 50°F), the paint will run and sag. If it’s too hot and dry, the paint will flash too quickly and fail to level. Aim for an ambient temperature of 65°F to 75°F with moderate humidity.
Troubleshooting Common High-Gloss Failures
Even seasoned veterans occasionally run into issues when pushing for a flawless gloss. If you encounter a defect, don’t panic. Let the paint dry completely, sand the defect flat, and re-coat.
Orange Peel
This looks exactly like the textured skin of an orange. It happens when the paint droplets fail to melt together into a unified sheet.
- The Cause: Paint viscosity is too high (too thick), or the temperature is too hot, causing the droplets to dry before they can level.
- The Fix: Thin the paint slightly and ensure your spray gun is atomizing correctly.
Fish Eyes
These are small, circular craters that open up in the wet paint, revealing the primer beneath.
- The Cause: Surface contamination. Usually, it’s a trace amount of silicone, oil from your fingers, or residual furniture polish. Gloss paint absolutely despises silicone.
- The Fix: You must sand down past the crater, clean the surface aggressively with a denatured alcohol wipe, and re-prime before applying the gloss coat again.
Runs and Sags
Thick, dripping curtains of paint that harden on vertical surfaces.
- The Cause: Applying the paint too heavily in a single pass, or holding the spray gun too close to the substrate.
- The Fix: Allow it to cure fully (this may take days for a thick run). Use a razor blade to carefully shave the high spot of the run flat, sand with 320-grit, and apply a lighter coat.
Maintaining the Sheen: Long-Term Mudroom Survival
You’ve successfully navigated the sanding, the chemistry, and the application. Your mudroom looks like a modern architectural masterpiece. Now, how do you keep it that way when the family dog shakes off rain and kids throw muddy cleats onto the bench?
The most critical thing to understand about modern waterborne alkyd enamels is the difference between drying and curing. The paint may feel dry to the touch in four hours, allowing you to carefully rehang the cabinet doors. However, the chemical polymerization process—the curing—takes anywhere from 21 to 30 days.
During this first month, the paint is incredibly vulnerable. It can easily scratch, dent, or peel if abused. You must treat your mudroom with absolute kid gloves for the first four weeks. Keep heavy bags off the painted benches and open doors gently.
Once fully cured, the high-gloss surface is remarkably resilient, but you must alter your cleaning habits.
- Never use abrasive scrubbing pads (like the green side of a kitchen sponge) or powdered cleansers. They will introduce micro-scratches that dull the gloss over time.
- Avoid harsh chemical degreasers or ammonia-based glass cleaners, which can slowly degrade the acrylic resins.
- To clean, simply use a high-quality, clean microfiber cloth dampened with warm water and a single drop of mild dish soap. Wipe down the surface, and immediately buff it dry with a second, dry microfiber cloth to prevent water spots.
The Bottom Line
Executing a high-gloss finish in a high-traffic area like a mudroom is an exercise in patience and precision. It forces you to abandon the “good enough” mentality of standard weekend DIY projects. The sleek, modern aesthetic you achieve is entirely dependent on your willingness to obsess over the preparation, respect the chemistry of your chosen coatings, and meticulously control your application environment. When done correctly, the result isn’t just a painted cabinet; it is a durable, light-reflecting architectural feature that elevates the entire tone of your home from the moment you walk through the door.
Creating custom mudroom cabinetry that is perfectly tailored to your space—and worthy of a mirror-like finish—starts with elite-level blueprints. If you are ready to stop guessing at dimensions and start building structural masterpieces, I highly recommend checking out Ted’s Woodworking. I use it constantly for inspiration and precise schematics. With instant access to over 16,000 professional woodworking plans and a massive 75% discount currently available, it’s the ultimate resource for ensuring the bones of your mudroom are as flawless as the high-gloss finish you are about to apply. Grab your plans, prep your workspace, and build something brilliant.