How High to Hang Coat Hooks: the Standard Coat Hook Height Guide
Discover the exact standard heights for hanging coat hooks. Learn ergonomic measurements for adults, kids, and ADA compliance, plus professional mounting tips.

Jun 26, 2026 · Linda Wise
5 min readWalk into any chaotic household, and you will likely find a familiar sight: a pile of jackets slumped over the back of a kitchen chair, backpacks sprawling across the floor like sleeping dogs, and a lone, empty wall that was supposed to solve all these problems. Often, the culprit is not a lack of intent, but a failure of positioning.
Hanging coat hooks seems like a trivial weekend task. You grab a drill, level it by eye, and zip a few screws into the drywall. However, anyone who has ever watched a full-length winter coat drag on a dusty floor, or witnessed a toddler stretch in vain to hang up their school bag, knows that precision matters.
The height at which you mount your hardware dictates the entire flow of your home’s transition zone. Too high, and you alienate half the household; too low, and your walls look cramped, while longer garments bunch up on the floor. To get this right, you need to balance ergonomic data, spatial realities, and structural integrity.
Before we dissect the exact formulas for every scenario, let’s look at the absolute best hardware options to secure your gear.
Quick Comparison: Top Picks
| Product | Rating | Check Price |
|---|---|---|
| Liberty Heavy Duty Coat and Hat Hook | ⭐⭐⭐⭐⭐ | View on Amazon |
| Franklin Brass 5-Hook Rail | ⭐⭐⭐⭐½ | View on Amazon |
| Umbra Flip Wall Mounted Hook | ⭐⭐⭐⭐⭐ | View on Amazon |
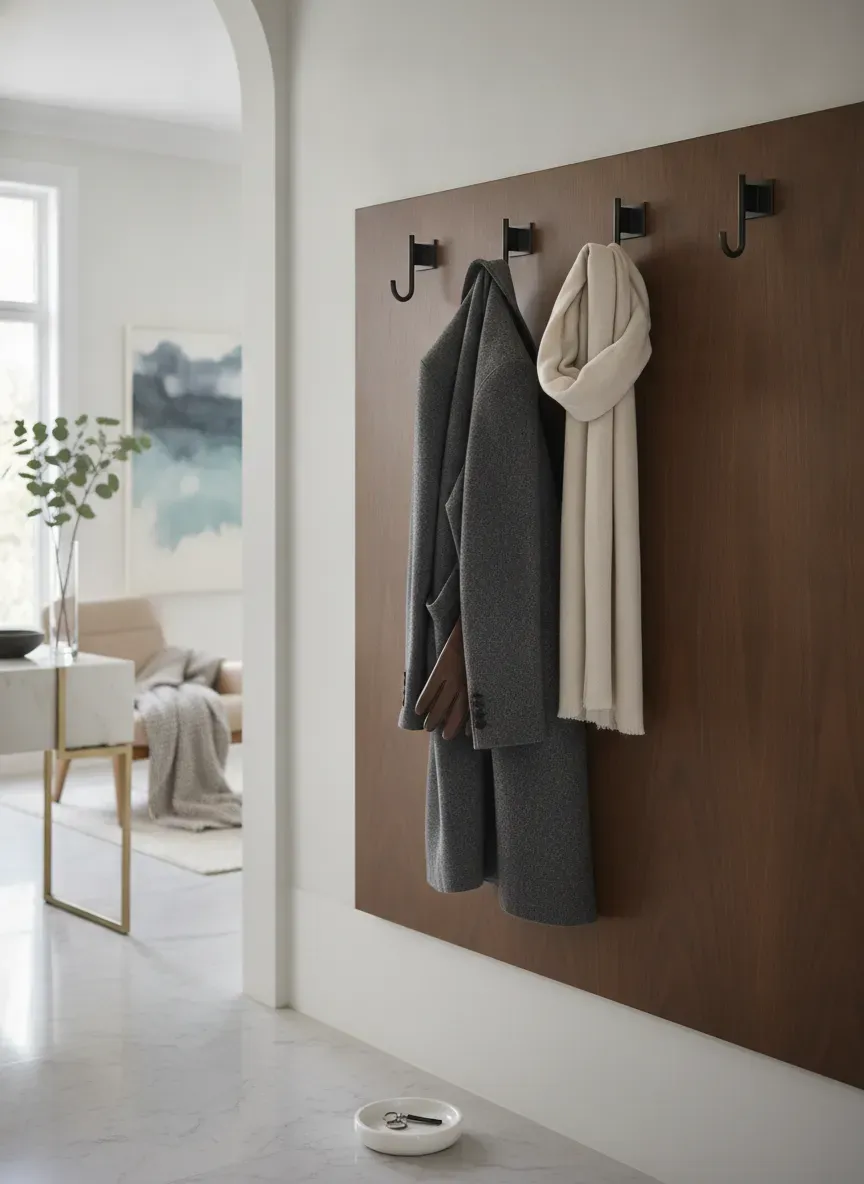
The Golden Standard: The 60-Inch Rule
For the vast majority of residential homes, the universal sweet spot for mounting coat hooks is 60 inches (152 cm) from the finished floor to the center of the hook.
This height did not emerge out of thin air. It is rooted deeply in human ergonomics. The average height of an adult globally sits between 5 feet 4 inches and 5 feet 9 inches. When you stand in front of a wall, your natural, comfortable reach zone—without straining your shoulders or bending your knees—ranges between 50 and 65 inches.
By centering your hardware at 5 feet (60 inches), you create a highly intuitive interface. It is high enough that a standard 40-inch trench coat or a bulky winter parka hangs with plenty of clearance from the floor. At the same time, it remains low enough that you do not need to stand on your tiptoes to hang a heavy bag.
However, while 60 inches is the default baseline, it is not a rigid law. If your household is composed of collegiate basketball players, pushing that line up to 64 or even 66 inches makes complete sense. If you are designing for a multigenerational home, or trying to optimize your entryway for everyone, you have to look deeper. For more perspective on these measurements, you might also find value in checking out our auxiliary guide on the nuances of coat hook heights.
Situational Heights: Designing for Every Demographic
A single standard height fails when your household is diverse. Let’s break down how to adjust your mounting heights based on who is actually using the space.
Designing for Children: Fostering Independence
If you mount all your hooks at 60 inches, your children have two choices: jump and throw their coats like a lasso, or drop them on the floor. If you want children to clean up after themselves, you must design spaces that welcome their physical proportions.
- Toddlers (Ages 2 to 4): Mount hooks at 36 inches (91 cm). At this height, toddlers can easily hang up their small jackets and preschool backpacks.
- Early Elementary (Ages 5 to 8): Elevate the hardware to 42 inches (107 cm).
- Tweens (Ages 9 to 12): Transition up to 48 to 54 inches (122 to 137 cm).
Pro Tip: Do not screw high-quality metal hooks directly into finished drywall at these lower heights if you expect to move them later. Instead, use a handsome wooden backer board. You can mount the board securely to the wall studs, and then mount the hooks to the board. As your children grow, you can simply detach the backer board, move it up, and patch only a few stud holes rather than a dozen individual drywall scars.
ADA Accessibility Guidelines
In public commercial spaces, or if you are designing an accessible home for individuals using wheelchairs, compliance with the Americans with Disabilities Act (ADA) is paramount.
According to ADA Section 308, the maximum high reach for an unobstructed forward or side approach is 48 inches (122 cm) above the finished floor. The absolute minimum low reach is 15 inches (38 cm).
To ensure complete accessibility, mount your hooks at precisely 48 inches. This ensures that anyone in a seated position can easily reach the hooks without straining or risking a tip-over, while still allowing enough vertical space for most jackets to hang without dragging on the ground.
The Double-Tier Strategy: Maximum Density
If you are dealing with a cramped mudroom or trying to fit an entire family’s gear into a tight space, a single row of hooks won’t cut it. You need a double-tier layout.
+--------------------------------------------------+  ~ 72" (Top Hook: Hats, Umbrellas)
|                                                  |
|                        O                         |
|                                                  |
+--------------------------------------------------+  ~ 60" (Middle Hook: Adult Coats)
|                                                  |
|                                                  |
|             O                      O             |
|                                                  |
+--------------------------------------------------+  ~ 42" (Bottom Hook: Kids, Bags)
|                                                  |
|                                                  |
+--------------------------------------------------+  Floor
When implementing a double-tier system, stagger the hooks. Do not place the lower hooks directly beneath the upper ones. Instead, offset them horizontally by at least 6 to 8 inches.
- Upper Row: Mount at 70 to 72 inches. This row is reserved for long coats, hats, scarves, and items used less frequently.
- Lower Row: Mount at 42 to 48 inches. This row is perfect for children’s gear, dog leashes, purses, and heavy backpacks.
This staggered layout prevents the items on the top row from completely burying the hardware below, keeping everything visible and reachable.
Spacing and Layout: The Horizontal Mechanics
Determining how high to hang your hooks is only half the battle. You also have to figure out how far apart to space them. If you crowd them too closely, your wall turns into an impenetrable clump of fabric. If you space them too far apart, you waste prime real estate.
The Density Formula
The distance between your hooks should match the climate you live in and the types of items you plan to hang.
- The Compact Spacing (4 to 5 inches): Best for light utility areas, keys, dog leashes, and thin rain jackets. This works exceptionally well when you are curating storage solutions for narrow hallways where space is at a premium.
- The Standard Spacing (6 to 8 inches): The sweet spot for everyday adult jackets, cardigans, and moderate sweaters. It allows garments to breathe without overlapping significantly.
- The Bulky/Winter Spacing (10 to 12 inches): Essential for cold climates. If your family wears heavy down parkas, thick wool overcoats, or bulky ski gear, you need at least 10 inches between hooks to prevent the coats from pushing each other off the wall.
Calculating Your Layout
To find the perfect spacing for your specific wall width, use this simple formula:
- Measure the total width of the wall space or backer board you want to use (e.g., 48 inches).
- Subtract the desired clearance from each end. I recommend leaving at least 4 inches of open space on the left and right ends so coats do not bunch up against door frames or adjacent walls. (e.g., $48 - 8 = 40$ inches of usable hook space).
- Decide how many hooks you want. Let’s say you want 5 hooks.
- Divide the usable space by the number of hooks minus one. $$\text{Spacing} = \frac{40\text{ inches}}{5 - 1} = 10\text{ inches}$$
- In this scenario, you will place a hook precisely at 4 inches from the left edge, and then every 10 inches thereafter. Your final hook will sit exactly 4 inches from the right edge.
The Physics of Mounting: Studs, Anchors, and Leverage
A coat hook is a lever. When you hang a heavy winter coat (approx. 5 lbs) or a fully loaded backpack (often 15 to 20 lbs) on a hook that protrudes 3 inches from the wall, you are creating significant rotational leverage.
If that hook is secured only by a cheap plastic expansion anchor in 1/2-inch drywall, gravity will win. Over a few months of daily use, the anchor will wiggle, the drywall will crumble, and the hook will begin to sag before eventually tearing free.
Finding the Studs
Whenever possible, mount your hooks directly into wooden wall studs. Standard home construction dictates that wall studs are spaced 16 inches apart on center (sometimes 24 inches in newer or non-load-bearing walls).
Use a reliable stud finder to locate these framing members. If your hook placement matches the stud locations, use heavy-duty wood screws (at least 2.5 inches long) to bite deep into the wood behind the drywall.
What If the Studs Don’t Align?
If your design requires specific hook placement that does not align with your home’s stud layout, you have three options:
- The Backer Board Method (Highly Recommended): Cut a piece of 1x4 or 1x6 hardwood (such as oak, maple, or poplar) to your desired length. Paint or stain it to match your decor. Mount this board horizontally, screwing it directly into every wall stud it crosses. Once the board is anchored to the studs, you can screw your coat hooks anywhere along the board with absolute confidence.
- Toggle Bolts: If you must mount directly to drywall, throw away the cheap plastic anchors that came in the hook packaging. Use metal toggle bolts or self-drilling zinc drywall anchors. Toggle bolts spread the load behind the drywall board, offering significantly higher pull-out resistance (often up to 50 lbs per anchor).
- Molly Bolts: These sleeve-type anchors expand behind the drywall, offering a highly secure grip that resists the constant upward and downward pulling forces that coat hooks experience.
Key Takeaways for Secure Mounting
- Never trust plastic press-in plugs for items heavier than a set of keys.
- Always pre-drill your pilot holes to avoid splitting wooden studs or backer boards.
- Use a spirit level to ensure your horizontal layout is perfectly flat; even a 1/8-inch slope across a 4-foot run will be highly visible once coats are hanging.
- If you are building a larger entryway setup, consider reading our step-by-step DIY mudroom construction guide to ensure all components are structurally sound.
Style, Material, and Aesthetic Harmony
The physical dimensions of your hooks are only half of the equation; how they integrate visually with your home’s architecture is what elevates a project from functional to professional.
Hook Profiles and Their Impact on Height
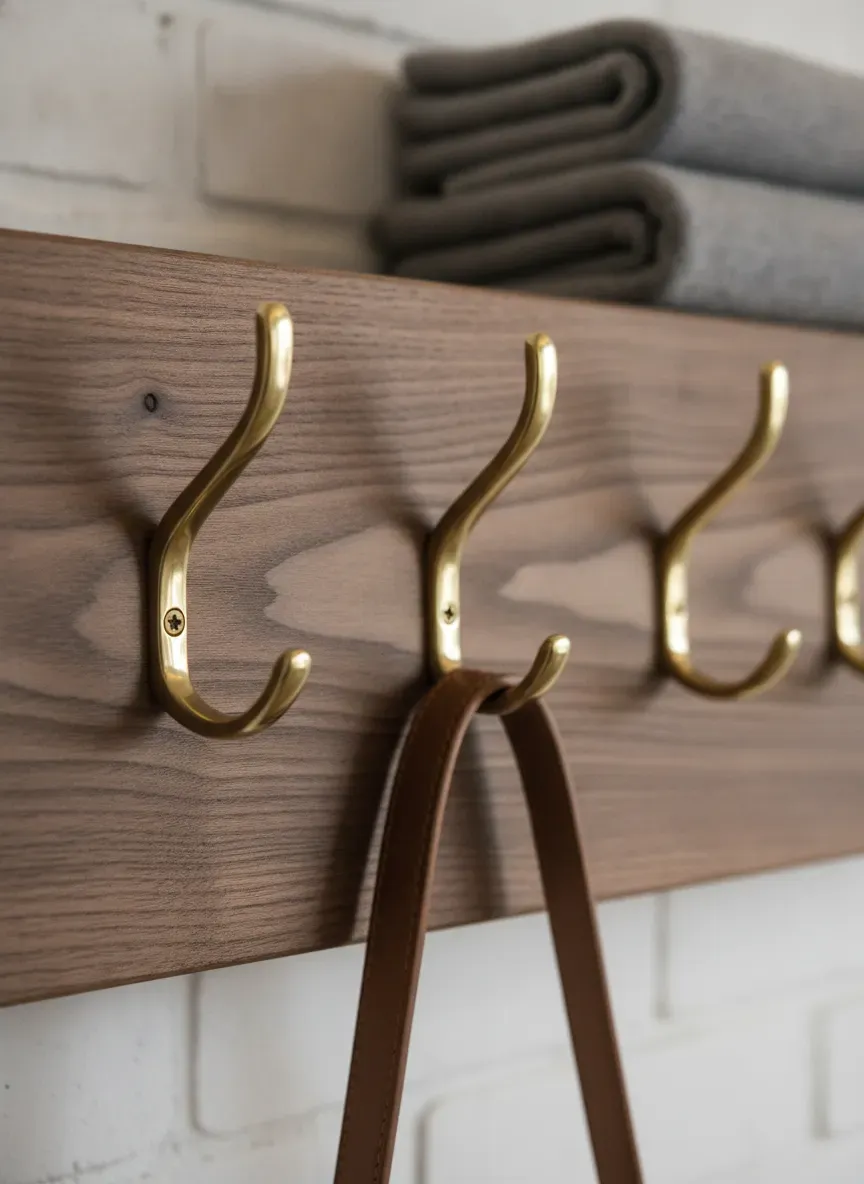
Not all hooks are shaped the same, and their profile should influence your mounting height:
- Classic Double-Prong Hooks: These feature a large upper hook (for hats or light jackets) and a smaller lower prong (for keys or bags). Because the lower prong sits 2 to 3 inches below the mounting screws, you should mount these hooks slightly higher (62 inches) to keep the lower items at a comfortable reaching height.
- Modern Peg Hooks: These are simple, minimalist wooden or metal cylinders that project straight out or at a slight upward angle. Because they have no lower hook, they can be mounted precisely at the 60-inch line.
- Flip-Down Hooks: Perfect for minimalist or ultra-modern spaces. These units feature hooks that fold flat into a wooden or plastic housing when not in use. Since they require a downward pulling motion to deploy, mount them at a comfortable eye-level (58 to 60 inches) so users can easily see and operate the mechanism.
Coordinating with Furniture and Wainscoting
Your coat hooks do not exist in a vacuum. They must coordinate with the other elements of your entryway design.
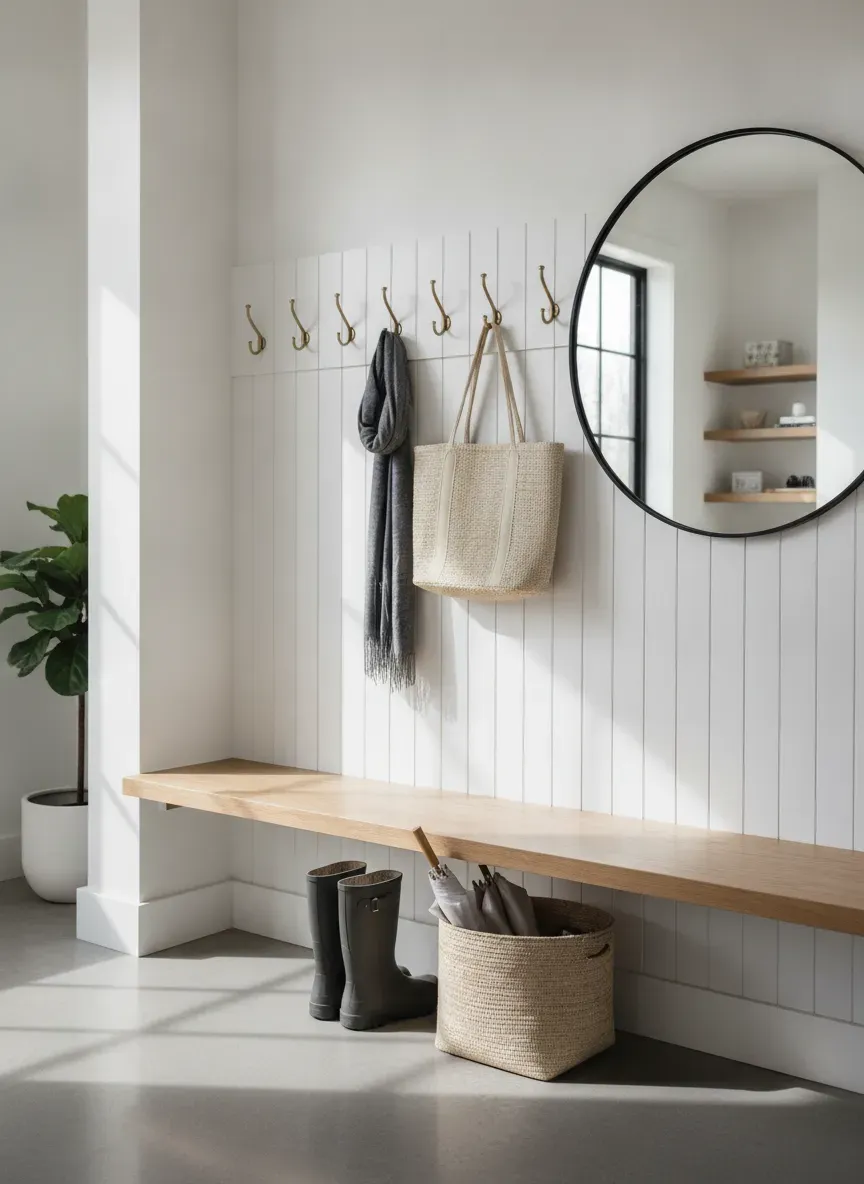
The Mudroom Bench Setup
If you have a bench in your entryway or mudroom, it changes how you calculate hook height. A standard bench height is 18 inches (46 cm) above the floor.
To prevent coats from piling up on the bench cushion or interfering with someone sitting down, you need a minimum of 40 inches of clearance between the top of the bench and the bottom of the hooks. This places your hook line at approximately 58 to 62 inches from the floor, perfectly aligning with our standard rule.
Wainscoting and Board and Batten
If your entryway features classic board and batten or wainscoting, the top rail of this trim work is the natural home for your coat hooks.
Standard wainscoting typically tops out at 36, 48, or 60 inches. If your wainscoting is 60 inches high, mount your hooks directly onto the top horizontal trim piece. This looks incredibly intentional and provides a solid wood backing for secure mounting.
If your trim is lower, say 48 inches, you can mount your primary coat hooks directly onto that rail, making it an excellent height for family-wide accessibility.
Common Pitfalls and How to Avoid Them
Even with the best measurements, minor installation oversights can ruin your entryway’s functionality. Avoid these common mistakes:
1. The “Ghost Swing” Clearance Failure
When you mount a hook near a door frame, always test the door’s swing path first. A thick winter coat hanging on a hook near a doorway can prevent the door from opening a full 90 degrees. Ensure you have at least 12 to 18 inches of clearance from any door casing before mounting a hook.
2. Ignoring Wall Switch Obstructions
Never mount a coat hook directly above or right next to a light switch or thermostat. A hanging coat can easily drape over the switch, turning lights off unexpectedly, blocking smart home sensors, or trapping heat and throwing off your thermostat’s readings. For those looking to modernize their foyer, consider how integrating smart home technology into your entryway might affect where you place physical storage.
3. The Sagging Screws Syndrome
Using screws that are too short is a recipe for failure. Remember that your screw must pass through:
- The thickness of the hook plate (approx. 1/8 to 1/4 inch).
- The thickness of the drywall (usually 1/2 or 5/8 inch).
- The empty gap behind the drywall before it bites into the stud.
If you use a 1.25-inch screw, only about 1/2 inch of thread will actually penetrate the wood stud. Always use at least 2-inch to 2.5-inch screws for primary stud mounting.
Step-by-Step Installation Guide
Ready to get to work? Follow this straightforward installation protocol to ensure your coat hooks are straight, secure, and beautiful.
Tools and Materials Needed
- Your chosen coat hooks (or hook rail)
- Tape measure
- Spirit level (at least 2 feet long)
- Stud finder
- Pencil
- Power drill and driver bits
- High-quality wall anchors (if not mounting to studs)
- Painter’s tape (optional, but highly useful)
The Installation Protocol
- Prep the Wall: Clear the area and clean the wall surface. Run your stud finder horizontally across the mounting zone. Mark the center of each stud lightly with a pencil at approximately the 60-inch height.
- Use the Tape Method: To make marking easy, lay down a strip of blue painter’s tape horizontally along the wall where you want your hooks to go. Use your spirit level to make sure the tape is perfectly level.
- Mark the Heights: Measure up from the finished floor and mark your desired height (e.g., 60 inches) directly onto the painter’s tape at several points. Connect these points with your level to create a perfectly level reference line.
- Layout Your Spacing: Using the density formula we calculated earlier, mark the exact center point for each hook along your level line.
- Pre-Drill the Holes: Holding your hook up to your pencil mark, use the hook’s mounting holes as a template to mark the screw locations. Set the hook aside. Using a drill bit slightly smaller than your screws (or the exact size required for your drywall anchors), drill pilot holes through the tape and drywall.
- Insert Anchors (If Needed): If any of your holes do not hit a stud, remove the painter’s tape and insert your heavy-duty drywall anchors into those pre-drilled holes until they sit flush with the wall.
- Mount the Hooks: Align your hooks with the holes and drive your screws home. Do not over-tighten them with an impact driver, as this can strip the drywall anchors or snap the heads off cheaper brass screws. Tighten the last few turns by hand.
- The Stress Test: Give each hook a firm downward tug. If there is any play, clicking, or movement against the wall, back the screws out and check your anchors before hanging heavy winter gear.
The Bottom Line
The secret to a highly functional entryway lies in matching human physical dimensions with the structural realities of your home. By sticking to the standard 60-inch height for adults, integrating lower 36 to 48-inch hooks for children, spacing them 6 to 10 inches apart, and anchoring them deep into wall studs or a solid wooden backer board, you create a system that functions flawlessly for years. Spend the extra twenty minutes to measure twice, find your studs, and level your lines. Your future self—standing in a clean, organized, clutter-free foyer—will thank you every single day.
Top Picks: Best Entryway Essentials
Editor's shortlist with verified ratings. Prices and availability below — clicking an Amazon link earns us a small commission at no extra cost to you.
| # | Product | Rating | Reviews | Tag | Check Price |
|---|---|---|---|---|---|
| 1 | Vasagle Industrial Entryway Bench | 8,420 | Top Pick | View on Amazon | |
| 2 | Crosley Furniture Seaside Hall Tree | 5,410 | — | View on Amazon | |
| 3 | Seville Classics 12-Pair Shoe Rack | 6,420 | Best Storage | View on Amazon | |
| 4 | Franklin Brass Wall Hooks (5-Pack) | 9,820 | — | View on Amazon | |
| 5 | Simplihome Artisan Solid Wood Bench | 3,127 | Editor's Pick | View on Amazon |
Affiliate disclosure: As an Amazon Associate we earn from qualifying purchases.
Tag: entreyway-20 — change in src/data/topPicks.ts.