Integrating Entryway Built-Ins with Existing Home Decor Styles
Master the art of designing entryway built-ins that look perfectly inherited. Discover expert millwork strategies, hardware selection, and seamless architectural integration.
Mar 11, 2026 - Written by: Linda Wise
The foyer sets the immediate narrative for your entire home. You cross the threshold, and instantly, the house speaks. Does it whisper serene, curated organization, or does it scream chaotic shoe mountain? I’ve spent years analyzing interior spaces, and I can tell you that the difference almost always comes down to custom storage. But here’s the real kicker: slapping a generic, big-box storage locker against your front wall won’t solve the aesthetic problem. It just elevates the clutter into a slightly more organized eyesore.
True spatial harmony requires integrating entryway built-ins with your existing home decor styles so flawlessly that the cabinetry looks inherited, not installed.
When you get this right, the built-in feels like it has always belonged there. It speaks the same architectural language as your baseboards, honors the historical era of your home’s construction, and mirrors your interior color palette. Achieving this level of bespoke continuity requires a deep understanding of millwork, proportion, and materiality. We are going to deconstruct exactly how to execute this architectural handshake, ensuring your drop-zone becomes a striking design feature rather than an afterthought.
Quick Comparison: Top Picks
| Product | Rating | Check Price |
|---|---|---|
| Kreg Pocket-Hole Jig 720PRO | ⭐⭐⭐⭐⭐ | View on Amazon |
| Solid Unlacquered Brass Cabinet Pulls | ⭐⭐⭐⭐½ | View on Amazon |
| Hand-Woven Water Hyacinth Storage Baskets | ⭐⭐⭐⭐⭐ | View on Amazon |
The Architectural Handshake: Why Integration Matters
You’ll notice that the most jarring home renovations are the ones that ignore the property’s original vernacular. Imagine a 1920s Craftsman bungalow featuring heavy, dark-stained oak trim and tapered columns. Now, picture a high-gloss, handle-less, stark white melamine mudroom unit dropped right beside the front door. The visual friction is immediate.
Designing built-ins is fundamentally an exercise in context. The cabinetry must shake hands with the room it occupies. This means evaluating the existing “bones” of the space before you ever sketch a shelving layout. You need to identify the exact profile of your current baseboards, the style of your interior doors (are they two-panel, six-panel, or flush?), and the prevalent window casings.
A successful built-in bridges the gap between raw utility and structural art. It absorbs the chaos of winter coats, muddy boots, and rogue umbrellas, hiding them behind a facade that mimics the surrounding architecture. When I consult on these projects, the first thing I look for is the transition point. How will the side of the cabinet meet the wall? Will the crown molding wrap seamlessly around the top of the unit, tying it into the ceiling? These minute details dictate whether the piece feels like high-end custom millwork or a temporary furniture fixture.
Decoding Your Home’s Aesthetic DNA
To weave a new structure into an old room, you have to diagnose the aesthetic DNA of your space. Let’s break down how to approach the design of your built-ins based on the four dominant residential styles I encounter most often.
Transitional and Traditional Elegance
Traditional homes demand symmetry, rich textures, and detailed carpentry. If your home features wainscoting, crown molding, and perhaps a classic staircase spindle design, your built-in must rise to that level of formality.
For a traditional space, opt for inset cabinet doors rather than overlay. Inset doors sit flush within the cabinet frame, a hallmark of historic craftsmanship that requires precise hinges and exact measurements. You’ll want to utilize raised-panel or classic Shaker-style door fronts.
Color plays a vital role here. While a crisp, classic white (like Benjamin Moore’s White Dove) is a safe and beautiful choice, deep, moody heritage colors are currently making a massive impact. Think hunter greens, deep navy blues, or even a rich, muted burgundy. Pair these colors with antique brass or oil-rubbed bronze hardware to ground the piece in a sense of history.

Modern Farmhouse and Rustic Warmth
The Modern Farmhouse aesthetic thrives on the tension between cozy, rustic elements and clean, contemporary lines. If your home features wide-plank oak floors, slipcovered furniture, and matte black accents, your entryway should reflect that relaxed but tailored vibe.
When drafting plans for a farmhouse built-in, I frequently incorporate V-groove or beadboard backing behind the open bench area. This adds vertical texture that draws the eye upward, making the ceiling feel higher. The bench seat itself is the perfect opportunity to introduce warmth; a thick slab of reclaimed wood or white oak finished with a matte, water-based polyurethane provides incredible durability while adding organic beauty.
Hardware should lean utilitarian. Matte black cup pulls on the lower shoe drawers and heavy-duty cast iron hooks for coats strike the right balance. Keep the paint colors soft and earthy—warm greiges, soft sage greens, or creamy off-whites.
Sleek Contemporary and Minimalist Edges
Contemporary design is unforgiving. Without the distraction of ornate molding or decorative hardware, every shadow line, gap, and surface finish must be flawless. If your home is a testament to minimalism, large-format tile, and expansive glass, a traditional mudroom bench will look absurd.
For a contemporary integration, the goal is stealth. The built-in should look like a paneled wall that just happens to open up into cavernous storage. Use full-overlay slab doors that completely cover the cabinet framing. Push-to-open latch mechanisms eliminate the need for visible hardware entirely, maintaining an uninterrupted visual plane.
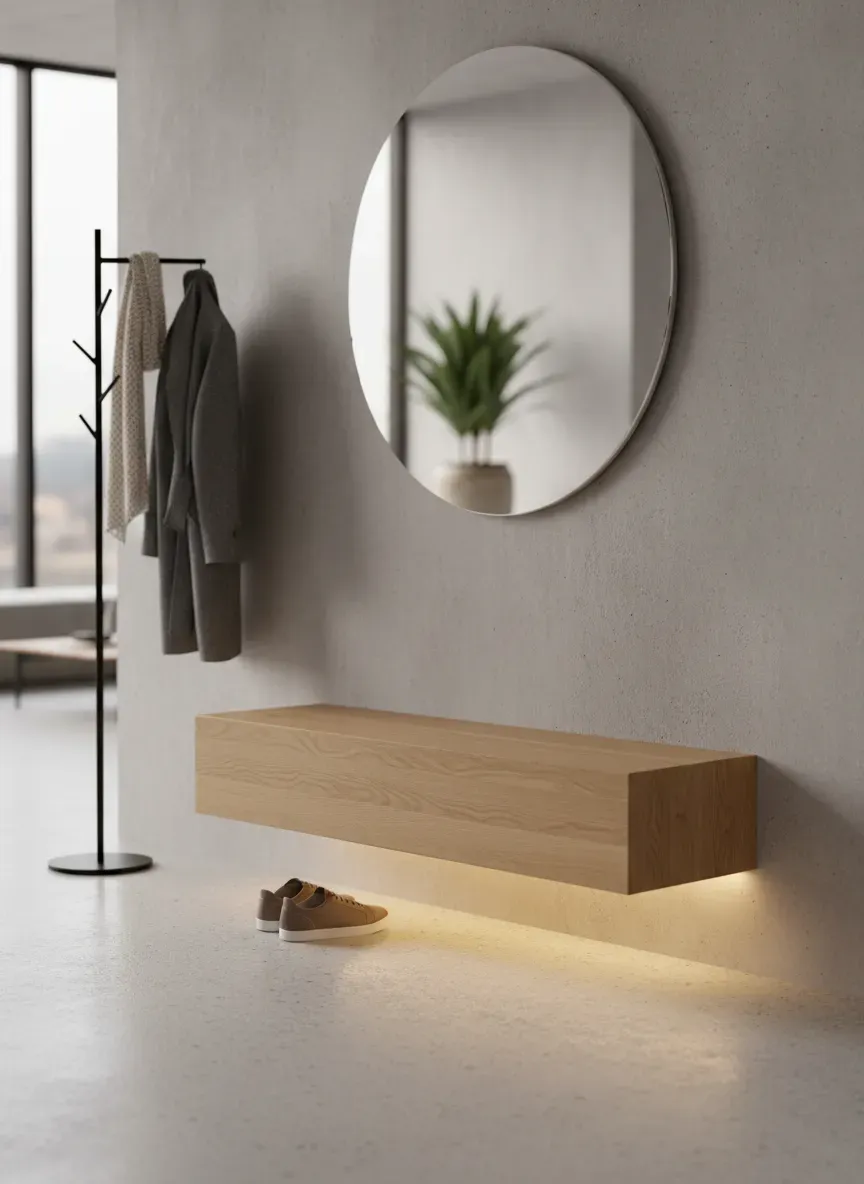
Instead of a traditional bench, consider a “floating” bench design where the seating area is cantilevered off the wall or supported by hidden steel brackets. Material choices often shift away from painted wood toward high-quality wood veneers, like flat-cut walnut or rift-sawn white oak, running the grain continuously from the bottom drawer up to the top cabinet door.
Mid-Century Modern Revival
Mid-Century Modern (MCM) homes are characterized by their organic integration with nature, asymmetrical facades, and specific wood tones. If you are retrofitting an entryway in a mid-century home, the built-in should pay homage to the geometric playfulness of the era.
Avoid heavy crown molding at all costs; MCM homes rarely feature it, and adding it to your built-in will ruin the illusion. Instead, leave a deliberate “shadow gap” (a small, recessed space) between the top of the cabinet and the ceiling. Use flat-panel doors, and consider incorporating sliding doors on tracks for upper storage rather than swinging doors. Peg-style coat hooks and recessed, routed finger pulls instead of external cabinet knobs keep the mid-century illusion alive.
Pro Tip: If you are trying to match an existing vintage wood finish in an MCM home, do not rely on standard hardware store stains. Hire a professional finisher to mix a custom stain, or use a combination of aniline dyes and amber shellac to replicate that decades-old patina.
Materiality and Finish: The Invisible Thread
Once the structural style is nailed down, the tactile experience takes over. The materials you choose act as the invisible thread tying the new construction to the existing space.
Let’s talk about paint. A common mistake I see is homeowners matching the color of their existing trim, but ignoring the sheen. If your baseboards are painted in a semi-gloss finish, painting your built-ins in a matte or eggshell finish will immediately highlight the cabinets as a separate, newly added entity. Light bounces off different paint sheens in vastly different ways. For total integration, exact sheen matching is non-negotiable.
Furthermore, you must consider the durability of the finish. Entryways take a brutal beating. Wet coats, thrown keys, and muddy boots demand a finish that can withstand impact. Instead of standard latex wall paint, use an enamel-based cabinet paint or a high-quality urethane alkyd. These formulas cure to a hard, furniture-like finish that resists chipping and allows for aggressive scrubbing.
Hardware as Jewelry
Cabinet hardware is the jewelry of your built-in. It’s the final accessory that can either elevate the piece or cheapen it.
When integrating with existing decor, look around your home. What metal finishes dominate your light fixtures, door hinges, and kitchen cabinet pulls? You don’t have to be entirely monochromatic—mixing metals is a hallmark of sophisticated design—but there needs to be a dominant and an accent metal.
Mixing Metals Successfully
If your home features predominantly polished nickel door hardware, bringing in unlacquered brass pulls for the entryway built-in creates a stunning, warm contrast. The key to mixing metals is deliberate placement. Ensure the accent metal appears in at least two places in the visual field. For instance, pair those Solid Unlacquered Brass Cabinet Pulls with a brass picture light mounted above the bench. This intentionality makes the design feel cohesive rather than accidental.

Spatial Dynamics, Scale, and Proportion
Even if the style and paint match perfectly, a built-in will look entirely out of place if the scale is wrong. Proportion dictates how comfortable a space feels.
A standard mistake is building the unit too shallow to be useful, or too deep, causing it to choke the hallway. Winter coats on heavy hangers require a surprisingly deep cabinet if you want to close doors over them without crushing the sleeves. Understanding the optimal dimensions for your cabinetry ensures the unit functions flawlessly without cannibalizing your walking space. Generally, an open bench needs to be at least 15 to 18 inches deep for comfortable seating, while a closed locker needs roughly 20 to 24 inches of depth for hanging bulkier items.
Ceiling height also plays a massive role in proportion. If you have standard 8-foot ceilings, taking the built-in all the way up to the ceiling (and finishing it with matching crown molding) draws the eye upward, effectively making the room feel taller. However, if you are blessed with soaring 12-foot or vaulted ceilings, taking cabinetry to the ceiling might look monolithic and overwhelming. In those cases, capping the built-in at a standard 8 or 9-foot height and treating the top like a display ledge for curated art or trailing plants maintains human scale.
Functional Stealth: Hiding the Chaos
Beautiful millwork is useless if it doesn’t actually solve your organization problems. The best built-ins are masters of functional stealth. They provide specific homes for specific items, preventing the horizontal surface clutter that plagues so many foyers.
Consider the ergonomics of coming home. You walk in, take off your shoes, drop your keys, put down the mail, and hang up your coat. Your built-in needs to facilitate this exact choreography.
For the drop zone, I strongly advocate for a shallow, concealed drawer right at waist height. This keeps visually noisy items out of sight. Inside this drawer, or mounted on the inside of a narrow cabinet door, you need a streamlined system for corralling daily carry items. Incorporating hidden outlets inside these drawers is a game-changer; you can charge phones, tablets, or even a handheld vacuum out of sight.
Designing for Multi-Purpose Spaces
Not everyone has a dedicated, sweeping foyer. In urban environments, townhomes, or open-concept floor plans, the entryway might bleed directly into the living room, the kitchen, or even a functional flex space.
When your built-in has to share a room with other distinct zones, the design must be highly adaptive. If the entryway merges with a home workout area, the cabinetry might need to house heavy, awkward items. Designing tall, reinforced vertical cabinets allows for cleverly disguised equipment solutions, meaning your guests see elegant wood paneling instead of dumbbells and yoga mats when they walk through the front door.
The secret to multi-purpose integration is closed storage. Open cubbies are great for stylized mudrooms in magazines, but in real life, open storage requires constant curation to look presentable. If your built-in is visible from the sofa where you relax in the evening, you want solid doors covering at least 70% of the storage space. Keep the open areas reserved strictly for decorative items or incredibly tidy shoe storage using uniform Hand-Woven Water Hyacinth Storage Baskets.
Illuminating the Millwork: Lighting Integration
Lighting is the most frequently overlooked element in built-in design. A poorly lit cubby feels like a dark cave, while well-integrated lighting elevates the cabinetry to a bespoke architectural feature.
Hardwired lighting should be planned before the first piece of wood is cut. If you have an open bench area, consider installing a pair of elegant wall sconces on the backing board. Not only does this provide warm, ambient light for the entryway, but it also creates a stunning focal point from the exterior if you have glass panels on your front door.
For a more modern approach, routed LED tape channels are indispensable. Recessing an aluminum channel with a frosted diffuser into the underside of an upper shelf casts a beautiful wash of light down onto the bench. You can also run LED strips along the toe-kick at the bottom of the unit, creating a floating effect and serving as an ideal, low-wattage nightlight for the house. Always put these built-in lights on a dimmer switch so you can control the mood of the entryway as day transitions into night.
Common Pitfalls in Built-In Design (And How to Dodge Them)
Even with the best intentions, I’ve seen DIYers and contractors alike fall into a few predictable traps when constructing entryway storage.
- Ignoring the Baseboards: The most glaring sign of a “tacked-on” cabinet is when the room’s baseboard stops abruptly at the side of the unit. For a true built-in look, you must remove the existing baseboard behind the unit, install the cabinetry, and then wrap the room’s baseboard seamlessly around the bottom of the new structure.
- Forgetting Scribe Molding: Walls are almost never perfectly plumb, and floors are rarely perfectly level. If you push a perfectly square cabinet against a wavy wall, you will have ugly, uneven gaps. Trim carpenters use a technique called scribing—cutting the edge of the cabinet to match the exact contour of the wall—or they use a small piece of scribe molding to cover the gap. Do not skip this step; caulking a massive half-inch gap looks terrible.
- Blocking HVAC Vents: Entryways often feature floor registers for heating and cooling. Building a solid box over a vent is a disaster for your home’s HVAC efficiency. If a vent falls under your footprint, you must route the ductwork through the toe-kick of the built-in and install a register cover on the front face of the base.
- Failing to Account for Outlets: Similarly, do not bury your wall outlets. Have an electrician move the receptacles forward so they are mounted flush on the side or inside the new cabinetry.
- Key Takeaways:
- Context is everything; mirror your home’s existing trim, doors, and architectural era.
- Paint sheen matters just as much as color when trying to blend new millwork with old.
- Deep, closed storage hides the reality of daily life; open storage requires constant curation.
- Scribing your cabinets to the wall and wrapping the baseboards are the true hallmarks of custom integration.
- Pre-plan your electrical needs for sconces, LED strips, and hidden charging stations.
The Final Polish: Styling Your New Built-In
Once the paint has cured and the hardware is installed, the final step is styling. The urge is often to fill every hook and stuff every cubby immediately. Resist this.
Treat the open areas of your built-in as a curated display. A vintage runner rug leading up to the bench softens the hard lines of the cabinetry. A textured throw pillow on the seating area invites comfort. Place a small, heavy ceramic bowl on a shelf for keys, and perhaps a hardy, low-light plant like a ZZ plant or a Pothos trailing down from an upper cubby to breathe life into the wood and paint.
The Bottom Line: Integrating entryway built-ins with existing home decor styles is an exercise in restraint, observation, and meticulous craftsmanship. It requires looking closely at the subtle details your home already possesses and reflecting them back in a highly functional format. By matching the architectural vernacular, insisting on exact paint sheens, and executing seamless trim transitions, you transform a simple storage solution into a permanent, value-adding architectural masterpiece that welcomes you home every single day.