Transforming Closet Entryways: Maximizing Storage Space in Existing Coat Closets
Discover expert strategies to renovate and maximize your entryway coat closet. Transform chaotic drop zones into sophisticated, high-capacity storage systems.
Feb 1, 2026 - Written by: linda wise

The entryway sets the tone for the entire home. It is the transitional threshold between the chaotic outside world and your personal sanctuary. However, in many homes, the standard builder-grade coat closet acts less like a functional storage solution and more like a chaotic abyss. A single rod and a solitary shelf often define these spaces, leaving significant vertical and horizontal volume unutilized. This architectural oversight turns what should be an organized drop zone into a clutter magnet.
Transforming an existing coat closet is not merely about aesthetic improvement; it is an exercise in spatial engineering. By rethinking the layout, utilizing advanced hardware, and customizing the interior to match specific lifestyle needs, you can triple the usable storage capacity of a standard closet. This guide provides a comprehensive roadmap for homeowners looking to elevate their entryway utility through strategic renovation and sophisticated organization.
The Anatomy of Inefficiency: Assessing the Current State
Before swinging a sledgehammer or purchasing lumber, one must understand why the current setup fails. The traditional closet design—a rod at 66 inches high and a shelf at 68 inches—was standardized decades ago when wardrobes were smaller and accessories fewer. This layout creates two specific “dead zones”: the floor space beneath hanging coats and the vertical space above the top shelf.
Conducting a Spatial Audit
Begin by emptying the closet completely. This blank canvas allows you to visualize the potential without the visual noise of winter parkas and scattered shoes. Measure the interior dimensions with precision, paying close attention to the “return walls”—the sections of the wall hidden behind the door frame. These hidden pockets are often the key to unlocking storage for small accessories like umbrellas, scarves, or cleaning tools.
Analyze the depth. A standard coat closet is 24 inches deep, yet most coats only require 22 inches of clearance. While two inches may seem negligible, in the world of micro-organization, this variance allows for the installation of back-of-door storage racks without inhibiting the door’s closure.
Benchmarking Your Inventory
Effective storage design is prescriptive, not generic. Take stock of exactly what needs to reside in this space. Do you live in a climate requiring heavy woolen coats and tall boots, or are you in a region where light jackets and sneakers dominate? Count your pairs of shoes, measure the length of your longest coat, and tally the accessories that currently lack a home. This inventory data will dictate whether you need double-hanging rods, extensive shoe cubbies, or dedicated shelving for bins.
Structural Optimization: Beyond the Single Rod
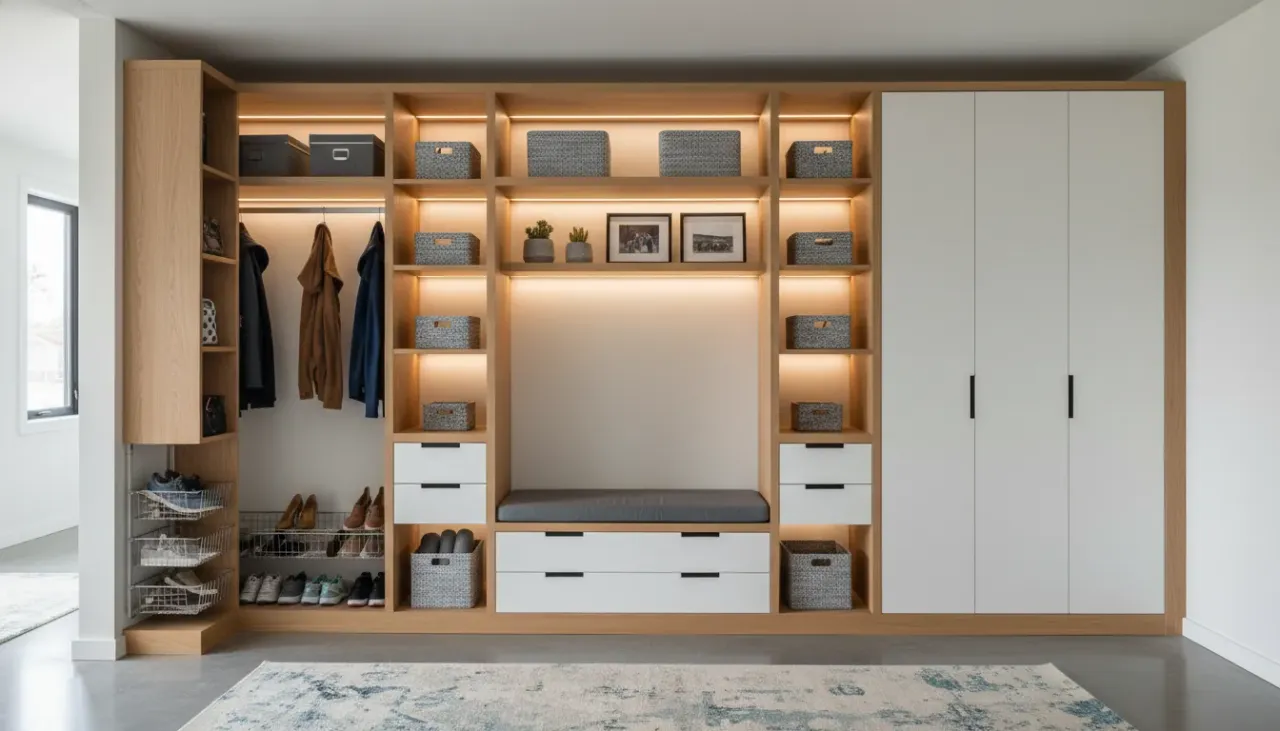
The most impactful change you can make is abandoning the single-rod philosophy. By segmenting the closet vertically, you can dramatically increase capacity.
Implementing Double-Hang Systems
For households that do not require storage for full-length trench coats or evening gowns in the entryway, a double-hang system is superior. By installing one rod at 40 inches and a second at 80 inches, you effectively double the hanging space for jackets, blazers, and shirts.
If long coats are a necessity, consider a split-system design. Dedicate one-third of the closet width to long-hanging storage and utilize the remaining two-thirds for double-hanging rods or shelving stacks. This requires installing a vertical divider, which also serves to structurally support additional shelving.
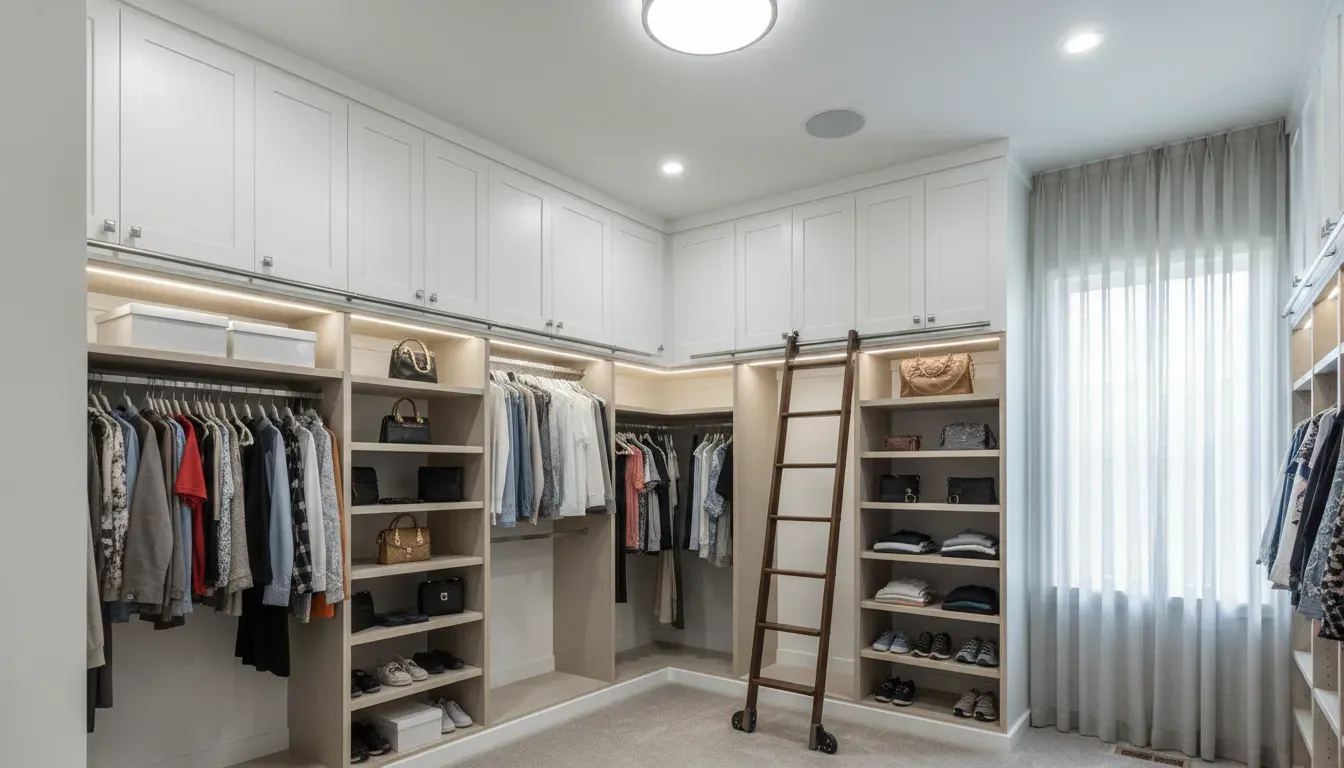
Utilizing the Vertical Extremes
Most closets have a header—the wall space above the door frame—that conceals a significant cavern of potential storage. Standard shelves often stop well below this ceiling line. By removing the existing shelf and installing cabinetry or heavy-duty shelving that extends all the way to the ceiling, you gain a prime location for “deep storage.” This area is ideal for seasonal items that are accessed infrequently, such as holiday decor or off-season camping gear.
To make this high storage accessible, avoid stacking loose items. instead, utilize uniform, opaque bins that can be easily pulled down. This reduces visual clutter and protects items from dust.
The Mudroom Conversion: Removing the Doors
One of the most popular trends in modern interior design is converting a closed closet into an open-concept “mudroom” nook. This involves removing the bi-fold or hinged doors entirely to create a recessed alcove. This approach is particularly effective in narrow hallways where opening closet doors blocks traffic flow.
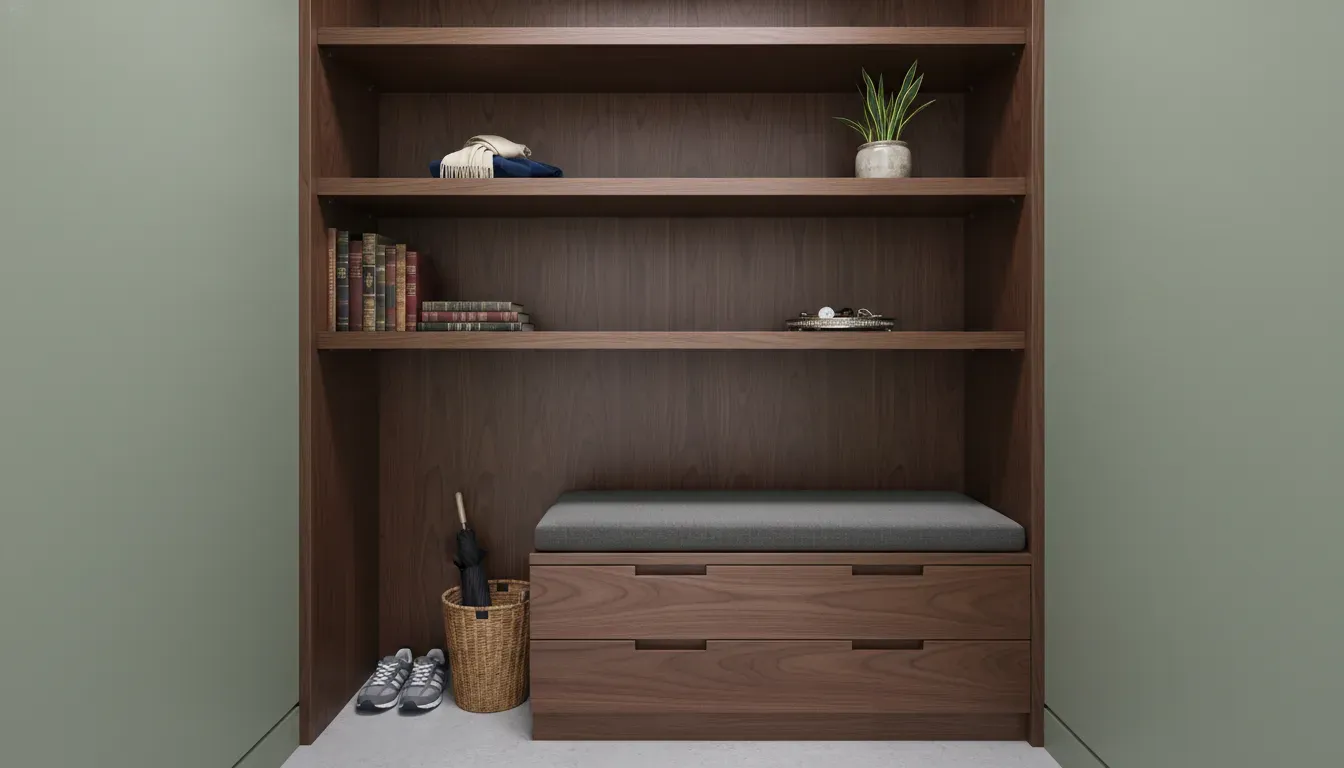
Constructing the Built-In Bench
The centerpiece of a mudroom conversion is the bench. A built-in bench provides a seated area for putting on shoes—a critical function of an entryway—while offering storage underneath. The space beneath the bench can be outfitted with pull-out drawers on heavy-duty slides or open cubbies for shoe baskets.
When designing the bench, aim for a height of 18 to 20 inches. This is the ergonomic standard for comfortable seating. Ensure the structure is reinforced with 2x4 framing anchored to the studs to support the weight of adults. For a polished look, top the bench with a hardwood slab stained to match your home’s flooring or a custom upholstered cushion.
Wall Treatments and Hook Placement
With the doors removed, the back wall of the closet becomes a focal point. Treat this surface with architectural interest. Beadboard paneling or shiplap adds texture and durability, protecting the drywall from scuffs caused by bags and coats.
Install heavy-duty hooks at varied heights. A row of hooks at 60-64 inches serves adults, while a secondary row at 36-40 inches allows children to hang their own backpacks and jackets, fostering independence and keeping the floor clear.
For those interested in exploring how open storage compares to traditional closed methods, you might find our analysis on Open vs. Closed Storage Systems helpful.
Advanced Shelving and Shoe Organization
Shoes are the primary antagonist in the battle for a clean entryway. When piled on the floor, they create a tripping hazard and waste space. Elevating footwear is essential for a functional closet.
Custom Cubbies vs. Slanted Shelves
For a high-volume shoe collection, floor-to-ceiling cubbies on a side wall are efficient. However, within a standard coat closet, slanted shelves with heel stops are often more practical. Slanted shelves allow for better visibility and easier access, preventing the “black hole” effect where shoes at the back of a flat shelf are forgotten.
If you are retaining the closet doors, consider a floor-mounted shoe rack that sits beneath the hanging clothes. However, avoid the flimsy, extendable wire racks found at discount stores. Opt for solid wood or metal structures that do not wobble.
For a versatile, modular approach to shoe storage that can adapt as your collection changes, consider investing in stackable systems that maximize vertical efficiency.
https://www.amazon.com/s?k=stackable+shoe+organizer+for+closet&tag=hats0f8-20
Lighting: The Forgotten Upgrade
Lighting is the difference between a dark utility cupboard and a boutique-style display. Standard coat closets rarely include hardwired lighting, making it difficult to distinguish between a navy and black jacket.
Battery-Operated and Motion Sensing Solutions
If hiring an electrician to run new wiring is not in the budget, modern LED technology offers powerful alternatives. Rechargeable, motion-sensor LED strip lights are a game-changer for closet interiors.
Install these strips along the underside of each shelf and along the vertical door frames. The motion sensor ensures the lights activate the moment the door opens, illuminating every corner. This not only adds a touch of luxury but significantly improves functionality.
https://www.amazon.com/s?k=motion+sensor+led+closet+lights&tag=hats0f8-20
Door Utilization: The Fourth Wall
In a small closet, the door itself represents valuable real estate. If you have a hinged door (as opposed to a slider or bi-fold), the interior face is perfect for specialized storage.
The Elfa System and Vertical Racks
Vertical rail systems can be mounted to the door to hold wire baskets. These are ideal for small, loose items that get lost on large shelves: gloves, hats, dog leashes, and sunscreen. Ensure that the baskets are positioned so they do not collide with the interior shelving when the door is closed. This often requires setting interior shelves back by a few inches to accommodate the door storage.
Alternatively, mount a mirror on the inside of the door. A full-length mirror is a functional necessity in an entryway for a final outfit check, and placing it inside the closet keeps the hallway walls uncluttered.
Material Selection and Aesthetic Cohesion
A closet renovation should blend seamlessly with the rest of the home’s interior design. The materials you choose for shelving and hardware contribute to the overall sense of order.
Wood vs. Wire
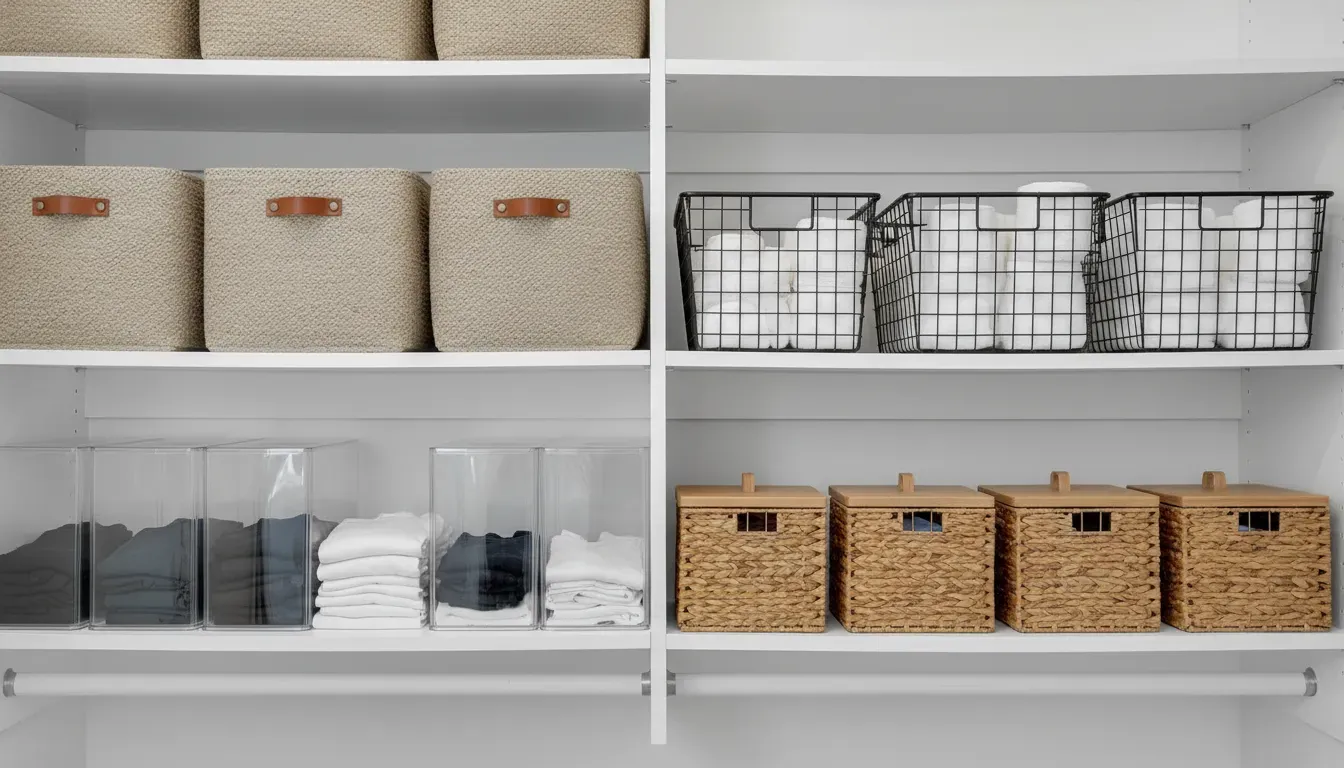
Wire shelving is the standard for builder-grade closets because it is cheap and easy to install. However, it frustrates users; items tip over between the wires, and it creates a visual stutter. Replacing wire with solid melamine, plywood, or natural wood shelving instantly upgrades the space. Solid shelving is easier to clean and provides a stable surface for bags and bins.
If budget constraints require retaining wire shelving, use plastic shelf liners to create a flat surface and prevent small items from falling through the gaps.
Uniformity in Hangers and Bins
Visual noise creates a sense of stress. One of the simplest ways to make a closet feel larger and more organized is through uniformity. Discard the mismatched collection of dry-cleaner wire hangers and plastic tube hangers.
Invest in a set of matching velvet or wooden hangers. Velvet hangers are particularly effective for coat closets as their slim profile allows you to fit more coats on the rod, while the non-slip texture keeps heavy jackets from sliding off.
https://www.amazon.com/s?k=velvet+non+slip+hangers+heavy+duty&tag=hats0f8-20
Similarly, use matching baskets for overhead storage. Woven sea grass, felt, or wire baskets with linen liners hide the contents while providing a cohesive texture. Labeling these bins (e.g., “Winter Gear,” “Rain Gear,” “Sports”) ensures that other family members maintain the organizational system.
Dealing with Awkward Shapes under Stairs
Many entryways feature closets tucked beneath a staircase. These present unique challenges due to the sloped ceiling and varying depth.
Graduated Storage Solutions
In an under-stair closet, the deep, low section at the back is often inaccessible. Avoid storing daily-use items here. Instead, install deep drawers or rolling carts that can be pulled out to access the back recesses.
Utilize the tallest part of the closet for hanging space. As the ceiling slopes down, transition to shelving, and finally to low shoe cubbies or luggage storage in the shortest section. Custom millwork is often the best route here to maximize every square inch of the triangle.
For more ideas on handling difficult layouts, read our guide on Maximizing Odd-Shaped Storage Spaces.
The DIY vs. Custom System Decision
Homeowners must decide between building a custom solution from scratch, purchasing a modular kit, or hiring a professional closet company.
The Modular Kit Route
Systems from big-box retailers offer a middle ground. They are adjustable and relatively easy to install. Look for systems that use a hang-track mounted to the studs at the top of the wall; vertical standards hang from this track, allowing you to move shelves and rods up and down as your needs change. This flexibility is vital for growing families.
The Custom DIY Build
For those with basic carpentry skills, building a system using plywood or MDF allows for a perfect fit. You can trim out the edges with iron-on veneer or solid wood facing to mimic high-end cabinetry. The advantage here is the ability to work around obstructions like electrical panels or odd bump-outs that modular systems cannot accommodate.
Maintenance: The “One In, One Out” Rule
Even the most perfectly designed closet will fail if it is overfilled. The entryway closet is a prime candidate for the accumulation of “stuff.” Coats that haven’t been worn in three years, broken umbrellas, and shoes that don’t fit tend to migrate here.
Adopt a strict maintenance policy. At the change of each season, rotate the inventory. Move heavy winter coats to a secondary bedroom closet during the summer to free up breathing room for light jackets and beach bags. If you buy a new coat, an old one must be donated or discarded. This discipline preserves the functionality of the renovated space.
Integrating Tech and Utility
The modern entryway closet can serve dual purposes. With the installation of an electrical outlet, it can become a charging station for vacuums or family devices.
The Hidden Utility Hub
If space allows, designate a vertical slice of the closet for cleaning tools. A cordless vacuum mounted on the wall, along with a broom and mop gripper, keeps these essential tools accessible but out of sight. This is particularly useful in homes lacking a dedicated utility room.
Ventilation and Freshness
Closets, by nature, are enclosed spaces with poor airflow. Coats, especially when damp from rain or snow, can introduce moisture and odors.
Ensure your closet door has sufficient clearance at the bottom for air intake. If you are doing a mudroom conversion, airflow is naturally handled. For closed closets, consider using moisture-absorbing desiccant packs or cedar blocks. Cedar naturally repels moths and absorbs moisture, leaving a pleasant, subtle scent that combats the “stale closet” smell.
Seasonal Rotation Strategies
To maintain an uncluttered aesthetic, active management of seasonal items is crucial. The coat closet should not be a museum of your entire wardrobe history; it should be a functional cockpit for the current weather.
The Vacuum Seal Method
For off-season items that must remain in the entryway due to lack of storage elsewhere, vacuum seal bags are indispensable. They compress bulky puffer jackets and down vests into flat, manageable packages that can be stacked on the highest shelf. Place these sealed bags inside opaque bins to maintain visual cleanliness.
Conclusion: The ROI of Organization
Transforming your entryway closet is a project with high returns. It streamlines your daily departure and arrival routines, reduces stress by eliminating visual clutter, and adds tangible value to your home. A well-organized, custom-fitted closet suggests to potential buyers that the home is well-maintained and spacious.
Whether you opt for a full mudroom conversion with custom millwork or a strategic reorganization using modular components and better lighting, the key is intentionality. Stop treating the coat closet as a holding cell for junk and start treating it as a machine for living. By maximizing the vertical axis, upgrading the hardware, and respecting the limitations of the space, you can turn even the smallest builder-grade closet into a triumph of storage and style.