Using Shiplap and Board-and-Batten for Aesthetic Entryway Organization Backing
Transform your chaotic drop zone into a bespoke architectural feature. Discover how shiplap and board-and-batten backing elevate both entryway aesthetics and structural organization.
Mar 10, 2026 - Written by: Linda Wise
The entryway is the architectural handshake of your home. It establishes the immediate spatial cadence, offering visitors a tactile and visual preview of the interior design language that follows. Yet, it simultaneously bears the brunt of our chaotic daily routines. Heavy winter coats get blindly tossed. Muddy boots graze the drywall. Wet umbrellas lean precariously in corners. I’ve personally found that leaving entryway walls bare is essentially an invitation for scuffs, dents, and visual clutter to commandeer your home’s first impression.
This is exactly where strategic millwork enters the chat. Using shiplap and board-and-batten for aesthetic entryway organization backing isn’t just a trendy design maneuver. It functions as a robust, protective armor for your high-traffic zones while providing the critical structural integrity required for heavy-duty storage hardware. You’ll notice that a beautifully textured wall treatment instantly elevates a standard bench-and-hook setup into something that looks custom-built and unapologetically expensive.
Before we dissect the nuanced architectural differences and installation strategies, let’s look at the foundational materials that make these transformations possible.
Quick Comparison: Top Picks
| Product | Rating | Check Price |
|---|---|---|
| Ekena Millwork PVC Shiplap Paneling | ⭐⭐⭐⭐⭐ | View on Amazon |
| MDF Primed Board and Batten Strips | ⭐⭐⭐⭐½ | View on Amazon |
| Franklin Brass Heavy Duty Coat Hooks | ⭐⭐⭐⭐⭐ | View on Amazon |
The Architectural Renaissance of Entryway Storage
Drywall is a spectacularly vulnerable material. When you attach standard hooks directly into gypsum board—even with heavy-duty toggle bolts—repeated dynamic loads from backpacks and wet denim will eventually cause structural failure. The anchors loosen. The drywall crumbles. Suddenly, your organization system is hanging by a literal thread.
Integrating a solid backing material completely rewrites this narrative. By spanning the studs with high-quality lumber or engineered wood, you effectively distribute the shear load across the entire wall frame. You can place hooks exactly where you want them aesthetically, completely liberated from the rigid 16-inch on-center constraints of your home’s framing.
Beyond the physics of load distribution, we have to talk about visual weight. A flat, painted wall lacks texture. It feels passive. Introducing millwork creates shadow lines, depth, and a sense of permanence. It grounds the space. Whether you are dealing with a grand, sweeping foyer or trying to implement clever small foyer layout ideas, adding a physical backing creates a distinct “zone.” It visually signals to the brain: This is the designated space for transition and organization.
Decoding the Contenders: Shiplap vs. Board-and-Batten
Choosing the right profile dictates the entire vernacular of your entryway. Neither option is inherently superior, but they speak entirely different design dialects. Understanding their historical context and geometric impact will save you from a costly stylistic mismatch.
Shiplap: Coastal Charm Meets Modern Farmhouse
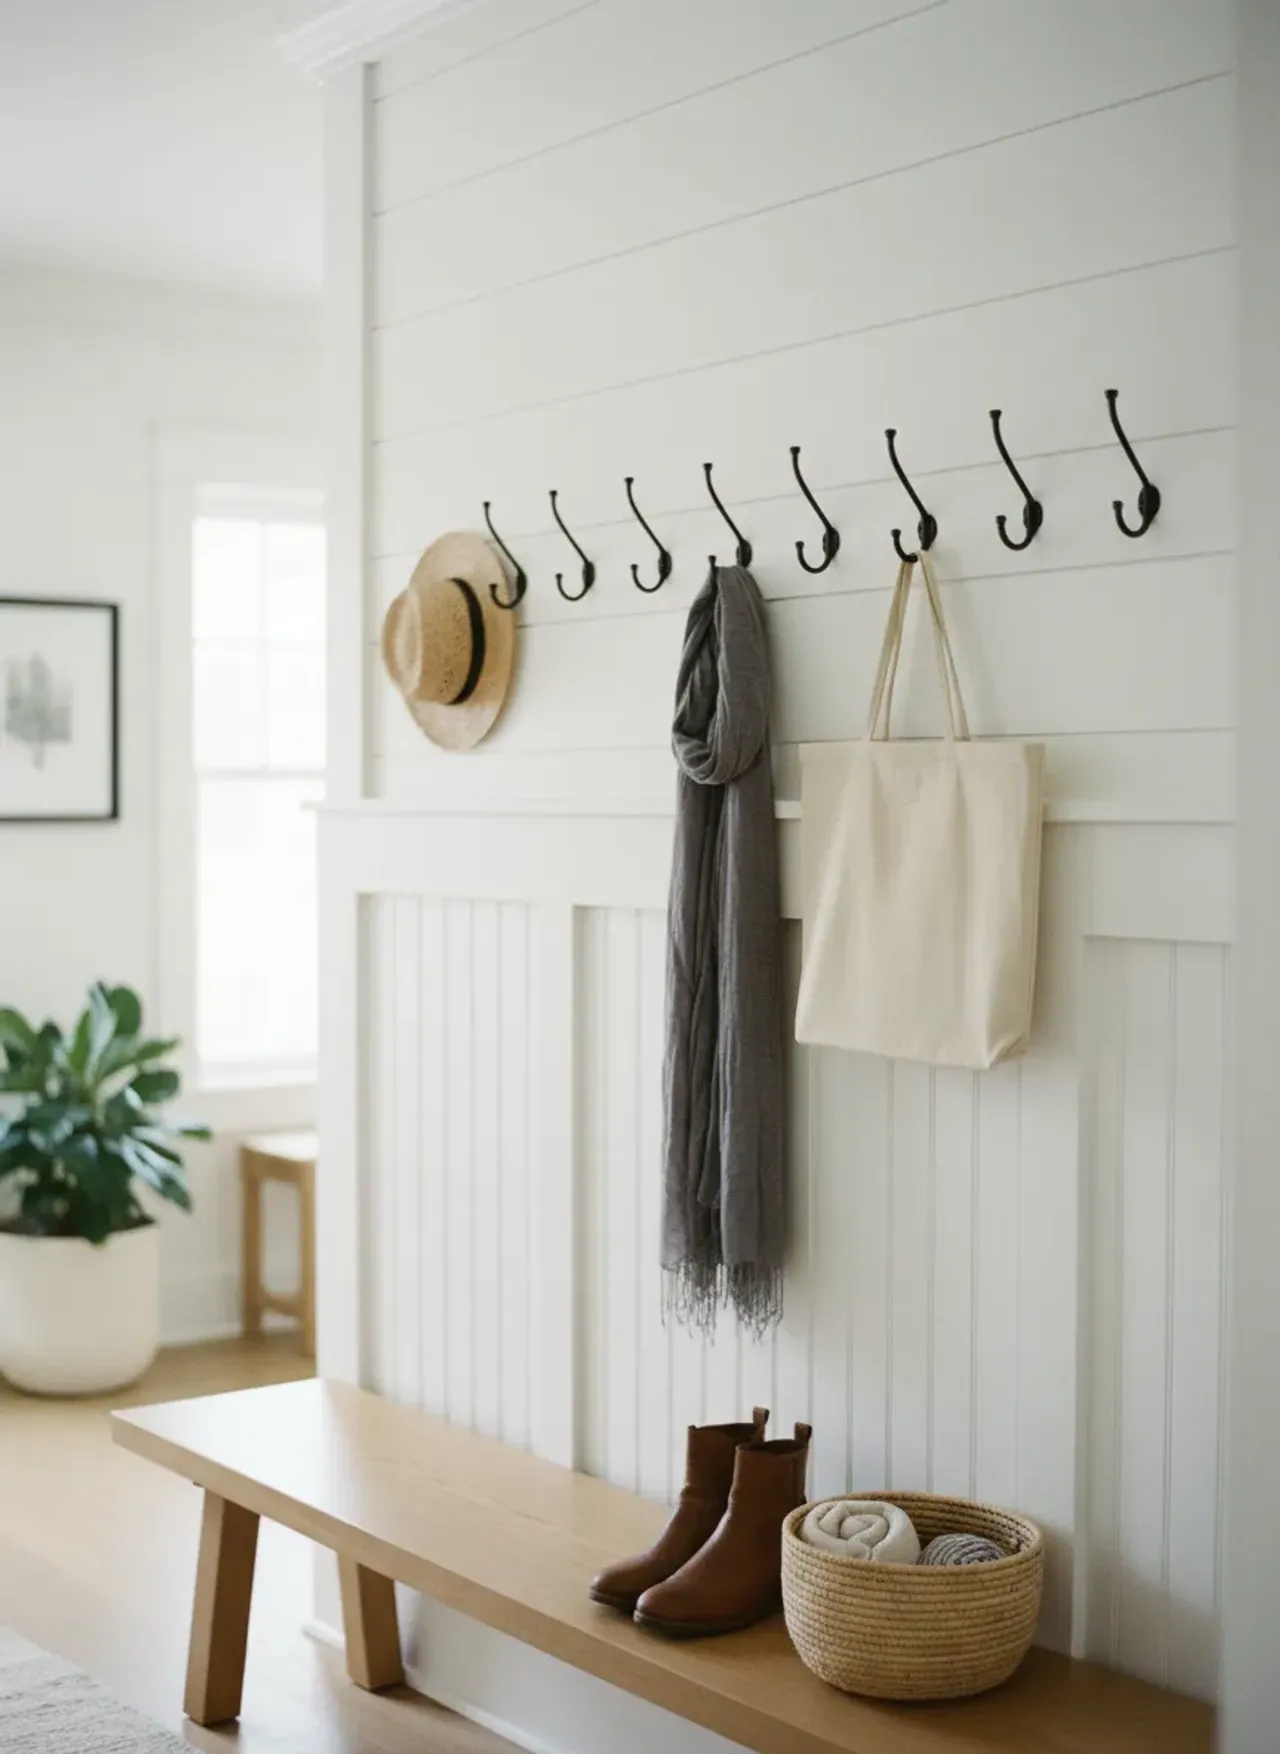
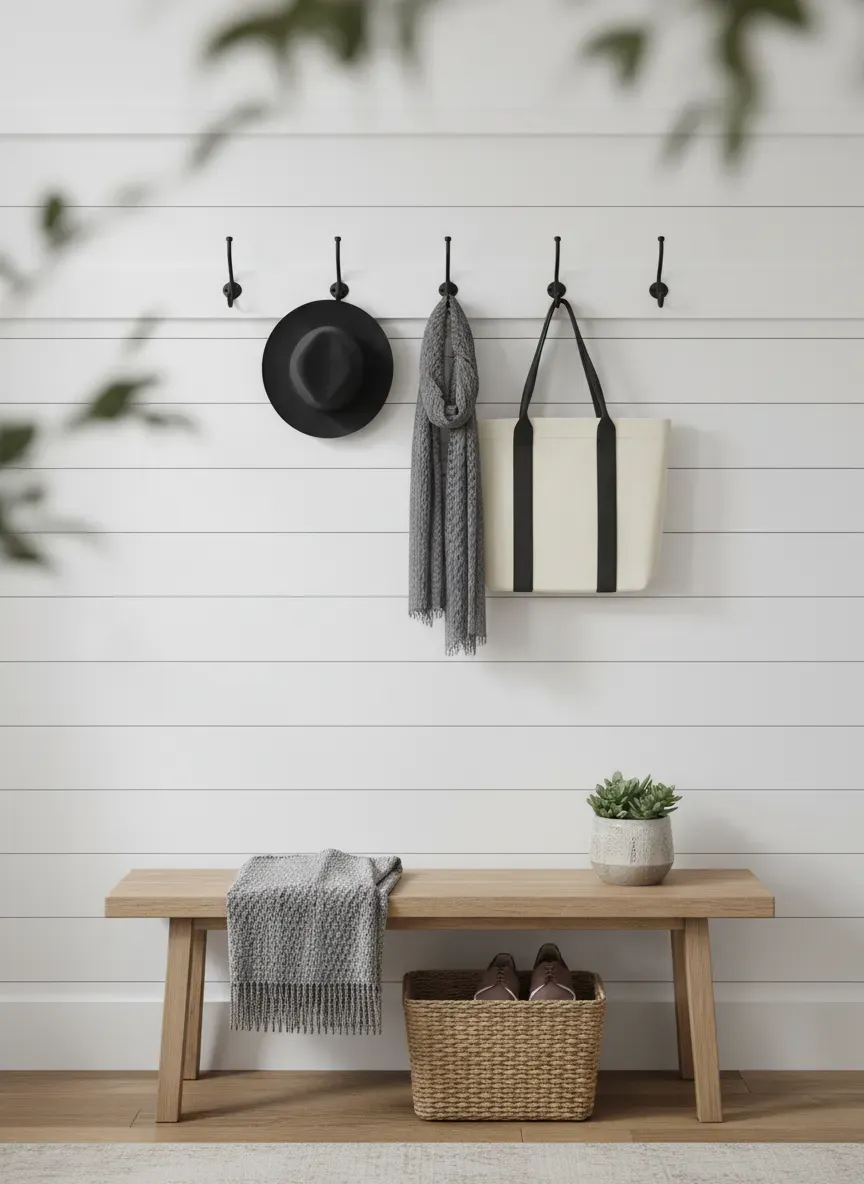
True shiplap features a rabbet (a step-shaped recess) cut into opposing edges of the board. This allows the panels to overlap, creating a highly weather-tight seal originally used in the construction of maritime vessels and harsh-climate exterior siding. Today, what we call “shiplap” in interior design is often a nickel-gap profile—boards that slot together via tongue-and-groove, leaving a precise, uniform gap that creates stark horizontal or vertical shadow lines.
Horizontal shiplap pulls the eye sideways, making a narrow entryway feel significantly wider. It feels slightly more relaxed, leaning into coastal, cottage, or modern farmhouse aesthetics. Vertical shiplap, conversely, draws the eye upward. If your entryway suffers from low, oppressive ceilings, vertical installation is a brilliant optical illusion that mimics height.
Because shiplap covers the entire wall surface, it offers unparalleled protection against scuffs. It acts as a continuous sheet of armor against swinging backpacks and kicking shoes.
Board-and-Batten: Structured Elegance and Geometric Precision
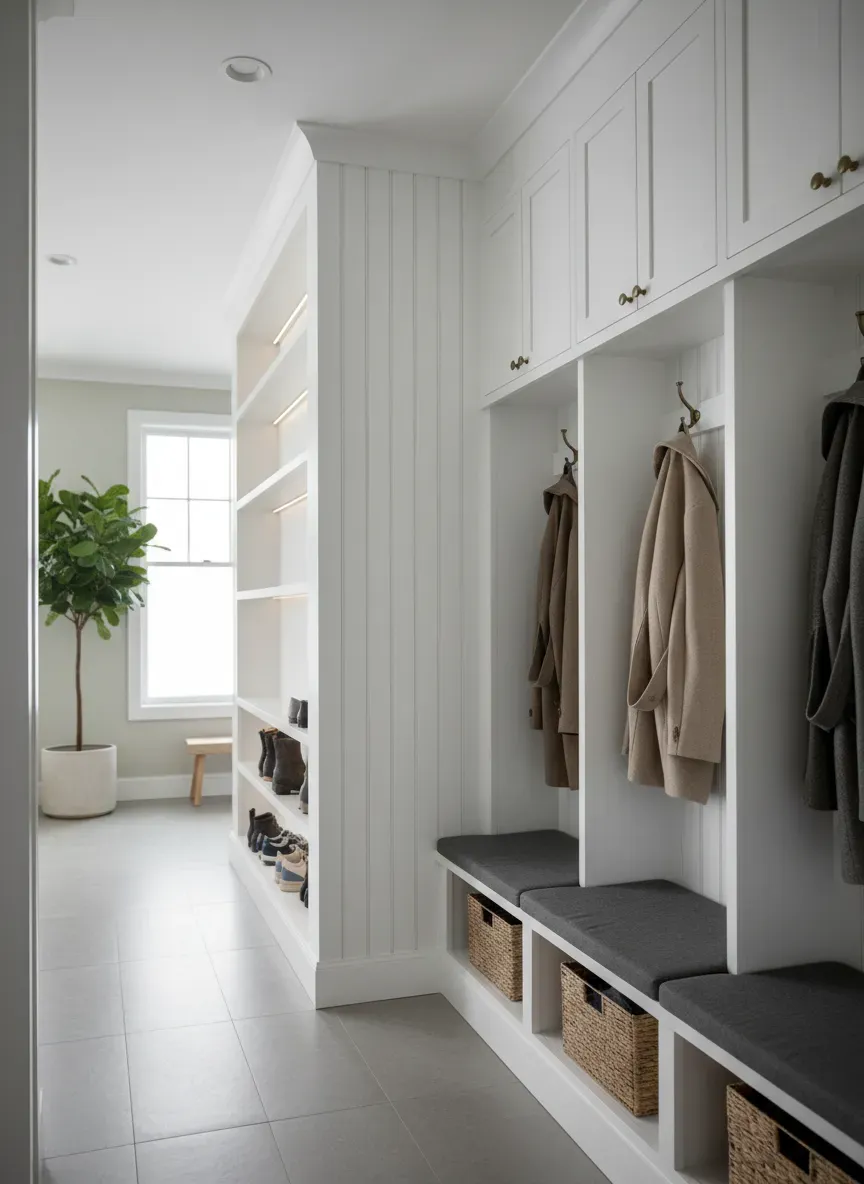
Board-and-batten possesses a more formal, structured pedigree. Historically used in Victorian and Craftsman architecture, it consists of wide boards (or simply a smooth drywall backing) visually separated by narrow vertical strips of wood called battens. The battens hide the seams of the panels and create a rigid, geometric grid.
This style thrives on proportion. You can run it a third of the way up the wall for traditional wainscoting, two-thirds up for a dramatic Craftsman vibe, or take it all the way to the ceiling for a striking, immersive, moody aesthetic.
Here’s the real kicker: Board-and-batten is incredibly forgiving for DIYers. Because you are often using your existing drywall as the “board” and simply attaching vertical battens and a horizontal top rail, it’s vastly cheaper and requires significantly less material than full-coverage shiplap. It also provides a designated, thick horizontal rail that is absolutely perfect for anchoring heavy iron or brass coat hooks.
Engineering the Perfect Backing for Organization Systems
Aesthetics are only half the battle. If your entryway backing can’t handle the sheer weight of a family’s winter gear, it’s nothing more than a pretty facade.
Structural Integrity for Hooks and Hardware
When utilizing board-and-batten, the horizontal top rail (often a 1x4 or 1x6 piece of lumber) is your primary anchor point. This rail must be aggressively secured to the wall studs behind the drywall. I recommend using 2.5-inch construction screws, countersunk and subsequently filled with wood putty.
Once that horizontal rail is fused to the framing, you possess a continuous, rock-solid mounting surface. You are no longer praying that your drywall anchor catches. You can drill heavy-duty hardware directly into the wood face.
For shiplap, the rules shift slightly. Because you are covering the entire wall, every piece of shiplap should be nailed into the studs. However, shiplap boards (especially MDF variants) are relatively thin—often only 1/2-inch or 5/8-inch thick. While stronger than drywall, they aren’t impervious to the pull-out force of a heavy bag. If you know exactly where your hook rail will go prior to installation, install a horizontal 2x4 blocking between the studs behind the drywall before you put the shiplap up. This provides an invisible, unbreakable anchor zone.
Integration with Built-in Benches and Cubbies
Your wall treatment shouldn’t exist in a vacuum; it needs to integrate seamlessly with your seating and lower storage.
If you are constructing a built-in bench, the millwork should flow logically from the top of the bench deck. Never run shiplap or battens all the way to the floor if you plan to push a freestanding bench against them. The baseboard thickness and the dimensional protrusion of the battens will create an awkward, dusty gap behind the furniture.
Instead, scribe your bench or build it in place first. Then, use the bench top as the literal starting line for your wall treatment. This creates a cohesive, custom-built appearance that looks intentional rather than assembled from disparate parts.
Planning Your Entryway Transformation
Before purchasing a single linear foot of lumber, you must execute a meticulous spatial audit. Entryways are notoriously tricky because they frequently intersect with swinging doors, light switches, HVAC vents, and security keypads.
Spatial Dynamics and Proportion
The golden rule of wainscoting and partial-wall treatments is the Rule of Thirds. Never split your wall exactly in half. A horizontal rail running exactly at the 48-inch mark on a 96-inch wall feels visually static and claustrophobic.
Opt for a height of roughly 32 inches (one-third) if you want a subtle accent, or push it up to 64 inches (two-thirds) to create a dramatic drop-zone. The two-thirds height is highly functional for entryways because it places the coat hooks at an ideal ergonomic level for adults while keeping the visual weight anchored lower in the room.
Pro Tip: Always map out your batten spacing with painter’s tape before making a single cut. You want to avoid the nightmare scenario where a vertical batten falls exactly on an electrical outlet. Adjusting your spacing by just half an inch across the wall can save you from highly complex, frustrating jigsaw cuts.
Working with Constrained Footprints
Not everyone is blessed with a cavernous foyer. If you are optimizing a compact 5x6 mudroom layout, every millimeter of depth counts.
In extremely tight spaces, thick battens or heavily textured shiplap can actually encroach on your usable square footage. When dealing with narrow corridors, opt for ultra-low-profile millwork. A 1/4-inch MDF board-and-batten treatment provides the visual structure you need without eating into the physical space required to shrug off a jacket. Furthermore, keep the color palette monochromatic. Painting the millwork and the wall above it the exact same color—perhaps shifting only the sheen—provides architectural texture without visually chopping the small room into smaller, fragmented pieces.
Material Selection and Preparation
The durability of your entryway relies heavily on your material choices. The lumber aisle at your local hardware store is filled with options, but they are not created equal.
MDF vs. Solid Wood
Medium-Density Fiberboard (MDF) is exceptionally popular for interior millwork, and for good reason. It is perfectly straight, devoid of knots, and boasts a glass-smooth surface that takes paint beautifully. It won’t warp or twist as it acclimates to your home’s humidity. For a pristine, painted board-and-batten look, primed MDF is usually the smartest, most cost-effective choice.
However, MDF has a fatal flaw: water. It is a highly hygroscopic material, meaning it acts like a sponge. If moisture breaches the painted surface, the MDF will swell, bubble, and permanently deform.
Solid wood (like pine or poplar) requires more prep work. You have to fill the knots, sand the grain, and carefully inspect every board for bowing. But solid wood can withstand abuse. It handles impact better than MDF and won’t disintegrate if someone leans a dripping umbrella against it.
Moisture Resistance in High-Traffic Zones
If you live in a climate with heavy rain or snow, you must plan for moisture. If you opt for MDF, ensure you are buying a moisture-resistant grade (MR MDF). Alternatively, look into PVC millwork.
PVC shiplap and trim boards are entirely impervious to water. They cut and install exactly like wood, but they will never rot, swell, or harbor mold. While slightly more expensive, using PVC for the baseboards and the bottom few inches of your entryway backing is a spectacular insurance policy against the inevitable puddles of melted snow.
Execution Strategies: Installation Nuances
The difference between a DIY project that looks amateur and one that looks bespoke lies entirely in the execution of the details.
The Spacing Calculus
For board-and-batten, the math can be intimidating. You want the space between every vertical batten to be exactly equal.
Here is the formula to cheat the math:
- Measure the total width of your wall.
- Decide roughly how wide you want the gaps (e.g., 16 inches).
- Determine how many vertical battens you want.
- Multiply the number of battens by the width of a single batten (a 1x3 is actually 2.5 inches wide).
- Subtract that total batten width from your total wall width.
- Divide the remaining number by the number of spaces (which is always one more than the number of internal battens).
This gives you the exact fractional width of your gaps. Cut a spacer block of scrap wood to this exact dimension. Now, you don’t even need a tape measure to install the battens. Plumb the first one, place the spacer block next to it, push the second batten tight against the block, and nail it in. Flawless symmetry, every time.
Seamless Caulking and Paint Finishes
Nail guns and construction adhesive are just the beginning. The magic happens during the finishing phase.
Wood filler goes into the nail holes. Caulk goes into the seams where the wood meets the drywall. Never skip caulking. Even if the joint looks tight, houses settle and shift. Without a bead of highly elastic, paintable acrylic latex caulk, those seams will crack open the first time your heater kicks on in the winter.
When it comes to paint, step away from the flat finishes. Entryways are dirt magnets. You need a surface you can aggressively wipe down with a damp rag without pulling the pigment off the wall. Satin or semi-gloss finishes provide a durable, washable shell. If you want to lean into a modern, moody aesthetic, consider a high-gloss finish. It reflects light brilliantly, adding an unexpected layer of sophistication to dark colors like navy, forest green, or charcoal.

Elevating Functionality: Hooks, Hardware, and Shoe Storage
Once the backing is flawlessly installed and painted, it’s time to dress the wall. The hardware you select acts as the jewelry of the space, but it must perform a highly utilitarian role.
Space your coat hooks deliberately. Crowding them too close together renders them useless; thick winter parkas require lateral breathing room. A minimum spacing of 8 to 10 inches between heavy-duty hooks is standard. Consider utilizing double-prong hooks—they allow you to hang a heavy coat on the upper prong and loop a dog leash or lightweight scarf on the lower one, doubling your storage density without widening the footprint.
Beneath the millwork, the floor zone must be managed. A stunning board-and-batten wall is instantly ruined by a chaotic pile of dirty sneakers. Integrating ultra-slim multi-functional shoe cabinets at the base of your wall treatment keeps the visual lines clean. Because your new millwork backing is so structurally sound, you can easily anchor these slim cabinets directly to the wall, floating them a few inches off the floor. This eliminates the need to cut around your new baseboards and keeps the floor fully accessible for quick vacuuming.
Key Takeaways for Entryway Millwork
- Anchor Securely: Always secure your horizontal load-bearing rails directly into the wall studs.
- Mind the Moisture: Utilize PVC or solid wood in the lower zones if your entryway sees heavy rain or snow.
- Calculate Spacing: Use a custom-cut spacer block to guarantee identical distances between vertical battens.
- Caulk Everything: Elastic caulk prevents unsightly seam-cracking as the seasons change and humidity fluctuates.
- Choose Washable Paint: Satin or semi-gloss sheens are non-negotiable for high-traffic drop zones.
Common Pitfalls and How to Sidestep Them
Even seasoned DIYers can stumble when integrating millwork into an existing space.
One of the most frequent errors is ignoring the existing baseboards. Standard builder-grade baseboards have a distinct, often curvy profile and are usually quite thin (around 1/2 inch). If you nail a 1x4 batten (which is 3/4 inch thick) directly above it, the batten will overhang the baseboard. It looks clunky and amateurish.
To solve this, you have two options. The professional route is to carefully pry off the existing baseboards and replace them with a flat 1x6 board that matches the thickness of your battens. The easier hack is to cut the bottom of your vertical battens at a sharp 45-degree angle (a chamfer cut) right where they meet the existing baseboard. This eases the visual transition and prevents a harsh, jutting overhang.
Another trap is failing to address the wall texture. If your home has heavily textured drywall (like orange peel or knockdown), installing board-and-batten over it will highlight the texture between the smooth wood strips. The juxtaposition looks messy. You’ll need to skim-coat the drywall with joint compound to achieve a flat surface, or install thin hardboard panels over the drywall before applying the battens.
The Final Polish: Styling Your Upgraded Entryway
You’ve built the structure; now you need to soften it. Millwork is highly architectural and rigid. To make the entryway feel welcoming, you must introduce organic elements and contrasting textures.
Warm up the space with textiles. A vintage runner rug stretching down the corridor breaks up the geometric rigidity of the wall treatment. Throw a textured, woven blanket over the edge of the bench. Introduce a small, hearty houseplant on the top rail or a floating shelf to bring a pop of living green into the space.
Lighting plays a spectacular role here. If you’ve chosen a deep, saturated color for your shiplap or board-and-batten, install a brass or matte black wall sconce above it. The light will wash down the wall, dramatically highlighting the three-dimensional texture of the wood and the crisp shadow lines you worked so hard to create.
The Bottom Line: Transforming your entryway with shiplap or board-and-batten backing is an investment that yields massive daily dividends. It strips away the anxiety of a cluttered, scuffed-up foyer, replacing it with a durable, structurally sound, and stunningly bespoke architectural feature. By thoughtfully selecting your materials, mastering the spatial math, and anchoring your hardware with precision, you create a transition space that commands respect and welcomes you home flawlessly every single day.