Wallpaper Cubby Backs: Creative Ways to Add a Pop of Pattern to Your Mudroom
Transform your utilitarian drop zone into a curated masterpiece. Discover expert techniques, material secrets, and design psychology for wallpapering mudroom cubbies.
Apr 2, 2026 - Written by: Linda Wise

Mudrooms are historically the sacrificial lambs of domestic architecture. We drag in slush, dump heavily loaded backpacks, and abandon wet umbrellas in these transitional spaces without a second thought. For decades, the aesthetic approach to this room was purely defensive: durable paint, hard-wearing tile, and maybe a rugged floor mat.
But I’ve personally found that treating the mudroom as a purely utilitarian airlock is a massive missed design opportunity. Your mudroom is the first interior space you experience when you come home and the last thing you see before facing the world. It deserves to be a space of joy, not just a holding pen for dirty boots.
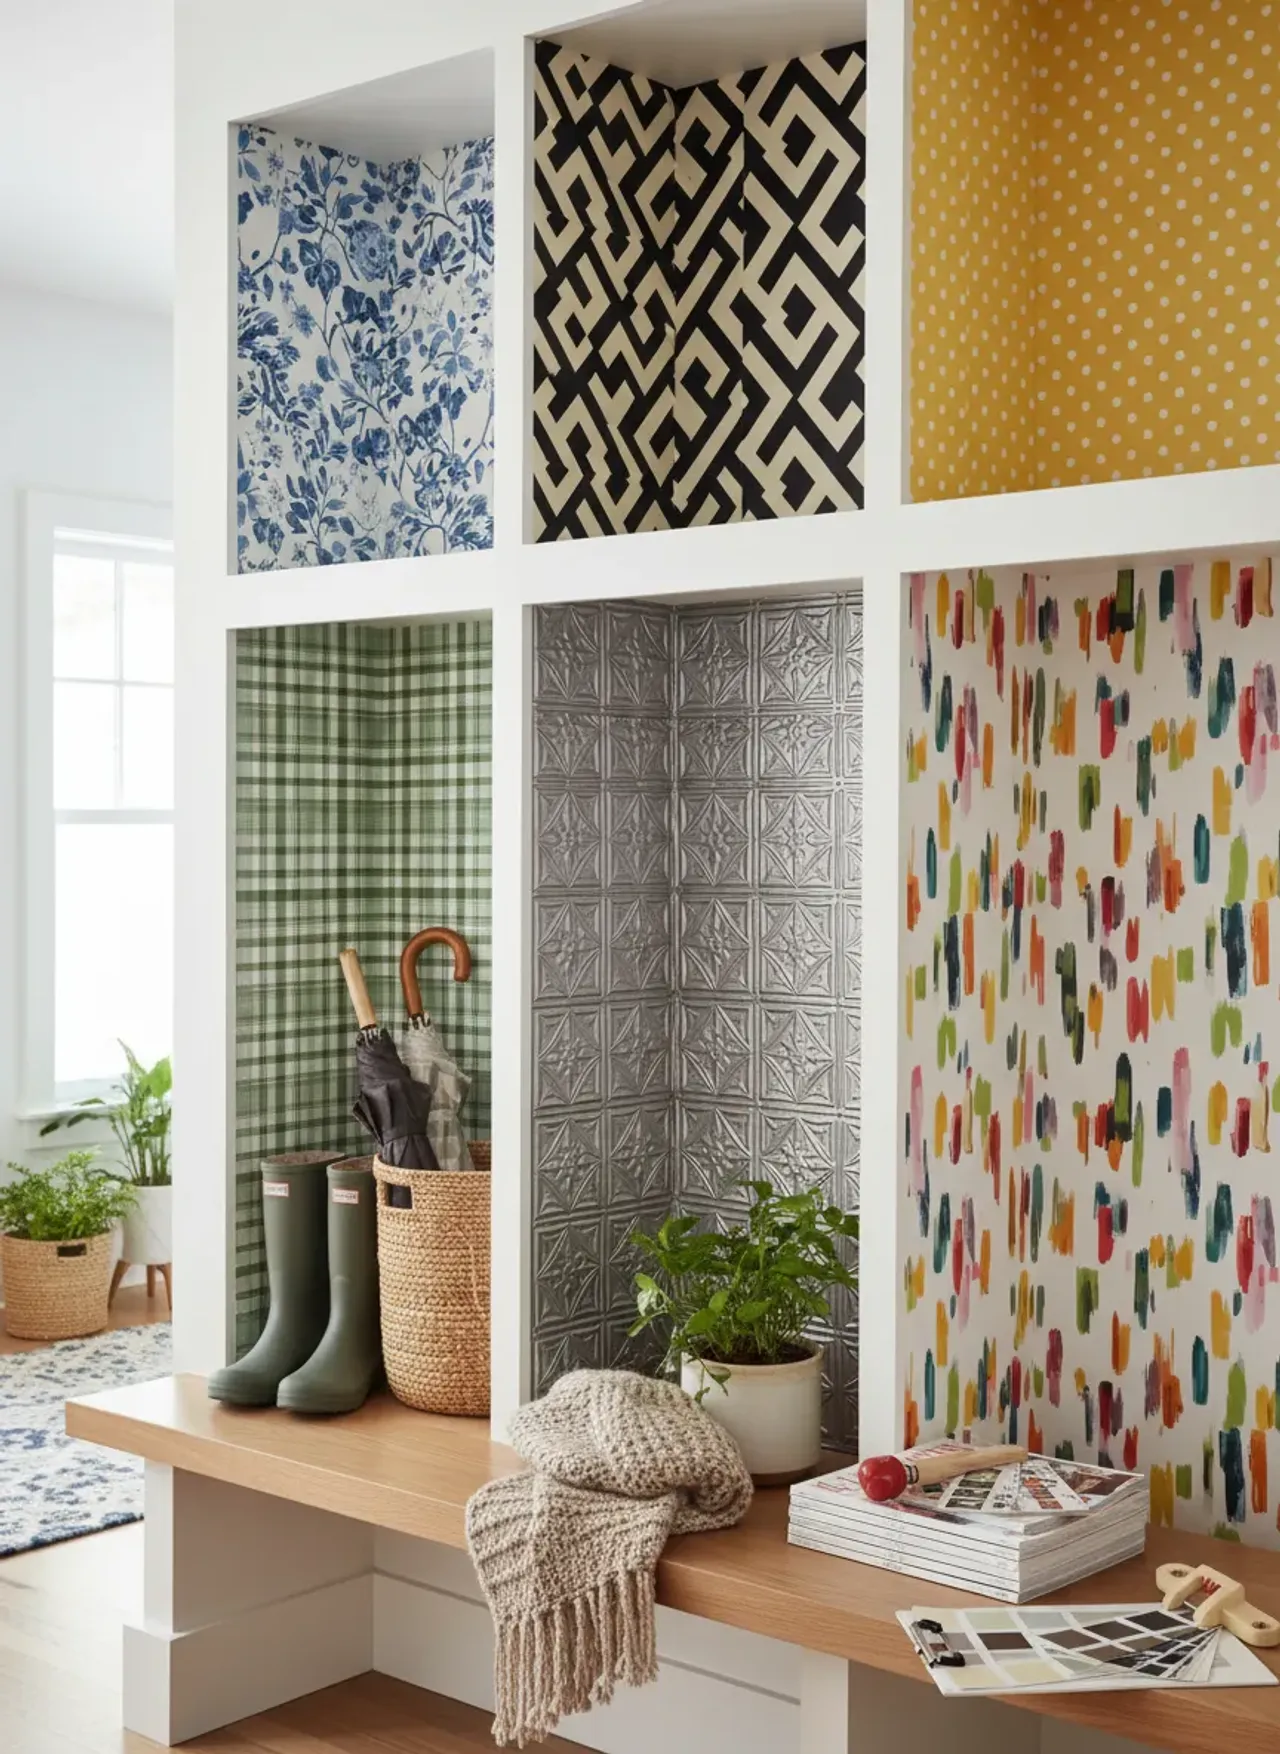
Injecting pattern directly into the backs of your storage cubbies is the ultimate architectural cheat code. It brings immediate chromatic resonance to a tight space without overwhelming the room. You get the high-impact visual punch of designer wallpaper, tightly constrained within the architectural frame of your millwork.
Before we tear into the mechanics of papering these tight, awkward spaces, you need the right arsenal. Using standard household tools for this job will result in bubbled vinyl and jagged cuts.
Quick Comparison: Top Picks
| Product | Rating | Check Price |
|---|---|---|
| NuWallpaper Peel and Stick Botanical | ⭐⭐⭐⭐⭐ | View on Amazon |
| Rust-Oleum Zinsser Wallpaper Smoothing Tool Kit | ⭐⭐⭐⭐½ | View on Amazon |
| OLFA Heavy-Duty Utility Knife | ⭐⭐⭐⭐⭐ | View on Amazon |
The Psychology of Pattern in Transitional Spaces
Why does wallpaper inside a cubby work so incredibly well from a psychological standpoint? It comes down to forced perspective and visual anchoring.
When you look at a bank of built-in lockers, your eye naturally travels to the deepest point of the structure. If that back panel is painted the exact same color as the sides and shelves, the built-in feels monolithic, heavy, and somewhat cavernous.
By applying a dynamic pattern to the back panel, you instantly manipulate the spatial perception of the unit. Light-colored, delicate patterns push the back wall away, making the cubbies feel remarkably deeper than they actually are. Conversely, dark, moody, large-scale prints pull the back wall forward, creating an intimate, jewel-box effect.
Here’s the real kicker: pattern acts as exceptional camouflage. Mudroom cubby backs take a beating. They get scraped by zippers, bumped by lacrosse sticks, and smudged by wet sleeves. A flat matte paint shows every single one of these micro-abrasions. A busy, organic wallpaper pattern absorbs that visual noise entirely. The eye tracks the illustration of the botanical frond or the geometric lattice, completely ignoring the minor scuff mark lingering underneath.
Navigating the Material Maze: Peel-and-Stick vs. Traditional
The first major crossroads you will hit is material selection. The market has been absolutely flooded with self-adhesive vinyl (commonly known as peel-and-stick), but traditional non-woven paste papers still hold serious weight in the design community.
The Argument for Removable Vinyl
Peel-and-stick wallpaper is effectively a giant decal. For cubby backs, this is often the superior choice for a few highly specific reasons.
First, mudrooms are subject to seasonal aesthetic fatigue. Because it’s a smaller space, homeowners often want to refresh it more frequently than a primary living room. Vinyl peels off cleanly without destroying the drywall or the MDF backing of your cabinet.
Second, peel-and-stick is inherently moisture resistant. Mudrooms are damp. Wet coats hang directly against these back panels. A polymer-based vinyl surface will repel that moisture, whereas a traditional paper might absorb it, leading to delamination or mold.
When Traditional Paste Makes Sense
Do not write off traditional unpasted wallpaper. If you are aiming for a high-end, textured look—think grasscloth, heavily flocked velvet, or metallic foil—you simply cannot replicate that luxury with vinyl.
Furthermore, traditional wallpaper paste allows for “slip.” When you are trying to perfectly align a seam inside the cramped, dark recess of a 15-inch-wide cubby, the ability to slide the paper around on the wet paste for a few minutes before it sets is an absolute lifesaver. Peel-and-stick is fiercely unforgiving; once it grabs the substrate, pulling it back up to adjust the alignment can stretch and permanently warp the pattern.
Pro Tip: If you choose peel-and-stick, keep the backing on the lower half of the strip while you align the top. Only pull the release liner away in six-inch increments as you smooth downward. This prevents the terrifying scenario of the paper folding over and adhering permanently to itself.
Prepping the Canvas: Setting Up Your Cubbies for Success
I cannot overstate this: your wallpaper installation will only be as flawless as the surface beneath it. You are applying a microscopic layer of material over wood or drywall. Every imperfection will telegraph right through to the final surface.
Structural Integrity and Surface Readiness
Most mudroom cubbies feature backs made from beadboard, raw MDF, or standard drywall.
If you have beadboard, you face a dilemma. Wallpapering directly over the vertical grooves will look disastrous. The paper will eventually sink into the channels, eventually cracking or peeling. You have two choices: either fill every single groove with wood filler and sand it perfectly flat (a miserable, dusty endeavor), or cut thin sheets of 1/8-inch hardboard to the exact dimensions of your cubby backs, wallpaper those panels out in the garage, and then use construction adhesive to pop the finished panels directly over the beadboard. The latter is infinitely faster and yields a much sharper result.
If you are working with bare MDF or freshly painted wood, you must address the porosity of the surface. Raw MDF will suck the moisture right out of traditional wallpaper paste, causing the paper to fall off a week later. If you are using peel-and-stick, the adhesive will struggle to grip a dusty, porous surface. You must prime the back panel. A high-quality acrylic primer or a dedicated wallpaper size creates a hard, uniform shell that gives adhesives the perfect microscopic texture to grip. Let the primer cure for at least 72 hours before applying paper; off-gassing paint will create massive chemical bubbles under vinyl wallpaper.
The Mathematics of Measurement
Before you order your rolls, you must calculate the square footage accurately, which inherently requires you to understand your standard mudroom locker depth requirements so you don’t run short on pattern repeats.
Wallpaper math is notoriously tricky because of the “repeat”—the vertical distance before the pattern duplicates itself.
There are three types of matches:
- Straight Match: The pattern matches directly straight across the seam.
- Drop Match: The pattern matches diagonally across the seam. This is the most complex and results in the highest amount of wasted paper.
- Random Match: Think vertical stripes or solid textures. You don’t have to align anything across seams.
If you’re building from scratch, figuring out the ideal spacing between individual lockers dictates whether a large-scale mural or a tight geometric print will read better to the eye. Narrow, 12-inch cubbies chop up large floral prints so severely that the pattern becomes unrecognizable. Wide, 24-inch cubbies give large-scale prints the breathing room they require to make visual sense.
Creative Application Strategies for High-Impact Visuals
The actual execution of your design vision requires strategic thinking. You are not just slapping paper on a wall; you are curating a micro-environment.
The Monolithic Backdrop
The most common and striking approach is to run the exact same pattern continuously across the backs of all cubbies. This creates a unified, cohesive look.
However, achieving this requires meticulous alignment. You want the pattern to look as though the wooden dividers of the cubbies were simply placed in front of a continuous mural. This means you cannot just start a new strip of paper at the left edge of every cubby. You must calculate the width of your wooden dividers and account for that “missing” vertical space in your pattern match, effectively skipping a section of the wallpaper so the pattern continues logically in the next cubby.
Alternating Patterns for Visual Rhythm
For families with multiple children, assigning a different, highly personalized wallpaper to each specific cubby is a brilliant organizational tactic. The visual boundary clearly delineates whose space is whose, eliminating the classic “your jacket is in my locker” argument.
To prevent the mudroom from looking like a chaotic funhouse, you must establish a unifying element. If you use different patterns, ensure they all share an identical color palette (e.g., navy and cream), or use the same geometric pattern but in varying monochromatic shades.
Integrating Hardware and Hooks
Cubbies are meant to hold things. You will inevitably need to drill hooks into your freshly papered surface.
When attaching coat hooks over your beautiful new backdrop, finding the sweet spot between 12 and 24 inches for hardware placement ensures your heavy winter coats won’t obscure your painstakingly applied focal point.
Drilling through wallpaper requires finesse. If you just drive a screw straight into the paper, the threads will catch the fibers or the vinyl, tearing a massive, jagged hole right behind your hardware.
To prevent this, apply a small square of blue painter’s tape exactly where you intend to drill. Put your drill in reverse and lightly press the drill bit against the tape. The friction will burn a perfectly clean, circular hole through the tape and the wallpaper without catching the fibers. Once you are through the paper layer, switch the drill back to forward and drill into the wood.
Common Pitfalls and How to Sidestep Them
I’ve seen plenty of DIY enthusiasts ruin hundreds of dollars of premium wallpaper by ignoring a few basic physical realities of the material.
The Alignment Catastrophe
Never assume the inside corners of your custom cabinetry or drywall are perfectly plumb (vertically straight). They aren’t. Homes settle, and wood warps. If you align the edge of your first strip of wallpaper directly against the side wall of the cubby, and that wall is leaning by an eighth of an inch, your pattern will begin to travel diagonally. By the time you reach the bottom of the locker, the visual tilt will be glaringly obvious.
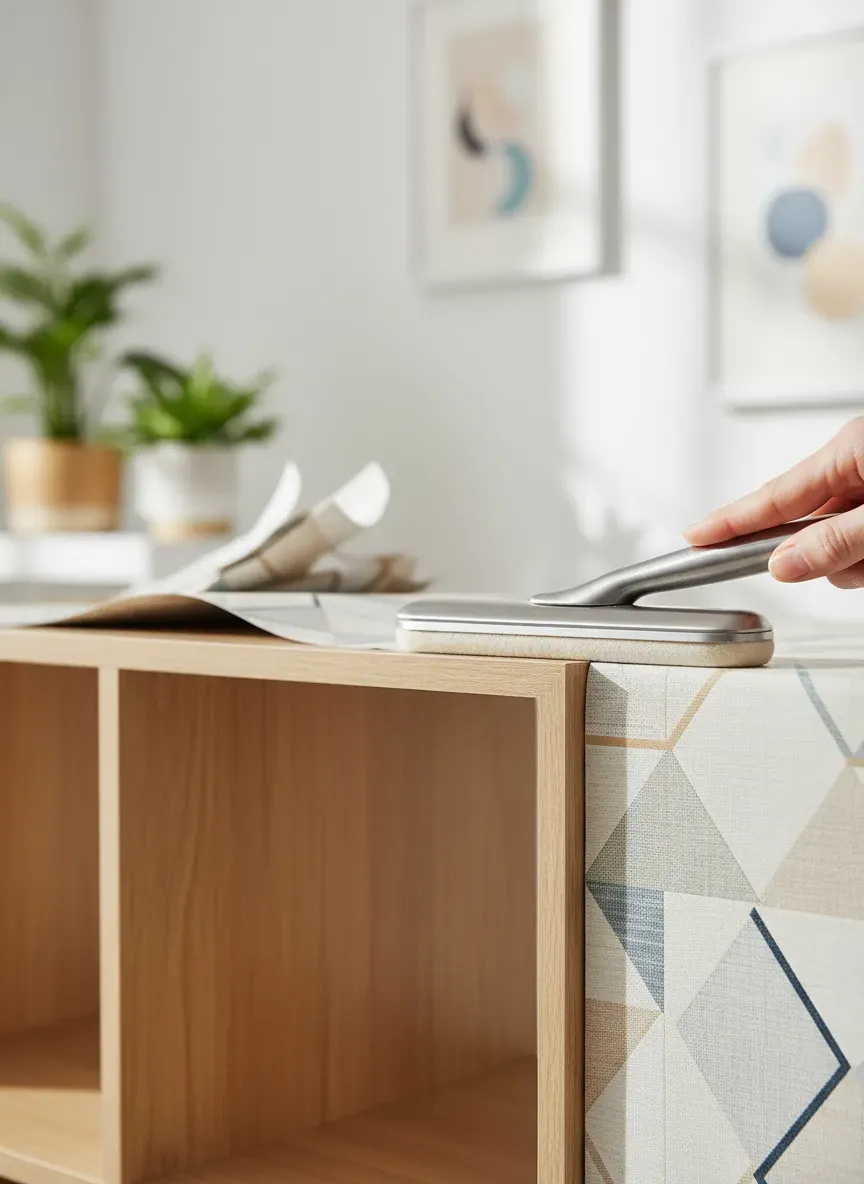
Always draw a perfectly plumb vertical pencil line down the center of the cubby back using a laser level. Apply your first strip of wallpaper aligned to that perfectly straight center line, and let the excess paper bleed over into the corners, trimming it away with a razor-sharp utility knife afterward.
Humidity and Adhesion Failures
Mudrooms experience aggressive temperature and humidity swings. If you apply peel-and-stick vinyl in the dead of winter when the mudroom is freezing, the adhesive will be stiff and fail to bite into the substrate. A week later, you’ll find your wallpaper curled up in a pile on the bench.
Ensure the room is climate-controlled to at least 70 degrees Fahrenheit for 24 hours before, during, and after installation. Furthermore, use your hard plastic smoothing tool to burnish the edges of the paper aggressively. The friction creates heat, which activates the adhesive polymers, locking down those vulnerable seams.
Elevating the Aesthetic: Pairing Patterns with Paint
The relationship between your cabinet paint color and your wallpaper is the defining characteristic of the room. They must speak to each other.
High Contrast Combinations
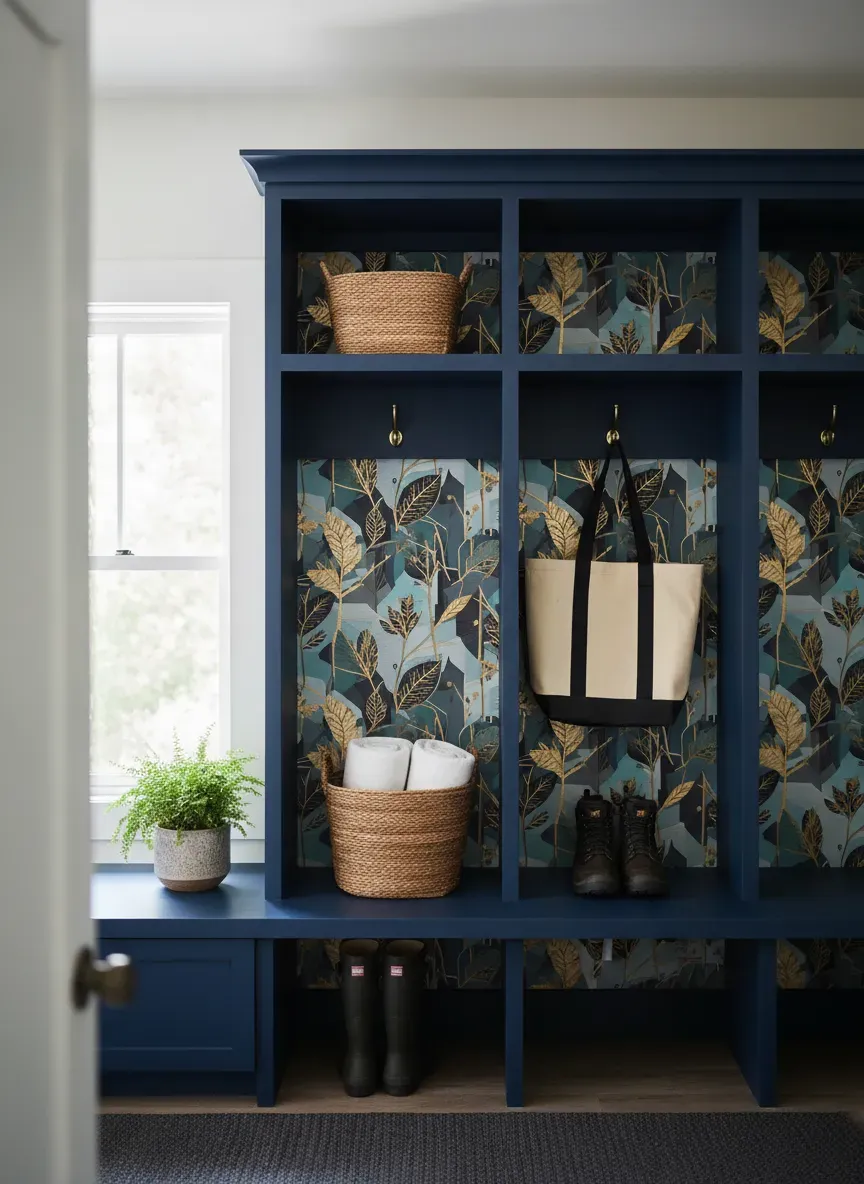
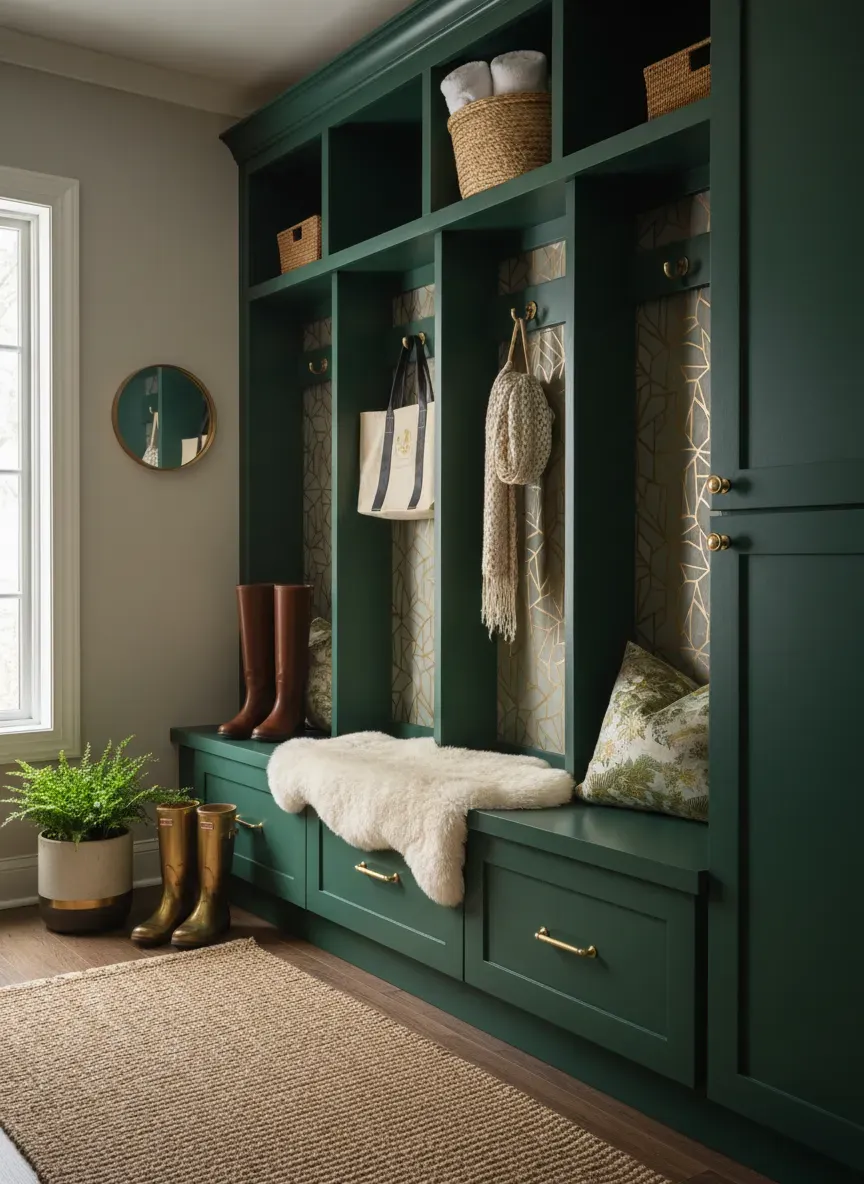
If you want drama, pair heavily saturated cabinetry—think hunter green, navy blue, or charcoal black—with a wallpaper that features a stark, light background. The dark cabinetry acts as a heavy, grounding picture frame, making the light, patterned interior leap forward.
Alternatively, painting the cubbies a crisp, bright white and backing them with a dark, moody floral print creates a stunning jewel-box interior. The white millwork provides visual relief, ensuring the dark wallpaper doesn’t turn the room into a cave.
Monochromatic Masterclasses
For a more sophisticated, subdued aesthetic, tone-on-tone styling is incredibly chic. Match the background color of the wallpaper perfectly to the paint color of the cubbies.
For example, if your cabinets are painted Farrow & Ball’s Pigeon (a gray-green), find a wallpaper with an identical gray-green background featuring a subtle, metallic gold geometric line. The seamless transition from the 3D wood to the 2D paper blurs the boundaries of the space, creating an enveloping, custom-crafted atmosphere.
You’ll notice that high-end interior designers often pull the least dominant color from the wallpaper pattern and use that as the paint color for the millwork. It’s an unexpected twist that ties the room together beautifully without being overly matchy.
Maintenance and Longevity in a High-Traffic Zone
Let’s shoot straight: putting paper in a drop zone is inherently risky if you don’t plan for the abuse. You need a defensive strategy to keep it looking pristine.
Cleaning Protocols
Vinyl peel-and-stick is wonderfully resilient. You can wipe it down with a damp microfiber cloth and a drop of mild dish soap. Do not use abrasive sponges or heavy chemical degreasers, as these will strip the printed ink right off the vinyl surface.
For traditional paper, you must be much more cautious. Unless it is specifically labeled as “scrubbable,” traditional paper should only be dusted with a dry electrostatic cloth.
The Ultimate Durability Hack: Clear Coating
If you are determined to use a delicate, traditional paper in a high-impact mudroom cubby, there is a secret weapon: clear water-based polyurethane.
Once your traditional wallpaper is installed and the paste is fully cured (wait at least a week), you can roll a high-grade, dead-flat, water-based polyurethane directly over the wallpaper. This encapsulates the paper in a hard plastic shell, rendering it virtually indestructible and entirely wipeable.
Warning: You must test this on a scrap piece of your wallpaper first! Some inks will bleed or turn yellow when they react with polyurethane. Always test before committing to your finished walls.
Key Takeaways
- Preparation is non-negotiable: Prime bare MDF and never apply paper over grooved beadboard without skinning it first.
- Mind the repeat: Calculate your square footage based on pattern repeat, not just raw dimensions, to avoid running out of paper.
- Hardware hacks: Always drill backwards through a piece of painter’s tape to prevent the drill bit from tearing your new wallpaper.
- Climate control matters: Install your paper in a warm room to ensure the adhesives activate properly.
The Bottom Line: You don’t have to settle for a sterile, purely functional drop zone. Wallpapering your cubby backs is an afternoon project that fundamentally alters the architecture and mood of your home’s busiest entrance. It requires precision, patience, and a sharp utility knife, but the resulting burst of highly contained pattern is worth every minute of effort.
Now, what if you don’t actually have mudroom cubbies yet? Applying wallpaper is the easy part, but paying a custom cabinet maker thousands of dollars to build the lockers in the first place is a massive hurdle for most homeowners.
I’ve personally found that building your own mudroom storage is surprisingly achievable, even if you aren’t a master carpenter—provided you have the exact right blueprints. If you want to construct stunning, structurally sound mudroom lockers that are perfectly prepped for a gorgeous wallpaper backdrop, you need to check out Ted’s Woodworking.
With instant access to over 16,000 step-by-step woodworking plans, you can find the exact cubby schematic that fits your space, complete with cut lists and material guides. The instructions are so precise, it’s like having a master craftsman looking over your shoulder.
Right now, you can grab the entire massive collection at a 75% discount. Stop dreaming about a custom entryway and start building it this weekend.
Click here to get your 75% discount on Ted’s Woodworking and unlock all 16,000 plans today!