Big Storage, Small Footprint: Optimal Small Mudroom Dimensions
Discover the exact dimensions, ergonomic benchmarks, and architectural tricks required to maximize storage in a micro-mudroom without sacrificing walking space.

Mar 9, 2026 - Written by: Linda Wise
I’ve personally found that the most aggressively constrained spaces often birth the most brilliant architectural solutions. If you are staring down a microscopic entryway, a converted hallway closet, or a sliver of wall space in your garage, you already know the stakes. The drop-zone is the hardest working square footage in any home. It absorbs wet boots, heavy backpacks, dog leashes, and winter coats. When you lack square footage, you simply cannot afford dead air.
Most homeowners assume they need a dedicated, cavernous room to achieve entryway nirvana. That’s categorically false. You don’t need more space; you need better math. Mastering the exact tolerances—down to the quarter-inch—transforms a claustrophobic hallway into a high-functioning utilitarian hub.
Before we tear into the anthropometric data and dimensional blueprints, here is a quick snapshot of the hardware and modular solutions I frequently recommend for ultra-tight builds.
Quick Comparison: Top Picks
| Product | Rating | Check Price |
|---|---|---|
| Narrow Hallway Hall Tree | ⭐⭐⭐⭐⭐ | View on Amazon |
| Slim Shoe Storage Cabinet | ⭐⭐⭐⭐½ | View on Amazon |
| Heavy-Duty Wall Mounted Coat Rack | ⭐⭐⭐⭐⭐ | View on Amazon |
The Anatomy of a Micro-Mudroom
A functional mudroom isn’t defined by its perimeter walls. It is defined by its ability to process transitions. You walk in from the elements, shed your exterior layers, and enter the sanctuary of your home. In a large home, this process is spread across ten feet of custom millwork. In a small home, you have to compress that entire sequence into thirty-six inches.
To achieve “big storage” in a “small footprint,” we must entirely abandon standard furniture sizing. Traditional hall trees and benches are designed with generous, relaxed proportions that will absolutely choke a narrow corridor. We have to design like shipbuilders. Every horizontal plane must justify its existence. Every vertical plane must perform double duty.
You’ll notice that the most successful compact designs rely on a concept called “visual encroachment.” A physical object might only protrude twelve inches from the wall, but if it is dark, bulky, and sits right at eye level, it feels like it takes up three feet. We combat this by manipulating depth, leveraging negative space, and pushing bulk below the knees or above the eyeline.
Defining the Absolute Minimums
How small is too small? If you have a wall that is at least 24 inches wide and you have 30 inches of clearance to stand in front of it, you have a mudroom.
To make it work, you have to respect the clearance zones. You cannot obstruct traffic flow. The absolute bare minimum clearance for a walking path is 36 inches. If your built-in bench protrudes into that 36-inch path, you will curse it every time you carry groceries into the house.
Here’s the real kicker: most standard benches are 18 to 20 inches deep. If you are building in a tight hallway that is only 48 inches wide, a standard bench leaves you with 28 inches of walking space. That is a building code violation in many municipalities, and functionally, it’s a nightmare.
You must scale back.
Key Takeaways for Minimum Footprints:
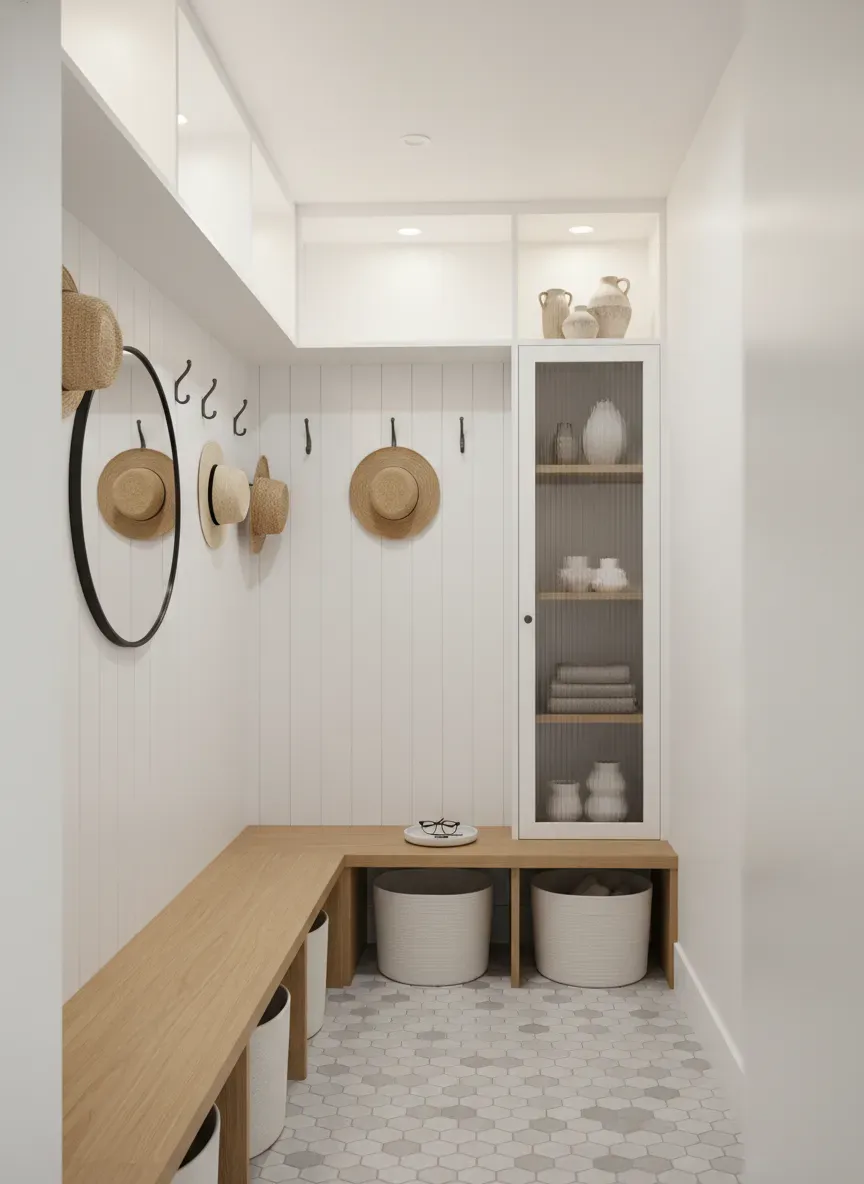
- The “Perch” Bench: A seating surface only needs to be 12 to 14 inches deep if it’s merely used to tie shoes. You aren’t lounging; you are perching.
- The Cantilever Trick: Floating a shallow bench off the wall (leaving the floor beneath it clear) tricks the eye into perceiving more floor space, making the hallway feel significantly wider.
- Flush Hardware: Avoid cabinet pulls that protrude. Use edge pulls or push-to-open mechanisms to shave off an extra inch of intrusion into your walkway.
Vertical Real Estate: The Secret Weapon
When horizontal space is taxed to the limit, your only path is up. The ceiling is your ultimate boundary. I’ve seen countless DIYers stop their mudroom cabinetry at 72 inches high, leaving two or three feet of dead space above. It’s a tragic waste of potential.
To maximize a small footprint, your millwork should scrape the ceiling.
Stratifying Your Storage
Divide your vertical elevation into three distinct operational zones:
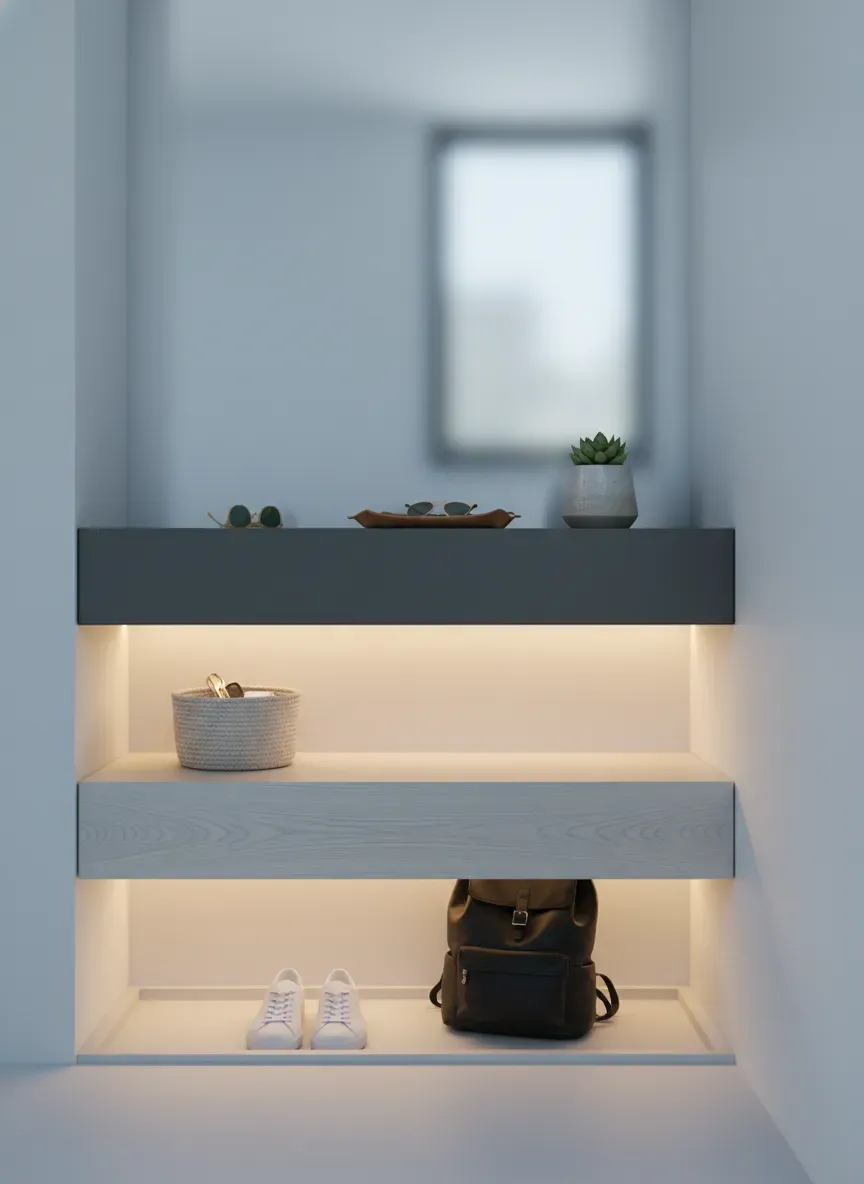
- The Primary Zone (24 to 60 inches from the floor): This is the high-frequency area. It houses your daily coats, dog leashes, backpacks, and keys. It must be open, instantly accessible, and highly durable.
- The Secondary Zone (Floor to 24 inches): Dedicated entirely to footwear and heavy, dirty items.
- The Tertiary Zone (60 inches to Ceiling): This is your bulk storage. Out-of-season gear, ski pants, extra hats, and guest items go here. Because this zone is above eye level, you can make these upper cabinets deeper without making the space feel claustrophobic.
When setting up the primary zone, hook placement dictates capacity. If you blindly screw hardware into a board, you’ll end up with coats piled on top of each other, rendering half the hooks useless. When mounting your hardware, mastering the ideal spacing and distance between hooks prevents bulky winter coats from overlapping into a damp, tangled mess. I generally advocate for a staggered, double-row hook layout to double your hanging capacity in the same linear footprint.
If you aren’t ready to hire a custom carpenter to build floor-to-ceiling millwork, investing in a robust, modular Heavy-Duty Wall Mounted Coat Rack allows you to establish a highly functional primary zone while leaving the floor open for separate shoe storage.
Decoding Optimal Dimensions: The Blueprint
Let’s get granular. Success in micro-mudrooms lives and dies by the inch. If you over-dimension your built-ins, the space feels like a closet. If you under-dimension them, they become useless decorative trim. Familiarizing yourself with standard depth and height measurements for entry built-ins provides a foundational baseline, even if you ultimately decide to break those rules for your custom build.
Seating Ergonomics in Tight Quarters
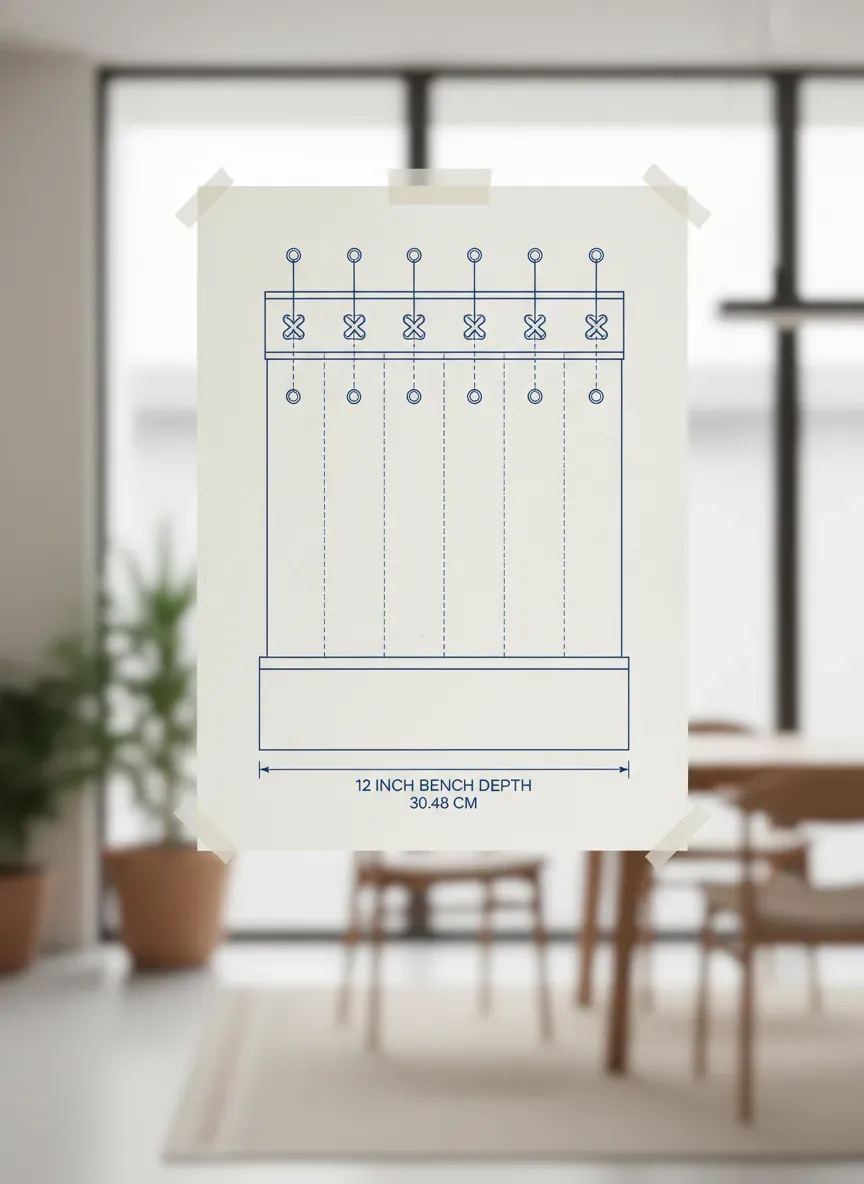
A standard dining chair sits about 18 inches off the floor. In a mudroom, 18 inches is a great target, but if you are integrating shoe cubbies directly underneath, you might need to stretch that to 19 or 20 inches to accommodate winter boots.
Depth is the variable you manipulate.
- Luxurious Depth: 18–20 inches.
- Standard Depth: 15–16 inches.
- Micro-Depth (The Perch): 11–13 inches.
If you opt for an 11-inch depth, be aware that it will not support a thick, plush cushion. A naked wood bench with a nicely routed edge is preferable here.
Pro Tip: If your entry hallway is less than 42 inches wide, skip the built-in bench entirely. Instead, use a fold-down, marine-style teak seat that sits flush against the wall when not in use. It gives you the utility of seating without permanently sacrificing your walking clearance.
The Locker and Cubby Calculus
If you are planning closed cabinetry, I highly recommend consulting a comprehensive mudroom locker depth guide to strike the perfect balance between internal capacity and external footprint.
For an open-concept small mudroom, individual cubby partitions often eat up too much space. A 3/4-inch plywood divider between every single coat section adds up. If you have a 40-inch span and you add three dividers, you’ve just lost nearly 2.5 inches of usable hanging space. In small builds, favor continuous, open backing with defined “zones” created by hook groupings rather than physical wooden walls.
If you absolutely must have enclosed lockers to hide the visual chaos, what is the optimal depth?
- 12 inches deep: Barely fits a men’s size 11 shoe straight in. Coats must be hung on front-facing hooks, not side-to-side on a rod.
- 15 inches deep: The sweet spot for tight spaces. Accommodates most shoes straight in, allows for angled interior hooks, and handles standard-sized backpacks.
- 24 inches deep: Standard closet depth. Avoid this in small mudrooms unless you are literally converting an existing framed closet.
The Geometry of Footwear
Shoes are the bane of any entryway. They multiply, they carry dirt, and they take up an awkward amount of floor space.
Storing shoes flat on the floor or on horizontal shelves requires roughly 12 to 14 inches of depth. If you don’t have that, you have to pivot to angled storage. A Slim Shoe Storage Cabinet utilizes a tilt-out drawer mechanism that stores shoes vertically against the door face. This ingenious piece of engineering can reduce the required depth of your shoe storage down to a mere 6 to 9 inches.
Placing one of these slim cabinets near the door, paired with a wall-mounted hook system above it, creates a fully functional drop zone that protrudes less than 10 inches from the drywall. It is a game-changer for historic homes with narrow central staircases that dump right at the front door.
Navigating Common Spatial Pitfalls
It’s easy to sketch a beautiful mudroom elevation on a piece of graph paper. It is entirely different to live with it. I’ve seen countless projects fall apart because the designer forgot to account for the dynamic movement of the space.
The Door Swing Collision
This is the most frequent and devastating mistake in entryway design. You build a stunning, 15-inch deep bench right next to the front door, only to realize that when the door is fully opened, the handle smashes into the side of the millwork.
Always map your door swings. You must account for the door, the projection of the doorknob, and the hinges. Leave a minimum of a 4-inch buffer between the maximum open arc of the door and the start of your mudroom built-ins.
Baseboard Heating and Vents
Tight spaces usually mean you are fighting with existing HVAC infrastructure. Building a solid wood base directly over a floor register or against a baseboard radiator is a recipe for warped wood and an icy house.
If you must build over a vent, the base of your mudroom bench needs to be elevated, or you must route the ductwork through the toe-kick of your cabinetry. A cantilevered bench is particularly useful here, as it allows air to circulate freely beneath the unit.
The Lighting Black Hole
When you add floor-to-ceiling cabinetry into a small, already dark hallway, you create a cave. The physical mass of the wood blocks ambient light from adjacent rooms.
You must plan for supplementary lighting. Hardwired sconces placed between locker sections look incredibly high-end, but they require tearing open drywall. A more accessible solution for tight spaces is low-voltage LED channel lighting routed into the underside of the upper cubbies. It washes the primary zone in bright, usable light without taking up a single millimeter of physical space.
Materiality and Visual Weight
The materials you choose drastically alter how large or small your mudroom feels. Heavy, dark-stained oak might look spectacular in a massive, dedicated mudroom, but in a 4-foot hallway, it will feel oppressive.
Paint and Finish Strategies
For micro-footprints, monochromatic color drenching is an incredibly effective optical illusion. Paint your mudroom millwork the exact same color as the surrounding walls and baseboards. By eliminating contrasting trim lines, the eye doesn’t stop at the edge of the bench; it travels continuously across the space, making the structure feel like a natural architectural extension rather than a bulky piece of furniture dropped into a hallway.
Hardware Selection
Knobs and pulls are the jewelry of your cabinetry, but in a tight space, they are also hip-bruisers.
- Avoid: Large cup pulls, protruding bar pulls, or oversized geometric knobs.
- Embrace: Finger routs (where the wood is notched out to grab), low-profile edge pulls that sit flush on the top of drawers, or mechanical push-to-open latches.
The Mirror Hack
Never underestimate the raw power of a well-placed mirror. If your small mudroom consists of a bench and some upper cabinets, installing a custom-cut mirror on the back wall between the bench and the uppers instantly doubles the visual depth of the space. It reflects light, provides a spot for a quick outfit check before leaving, and entirely negates the “heavy” feeling of the cabinets above.
If you are using a freestanding Narrow Hallway Hall Tree, look for models that integrate a mirror into the upper half. It serves the same optical purpose without requiring custom glasswork.
Custom vs. Modular in Micro-Spaces
I often get asked if it’s strictly necessary to hire a custom cabinet maker for these tiny footprints. The honest answer? It depends on your tolerance for gaps.
Modular, off-the-shelf furniture is built to standard dimensions. If you have a 45-inch niche and you buy a 38-inch wide hall tree, you are going to have a 3.5-inch gap on either side. In a massive room, you wouldn’t notice. In a micro-mudroom, those gaps become black holes for dog hair, dropped keys, and dust. Furthermore, it breaks the visual continuity, making the piece look temporary and cluttered.
If you are going the modular route, my advice is to buy a piece slightly smaller than your space, center it, and intentionally use the side gaps for specific vertical storage—like an umbrella stand or a slim umbrella hook. Better yet, add your own filler strips to the sides of a modular unit and paint them to match, faking a built-in look for a fraction of the cost.
Custom millwork, however, allows you to dictate every fraction of an inch. You can scribe the wood perfectly to uneven walls, wrap around awkward bulkheads, and seamlessly integrate your baseboards. If your budget allows, custom is always the superior path for maximizing small footprints.
Final Walkthrough
The Bottom Line: You do not need a massive addition to create a life-changing drop zone. The secret lies in unapologetic precision.
By shaving a few inches off standard bench depths, exploiting the vertical space all the way to your ceiling, and carefully selecting flush hardware and tilt-out shoe mechanisms, you can squeeze immense utility out of the tightest architectural constraints.
Stop looking at your narrow hallway as a liability. Treat it as a puzzle. Measure your coats, measure your largest boots, map out your door swings, and build exactly what you need—and absolutely nothing more. The result won’t just be a place to hang a jacket; it will be a masterclass in spatial economy.