Build It Right: DIY Mudroom locker Plans with Pro Dimensions
Master the art of custom entryway storage with professional-grade DIY mudroom locker plans, precise dimensional blueprints, and expert millwork techniques.

Mar 9, 2026 - Written by: Linda Wise
Entryways naturally attract chaos. Without a dedicated structural system to corral the daily influx of muddy boots, dripping raincoats, and overstuffed backpacks, your home’s primary threshold quickly devolves into an anxiety-inducing obstacle course. You’ve likely stared at that blank wall near your garage door and visualized a beautifully integrated storage solution. Building it yourself is entirely achievable, but executing it flawlessly requires more than just a passing familiarity with a circular saw.
I’ve personally found that the difference between a DIY project that looks “homemade” and one that mirrors high-end custom millwork lies entirely in the planning phase. Most amateur builders rush straight to the hardware store without grasping the architectural nuances of cabinet construction. They eyeball the spacing, guess the bench height, and inevitably end up with a unit that feels awkward to use and looks disproportionate in the space.
Here is the real kicker: professional carpenters don’t guess. They rely on strict, time-tested ergonomic standards. If you want a drop-zone that functions seamlessly while elevating your home’s interior architecture, you have to adopt a craftsman’s mindset. We are going to deconstruct the anatomy of the perfect entryway build, focusing heavily on structural integrity, proper joinery, and exact measurements.
Quick Comparison: Top Picks
| Product | Rating | Check Price |
|---|---|---|
| Kreg Pocket-Hole Jig 720PRO | ⭐⭐⭐⭐⭐ | View on Amazon |
| DeWalt 20V MAX Cordless Brad Nailer | ⭐⭐⭐⭐½ | View on Amazon |
| Franklin Brass Heavy Duty Coat Hooks | ⭐⭐⭐⭐⭐ | View on Amazon |
The Architectural Anatomy of a Mudroom Locker
Before cutting a single sheet of plywood, you must understand the tripartite structure of a standard locker system. Think of it as a three-act play. You have the base (the foundation and shoe repository), the main column (the hanging space and seating area), and the upper cabinet (the bulk storage bulkhead). Each zone serves a highly specific mechanical and ergonomic purpose.
Establishing a Rock-Solid Foundation
The base is arguably the most critical component. It bears the entire dead load of the cabinet structure above it, plus the dynamic load of humans sitting down to tie their shoes.
Amateur builders frequently make the mistake of resting their plywood carcases directly on the subfloor. Do not do this. Floors are never perfectly level. Instead, you need to construct a separate ladder base out of dimensional 2x4 lumber. This hidden plinth allows you to shim the entire framework perfectly plumb and level before attaching the visible cabinetry.
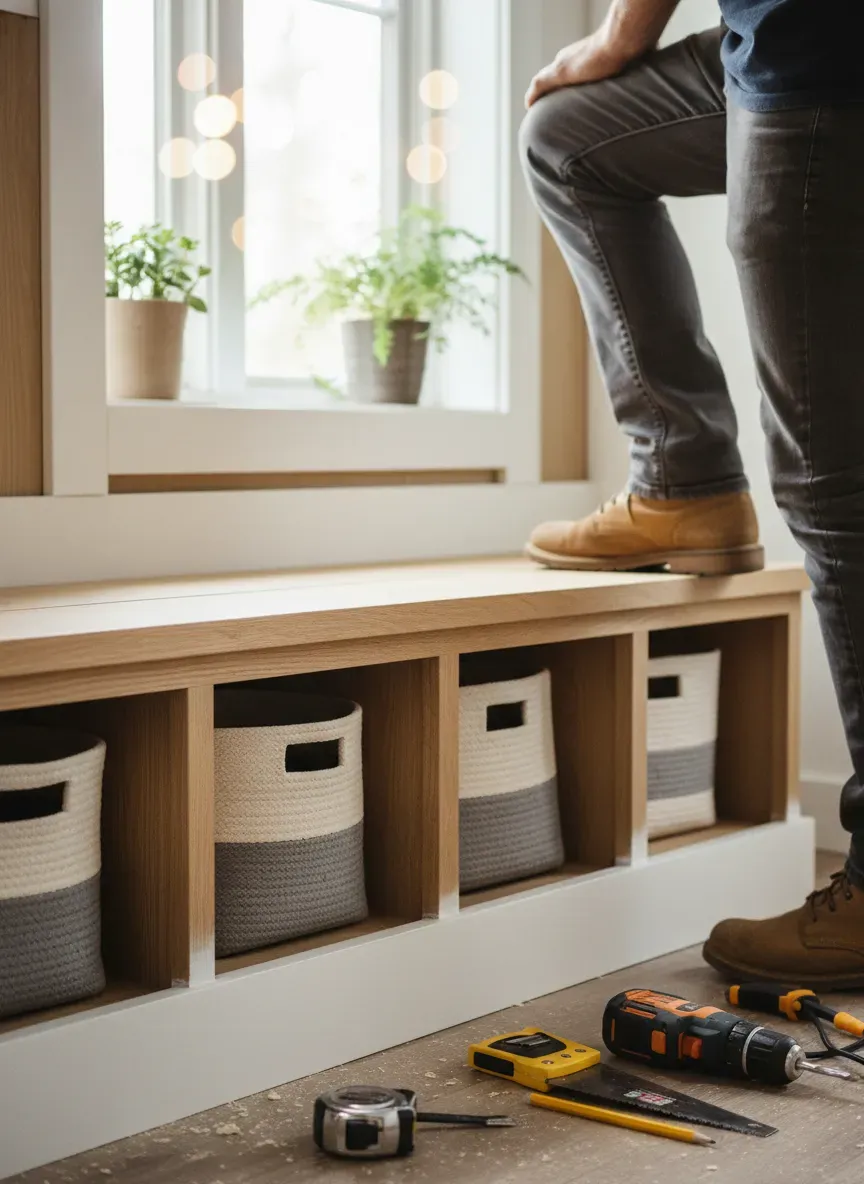
Your ladder base should sit recessed about 3 inches from the front edge of your eventual bench. This creates a toe-kick. A toe-kick isn’t just a stylistic choice; it prevents you from stubbing your boots against the painted wood when standing close to the hooks.
Sizing the Cubbies and Seating
Once your ladder base is anchored securely to the wall studs, the bench box sits on top. For adults and children to comfortably transition from standing to sitting, referencing the standard depth and height measurements is non-negotiable.
If you build the bench too high, kids will struggle to hop up, and adults will feel like their legs are dangling. If you build it too low, standing back up requires an awkward, deep squat. The golden ratio for bench height—including the solid wood or butcher-block top—is exactly 18 inches from the finished floor.
Beneath that seating surface, your shoe cubbies need adequate volume. I recommend a minimum internal opening of 7 inches high by 10 inches wide. Anything smaller, and you will find yourself trying to forcefully wedge winter boots into spaces designed for slim sneakers.
Pro Dimensions You Simply Cannot Ignore
Dimensional accuracy separates the master carpenters from the weekend warriors. You can use the most expensive hardwood on the market, but if your proportions are off, the entire unit will feel incredibly oppressive or frustratingly cramped.
The Science of Depth
How far out should your lockers project into the room? This is a delicate balancing act. If your hallway is narrow, an overly deep cabinet will choke the pedestrian traffic flow. Conversely, a shallow cabinet renders the coat hooks practically useless, as winter parkas will constantly spill out past the divider panels.
To navigate this, consult a comprehensive mudroom locker depth guide. As a general rule of thumb, the bench seat should protrude 18 to 20 inches from the drywall. This depth comfortably supports a seated adult thigh.
The vertical locker dividers rising above the bench should be shallower. You’ll notice that professional builds almost always feature a “step back.” The upper vertical partitions typically measure between 11 and 15 inches deep. This 3-to-7-inch differential between the bench edge and the vertical towers prevents users from violently hitting the back of their heads against the partitions when sitting down.
Width and Breathing Room
Cramming five narrow lockers into a tight wall space might look symmetrical on paper, but in reality, it creates an unusable nightmare. Winter coats possess significant bulk. Backpacks are wide.
A single locker cubby needs an absolute minimum interior width of 18 inches. If your wall allows for it, expanding that width to 22 or 24 inches is vastly superior. At 24 inches wide, you can install a double-prong hook on the back wall and single hooks on the side panels without the hanging items actively fighting each other for airspace.
Pro Tip: When calculating your overall width, remember to account for the thickness of your material. If you are using 3/4-inch plywood for your vertical dividers, a five-locker system will consume an extra three inches of wall space just in material thickness. Always draft your cut lists using outside dimensions.
Material Selection: Structural Integrity Over Savings
You will walk into the lumber aisle of a big-box store and immediately feel tempted by the cheap, warped sheets of nominal pine plywood. Resist that urge. Your entryway takes a daily beating. Moisture from umbrellas, dirt from cleats, and the heavy impact of tossed bags require high-grade materials.
The Plywood Hierarchy
For the primary carcase (the structural boxes), ¾-inch cabinet-grade plywood is the undisputed champion. Look specifically for Birch or Maple veneer core plywood. These sheets possess multiple thin layers of wood pressed together with minimal voids, ensuring incredible dimensional stability.
Medium Density Fiberboard (MDF) is heavily debated in carpentry circles. It takes paint beautifully, resulting in a glass-smooth finish that plywood struggles to match due to its natural grain texture. However, MDF is a sponge. If a wet boot sits directly on unsealed MDF, the fibers will swell, bubble, and disintegrate.
If you opt for MDF to achieve that flawless painted look, hybridize your build. Use ¾-inch plywood for the base and shoe cubbies where moisture is inevitable, and switch to MDF for the upper dividers and top bulkhead where water exposure is virtually zero.
Face Frames: The Mark of Craftsmanship
Raw plywood edges are ugly. To hide them, you must build a face frame. This is a framework of solid wood attached to the front of your plywood carcases, giving the illusion of thick, substantial cabinetry.
For paint-grade projects, Poplar is the gold standard. It is a dense, smooth-grained hardwood that takes primer exceptionally well and resists denting far better than soft pine. When constructing your face frames, nominal 1x2 (which actually measures ¾” x 1 ½”) is perfect for the vertical stiles, while nominal 1x3 (measuring ¾” x 2 ½”) works beautifully for the horizontal rails.
The Step-by-Step Construction Masterclass
We have covered the theory. Now we dive into the actual assembly. The sequence of operations dictates the ease of your build. Do not attempt to build the entire unit in the middle of your garage and then carry it inside. It will be far too heavy and will never fit through your doorways. Build it in modular boxes.
Step 1: The Plinth and Base Cabinets
Start by finding the highest point of your floor along the installation wall. Floors slope; it is a law of physics. Build your 2x4 ladder base and place it against the wall. Using a laser level and composite shims, raise the base until it is perfectly level across its entire length and depth. Secure it directly into the wall studs using 3-inch construction screws.
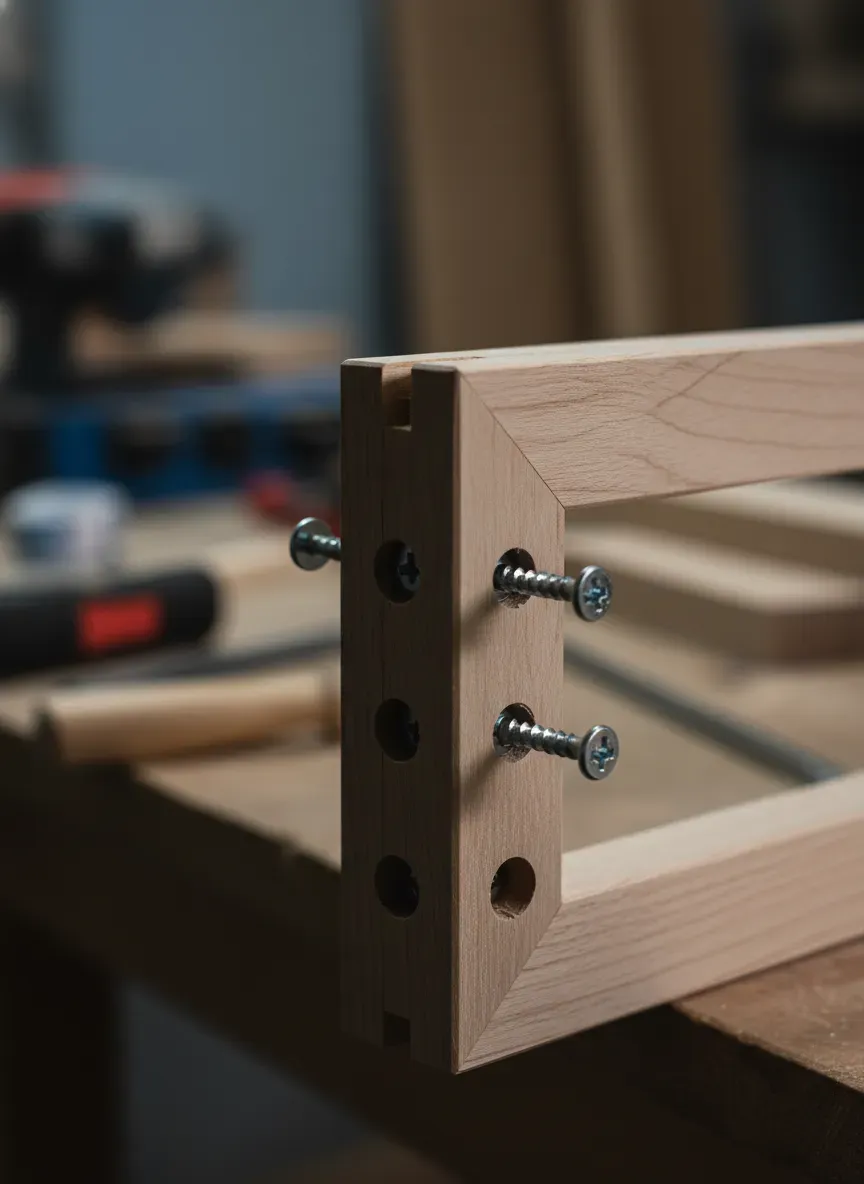
Next, assemble your base cubby boxes using your chosen ¾-inch plywood. Joinery here is critical. The fastest and most structurally sound method for DIYers is pocket hole joinery. Tools like the Kreg Pocket-Hole Jig 720PRO allow you to drill angled holes and drive self-tapping screws that pull the plywood joints tight.
Remember, the screws act primarily as internal clamps. Wood glue is what actually creates the permanent bond. Apply a generous bead of high-quality aliphatic resin wood glue to every joint before driving your pocket screws.
Step 2: The Bench Top
Your seating surface takes massive abuse. While you can use painted plywood here, opting for a solid wood surface adds a stunning visual anchor to the project. Hardwood butcher block is an excellent choice.
To attach the top to your base cabinets, do not screw down through the top—that leaves ugly holes you’ll have to fill. Instead, drive screws upward from inside the base cabinets into the underside of the bench.
Step 3: Vertical Dividers and Upper Bulkheads
Once the bench is secured, it is time to build the upper towers. These vertical panels form the individual locker stalls. To keep everything perfectly spaced and square, cut spacer blocks out of scrap wood. If your design calls for an 18-inch interior width, cut two pieces of scrap exactly to 18 inches. Place these blocks between your vertical panels as you attach them. This guarantees perfectly parallel lockers without having to constantly check a tape measure.
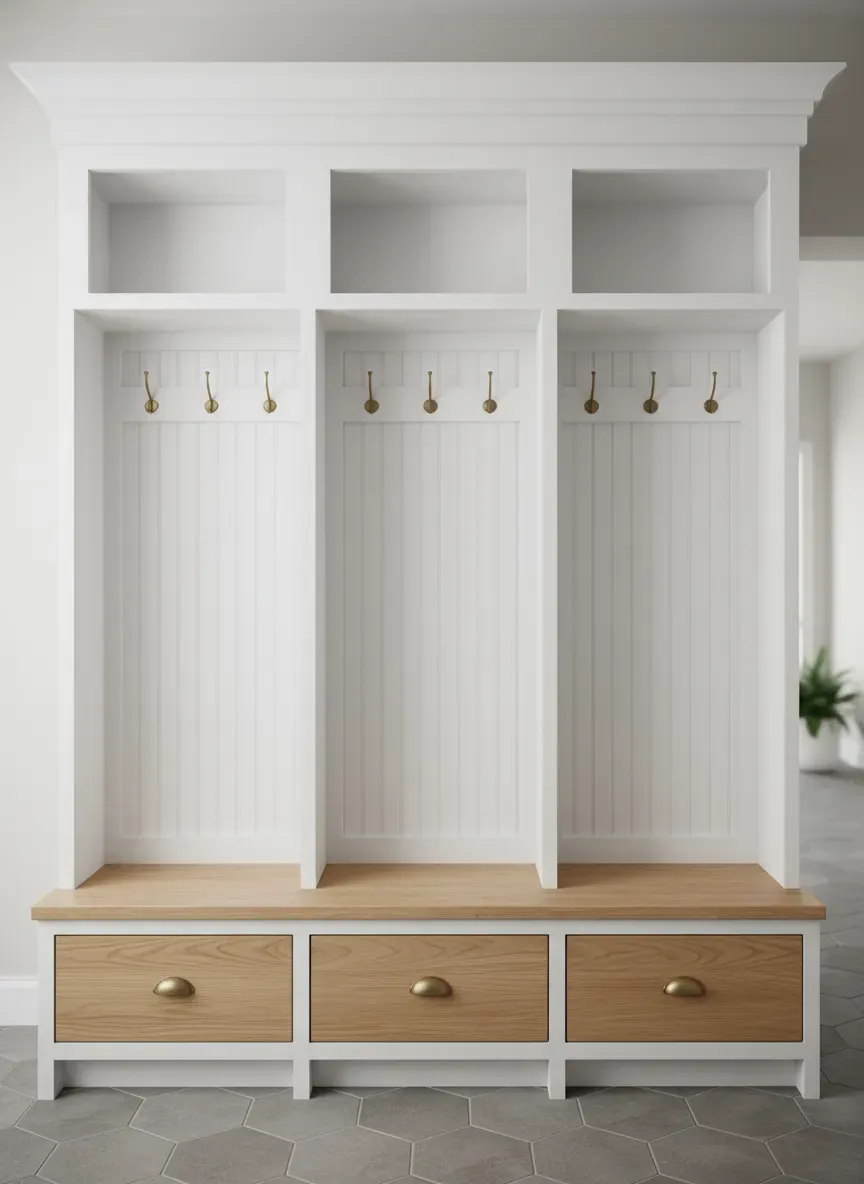
The tops of these vertical dividers should be capped with a horizontal shelf, creating the upper bulkhead area. This upper zone is ideal for storing out-of-season items in woven baskets.
The Art of Scribing: Defeating Crooked Walls
Here is where amateur projects usually fail spectacularly. Drywall is never perfectly flat. Corners are rarely exactly 90 degrees. If you push a perfectly square wooden cabinet against a wavy drywall surface, you will be left with ugly, inconsistent gaps ranging from ⅛-inch to ½-inch.
You cannot fix a ½-inch gap with caulk. It will crack, shrink, and look terrible. You must scribe the wood to match the wall.
Scribing involves holding the wooden panel slightly away from the wall, taking a compass (or a specialized scribing tool), and tracing the exact topography of the drywall onto the wood. You then take a jigsaw or a power planer and remove material right up to that pencil line. When you push the panel back against the wall, it will interlock with every bump and wave in the drywall, creating a flawless, gap-free seam.
Key Takeaways for Structural Success:
- Never trust the floor: Always build an independent, level ladder base.
- Modular is better: Build your system in manageable, interconnected boxes.
- Glue is paramount: Mechanical fasteners are just temporary clamps while the glue cures.
- Scribe, don’t caulk: Cut your wood to fit the wall’s imperfections.
Advanced Customization: Venting and Electronics
A truly elite entryway system anticipates modern needs. Wet gear generates humidity, and modern families require charging infrastructure.
If you live in a region with heavy snowfall, consider integrating active boot drying technology into your base cubbies. You can route PVC piping through the ladder base, connected to a hidden low-voltage blower fan, directing ambient air up into the shoe compartments. To allow this moisture to escape, install decorative brass or powder-coated aluminum vent grilles into your baseboard toe-kick.
Similarly, the modern drop-zone needs power. Before securing your vertical towers to the wall, have an electrician wire a few recessed outlets inside the lockers. Routing these circuits allows you to install hidden USB charging hubs for tablets, phones, and wireless earbuds directly inside the cubbies, keeping messy cords off your kitchen counters.
Finishing Touches: Hardware, Paint, and Ergonomics
The final 10% of the project dictates 90% of the visual impact. Do not rush the finishing stage.
Hardware Geometry
Hook placement requires careful thought. If you place the hooks too high, young children will be forced to jump or yank on their coats, eventually tearing the fabric or pulling the hardware straight out of the wood. If you place them too low, long trench coats will pool awkwardly on the bench seat.
When calculating the ideal spacing and how far apart to mount your coat hooks, aim for a primary hook height of about 45 to 50 inches from the bench seat. For the hardware itself, cast iron or solid brass double-prong hooks, like the Franklin Brass Heavy Duty Coat Hooks, provide the necessary structural rigidity to handle backpacks loaded with heavy textbooks.
Achieving a Factory Paint Finish
Slapping a coat of cheap latex wall paint on your beautiful millwork is a cardinal sin. Wall paint is designed to be soft and flexible; it will peel off wooden cabinets within a month.
You need an enamel or a waterborne alkyd paint. Products like Sherwin-Williams Emerald Urethane Trim Enamel or Benjamin Moore Advance dry to a rock-hard, self-leveling finish that mimics a factory spray job even if you apply it with a brush and foam roller.
Before painting, preparation is mandatory. Fill every single nail hole, pocket screw void, and tiny seam with a high-quality wood filler—or better yet, an automotive body filler like Bondo, which doesn’t shrink as it dries. Sand the entire unit down to 220-grit smoothness.
Next, apply a stain-blocking primer. A shellac-based primer like B-I-N is phenomenal for sealing wood knots, ensuring that the natural tannins in the wood won’t bleed through your pristine white paint six months down the road. Once the primer is dry, lightly scuff it with a 320-grit sanding sponge, wipe away the dust with a tack cloth, and lay down two thin, even coats of your urethane enamel.
Pro Tip: If you are using a pneumatic finishing tool like the DeWalt 20V MAX Cordless Brad Nailer to attach your trim and face frames, dial in the depth adjustment carefully. You want the nail head to sink just 1/16th of an inch below the wood surface. If it sinks too deep, you create an unnecessarily massive crater to fill.
Trim and Integration
To make the locker system look like it was built with the house rather than added later as an afterthought, you must integrate it with the room’s existing trim.
Remove the existing baseboards on the wall where the lockers will sit. Once the unit is installed, run new baseboard wrapping continuously around the front toe-kick of your locker base, tying it seamlessly back into the room’s perimeter trim. Repeat this process at the ceiling. A continuous run of crown molding bridging the gap between the top of your locker bulkhead and the ceiling instantly elevates the project from a piece of furniture to permanent, high-end architectural millwork.
The Bottom Line: Building a custom mudroom locker system is a heavy lift, but it is one of the most rewarding DIY projects you can tackle. By respecting strict ergonomic dimensions, investing in cabinet-grade materials, and executing professional joinery and finishing techniques, you transform a chaotic drop-zone into a beautifully structured, highly functional piece of permanent architecture. Take your time, measure twice, and let the precision of your planning dictate the quality of your build.