Custom Entryway Lockers: Sizing Guidelines and Ventilation Tips
A comprehensive guide to dimensioning and ventilating custom mudroom lockers. Stop guessing measurements and prevent moisture buildup with these expert joinery and design strategies.

Feb 20, 2026 - Written by: Linda Wise

The mudroom is the airlock of the home. It is the chaotic transition zone between the harsh elements outside and the sanctuary inside. Over the years, I’ve seen countless homeowners pour thousands of dollars into custom millwork that looks stunning on Pinterest but fails miserably in practice. Why? Because the measurements were based on aesthetics rather than anthropometrics, and nobody thought about where the moisture goes.
If you build a locker that is too shallow, your coats won’t hang straight. If you build one without airflow, your expensive joinery becomes a petri dish for mildew.
We aren’t just nailing boxes together here; we are engineering a lifestyle solution. This guide dives deep into the specific mathematics of sizing and the critical, often ignored, physics of ventilation.
The Mathematics of the Perfect Locker
One size does not fit all, and “standard” cabinet dimensions are frequently useless for mudroom applications. Kitchen cabinets usually run 24 inches deep for bases and 12 inches for uppers. Mudroom lockers live in a grey area between these two, and getting it wrong means your parka creates a permanent bulge in the door—or worse, you can’t close it at all.

1. Depth: The Hanger vs. Hook Debate
The depth of your unit dictates the hardware you can use. This is the first decision you must make.
- The 24-Inch Standard (The Gold Standard): If you have the square footage, a 24-inch depth is superior. It matches standard kitchen base cabinets, meaning you can use stock countertops for the bench. More importantly, it allows you to use a standard closet rod. A coat on a hanger typically requires 21 to 22 inches of clearance. A 24-inch deep locker accommodates this with ease, keeping tailored coats wrinkle-free.
- The 18-Inch Compromise: This is common in tighter hallways. However, you cannot use a standard closet rod running left-to-right here. The shoulders of a coat will rub against the door or the back wall. In this scenario, you must rely on double-prong hooks mounted to the back and side walls, or a pull-out valet rod that faces forward.
- The 12-15 Inch Shallow Build: I generally advise against this unless you are extremely tight on space. At this depth, you are essentially building open shelving with hooks. Doors become impractical because bulky winter gear will prevent them from closing.
Pro Tip: If you are forced into a shallow depth (under 16 inches), abandon the idea of individual locker doors. Instead, look into hall trees and mudroom lockers guide to see how open-concept designs can reduce the visual bulk while maintaining functionality.
2. Width: The Shoulder Check
How wide should each bay be? I’ve seen DIY plans suggesting 12 inches per locker. Unless you are running a high school gymnasium, this is insufficient for residential use.
- Minimum Functional Width: 15 inches. This allows for a backpack to hang without getting crushed, or a pair of adult boots to sit side-by-side.
- Ideal Width: 18 to 20 inches. This feels luxurious. It gives enough elbow room for someone sitting on the bench to tie their shoes without banging their elbows against the dividers.
- The “Double” Locker: If you have multiple children, consider a 30-inch wide bay shared by two kids, rather than two cramped 15-inch bays. It often feels more spacious and allows for larger items like hockey bags or musical instruments.
3. Vertical Ergonomics
Height is where the “custom” in custom cabinetry really shines. You need to map this out based on who lives in your house right now, and who will live there in five years.
- The Bench Height: Standard chair height is 18 inches. However, for a mudroom, I prefer 19 to 20 inches. This slightly elevated position makes it easier for adults to stand up after lacing boots. If you plan to add a cushion (usually 2-3 inches thick), build the wooden bench at 16 or 17 inches so the final sitting height hits that 19-inch sweet spot.
- Hook Height: This is a moving target. For adults, 60 to 66 inches off the floor is standard. For kids, you want an intermediate row of hooks at about 48 inches.
- The “Head Knocker” Upper Cubby: Be careful with the upper storage. If you extend the upper cabinets out to the full depth of the bench (e.g., 20 inches deep), anyone standing up quickly will hit their head.
- Design Hack: Keep the upper cabinets shallow (12-14 inches) or start them at least 60 inches above the bench seat.
Ventilation: The Silent Integrity Killer
You can build the most beautiful white oak cabinetry in the world, but if you throw wet raincoats and sweaty soccer cleats into a sealed box, you are building a mold factory.
Moisture management is the single most overlooked aspect of locker design. When damp gear sits in a stagnant air pocket, the humidity spikes. This warps your wood, rusts your hardware, and breeds bacteria.
Passive vs. Active Ventilation Strategies
You don’t necessarily need electric fans (though they help), but you absolutely need airflow paths.
1. The Toe Kick Vent
Never seal the base of a locker completely if you store shoes there. I recommend cutting a rectangular vent into the toe kick. You can cover this with a decorative metal grille. This allows cool air from the floor to be drawn into the cabinet.
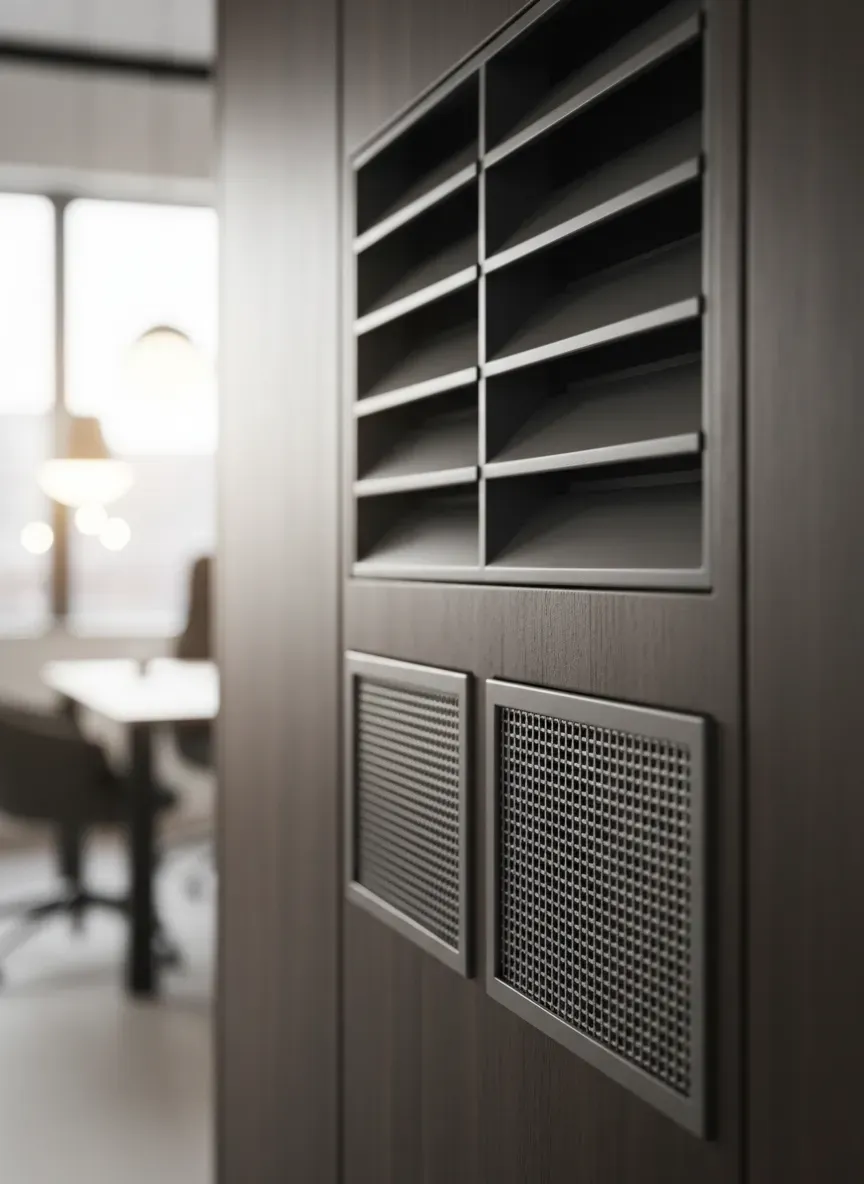
2. Door Inserts and Routing
Solid slab doors are the enemy of airflow.
- Wire Mesh/Rattan: Using a breathable insert panel is not just an aesthetic choice; it’s functional. If you appreciate that organic look, check out coastal charm woven entryway benches for inspiration on how woven textures can facilitate airflow while hiding clutter.
- Louvered Doors: Traditional louvers are excellent for allowing heat and moisture to escape while blocking the view of the mess inside.
- Routered Slots: If you want a modern, minimalist look, have your carpenter router vertical slots or geometric patterns directly into the MDF or wood door panels.
3. The “Chimney Effect”
Hot air rises. If you vent the bottom (toe kick) but seal the top, the air won’t move. You need an exit strategy.
- Leave a 1/2 inch gap at the top of the door.
- Drill a series of unobtrusive holes in the top panel of the cabinetry (if it doesn’t go to the ceiling).
- If the lockers go to the ceiling, install a small grille in the upper frieze board.
The Bottom Line: You need an intake and an exhaust. Without both, air remains static.
Active Ventilation for Sports Families
If you have hockey players or heavy hikers in the family, passive air isn’t enough. I’ve personally installed small computer cooling fans into the back panels of lockers.
If you want the best experience without wiring a complex 12V system yourself, I highly recommend checking out the AC Infinity AIRPLATE S1. These are USB-powered, whisper-quiet fans that can be retrofitted into cabinet walls to force air circulation. It’s a game-changer for drying boots.
Material Selection: Durability Meets Design
Mudrooms take a beating. They face water, mud, road salt, and impact. The materials you choose for the carcass and the finish are critical.
The Case Against Particle Board
Do not use melamine or particle board for the box construction if the unit sits on the floor. One melted snow puddle will cause the base to swell like a sponge. Once that happens, the structural integrity is gone.
- Plywood: Use marine-grade or high-quality birch plywood for the boxes. It is dimensionally stable and handles moisture significantly better than composites.
- MDF (Medium Density Fiberboard): MDF is fantastic for painted doors because it doesn’t warp with humidity changes and paints smoothly. However, keep it off the floor. Use a solid wood base or plywood toe kick, then transition to MDF for the upper sections.
Hardware That Lasts
Hooks break. It’s a fact of life. Those cheap zinc hooks that come in a 10-pack? They will snap under the weight of a wet wool coat and a backpack.
Invest in cast iron or solid brass. I’ve had great success with the Amerock 190mm Pilltop Hook. It has a heavy, substantial feel and the dual-prong design is spaced wide enough to actually hold two items without them slipping off.
Scribing and Installation: The Professional Touch
Nothing screams “amateur” like a large gap between the locker and the wall. Your walls are not straight. Your floor is not level.
When building built-in entryway organization, you must plan for scribing. This involves adding an extra strip of wood (a scribe rail) to the outer edges of your cabinet face frame. During installation, you use a compass to trace the irregularities of the wall onto this strip, and then cut along that line with a jigsaw or belt sander. This creates a seamless, watertight fit that looks like the house was built around the furniture.
Electrical Integration
Before you slide those cabinets into place, think about power.
- Charging Stations: Route an outlet into the back of a cubby or a drawer. This keeps devices off the kitchen counter.
- Boot Warmers: If you live in a snow zone, having an outlet near the floor inside the locker allows you to plug in a boot dryer.
Blending Style with Utility
While function is king, the form is what makes you smile when you walk in the door. The lockers should feel like an extension of your home’s architecture, not a commercial changing room.
If your home leans towards a retro or minimalist aesthetic, you don’t have to settle for farmhouse shiplap. You can incorporate tapered legs, walnut veneers, and clean lines. I suggest looking at mid-century entryway benches storage to see how those specific design elements can be translated into larger built-in structures.
The Shoe Storage Solution
Let’s be real about shoes. They are the primary source of clutter.
- Open Shelves vs. Drawers: Drawers look cleaner, but open shelves encourage kids to actually put their shoes away.
- The Boot Tray: Even with custom lockers, you need a removable tray for the bottom. You don’t want road salt eating your plywood finish.
- For a rugged, perfectly sized solution, take a look at the JobSite Heavy Duty Boot Tray. It’s nothing fancy, but it catches the slush so your cabinetry doesn’t have to.
Key Takeaways for Your Build
- Depth Matters: Aim for 24 inches deep if you want to use hangers. Anything less requires hooks.
- Ventilation is Mandatory: Use mesh inserts, louvered doors, or active fan systems to prevent mold.
- Height for Humans: Bench at 19 inches; upper storage accessible or purely decorative.
- Material Science: Plywood for the base (water resistance), MDF for painted doors (finish quality).
- Scribe to Fit: Walls are never straight; build your face frames with extra width to trim down.
Building custom lockers is a significant investment of time and money, but the payoff is a morning routine that actually functions. By respecting the math of sizing and the physics of airflow, you create a space that serves your family rather than frustrating them. Measure twice, ventilate once, and enjoy the organization.