Essential Power Tools for Professional-Looking DIY Built-In Entryway Organization
Stop building amateur mudrooms. We analyze the specific power tool loadout required to achieve custom joinery, perfect scribes, and factory-grade finishes in your DIY entryway.

Feb 28, 2026 - Written by: Linda Wise

There is a distinct, often painful gap between visualizing a sleek, custom mudroom on Pinterest and staring at a pile of jagged plywood cuts in your garage. I’ve been there. You measure twice, cut once, and somehow the gap against the wall still looks like a topographic map rather than a straight line.
The difference between a project that screams “weekend warrior” and one that whispers “high-end custom cabinetry” rarely comes down to the quality of the wood. It comes down to the machinery you use to manipulate it. While skill is undeniable, tools are the multipliers of that skill. You cannot force precision with a dull blade or an underpowered motor.
If you are serious about transforming your foyer into a functional masterpiece, you need to look beyond the basic homeowner tool kit. We aren’t just hanging a picture frame here; we are building structural furniture that needs to withstand wet coats, heavy backpacks, and the settling of your home’s foundation.
Below, I’m breaking down the specific arsenal required to achieve that elusive professional finish.
The Foundation: Precision Cutting Ecosystems
Everything starts with the cut. If your carcass—the main box structure of your lockers or bench—isn’t square, no amount of trim or caulk will save you. The geometry of the entire build relies on your ability to rip sheet goods and crosscut lumber with absolute accuracy.
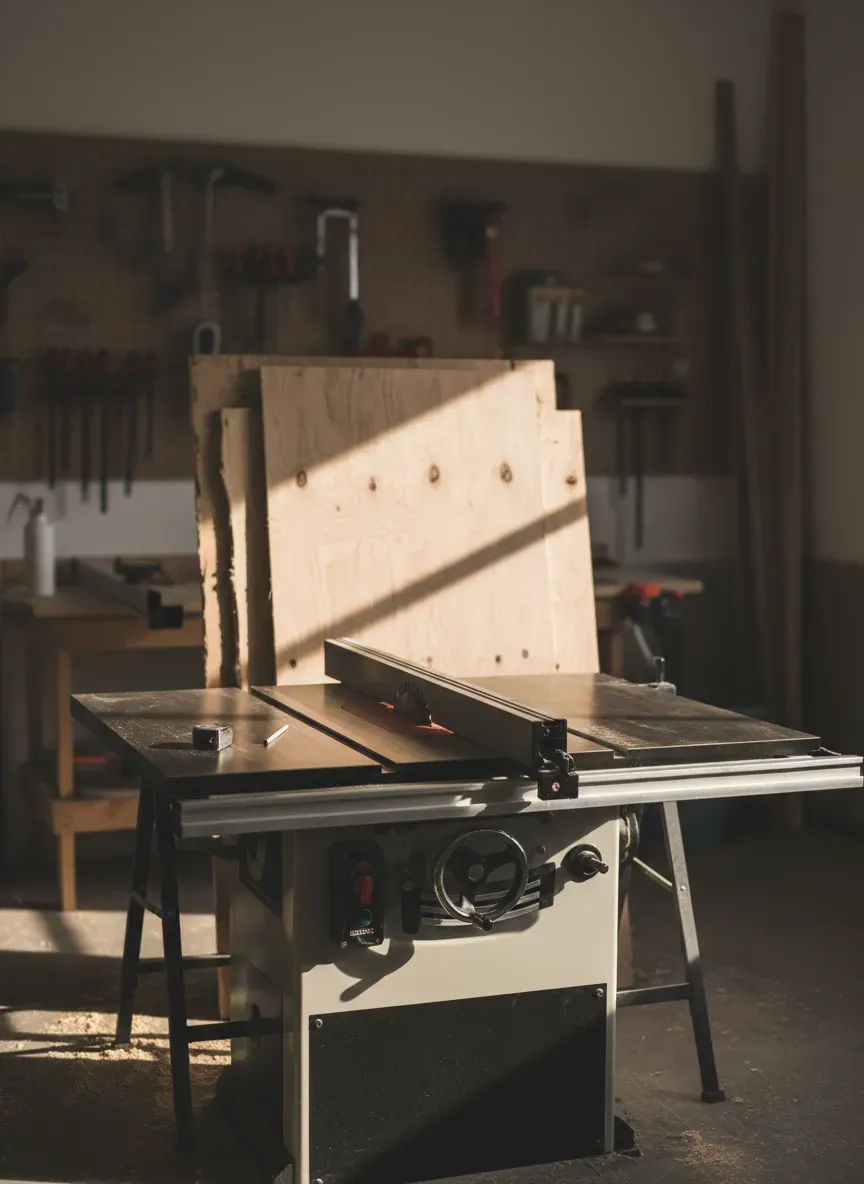
The Table Saw: The Heart of the Shop
You might think you can get by with a circular saw and a straight edge guide. For rough framing? Sure. For cabinet-grade plywood visible in an entryway? Absolutely not. You need a table saw with a reliable fence. The fence is the critical component here; if it drifts even a 1/16th of an inch from the front of the blade to the back, you will get burning, binding, and trapezoidal panels.
I’ve personally found that job site saws have come a long way, but you have to check the rip capacity. You’ll want at least 24 inches of rip capacity to handle half-sheets of plywood. If you are debating between models, always prioritize the rack-and-pinion fence systems. They lock parallel to the blade automatically, removing the “tap and pray” method of adjustment.
Pro Tip: Upgrade your blade immediately. The 24-tooth blade that comes with the saw is for framing houses, not building furniture. Switch to a 60-tooth or 80-tooth Hi-ATB (High Alternate Top Bevel) blade to slice through veneer without chipping it.
The Track Saw: The Sheet Good Specialist
Here is the real kicker for solo DIYers: wrestling a 4x8 sheet of 3/4-inch plywood onto a small table saw is dangerous and inaccurate. This is where the track saw changes the game. It allows you to bring the tool to the wood rather than the wood to the tool.
A track saw rides on an aluminum rail with a rubberized strip that prevents the wood from splintering (tear-out) right at the cut line. For breaking down large panels into manageable sizes for your standard depth and height measurements, a track saw offers factory-edge quality that a handheld circular saw simply cannot replicate.
The Compound Miter Saw
While the table saw handles the big panels, the miter saw handles the linear footage—the face frames, the baseboards, and the crown molding. Since entryways are heavy on trim work to blend the unit into the existing walls, a sliding compound miter saw is non-negotiable.
Why a slider? Because a standard 10-inch chop saw won’t cut through a 1x12 shelf board in a single pass. A sliding mechanism gives you that crosscut capacity. Look for a dual-bevel feature, which allows the saw head to tilt left and right. This saves you from having to flip long, awkward pieces of molding around in a tight hallway just to cut the opposite angle.
If you want the best experience, I highly recommend checking out the DeWalt 12-Inch Sliding Compound Miter Saw. The shadow line cut indicator on this machine uses an LED to cast a shadow of the blade onto the wood, meaning it never needs calibration like laser guides do. It shows you exactly where the kerf (the material removed by the blade) will be.
Joinery and Assembly: The Invisible Strength
Once the wood is cut, it has to be connected. Professional built-ins don’t have visible screw heads marring the side panels. The structure needs to be rigid, and the fasteners need to be hidden.
The Pocket Hole Jig System
Purists might argue for dados and rabbets, but for a built-in application, pocket screws are the industry standard for speed and strength. A pocket hole jig allows you to drill an angled hole into one piece of wood, joining it to another with a self-tapping screw.
This is exceptionally useful for face frames—the “front” of the cabinet that hides the plywood edges. You can assemble the entire face frame on a flat workbench and then attach it to the cabinet boxes. This ensures the joints are flush and tight before they ever touch the vertical installation.
Impact Driver vs. Drill/Driver
You need both. It sounds redundant, but switching bits between a pilot drill and a screwdriver bit every thirty seconds will drive you insane. Keep a standard drill set up with a countersink bit (to pre-drill holes so the wood doesn’t split) and use an impact driver to drive the screws.
An impact driver uses rotational concussion to drive long screws without stripping the head (cam-out). When you are driving 3-inch screws into studs to anchor the unit—which is critical when determining the best depth for mudroom lockers to prevent tipping—the impact driver provides the torque necessary to cinch that cabinet tight against the wall.

Scribing and Fitting: The “Built-In” Look
This is the section that separates the pros from the amateurs. Houses are never square. Floors sag, walls bow, and corners are rarely 90 degrees. If you build a square cabinet and shove it into a non-square corner, you will have ugly gaps. You need to “scribe” the unit to the wall.
The Jigsaw
Scribing involves transferring the profile of the wavy wall onto your filler strip and then cutting along that line. A jigsaw is the tool for this curvilinear cutting. However, standard jigsaws tend to vibrate and wander.
You need a jigsaw with a “barrel grip” for better control, or at least a top-handle model with variable speed. You want to cut slow and steady. Use a “down-cut” blade if you are cutting from the finished side, as the teeth point downward and won’t chip the top veneer.
The Oscillating Multi-Tool
I call this the “get out of jail free” card. Sometimes, you need to undercut an existing baseboard so your new built-in can slide underneath it for a seamless look. A jigsaw can’t do that. A circular saw can’t do that.
The oscillating multi-tool vibrates a blade back and forth at high speed, allowing you to make plunge cuts directly into trim, drywall, or even stray nails. It is surgical. When you are fitting the final pieces of trim and one corner is just a hair too tight, the multi-tool can shave off a millimeter of material in seconds without having to disassemble the whole unit.
For a versatile option that handles everything from sanding tight corners to cutting nails, take a look at the Makita 18V LXT Lithium-Ion Cordless Multi-Tool. The vibration reduction technology in this model is significant, meaning your hands won’t be numb after five minutes of sanding a tight corner.
Fastening the Finish: Nailers
Please, put down the hammer and finishing nails. Trying to hand-nail crown molding or face frames will result in “moon” dents in your wood from missed hammer strikes, and the repeated impact can shift your perfectly aligned joints. Pneumatic or battery-powered nailers are essential.
The 18-Gauge Brad Nailer
This is your workhorse. It shoots thin nails that leave small holes, which are easily filled with putty. You will use this for attaching face frames, baseboards, and shelves. The holding power is sufficient to glue and nail trim in place while the adhesive dries.
The 23-Gauge Pin Nailer
This is a luxury that quickly becomes a necessity. Pin nails are headless and practically invisible. They have very little shear strength, so they don’t hold much weight, but they are perfect for attaching delicate molding or holding a piece of trim in place while the glue sets. Because the hole is so small, you often don’t even need to fill it with putty if you are painting the unit.
Surface Preparation: The Sander
You can build the most structurally sound lockers in the world, but if the surface feels like a gravel road, it will look cheap. Sanding is 50% of the project.
Random Orbital Sander
A belt sander is too aggressive for plywood veneers; you’ll sand right through to the inner core in seconds. A finishing sander (vibrating square pad) is often too slow. The random orbital sander spins and oscillates simultaneously, ensuring you never leave swirl marks on the wood.
You’ll need to progress through grits—start at 120 to level the joints, move to 180 to smooth the grain, and finish with 220 before priming. When you are child-proofing your entryway benches, this tool is your best friend for rounding over sharp corners that could otherwise be a hazard.
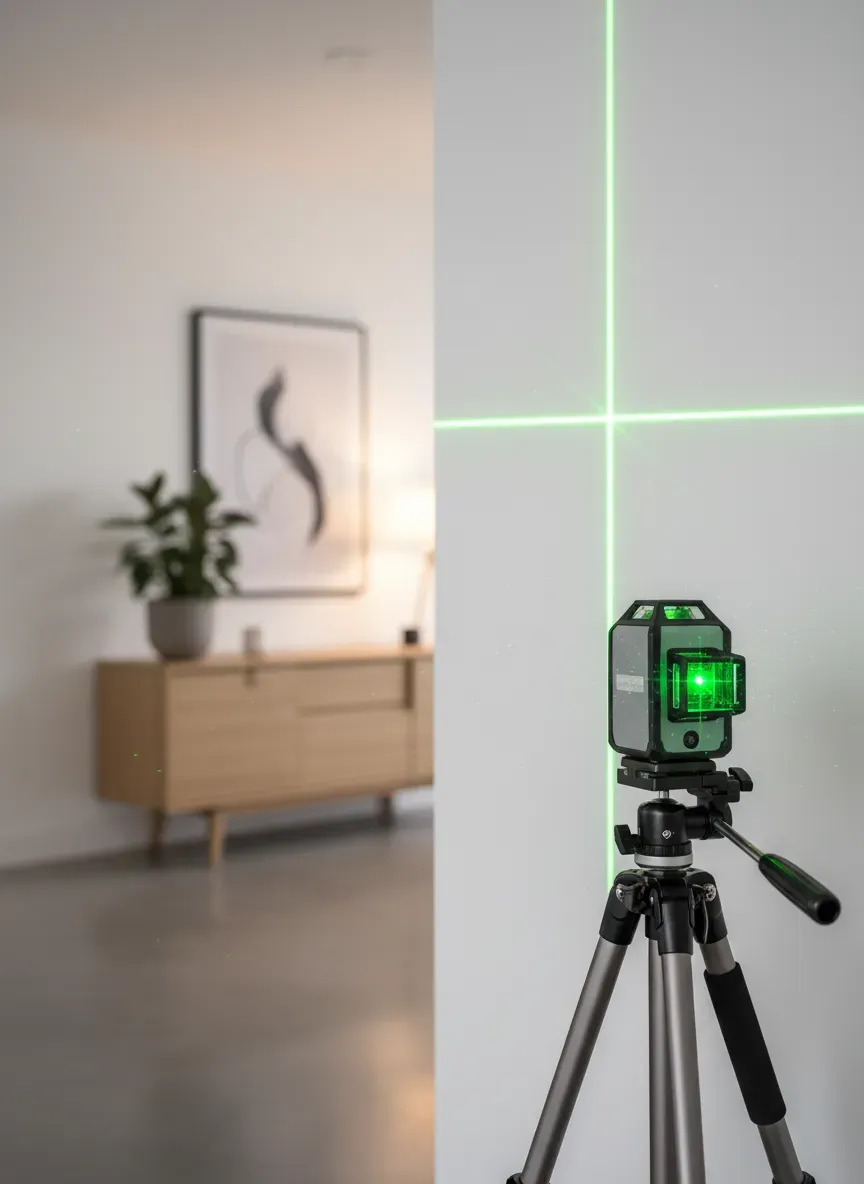
Installation Accuracy: Laser Levels
The old bubble spirit levels are fine for checking if a picture is straight, but when you are installing a 8-foot wide unit, a 2-foot level isn’t long enough to tell you the whole story.
The Self-Leveling Cross-Line Laser
This tool projects a bright red or green line vertically and horizontally across the entire room. It gives you a “datum line”—a perfect reference point that doesn’t care if your floor slopes three inches (which it might).
By setting up a laser level, you can shim your base platform perfectly level before you ever set a cabinet on top of it. If the base is twisted, the doors won’t shut right, and the drawers will bind. The laser doesn’t lie. It also helps immensely when deciding how far apart to space hooks, ensuring they remain in a perfect horizontal regiment.
Dust Management: The Unsung Hero
If you are working in an attached garage or, heaven forbid, inside the house, dust is your enemy. It ruins finish coats and gets into your HVAC system.
Shop Vac with Cyclone Separator
Don’t just plug your sander into the wall; plug it into a vacuum. Most modern power tools have dust ports. Use them. I recommend attaching a cyclone separator (like a Dust Deputy) to your shop vac. It uses centrifugal force to spin the heavy sawdust into a bucket before it hits your vacuum filter. This keeps suction high and prevents you from cleaning the filter every 20 minutes.
If you are looking for a compact solution that packs a punch, the Milwaukee M18 FUEL Packout Wet/Dry Vacuum is fantastic, especially if you are already on the Milwaukee battery platform. It’s portable enough to bring right into the foyer for cleanup without trailing cords everywhere.
Corded vs. Cordless: A Strategic Choice
A decade ago, pro carpenters laughed at cordless table saws. Today, they are commonplace. However, for a dedicated entryway build, you need to be strategic with your budget.
- Go Cordless for: Drills, impact drivers, nailers, and the oscillating tool. These are tools you move around with constantly. The freedom of movement allows you to get into tight cabinet corners without a cord knocking over your glue bottle.
- Go Corded for: The miter saw and the sander. A miter saw stays stationary; there is no benefit to battery power unless you are building a deck in the middle of a field. Sanders consume massive amounts of power; swapping batteries every 15 minutes breaks your flow.
The Bottom Line
You do not need to buy the most expensive brand for every single tool, but you must buy the right type of tool.
Attempting to rip plywood with a jigsaw will result in waves. Trying to scribe trim with a circular saw is a recipe for disaster. The investment you make in these tools is effectively the “labor cost” you are saving by not hiring a contractor. Plus, unlike the contractor, the tools stay with you for the next renovation.
When you stand back and look at your new entryway—with its tight joints, smooth finish, and perfectly level shelves—you won’t be thinking about the cost of the laser level. You’ll be looking at a permanent upgrade to your home that looks like it was born there.
Key Takeaways
- Precision First: A table saw or track saw is mandatory for square cuts; a circular saw guide is rarely accurate enough for cabinetry.
- Hide the Fasteners: Use pocket holes for structure and pin nails for trim to maintain a clean visual surface.
- Scribe to Fit: Walls are never straight. Use a jigsaw and scribe tool to match your furniture to the wall’s imperfections, not the other way around.
- Level the Base: Use a laser level to establish a datum line. If the foundation is off, the doors and drawers will never function correctly.
- Dust Control: Connect your sander to a vacuum to protect your lungs and ensure a blemish-free paint finish.