Hidden Shoe Storage Solutions for Built-In Entryway Organization Systems
Master the art of invisible organization. We explore advanced carpentry hacks, hardware secrets, and design strategies for concealing footwear in your entryway built-ins.
Feb 20, 2026 - Written by: Linda Wise

There is a specific kind of visual chaos that plagues even the most beautifully designed foyers. You walk in, the wainscoting is pristine, the paint color is a carefully curated greige, but then your eyes drift downward. There it is: the mountain of sneakers, discarded rain boots, and stray running shoes that inevitably accumulate at the threshold.
It disrupts the flow. It screams “clutter” before you’ve even hung up your coat.
If you are investing in a custom solution, simply adding open cubbies isn’t enough. While open shelving has its place, true luxury is the absence of visual noise. I’ve spent years refining the architecture of entryways, and the game-changer is always concealment. We aren’t just talking about a cabinet door; we are talking about engineering a system where footwear vanishes, leaving only clean lines and intentional design.
This deep dive explores the mechanics, aesthetics, and practical execution of hidden shoe storage solutions for built-in entryway organization systems. We’re going past the basics and looking at how to utilize dead space, ventilation physics, and advanced hardware to reclaim your floor.
The Philosophy of “Visual Quiet”
Before we start cutting wood or ordering hardware, you have to understand the goal. A built-in system is a permanent architectural feature. Unlike a standalone rack you can toss in a dumpster when you move, this becomes part of the house’s bones.
When you consult a guide on building built-in entryway organization systems, you’ll notice a trend: the best designs prioritize closed storage. Why? Because shoes are inherently irregular. They vary in height, color, and cleanliness. By hiding them, you create “visual quiet.” This allows the eye to travel up to your millwork, your art, or the lighting fixtures, rather than getting snagged on a muddy pair of Wellingtons.
Pro Tip: When designing your built-in, measure your tallest boots and your widest sneakers. A standard 12-inch depth is often insufficient for men’s sizes or structured boots. Aim for a 14 to 16-inch depth if your hallway width allows it.
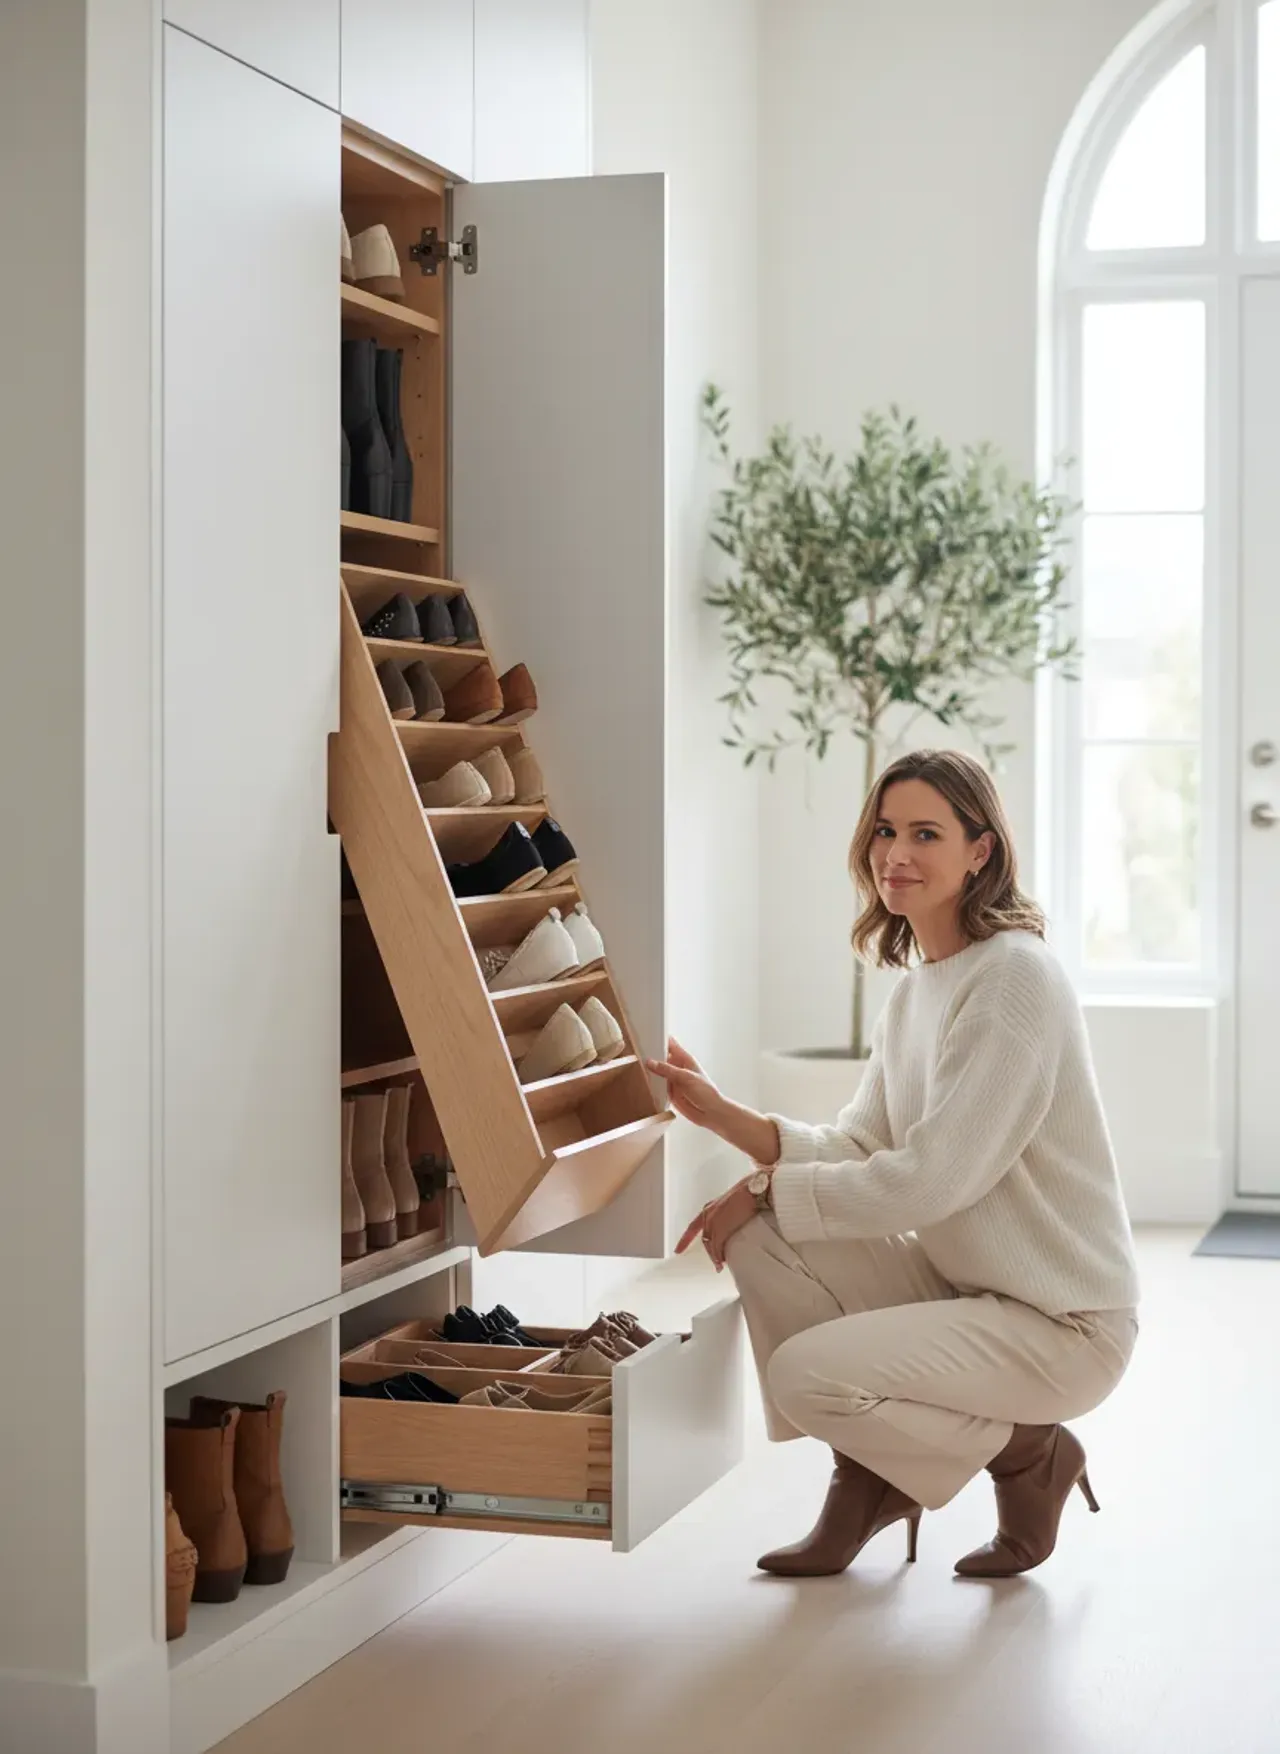
The Vertical Pull-Out: Defying Narrow Spaces
One of the most underutilized mechanisms in cabinetry is the vertical pull-out. Borrowed from kitchen design (where it’s used for spices or pantry goods), this is a powerhouse for narrow entryways where swing-out doors would block traffic.
Imagine a tall, slender column on the end of your built-in unit. From the front, it looks like a decorative pilaster or a simple panel. But pull the handle, and a 6-foot tall drawer slides out laterally, revealing shelves accessible from both sides.
Why It Works
This configuration maximizes verticality. You can fit standard shoes on the lower shelves and reserve the harder-to-reach upper shelves for off-season footwear. Because you access it from the side, you don’t need to dig into a deep dark cabinet hole. Everything is presented in daylight.
To execute this, you need hardware that can handle significant torque. Shoes are heavy—50 pairs can weigh over 100 pounds. You can’t use standard drawer slides here; you need heavy-duty, ball-bearing runners rated for high loads.
If you are retrofitting a system or building from scratch, I highly recommend looking at the VADANIA Heavy Duty Drawer Slides. These are industrial-grade, meaning they won’t sag or stick when fully loaded with winter timberlands.

The Secret of the Toe-Kick Drawer
Here is a detail that separates high-end joinery from IKEA hacks: the toe-kick drawer.
In standard cabinetry, the bottom four inches are wasted space, blocked off by a plinth to allow you to stand close to the counter without stubbing your toes. In an entryway built-in, that four-inch cavity is prime real estate.
By installing shallow, wide drawers in the plinth, you create the perfect hiding spot for flat items:
- Flip-flops
- Guest slippers
- Shoe polish kits
- Dog leashes
The Push-to-Open Mechanism
Because this drawer is at floor level, you don’t want hardware sticking out that could trip you. The solution is a “push-to-open” (touch latch) slide. You simply tap the toe-kick with your foot, and the drawer springs open. It’s elegant, invisible, and utilizes space that 99% of homeowners ignore.
However, be warned: this requires precise carpentry. Your floor must be level, or the drawer bottom will scrape. If you live in an older home with undulating floors, you might need to scribe the bottom edge of the drawer face to match the floor’s profile perfectly.
Integrated Bench Storage: Beyond the Flip-Top
We all love the look of those mid-century entryway benches with storage, but when integrating a bench into a wall-to-wall built-in, we have to rethink the access point.
The classic “flip-top” bench (like a toy chest) is arguably the worst design for daily shoe storage. To get your shoes, you have to remove the cushions, the throw pillows, and whatever bags you set down. It creates friction in your morning routine.
The Deep Drawer Solution
Instead, opt for large, deep drawers under the seating area. These should be mounted on full-extension undermount slides. Undermounts are crucial here because they are concealed beneath the drawer box, keeping the look clean and preventing dirt from the shoes from jamming the glides.
Inside these deep drawers, don’t just throw shoes in a pile. Use adjustable dividers. Vertical dividers allow you to slot sneakers in like files in a cabinet, maximizing density and keeping pairs together.
Key Takeaway: If you must use a flip-top due to budget constraints, use hydraulic soft-close hinges. A heavy bench lid slamming on fingers is a liability, especially with children in the house.
The Euro-Style Tilt-Out
For extremely tight corridors where even a drawer pulling out is too much intrusion, the tilt-out hamper style is the gold standard. The cabinet depth can be as shallow as 7 or 8 inches.
The door panel is hinged at the bottom and tilts forward. Attached to the back of the door is a specialized rack that holds shoes vertically. When closed, the shoes are stored almost upright. This drastically reduces the footprint required.
While you can buy cheap plastic versions of this, a custom built-in requires a more robust approach. You build a wooden face frame and insert a metal or high-impact polymer mechanism. This style is fantastic for flats, sneakers, and kids’ shoes, though it struggles with high-top boots.
The Ventilation Conundrum
Here is the kicker that most DIYers forget: Shoes smell. Leather needs to breathe. If you seal damp shoes inside an airtight lacquer-finished plywood box, you are creating a petri dish for mold and bacteria.
Hidden storage does not mean hermetically sealed storage. You must engineer airflow.
Strategies for Airflow:
- Routed Slots: Have your carpenter route decorative slots or geometric patterns into the toe kick or the side panels of the cabinetry to allow air intake.
- Mesh Inserts: Swap out solid wood center panels on doors for wire mesh or rattan. This adds texture—similar to the aesthetic found in coastal charm woven entryway benches—while allowing full air circulation.
- Active Ventilation: For large, locker-style built-ins, I’ve actually installed small, low-voltage computer fans at the rear of the cabinet to pull air through. It sounds extreme, but if you have athletic teenagers, it’s a nose-saver.

The “Mudroom Locker” Concealment
When dealing with full-height hall trees and mudroom lockers, the challenge is the sheer volume of space. A standard locker is great, but open lockers look messy fast.
Pocket Doors
The ultimate luxury upgrade for a built-in locker system is the pocket door. These doors open and then slide back into the cabinet walls (using a flipper door slide). This allows the locker to remain “open” during the morning rush hour for easy access, but “closed” and seamless when guests arrive for a dinner party.
The Double-Decker Strategy
Don’t waste the vertical space at the very bottom of a tall locker. Create a false bottom. The floor of the locker can be raised 12 inches, creating a cubby underneath for the muddy boots you use daily, while the “clean” shoes go inside the locker behind the door. This hybrid approach keeps the worst grime off your beautiful joinery while keeping the bulk of the collection hidden.
The Rotating “Lazy Susan” for Shoes
If you have a corner unit in your built-in assembly, you have a deep, dark cavern that is usually useless. A standard shelf there becomes a graveyard for lost shoes.
The solution is a high-density rotating rack. Essentially a Lazy Susan on steroids, these multi-tiered towers can hold 20-30 pairs of shoes in a 360-degree rotating column. You spin it to find what you need.
You can construct this using plywood circles and a central pipe, but getting the balance right is tricky. If the weight distribution is off, it won’t spin. For a reliable mechanism, look into the Revolving Shoe Rack Hardware Kit. This provides the central axis and bearings needed to support the weight of the shelves and shoes, ensuring smooth rotation for years.
Interior Organization: The Micro-Level
Building the cabinet is only half the battle. How you organize inside the hidden compartment dictates how many pairs you can fit.
Risers and Stackers
In a standard shelf configuration (hidden behind doors), you effectively lose half your vertical space with low-profile shoes like loafers. Acrylic risers double your capacity by allowing one shoe to sit on top of the other without touching.
Boot Shapers
For tall boots stored in hidden pull-outs, flop is the enemy. A flopped boot takes up the width of two boots and creates creases in the leather. You need to maintain structural integrity inside the dark cabinet.
I swear by using proper inserts. They keep the shaft upright, ensuring the drawer closes smoothly without catching on a bent zipper. A solid choice is the Daily Boot Shaper Form Inserts, which allow for air circulation while holding the shape.
Material Selection for Durability
We need to have a serious conversation about materials. The interior of a shoe cabinet sees more abuse than almost any other part of your home. It deals with water, mud, road salt, and grit.
If you use melamine or standard MDF for the shelving, the edges will eventually swell and crack from moisture exposure.
The Bottom Line: Use marine-grade plywood or moisture-resistant MDF for the interior carcass. Even better, line the shelves with a rubberized matting or a laminate sheet (like Formica) that can be wiped down with a wet rag.
For the shelf edges, avoid iron-on edge banding. It will peel off after a year of shoes dragging over it. Use solid wood nosing (a thin strip of real oak or maple) glued and nailed to the front of the plywood shelf. It’s a small detail that adds decades to the life of the built-in.

Planning Your Layout: A Checklist
Before you commission your carpenter or fire up your table saw, run through this checklist to ensure your hidden solution actually fits your life:
- ** The Heel Count:** How many pairs of high heels do you own? Heels require specific angled shelves or a heel rail to prevent them from tipping over.
- ** The Kids Factor:** If you have small children, low-level pull-out drawers are superior to doors. Kids rarely close doors, but they often enjoy pushing a drawer shut.
- ** The Season Rotation:** Do you need all shoes accessible year-round? If not, utilize the highest, hardest-to-reach cabinets for off-season storage to free up prime “eye-level” real estate for daily drivers.
- ** Depth Check:** Have you measured your partner’s size 13 gym shoes? Standard 12-inch cabinets will not close on them.
Lighting the Cavern
Hidden storage is often dark storage. If you build a deep wardrobe-style cabinet for shoes, it becomes a black hole.
Install vertical LED strip lighting in a channel along the inside face frame. Connect it to a magnetic reed switch (door sensor). When you open the cabinet door, the lights trigger automatically. It transforms the experience from “rummaging in a box” to “shopping in a boutique.” It also helps you spot that one black sneaker hiding in the back corner.
The Cost of Concealment
Be realistic about the budget. Hidden solutions cost more than open ones.
- Open Cubbies: minimal material, no hardware.
- Drawers: requires drawer boxes, expensive slides, drawer fronts, and handles.
- Pull-outs: requires specialized heavy-duty hardware.
Expect your cabinetry quote to increase by 30-40% when you switch from open shelving to fully integrated, hidden storage. However, the return on investment isn’t just financial—it’s psychological. The peace of mind that comes from a clutter-free entry is difficult to price.
Final Thoughts
We often treat entryways as transition spaces—places we move through rather than be in. But the entryway sets the tone for the entire home. If the first thing you see is chaos, that stress follows you into the living room.
Hidden shoe storage in a built-in system is not about being secretive; it’s about being intentional. It’s about acknowledging that while life is messy, your architecture doesn’t have to be. Whether you opt for the toe-kick drawer, the vertical pull-out, or the ventilated locker, the goal remains the same: a home that welcomes you with open arms, not a pile of shoes.