Integrating Lighting Ideas for Your Built-In Entryway Organization Unit
Transform your mudroom from dark utility to architectural statement. A deep dive into integrating LED, task, and accent lighting for built-in entryways.

Feb 20, 2026 - Written by: Linda Wise

The entryway is the handshake of your home. It’s the first thing guests see and the last thing you experience before facing the world. Yet, for all the effort we pour into custom joinery, shiplap backings, and perfectly sized cubbies, lighting is often treated as an afterthought—a single ceiling fixture expected to do all the heavy lifting.
This is a missed opportunity. Lighting isn’t just about visibility; it is about architecture. When you integrate lighting directly into your built-in organization unit, you transform a utilitarian drop-zone into a high-end design feature. I’ve seen standard IKEA hacks look like bespoke Italian cabinetry simply because the homeowner understood how to hide a few LED channels.
If you are planning a renovation or looking to upgrade an existing unit, understanding the physics and aesthetics of integrated illumination is non-negotiable. We are going to dissect exactly how to layer light, where to hide the hardware, and the specific gear you need to elevate your mudroom.
The Architecture of Light: Layering for Depth
You cannot rely on a single light source. Professional lighting designers work in layers, and your entryway built-in should be no exception. The goal is to create a hierarchy of light that guides the eye and serves specific functions.
The Ambient Foundation
Ambient light is your base layer. In a built-in context, this usually comes from the room’s overhead fixtures, but you can integrate ambient light into the unit itself. Think of up-lighting on top of a tall cabinet unit that washes the ceiling in a soft glow. This reduces the “cave effect” that large, dark cabinetry can sometimes create in a narrow hallway.
Task Lighting: The Workhorse
This is where utility meets design. Your entryway is a workspace. You are tying shoes, finding keys, checking makeup, or locating that one specific dog leash. Task lighting needs to be brighter and positioned so that your body doesn’t cast a shadow on what you are doing.
Pro Tip: Never position a task light directly behind your head. This creates shadows on your work surface (the bench or shelf). Instead, integrate lighting under the upper cabinets or shelves directly above the bench to bathe the area in shadow-free illumination.
Accent Lighting: The Drama
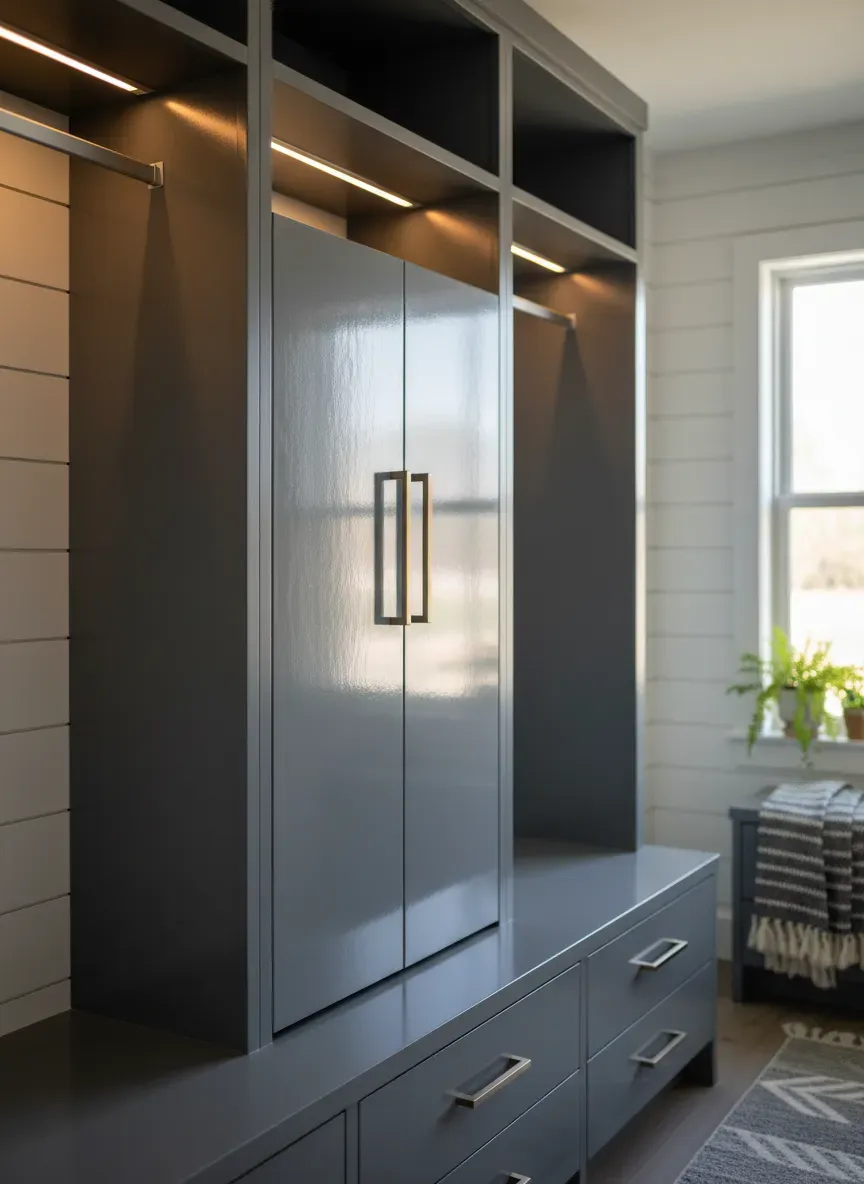
Accent lighting is purely aesthetic, but it’s what gives you that “wow” factor. This includes illuminating the back of a display shelf, highlighting a piece of art in a niche, or the increasingly popular toe-kick lighting that makes heavy cabinetry look like it is floating.
Strategic Placement: Where to Hide the Photons
The difference between a DIY look and a professional finish is the visibility of the light source. You want to see the light, not the bulb.
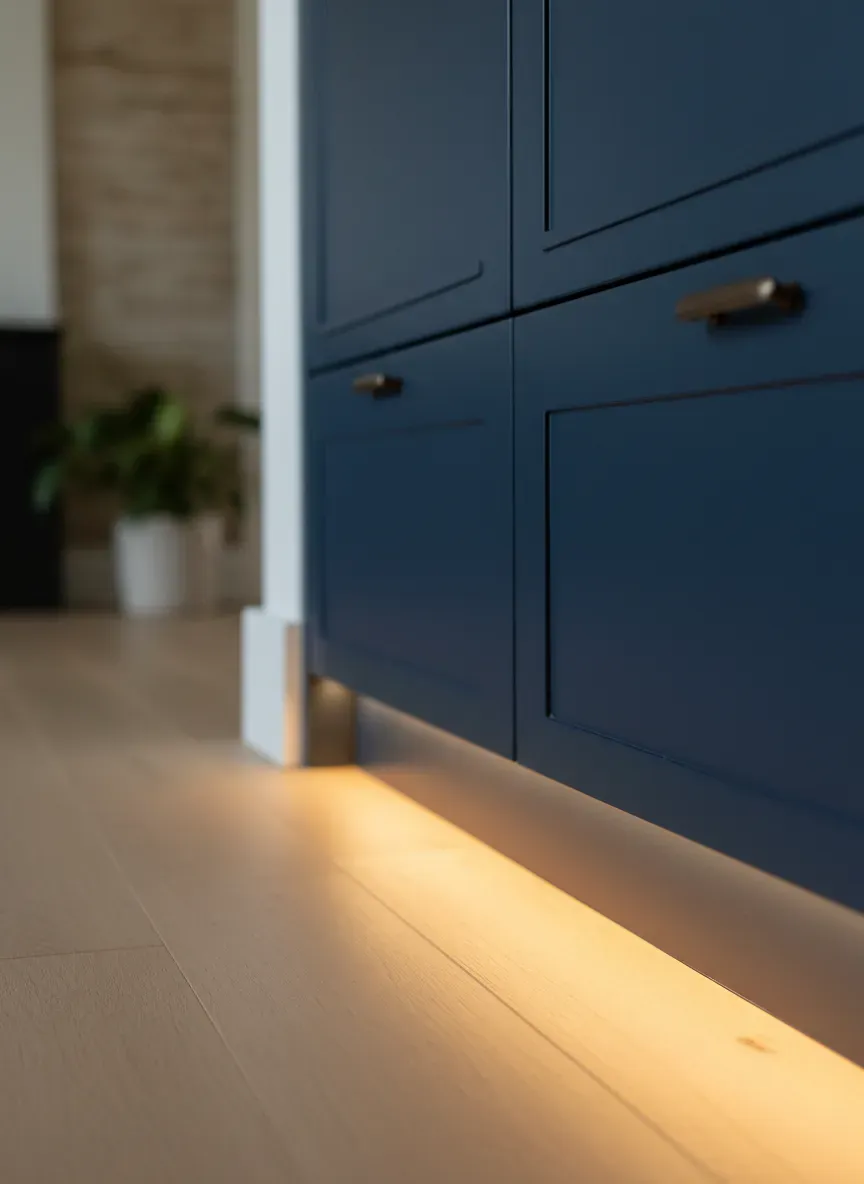
The Floating Bench Effect (Toe-Kick Lighting)
If your built-in unit extends to the floor, installing an LED strip in the toe-kick (the recessed area at the base) is a game-changer. It provides a soft, low-level guide light that is perfect for late nights when you don’t want to blast the overhead cans.
Mechanically, this requires a router. You’ll want to rout a channel into the underside of the bottom cabinet before installation. If the unit is already built, you can surface-mount a slim aluminum profile, but flush-mount is always cleaner.
Illuminating Cubbies and Lockers
Dark cubbies are black holes for clutter. By running a vertical LED channel down the inside face frame (hidden from view) or a horizontal strip at the top of each cubby, you turn storage into display.
For those strictly focused on the construction phase, this is the time to plan your wire routing. If you are currently in the framing stage of constructing your custom storage unit, drill your pass-through holes for low-voltage wiring now. Trying to fish wires through finished MDF is a nightmare you want to avoid.
The “Coat Check” Sensor
One of my favorite integrations is a mechanical or magnetic reed switch on closet doors within the built-in. Open the door, and the interior lights up instantly. It feels incredibly luxurious, akin to opening a high-end refrigerator or a jewelry box.
Hardware Selection: Choosing Your Weapons
Not all LEDs are created equal. The market is flooded with cheap tape lights that look like a series of polka dots rather than a solid beam of neon.
COB vs. SMD LED Strips
For years, Surface Mounted Diode (SMD) strips were the standard. You could see the individual chips. If you used these with a shallow diffuser, you got the dreaded “spotting” effect.
Enter Chip on Board (COB) technology. COB strips pack hundreds of diodes so closely together that the phosphorous coating covers them entirely. The result is a seamless, continuous line of light, even without a diffuser.
If you want the best experience, I highly recommend checking out the PAUTIX COB LED Strip Light. The color consistency is excellent, and the dot-free appearance makes it forgiving if your diffusion channel isn’t perfectly deep.
CRI: Why Your Red Coat Looks Brown
You need to look at the Color Rendering Index (CRI). This measures how accurately a light source reveals colors compared to natural sunlight. A low CRI (below 80) makes wood tones look flat and vibrant colors look muddy. For an entryway where you are doing a final outfit check, aim for a CRI of 90+.
Color Temperature (Kelvin)
- 2700K: Very warm, incandescent feel. Good for traditional homes with lots of natural wood.
- 3000K: The sweet spot. Crisp but warm. Matches most modern halogen replacements.
- 4000K: Cool white. Starts to look a bit clinical or “commercial,” but works in ultra-modern, monochrome grey/white entryways.
The Control Freak: Switches, Sensors, and Smarts
How you turn the lights on is just as important as the lights themselves. Nobody wants to fumble for a tiny inline switch on a cord behind a basket.
Motion Activation
For a mudroom, hands-free is mandatory. You are walking in with groceries, a toddler, and a muddy dog. You need the lights to greet you.
I generally advise against the cheap battery-powered stick-on motion lights for a permanent built-in. They chew through batteries and often have ugly, bulky sensors. Instead, wire your transformer to a wall switch equipped with a motion sensor.
If you are hardwiring your system, the Lutron Maestro Motion Sensor Switch is the gold standard. It handles the load perfectly, has adjustable sensitivity so the cat doesn’t trip it, and looks integrated into your wall plate.
Door Triggers and Pressure Switches
For bench seating with storage underneath (flip-top benches), consider a pressure switch. When the lid is lifted, the interior illuminates. This is brilliant for deep storage bins where seasonal gear gets lost.
Aesthetics and Style Matching
Your lighting choices must converse with the style of the furniture.
The Mid-Century Vibe
For those leaning into a retro aesthetic, similar to what you’d see in classic mid-century bench designs, you want warmer light (2700K). You might avoid the continuous “Tron-like” lines of LED tape and instead opt for recessed puck lights that mimic the directional downlighting of 1950s architecture.
Coastal and Organic
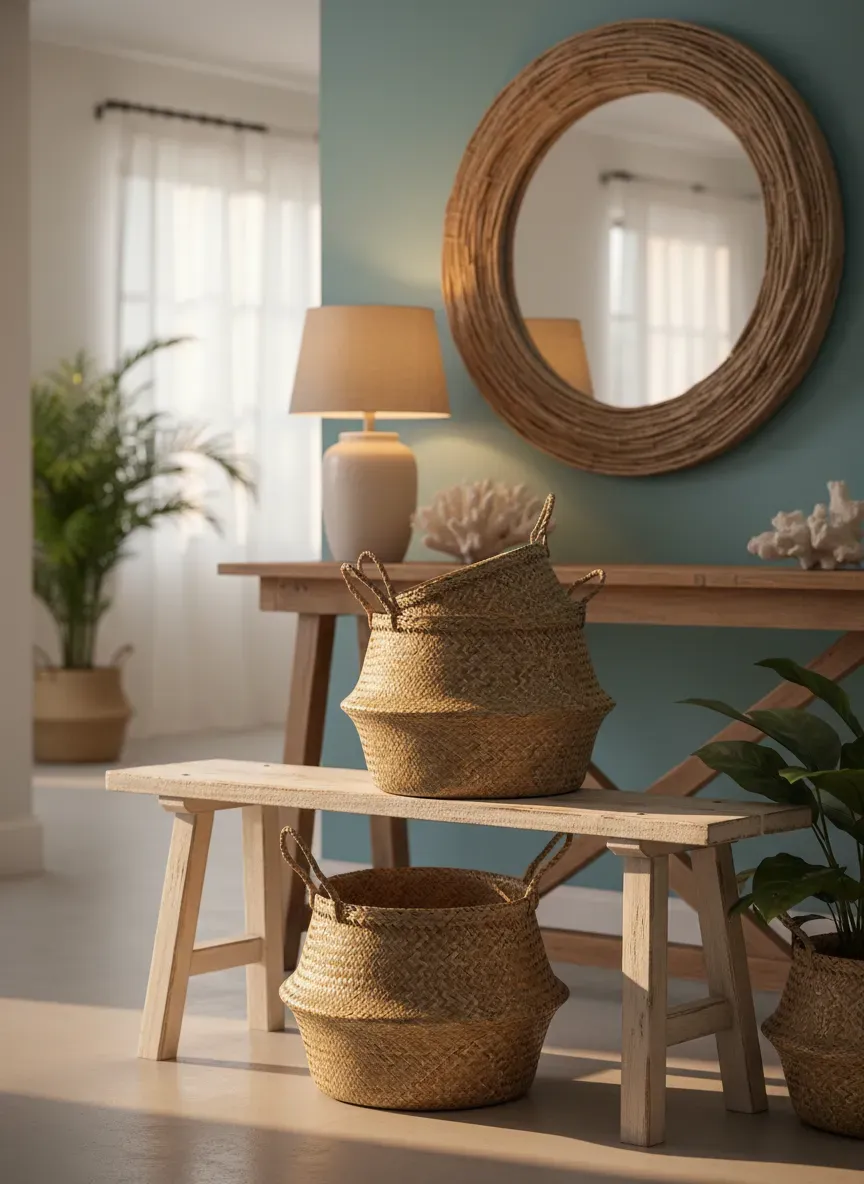
Alternatively, if your vibe is breezy, lighting up the textures of woven coastal seating elements requires a high CRI. You want the texture of the rattan or seagrass to pop. Grazing light—where the light source is placed very close to the textured surface and aimed down—highlights the peaks and valleys of the weave, creating incredible visual depth.
The Installation: A Technical Walkthrough
Let’s get into the weeds of actually building this.
1. The Aluminum Channel
Never stick LED tape directly to wood. Wood is a poor heat sink, and LEDs hate heat; it shortens their lifespan. Always use an aluminum channel. It dissipates heat and, crucially, holds the plastic diffuser lens.
The Bottom Line: If you stick tape directly to MDF, it will peel off in six months. Use the channel.
2. Voltage Drop and Wire Gauge
This is where DIYers fail. If you run a 20-foot strip of 12V LED tape, the end of the strip will be dimmer than the start because of voltage drop.
- Solution 1: Use 24V tape instead of 12V. It carries current better over distances.
- Solution 2: Power injection. Run a wire from the driver to both the start and the end of the strip.
3. Hiding the Driver
The “Driver” (transformer) takes your house’s 120V AC and turns it into 12V or 24V DC. These boxes can get warm and they are ugly.
- Do not bury them inside a wall without an access panel. If it fails (and it’s the most likely component to fail), you don’t want to rip out drywall.
- Do place them in the top cabinet, behind a false back, or in the basement directly below the unit if accessible.
For a robust power solution that won’t buzz or flicker, I use the HitLights Dimmable LED Driver. It is compatible with most magnetic low-voltage dimmers and is built like a tank.
Common Pitfalls to Avoid
I have seen beautiful carpentry ruined by bad lighting decisions. Here is what to watch out for.
The Glare Bomb
If you have a glossy finish on your built-in, seeing the reflection of the LED strip is distracting. This is particularly relevant if you are installing high-gloss cabinetry typically found in modern mudroom locker setups. To combat this, use a 45-degree angle channel that points the light inward toward the back of the cabinet, rather than straight down onto the glossy bench.
The “Color Clash”
Ensure your built-in lighting matches the color temperature of your ceiling cans. Having 3000K in the shelves and 5000K in the ceiling creates a jarring, subconscious dissonance that makes the room feel “off.”
Advanced Integration: Smart Home Ecosystems
If you are deep into the Hue, Alexa, or HomeKit ecosystems, your entryway shouldn’t be an island. Using a Zigbee or Wi-Fi controller between your driver and the LED strip allows you to automate scenes.
Imagine this:
- “Welcome Home” Scene: When the smart lock disengages, the entryway built-in ramps up to 80% brightness.
- “Night Mode”: At 10 PM, the toe-kick lighting dims to 10% and turns a warm amber, acting as a nightlight for late-night kitchen raids.
Maintenance and Longevity
LEDs last a long time, but they don’t last forever. The adhesive on the back of the strip is usually the weak link.
- Reinforce: Add a dab of superglue or clear silicone at the start and end of the strip within the channel.
- Clean: Dust accumulation on the diffuser lens can cut brightness by 20%. A quick wipe with a microfiber cloth every few months keeps it crisp.
The Final Polish
Integrating lighting into your entryway organization unit is the difference between buying furniture and building architecture. It adds depth, functionality, and a welcoming warmth that a simple ceiling fixture can never achieve.
By focusing on high CRI sources, hiding your channels, and automating the control, you elevate the humble act of taking off your shoes into a design experience. Don’t be afraid to drill those holes and run those wires; the result is absolutely worth the effort.