Maximizing Storage in Narrow Hallways: Slim DIY Entryway Organization Ideas
Transform your cramped corridor into a functional powerhouse. We explore slim profile furniture, vertical hacks, and expert DIY strategies for narrow entryways.

Feb 18, 2026 - Written by: Linda Wise

The narrow hallway is the architectural equivalent of a bottleneck. It’s that transitional zone where traffic jams happen, where groceries collide with coats, and where the simple act of taking off your boots can feel like a game of Twister. If you are living with a “landing strip” entryway—typically defined as anything less than 40 inches wide—you know the struggle intimately. You don’t have the luxury of sprawling mudroom lockers or deep benches. You have a wall, a walkway, and a desperate need for order.
I’ve spent years consulting on interior layouts where every quarter-inch matters. The mistake most homeowners make isn’t a lack of organization; it’s a misunderstanding of volume. They try to cram standard-depth furniture into a non-standard space. The result? Shin bruises and visual claustrophobia.
To conquer the narrow hall, we have to rewrite the rules of engagement. We need to think in terms of slim profiles, vertical dominance, and “floating” physics.
The Geometry of the Squeeze: Understanding Your footprint
Before you buy a single bracket or board, you need to understand the ergonomics of your corridor. A standard hallway might range from 36 to 48 inches wide. However, in many older urban builds or subdivided apartments, I’ve seen widths shrink to a suffocating 30 inches.
The golden rule of hallway flow is maintaining a clear path of travel. Ideally, you want 36 inches of clearance. If your hall is 42 inches wide, you only have 6 inches of depth to play with for storage. That sounds impossible, but it’s actually a massive opportunity if you know how to manipulate the space.
Pro Tip: “Tape it out. Before committing to a piece of furniture, use blue painter’s tape on the floor to mark the footprint. Then, walk past it carrying a laundry basket. If you have to turn sideways, the design is too deep.”
This is where understanding sizing becomes critical. You have to move away from standard furniture dimensions and look at specialized sizing. For a deeper dive into the math behind this, I recommend reading up on sizing secrets for the perfect entryway, which breaks down the clearance codes more rigidly.
The Philosophy of “Slim” Storage
When we talk about maximizing storage in narrow hallways, we are shifting from horizontal storage to vertical and shallow storage. We are looking for the “z-axis.”
1. The Cantilever Effect (Floating Furniture)
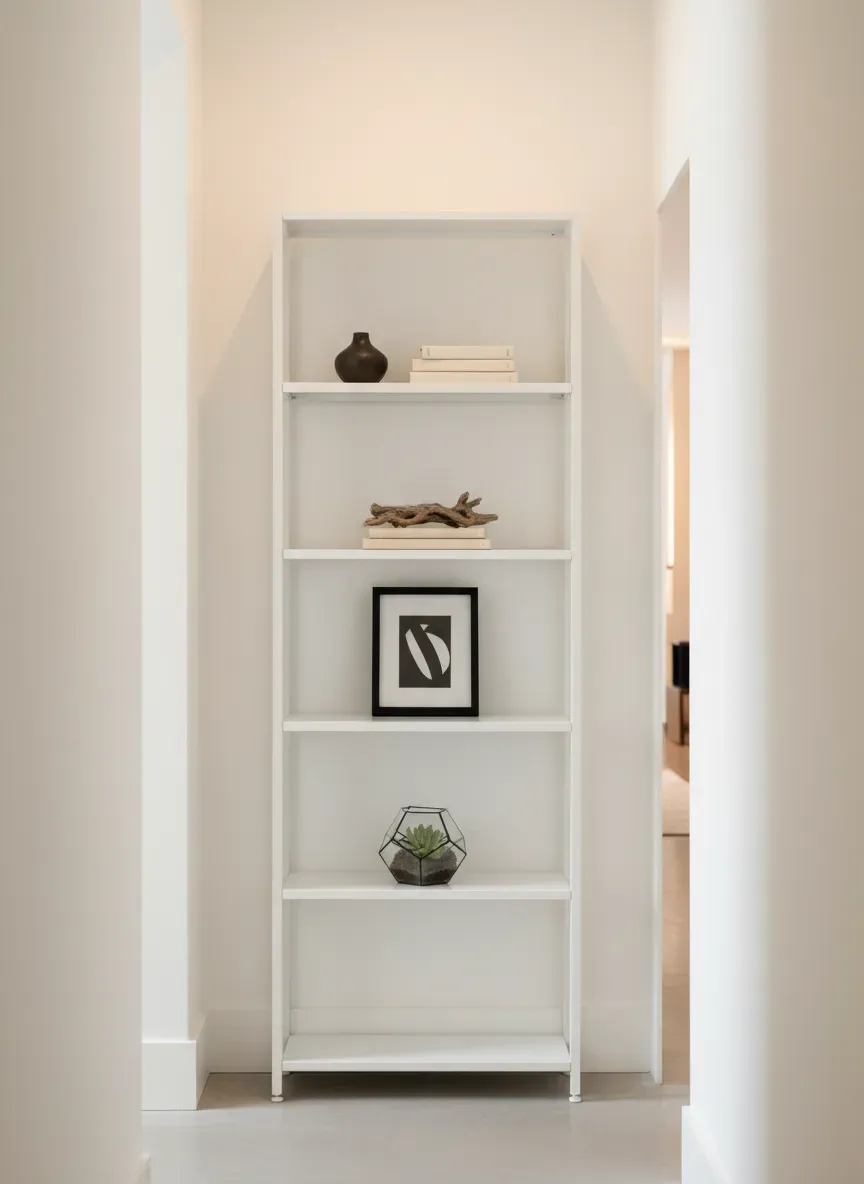
Floor space is premium currency. The moment you place legs on the floor, the room feels smaller. Your eye traces the floor to the wall; if that path is interrupted, the brain registers the space as “full.”
I always advise clients to mount everything. Floating consoles, wall-hung shoe cabinets, and suspended benches allow light to pass underneath, tricking the brain into perceiving more square footage.
2. The Recessed Mindset
If you are handy with a reciprocating saw and checking for studs, the best storage is inside the wall. Creating a niche between studs (typically 14.5 inches wide and 3.5 inches deep) offers enough depth for keys, mail, sunglasses, and even single rows of shoes, without protruding into the walkway at all.
DIY Shoe Storage: The “Tip-Out” Revolution
Shoes are the primary enemy of the narrow hall. They are bulky, dirty, and tripping hazards. Standard shoe racks are usually 12 to 14 inches deep—too big for our needs.
The solution is the “tip-out” cabinet. These units store shoes vertically (on an angle) rather than horizontally flat. This engineering shift reduces the cabinet depth to as little as 6 or 7 inches.
I’ve personally installed countless IKEA variations (like the Trones or Hemnes), but for a more polished, high-end look without the custom carpentry price tag, I often point clients toward sleek metal variations. If you want the best experience, I highly recommend checking out the YITAHOME Metal Shoe Cabinet. Its magnetic closure and ultra-slim profile (often under 6 inches) make it disappear into the wall.
The “Top-Shelf” Hack
Don’t just install the cabinet. Customize it.
- The Topper: Buy a piece of live-edge walnut or a slab of marble cut to size. Adhere it to the top of a metal shoe cabinet.
- The Lighting: Run an LED strip along the back edge.
- The Result: It stops looking like a utility bin and starts looking like a bespoke console table.
Seating: The Impossible Ask?
“Where do I sit to put my shoes on?” This is the most common complaint. In a 3-foot wide hall, a bench is usually out of the question. Or is it?
We need to look at theatre design. Cinema seats flip up when not in use. We can apply this mechanics to the home. Murphy-style fold-down seats are a game-changer. When closed, they are merely a wall panel, protruding perhaps 2 inches. When open, they support the weight of an adult.
If a fold-down mechanism feels too mechanical for your aesthetic, consider the “perch” bench—a very shallow (8-inch), high bench. It’s not for lounging, but it provides just enough leverage to tie a lace.
You have to balance comfort with flow. It is a delicate dance. You can learn more about balancing these factors by exploring the ergonomics of entryway benches with storage and seating, which details exactly how much depth you sacrifice for comfort.
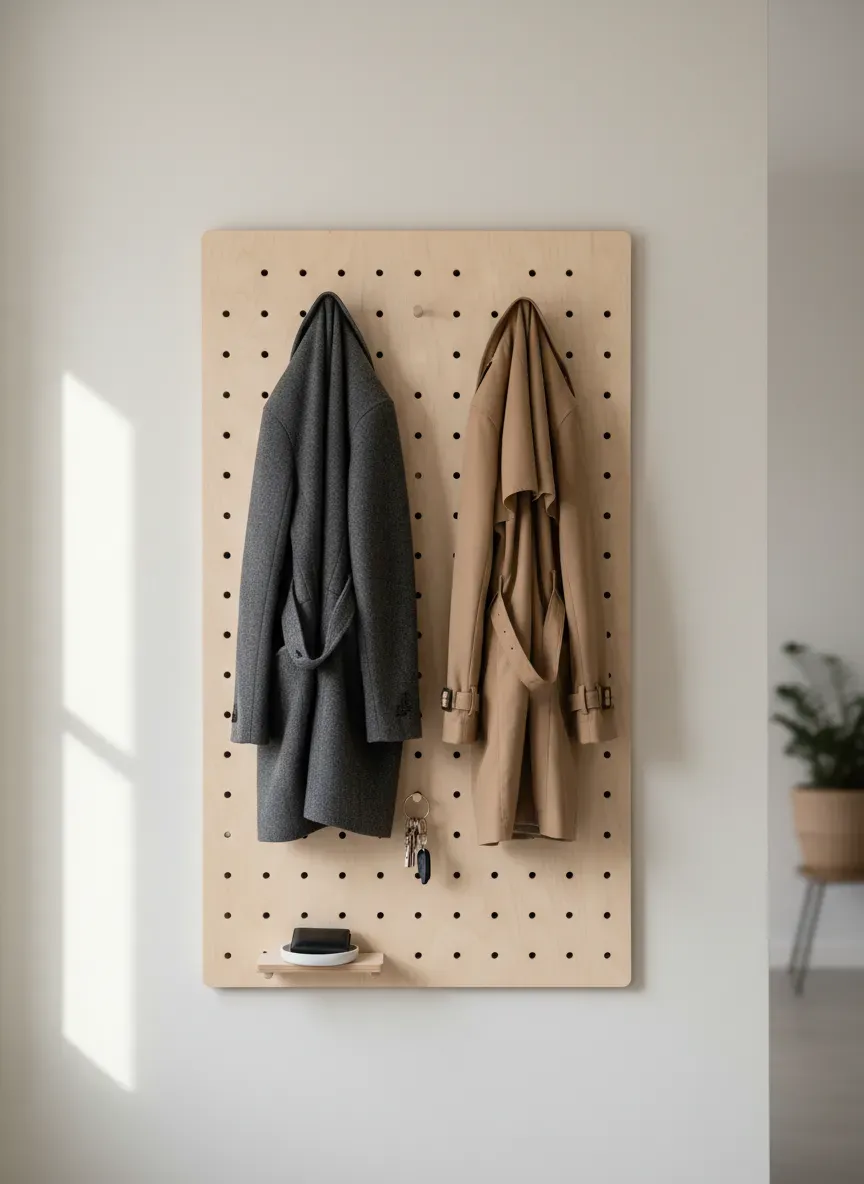
Vertical Dominance: Pegboards and Slatwalls
When you can’t build out, build up. But avoid the “coat rack” trap. A standing coat rack is a tree of clutter that eats floor space.
Instead, look at modular wall systems. Pegboards are no longer just for garages. High-end wooden pegboards or architectural slatwalls allow you to reconfigure storage daily.
- Winter: More heavy-duty hooks for coats.
- Summer: Small shelves for sunglasses and sunscreen.
The beauty of a modular system is adaptability. You aren’t stuck with a static configuration.
Key Takeaway:
- Zone High: Place seldom-used items (off-season hats, decorative bins) above the 6-foot mark.
- Zone Mid: The “Active Zone” (shoulders to waist) is for keys, daily coats, and bags.
- Zone Low: Shoes and kid-access only.
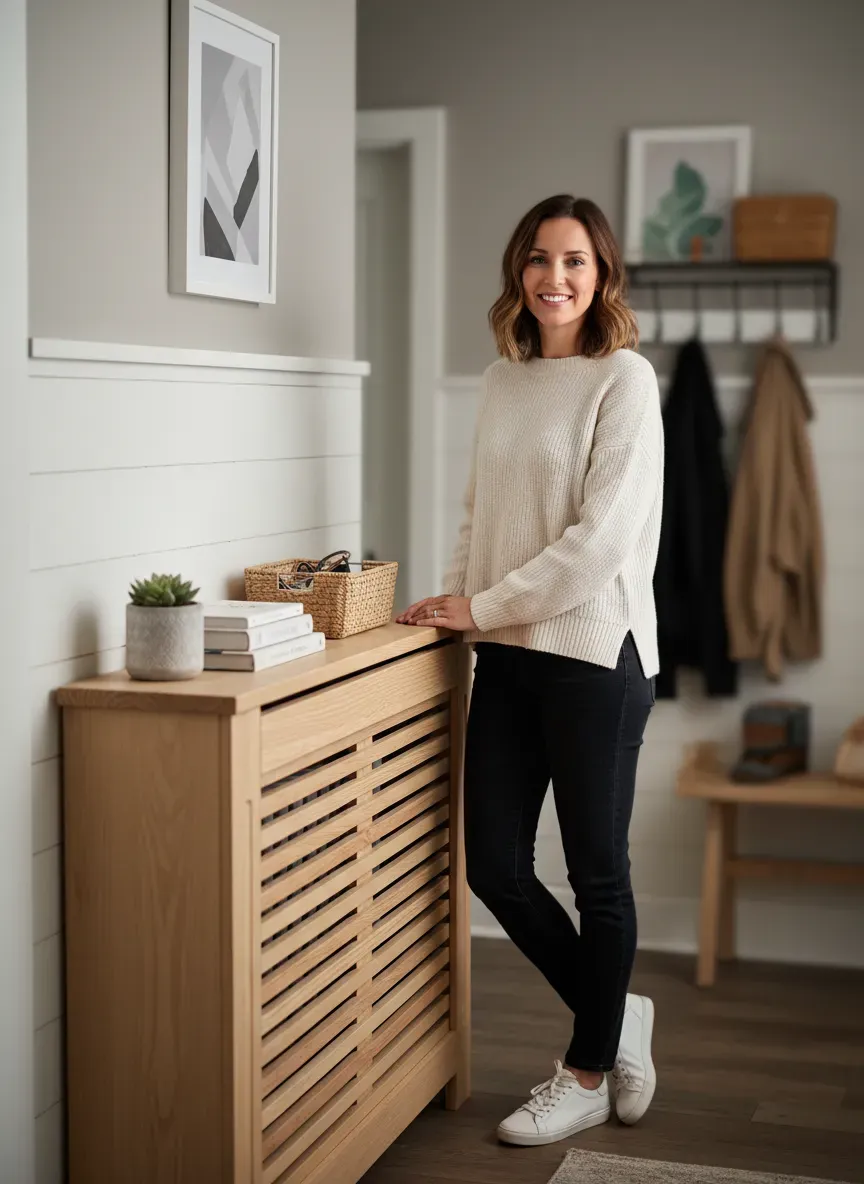
The Radiator Cover Opportunity
Many older homes have radiators in the hallway, which are essentially dead space heaters. Building a custom radiator cover with a vented front and a solid top retrieves that lost space. You gain a console table surface, and if you extend the cover slightly to the sides, you can hide slim vertical shelving for umbrellas or dog leashes.
Material Selection: Visual Weight
Here is a nuance that separates the amateur DIYer from the designer: Visual Weight.
A solid oak cabinet feels heavier and larger than a glass and metal console of the exact same dimensions. In narrow spaces, we want materials that recede.
- Acrylic/Lucite: Literally transparent. Excellent for shelves or “ghost” chairs.
- Wire/Mesh: Allows the eye to see the wall behind it.
- Light Woods vs. Dark Woods: Dark woods absorb light, making the hall feel like a tunnel. Light woods (Ash, Maple, Birch) reflect light.
However, don’t rule out metal entirely. Thin, black steel lines can act as a “graphic” element that frames the space without filling it. It’s a debate I often have with clients. To help you decide, consider the trade-offs discussed in our guide on wood vs. metal: which material suits your space best.
The Family Factor: Managing The Chaos
If you live alone, a narrow hallway is a design challenge. If you have kids, it is a combat zone.
Children do not understand “slim profiles.” They understand “drop it here.” If your storage systems are too complex (e.g., “open this drawer, place gloves here, close drawer”), they will fail. The floor will become the storage unit.
For families, the system must be zero-friction.
- The “Drop” Hook: Use oversized, rounded hooks mounted low.
- The Open Bin: Don’t use lids. A wall-mounted wire basket is better than a closed box.
- The Label: It sounds trivial, but labeling specific hooks for specific people reduces the morning bottleneck.
For a comprehensive strategy on this specific struggle, I recommend reading about designing a kid-friendly entryway with low hooks. It moves the conversation from aesthetics to pure survival logistics.
Illusion and Light: Expanding the Space
Storage isn’t just about boxes; it’s about perception. You can store a lot in a hallway if the hallway feels big.
The Mirror Trick
A large mirror is non-negotiable. But let’s make it work harder. Look for mirrors with hidden storage behind them (like a medicine cabinet, but full length) or mirrors with a built-in shelf ledge.
If you are looking for a stylish piece that serves dual purposes, the Umbra Circo Wall Mirror with Shelf is a fantastic option. It gives you that necessary reflection to check your look while providing a hidden stash spot for keys and wallets.
Lighting the Void
Dark corners shrink space. If your storage (like a shelf or cabinet) casts a shadow, it adds visual weight.
- Uplighting: Place a small can light on top of your tall cabinet to bounce light off the ceiling.
- Toe-Kick Lighting: LED strips underneath a floating cabinet make it look like it’s hovering.
Utilizing the “Dead” Zones
In every hallway, there are micro-zones we ignore.
1. Above the Door Frame: There is usually 12 to 18 inches of wall space above the door header. A simple shelf here can hold baskets of winter gear or archived paperwork. It is invisible to anyone standing in the hallway, as it is above the sightline.
2. The Under-Stair Triangle: If your hallway runs alongside a staircase, you might have the “Harry Potter” cupboard situation. This is often a chaotic abyss. Customizing this with pull-out drawers (rather than a swinging door) maximizes the deep, awkward angles. This is a complex topic, but for those with this architectural feature, maximizing entryway storage under the stairs is required reading.
3. The Corner Return: Sometimes a hallway has a small 90-degree turn or a small nook behind the door swing. Corner floating shelves maximize this triangular space that no square furniture could ever fit.
Advanced DIY: The “Stud-Bay” Pantry
For the truly brave, here is a project I recently oversaw that revolutionized a client’s 32-inch hallway.
We cut open the drywall between three stud bays. We framed them out with 1x4 pine. We installed simple dowels across the bays.
- Bay 1: Shoe storage (heels hang on dowels, sneakers sit on thin shelves).
- Bay 2: Key hooks, mail sorting, and a charging station (we ran power from a nearby outlet).
- Bay 3: Dog leash and umbrella storage.
We then covered the entire assembly with a large, sliding barn door mechanism (using a lightweight hollow-core door to save weight). When closed, it looked like a piece of modern art. When slid open, it revealed the “guts” of the entryway. It encroached 0 inches into the hallway depth.
If you plan to tackle floating shelves or heavy wall-mounted units, standard drywall anchors won’t cut it. You need structural integrity. I always keep a stash of Heavy Duty Floating Shelf Brackets on hand. They are invisible once installed but provide the peace of mind that your decor won’t come crashing down at 3 AM.
The Bottom Line
You do not have a space problem; you have a layout problem.
The narrow hallway requires you to be ruthless with clutter and creative with geometry. By utilizing the vertical axis, choosing shallow-depth furniture, and tricking the eye with floating elements and lighting, you can turn a claustrophobic tunnel into a functional gallery of organization.
It requires a shift in thinking. Stop looking for “hallway furniture” at big-box stores, because most of it is too big. Start looking for components—brackets, shelves, tip-out mechanisms—and build a system that hugs your walls. The goal is to create a space where you can breathe, even if the walls are closing in.